This article outlines the Bematech LS8000 display system including initial setup and configurations.
Bematech LS8000 is a Kitchen Display System (KDS) that helps to create increased operational efficiency and customer satisfaction by displaying items that have been added to Orders on SmartPOS terminals to the kitchen staff on remote screens.
Once the items or whole Order is prepared, the system visually notifies that it is ready for collection and delivery via a KDS display screen/s and Printed docket.
The integration of Bepoz & Bematech LS8000 allows Operators to manage kitchens based on routing Products to the appropriate KDS devices, preparation & cooking times.
NB: In an attempt to maintain brevity, this article will not cover Bematech LS8000 installation, setup, workflows or use - only the BackOffice configurations required for the integration.
Prerequisites
- To access Bematech LS8000 features, the applicable Operator Privileges will need to be enabled
-
Operator Maintenance 'General' Tab - System Setup: "Access Venue, Stores & Tills" Flag
- System Setup: "Maintain Venue, Stores & Tills" Flag
- System Setup: "Maintain Scheduled Jobs" Flag
- System Setup: "Maintain Till Function Maps" Flag
-
Operator Maintenance 'Maintenance' Tab - Products: "View Products" Flag
- Products: "Edit Products" Flag
BackOffice Configurations
- The integration with Bematech LS8000 begins with configuring various components in BackOffice; some are mandatory & some are optional, however, this article will cover all :
- Kitchen Display
Devices - "KDS Bematech 8000" -
Scheduled Jobs - "Bematech Send 8000" & "Bematech Bumps 8000" -
Till Functions - Comment Functions & "Rush Order" Function - BackOffice Extension - "Bematech Prep Time"
-
Product Settings - "Preparation Time"
Kitchen Display Device Setup
- The integration with Bematech begins with setting up Kitchen Display Devices
- These will need to be created for each Till individually that will be communicating with Bematech
- Similar to Printers, multiple SmartPOS can 'print' to different physical KDS Devices, however, the BackOffice Device will need to be created for each SmartPOS instance required
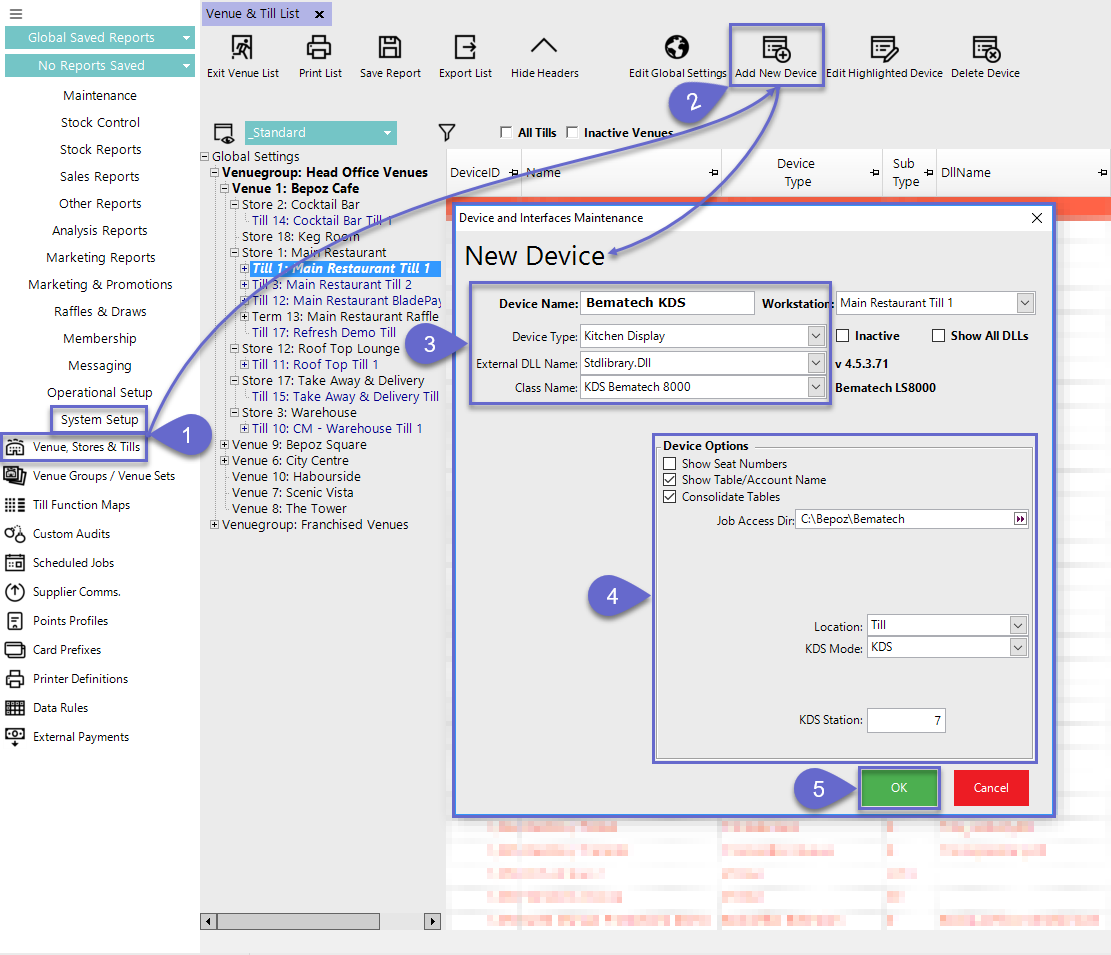
- To set up each BackOffice KDS Device, complete the following steps after logging into BackOffice:
- Navigate to the System Setup component in the sidebar menu and select Venue, Stores & Tills to open the Venue & Till List tab
- Highlight the desired Till and click on the Add New Device button at the top of the tab; when prompted select 'Blank Device' and a New Device and Interfaces Maintenance window will open
- Enter a relevant Device Name, set the Device Type to 'Kitchen Display', the External DLL Name to 'Stdlibrary.Dll', and the Class Name to 'KDS Bematech 8000'
- Configure the Device Options Flags as desired:
- Show Seat Numbers flag:
- If this flag is enabled, Seat Numbers will display on the KDS screen/s
- Show Table/Account Name flag:
- If this flag is enabled, the Table/Account Name will display on the KDS screen/s
- Consolidate Tables flag:
- This controls the KDS behavior when changes are made to a Table Order such as adding additional Products
- If this flag is enabled, changes to a Table Order will be added to the existing ticket on the KDS screen/s
- Any changes for ordered products will update the existing ticket on the KDS
- If this flag is disabled, a new ticket will be created for each Transaction - including when changes are made to an existing Table Order
- If enabled, refunds will only be displayed if there is still an active ticket for the Table
- This flag must be enabled to support Bematech's Void option
- Job Access Dir:
- Enter the absolute Directory Path which can also be accessed by the Bematech Scheduled Jobs running in SmartController
- This is where the Bematech working files will be stored; the standard is C:\Bepoz\Bematech
- The following sub-directories will be created in the base Job access Directory:
- BumpData - This is used when bump notifications are enabled through the Bematech Send job; when a bump occurs from a KDS unit, it will write a bump XML file which is listened for and processed if the "Bematech Bumps 8000" Scheduled Job is set up
- SendData - This is used as a working Directory for the Bematech Send Job in Bepoz; the device will generate the file but the "Bematech Send 8000" Scheduled Job will communicate to the Bematech KDS
- TableCsData - This is used only when "Consolidate Tables" flag is enabled
- Location drop-down:
- This drop-down controls displaying of an Order's origin on KDS screen/s
- Select from None, Venue, Store, or Till; e.g., if Till is selected then the Name of the Till where the Order was placed will be displayed on the ticket on the KDS screen/s
- KDS Mode drop-down:
- Use this drop-down to select the Device's KDS Mode
- This determines how the XML file/s are generated and sent to Bematech
- Again, a Bematech Device must be set up for each physical LS8000 unit being installed
- The devices are then configured for remote printing so Bepoz understands how to route the orders and Products to the correct screen
- Select from the following options:
- KDS - This is a Non-Router Mode; in this mode, Bepoz will generate an XML per device and when configured this way, the Bematech Send 8000 Job must be set up in a one-to-one relationship with the Devices meaning that for every KDS Device set up in BackOffice, a Job is needed to send the XML to the Device
- Router Modes - This is a separate app on the Bematech KDS 8000 device called KitchenGo Router; when the router is enabled in Bematech and used as the communication method in Bepoz, the KDS Mode must be set to either RouterServer or RouterClient; when using Router mode, there is only one XML file between Bepoz and Bematech; if there are multiple KDS, the router program will send the orders to the relevant Bematech KDS using the router program using the one file
- RouterServer - This KDS Mode is only to be set for the Device that physically runs the KDS Router program on the Bematech LS8000 device; there should only ever be one device set with RouterServer per Venue
- RouterClient - This KDS Mode is to be set for Devices that are running as clients to the Router Mode; if the physical LS8000 Device is a client of the KitchenGo Router program, then it should be set to RouterClient
- KDS Station:
- Every physical KDS unit has a KDS Station number
- This number should be unique and is configurable through the KitchenGo KDS program
- The number set in the BackOffice Device needs to match the physical Device's settings
- Select OK to save the Kitchen Display Device
Scheduled Jobs
- There are two (2) different types of Scheduled Jobs that require creation and configuration in order to properly communicate with the LS8000 KDS
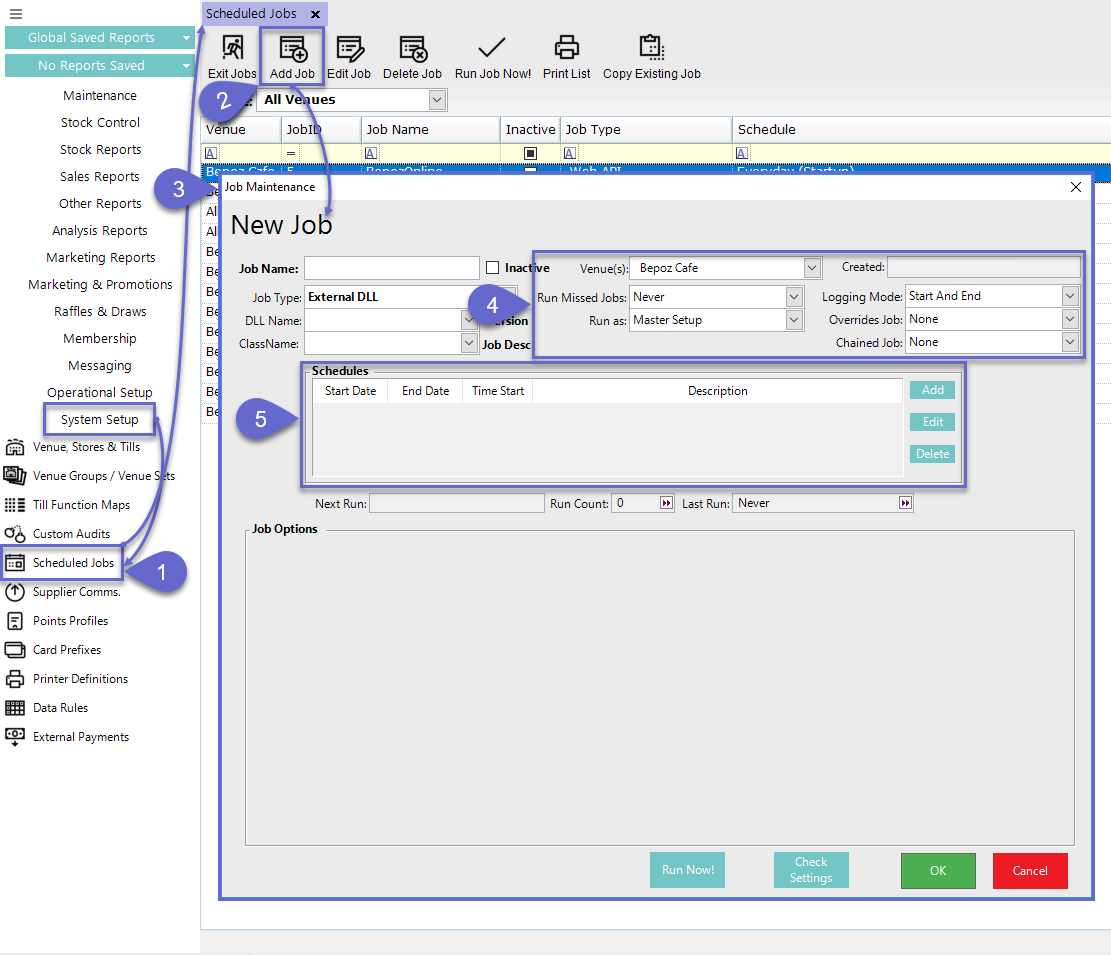
- To add these Scheduled Jobs, complete the following steps after logging into BackOffice, then proceed to each Job's individual configuration details below:
- Navigate to the System Setup component in the sidebar menu and select Scheduled Jobs to open the Scheduled Jobs tab
- Click the Add Job button at the top of the tab
- A New Job Maintenance window will open
- Ensure that the correct Venue is selected, and optionally set other configurations as desired such as "Run Missed Jobs", "Run as", "Chained Job", etc.
- Set up a desired Schedule for the Job to Run
Bematech Send 8000
- To reiterate from above: The Bematech Send 8000 Job must be set up in a one-to-one relationship with the Devices meaning that for every KDS Device set up in BackOffice, a Job is needed to send the XML to the Device; so for every KDS Device set up, a corresponding Bematech Send 8000 Job will also need to be created
- After completing the generic steps above to begin Job Maintenance, complete the following steps to fully configure the Bematech Send 8000 Job Options:
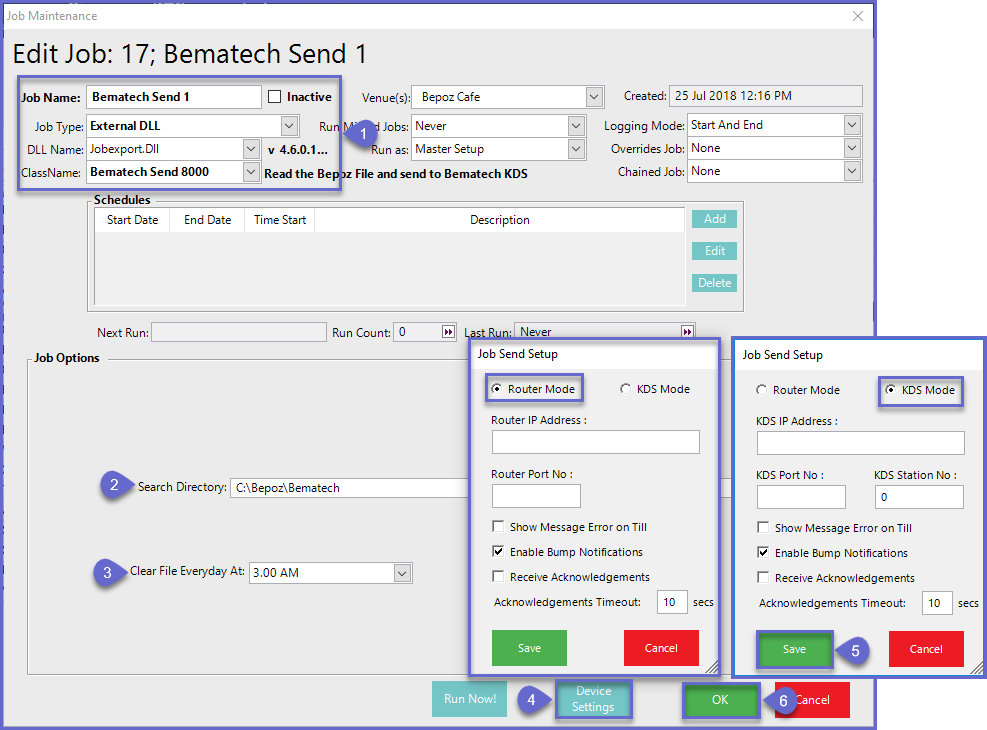
- Enter a relevant & desired Job Name; set the Job Type to "External DLL"; set the DLL Name to "Jobexport.Dll"; set the Class Name to "Bematech Send 8000"
- Enter the Search Directory which is the Directory the Job searches to look for new XML files to send and process; this should be set to the same Directory as set up in the corresponding KDS Device settings (e.g., C:\Bepoz\Bematech)
- Set the Clear File Everyday At drop-down as either "None" or at an hour from 3:00 AM to 8:00 AM
- As the XML will write to the file system and send to an archive subfolder, the job will clean up the file system directory every day at the specified time
- Click on the Device Settings button to open a small Job Send Setup window which will contain the following settings to be configured accordingly:
- Depending on the KDS Device that this Job corresponds to, select the applicable radio button:
- Router Mode - Select this option when the corresponding KDS Device's KDS Mode is set to RouterServer or RouterClient; in this case, the Router IP Address and Router Port Number configured on the physical Bematech LS8000 Device will need to be entered into their applicable fields
- KDS Mode - Select this option when the corresponding KDS Device's KDS Mode is set to KDS; in this case, the IP Address, Port Number, and the KDS Station Number will need to be entered into their applicable fields
- Show Message Error on Till - this flag controls the ability to show messages at the Till when Bematech is in an error condition; when enabled a message will be sent to SmartPOS when an order to the KDS is in error
- Enable Bump Notifications if desired - this will allow for bumping off a course in the kitchen to trigger another course to print; i.e., bump off 1st-course items to trigger 2nd-course items to Print (display on the KDS screen/s)
- When ticked-on, this will write the bump notification to an XML file that will be stored in the Directory specified in the corresponding KDS Device's settings (C:\Bepoz\Bematech)
- This relates to the "Bematech Bumps 8000" Scheduled Job (below) which will pick up the bump notification file and trigger an event
- Receive Acknowledgements - if this flag is enabled, the System will expect an Order Acknowledgement from the KDS device prior to the Initial Order being sent
- If no Acknowledgement is sent, then the System will assume that an error has occurred and the order was not successfully sent
- Acknowledgment Timeout - the amount of time to return the Acknowledgement Information before System Timeout
- Order Acknowledgements need to be Enabled on the KDS Router so that Acknowledgement notifications and errors can be received on the Till
- Click Save to save the Device Settings for the Job
- Click OK to save the Job
Bematech Bump 8000
- This Scheduled Job relates to the Enable Bump Notifications configuration flag from the "Bematech Send 8000" Scheduled Job
- When that flag is enabled, bump actions on the physical LS8000 Device will trigger events such as Printing other items/courses
- The bump notification XML files will only be generated from the LS8000 Device interface if the "Enable Bump Notifications" flag is ticked-on
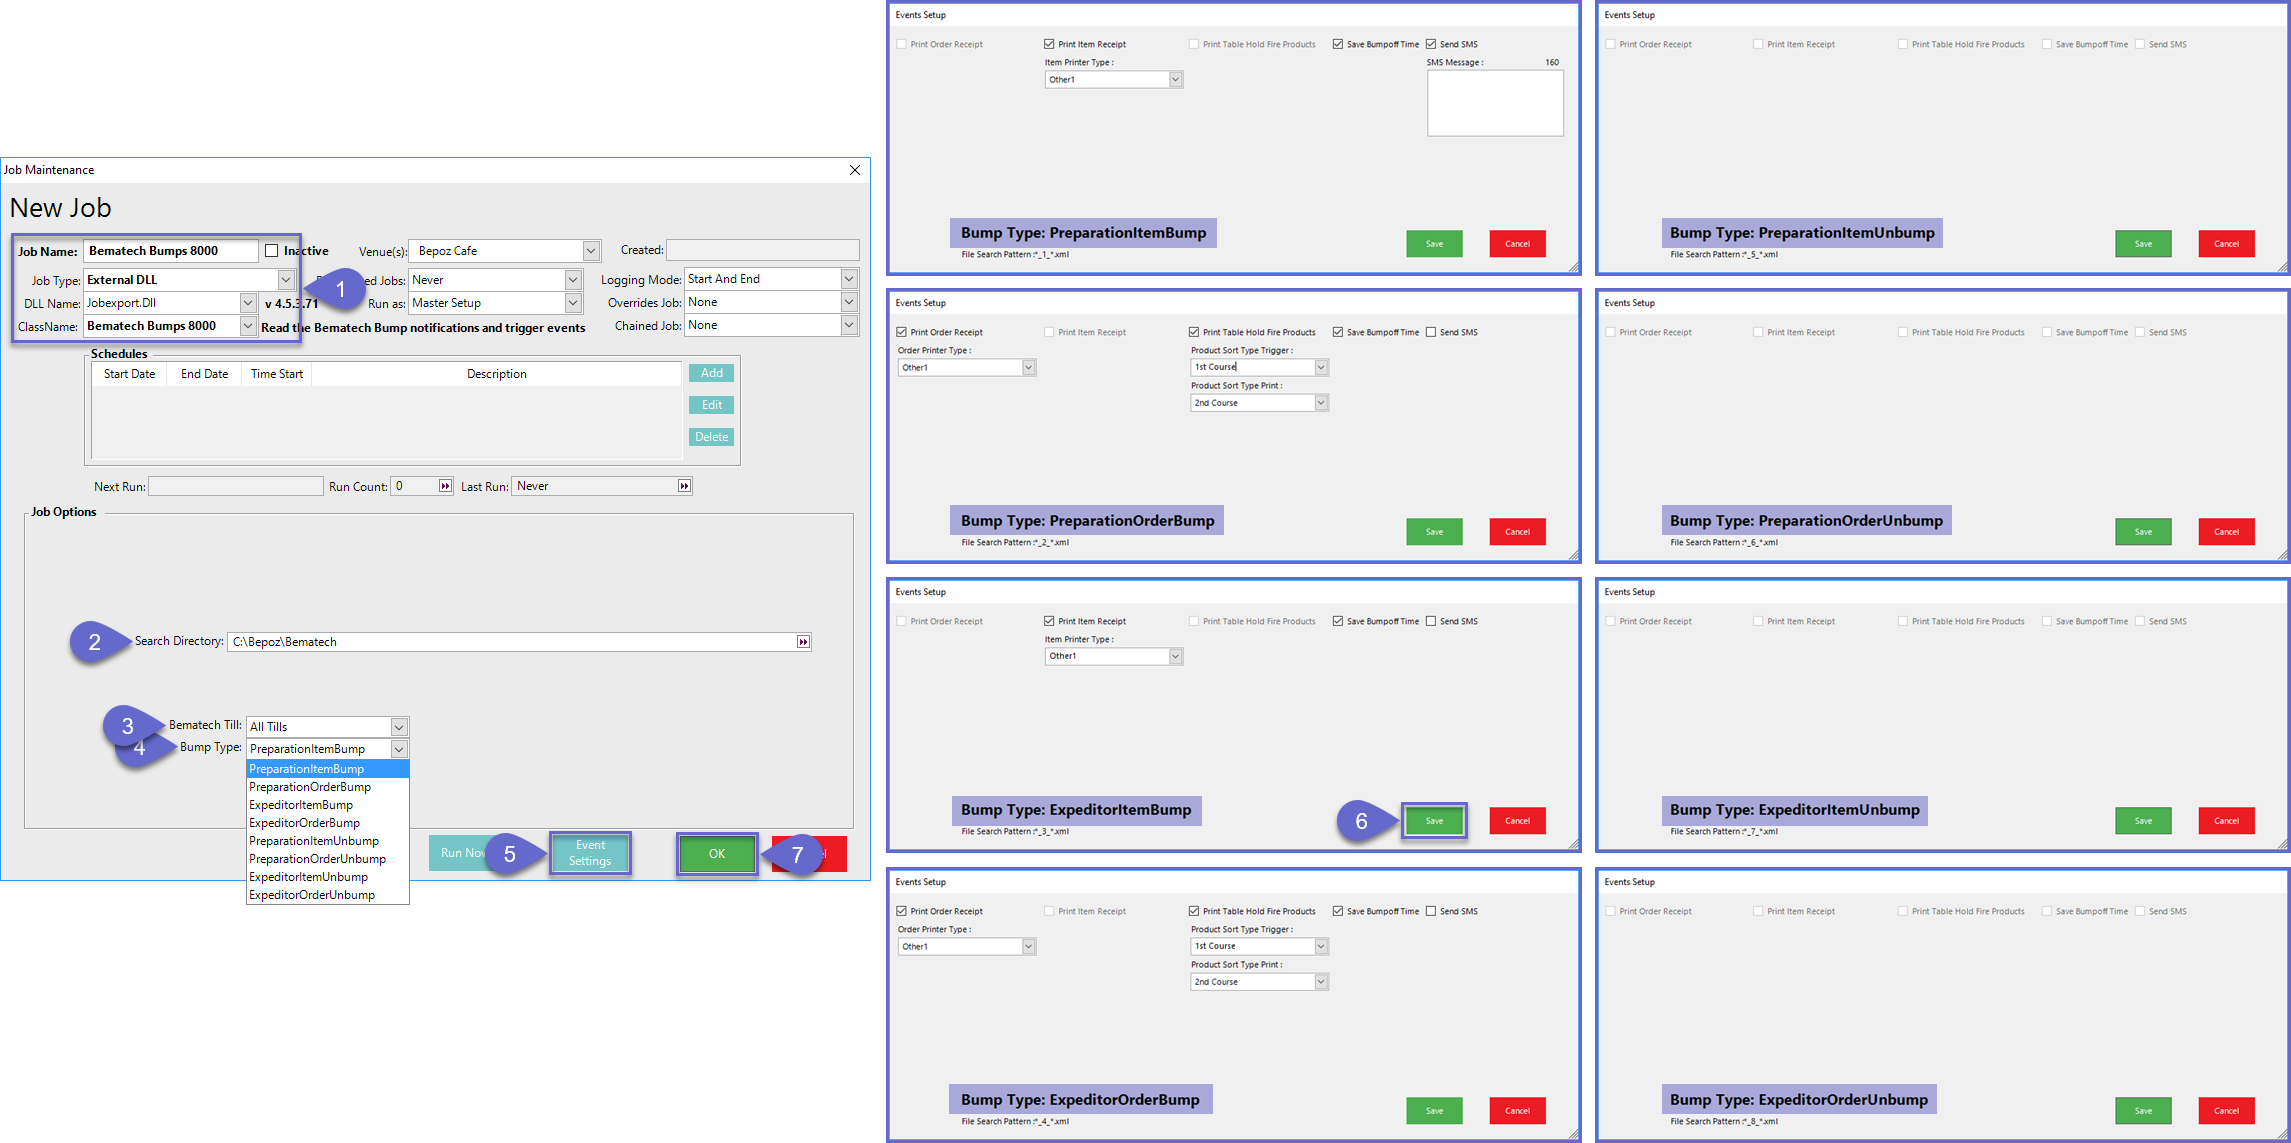
- After completing the generic steps (above) to begin Job Maintenance, complete the following steps to fully configure the Bematech Bump 8000 Job Options:
- Enter a relevant & desired Job Name; set the Job Type to "External DLL"; set the DLL Name to "Jobexport.Dll"; set the Class Name to "Bematech Bump 8000"
- Enter the Search Directory which is the Directory the Job searches to look for bump notifications
- Use the Bematech Till drop-down to optionally select one of the System's configured Tills; this will filter the bump files that will be processed with the Job
- Select the desired Bump Type from the drop-down which allows for connecting events based on the type of bump that was carried out at the KDS Device:
- Preparation Item Bump
- Preparation Order Bump
- Expeditor Item Bump
- Expeditor Order Bump
- Preparation Item Unbump
- Preparation Order Unbump
- Expeditor Item Unbump
- Expeditor Order Unbump
- Click on the Event Settings button to open the Events Setup window (image below - right); the configuration options available will differ depending on the Bump Type selected
- Based on the Bump Type, the event trigger will execute based on how the Event Setup is configured
- Event trigger configuration options are not available for any "xxyyUnbump" Bump Types
- The Events Setup configuration options will be explained further below
- Click Save to save the Events Setup for the Job
- Click OK to save the Job
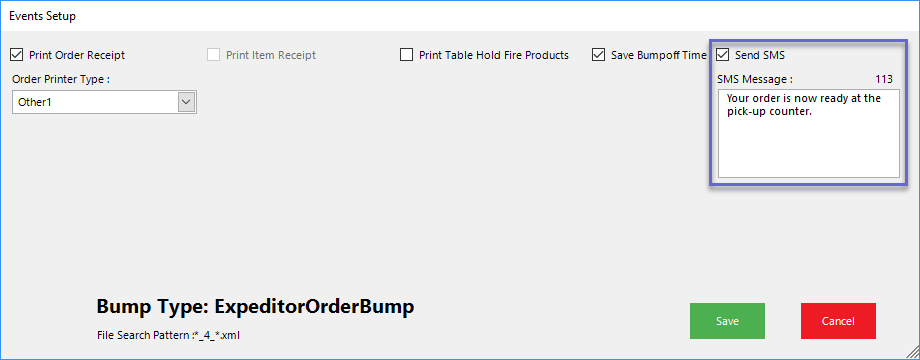
Events Setup Configuration Options
- Print Order Receipt flag:
- This flag is only available for the Preparation Order Bump & Expeditor Order Bump
- If enabled, this will Print a Receipt of the bumped order
- When enabled, a drop-down will appear dynamically allowing for selecting the Printer Type to specify which Remote Channel to Print for using the Workstation Printer settings of the Bematech Till configured in the Job
- Print Item Receipt flag:
- This flag is only available for the Preparation Item Bump & Expeditor Item Bump
- This is similar to the Print Order Receipt flag except it will Print the Single Item that has been bumped
- When enabled, a drop-down will appear dynamically allowing for selecting the Printer Type to specify which Remote Channel to Print for using the Workstation Printer settings of the Bematech Till configured in the Job
- Print Table Hold Fire Products flag:
- This flag is only available for the Preparation Order Bump & Expeditor Order Bump and when enabled will dynamically display drop-downs for selecting the Product Sort Type Trigger and the Product Sort Type Print
- If this flag is enabled, it will execute the "Print Table Hold Fire Products" Till Function with the Sort Type specified
- The Product Sort Type Trigger selected will determine that when Products matching that Sort Type are bumped from the KDS it will trigger the next Product Sort Product/s in the Hold Fire system
- The Product Sort Type Print selected will determine that Products matching that Sort Type will be the next Products to be Printed/Displayed from the Hold Fire system
- Save Bumpoff Time flag:
- If enabled, this will write the <Bumpoff_Time> specified in the Bump notification XML to a new field in the table "Tables called "DateTimeBumpOff" so that the Bumpoff Time can be referenced when needed
- Send SMS flag:
- If this flag is enabled, the bump event will trigger an SMS to be sent to an Account's Mobile Number using the SMS Link Device interface
- The prerequisites here are that the Product/s' Transaction would need to be attached to an Account and the Account must have a Mobile Number configured
- When enabled, an SMS Message text entry field will appear for entering Message text to be sent
Till Functions
- There are few
Till Functions related to the Bematech integration that were either updated or developed specifically as a result of required functionality
"Comment" Till Functions
- The Till Functions called "PrintOnly Comment" & "Saved Comment" will now send the comment text through to the KDS screen/s when a comment is created using one these Till Functions is included in a Transaction
- Both of these can be found in the "Number Entry" Function drop-down
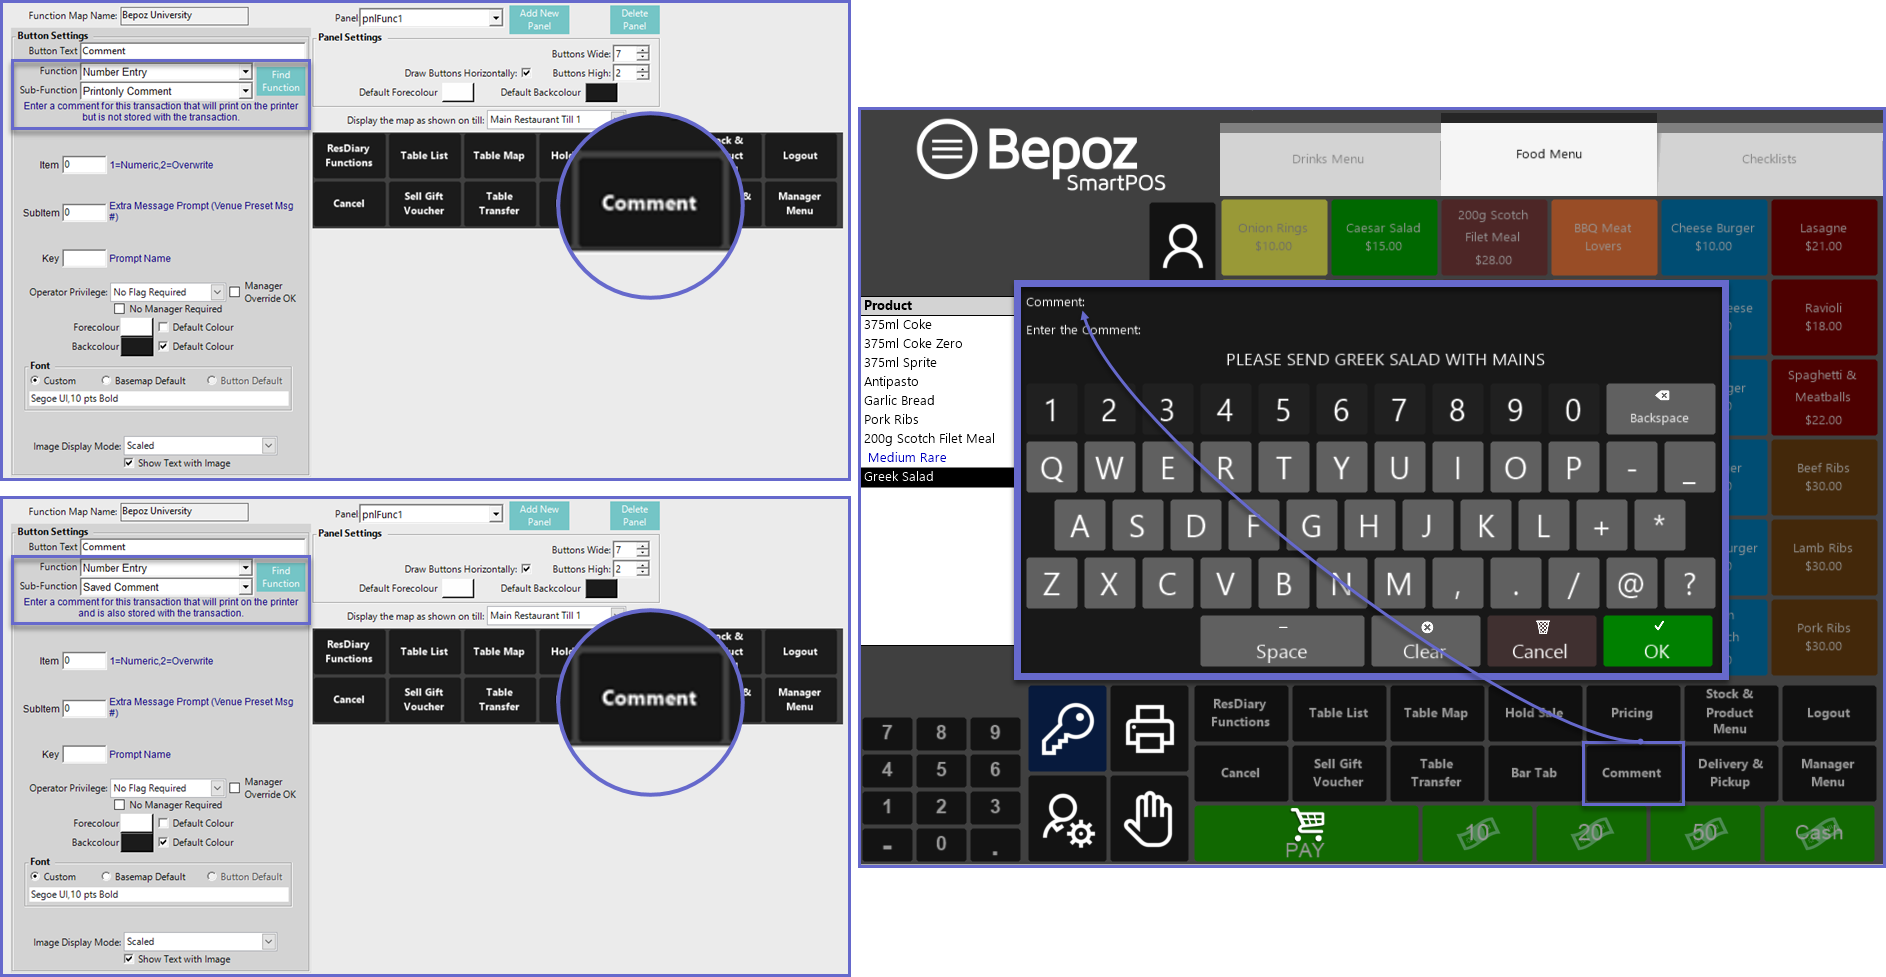
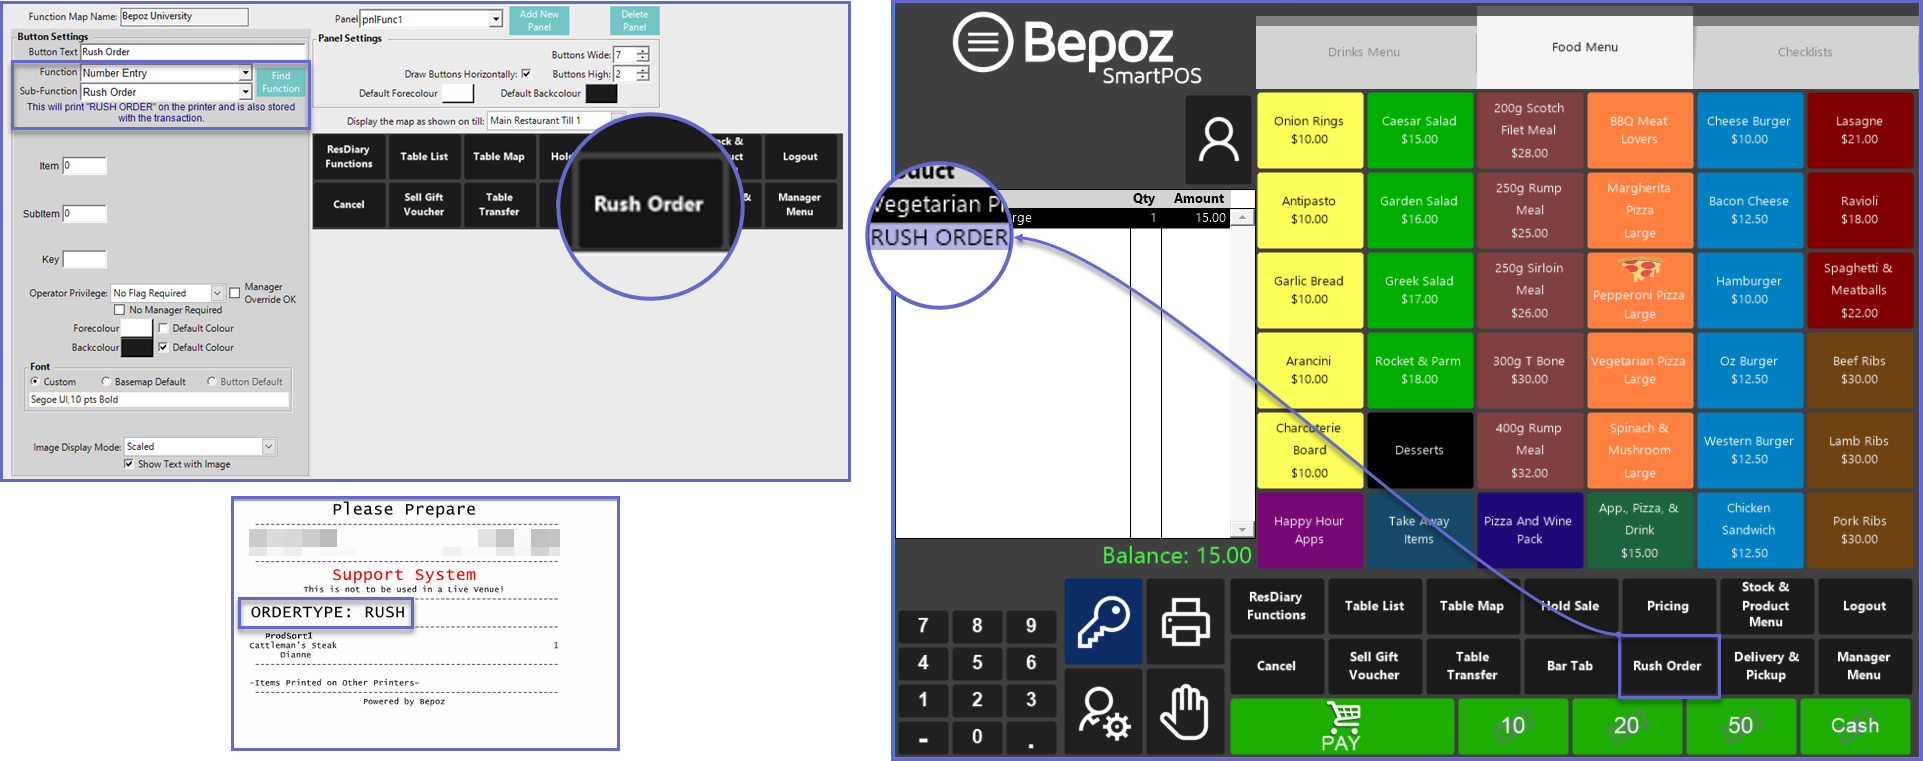
"Rush Order" Till Function
- The "Rush Order" Till Function allows Operators to send a prioritized Order to the top of the queue on the KDS screen/s when necessary
- Not only will this send Rush Orders through to the Bematech Device/s, but it will also Print on Receipt Printers similar to a Saved Comment
- This can be found in the "Number Entry" Function drop-down
- When this Till Function is selected, "RUSH ORDER" will display in the Transaction window to confirm
- This will also Print above any other Saved Comments when Printing to a Kitchen Printer