
Overview
The Intercard integration with SmartPOS enables venues to manage arcade cards directly from the point of sale. This provides a seamless experience for both staff and guests by removing the need for separate Intercard kiosks.
Supported functionality includes:
-
Card Purchases: Sell arcade cards based on pre-defined Intercard packages (e.g. $20 Arcade Card, 3 Game Swipes, Bonus Value).
-
Card Top-Ups: Add value to an existing card using the SmartPOS interface.
-
New Card Activation: Activate a blank arcade card and load it with the desired amount.
-
Card Balance Checks: Check the remaining balance on a guest's arcade card directly from POS.
-
Real-Time Integration: All transactions are authenticated live against the Intercard system using venue-specific credentials.
This integration ensures tighter control over arcade transactions, improved user experience, and better reporting visibility within the Bepoz ecosystem.
Release Version: 4.8.1.0
⚙️ Configuration
🏷️ Step 1: Create Intercard Arcade Products in BackOffice
To enable arcade card workflows in SmartPOS, you must create a set of products in BackOffice that align with your Intercard packages. Along with two configuration products that are used in the Till Extension configuration:
|
Product Name |
Product Type |
Price |
Description |
|---|---|---|---|
|
Arcade Card Revalue Top-Up (Open) |
Normal |
$0.00 |
Placeholder product used for variable-value top-ups (mapped in Revalue Product dropdown of Till Extension) |
|
Text Condiment Product |
Normal |
$0.00 |
Used to facilitate showing balance details under the Intercard product (mapped in Text Condiment Product dropdown of Till Extension) |
🔖 Step 2: Tag Arcade Products
Within BackOffice:
-
Navigate to the product maintenance window → Custom Info.
-
Add a new custom flag - for example, Intercard Product
-
For each product intended to trigger an Intercard flow (e.g. "Top Up $10", "New Arcade Card - $30"), apply the custom flag created in the previous step.
This flag is used by SmartPOS to filter the product list within the Till Extension device for a more convenient configuration process.
🧩 Step 3: Till Extension Device Setup
Each SmartPOS terminal must be configured with an Intercard Till Extension Devices in BackOffice.
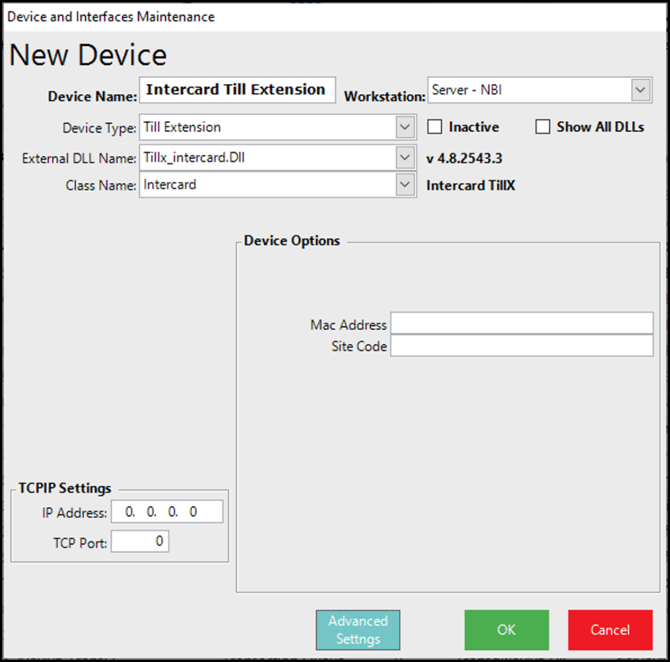
Required fields:
|
Field |
Description |
|---|---|
|
IP Address |
Points to the Intercard transaction server running locally at the venue |
|
Port |
Port used to communicate with the Intercard DLL |
|
MAC Address |
Unique ID used to identify the terminal in Intercard. The value cannot contain any spaces, and must be 12 characters. We recommend a combination of Venue+Store+Till that would create a unique name that can be used to identify which till it represents (CANN-BAR-REDT2) All MAC Addresses must be provided to Intercard as they need to be configured on the Transaction Server as authenticataed devices. |
|
Site Code |
Supplied by Intercard, used to validate transactions at a site level |
Ensure the venue's IT infrastructure allows TCP traffic between SmartPOS and the Intercard service.
Advanced Mapping Settings:
These options are available within the 'Advanced Settings'
The ‘advanced settings’ form is a ‘live’ form, meaning it requests information from Intercard as it’s opened. If there is no live connection to the Intercard server, you will see the following dialogue informing you that the Intercard Product list will be shown.
Check the IP address and port configured on the till extension, and confirm the port is not being restricted by IT.


|
Setting |
Description |
|---|---|
|
Custom Flag |
Select the same custom flag created in Step 1 to filter arcade-related products. |
|
Mapping Matrix |
This matrix allows Bepoz products (e.g. "$20 Top Up") to be mapped to Intercard packages. |
|
Revalue Product |
Selects the product to be used for custom-value top-ups (e.g. customer wants to top-up $23). |
|
Text Condiment Product |
Used for displaying card balance information on customer-facing screens or receipts. |
🔧 Step 4: Configure Function Buttons in SmartPOS
To fully utilize the Intercard integration, you’ll need to configure specific function buttons in SmartPOS to handle balance inquiries.
-
Balance Display Button:
-
Go to the SmartPOS button configuration area.
-
Create a new function button.
-
Set the Function to "Custom Function" and the Sub-Function to "Till Extension Function."
-
For a button that displays the card balance on the screen, set the Item to 0 and the Sub-Item to 0.

-
-
Balance Print Button:
-
Similarly, create another function button.
-
Use the same function and sub-function settings.
-
To print the balance information on a receipt, set the Item to 0 and the Sub-Item to 1.
-
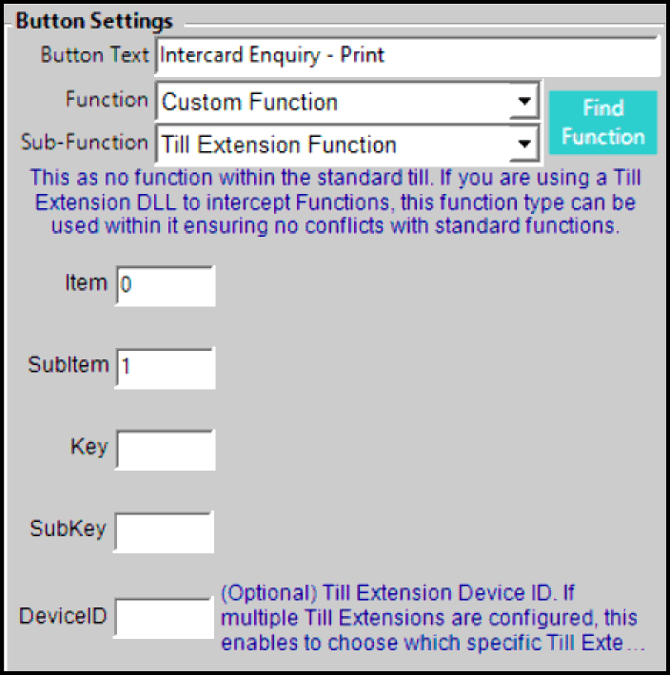
With these buttons configured, staff can quickly check a customer’s card balance on the screen or print it out for the customer.
🧪 SmartPOS Workflows
🔁 Arcade Card Sale
-
Operator selects a product tagged with the Intercard flag.
-
SmartPOS will prompt the user to scan or enter the card number.
-
Customer presents their arcade card (tap or scan).
-
Intercard verifies the card and applies the top-up amount.
-
Transaction added to the POS List.
It’s worth noting that card balances are updated at the point of scan, not on payment. If the transaction is cancelled or payment fails, the balances will be refunded on intercard.
🧾 Arcade Card Top Up
-
Operator selects a “Intercard Revalue” product.
-
SmartPOS prompts for an an amout to top up.
-
SmartPOS will prompt the user to scan or enter the card number.
-
Customer presents their arcade card (tap or scan).
-
Intercard verifies the card and applies the top-up amount.
-
Transaction added to the POS List.
💳 Balance Check
-
Operator selects a dedicated “Balance Enquire” function button.
-
SmartPOS will prompt the user to scan or enter the card number.
-
Customer presents their arcade card (tap or scan).
-
Intercard verifies the card and retrieves the card balances.
-
SmartPOS displays the current balance retrieved from Intercard on the POS, on the customer display and an optional receipt can be printed for the customer.
🧰 Troubleshooting
|
Issue |
Suggested Actions |
|---|---|
|
Intercard interface does not launch |
✅ Check if product has correct custom flag |
|
Card not recognised |
✅ Confirm card is registered in Intercard |
|
No response from Intercard |
✅ Verify IP/port configuration |
|
Transaction completes in POS but not in Intercard |
✅ Check if the venue’s Intercard system is online |