
Overview
This lesson covers the process of setting up a Boca Ticket Printer along with a Sample Boca XML file that needs to be located in the Bepoz Data Directory
Overview-
Boca Ticket Printer can be installed and set up within Backoffice for Ticket printing
-
Please make sure to load the drivers before the printer is plugged in
-
Windows should find the printer and install itself
-
This will be a Windows printer and the Operators will use the typical device settings for a printer that is Windows print spooler driven in Bepoz
Prerequisites Installing the Boca Printer Drivers
-
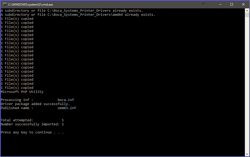
Download boca_printer_drivers.exe
-
Operators will need to install the drivers with the Administrator user, right click boca_printer_drivers.exe and select 'Run As Administrator'
-
A command prompt window will appear
-
Press any key to finalise to install of the drivers
-
When you have installed the Drivers for the Boca Printer you will need to attach the USB cable from the Boca Printer to the PC
-
When the Printer is connected to the PC, Windows will install the correct drivers for the device automatically
-
When the device has successfully being setup with windows you can setup the printer in bepoz
Step-by-step Guide Setting Up a Boca Printer In Bepoz
-
Log into Backoffice
-
Select System Setup > Venue, Stores & Tills
-
Highlight the workstation that the printer is connected to
-
From the venue, stores & tills header, select 'Add New Device' button
-
Select Blank Device from the device list prompt
-
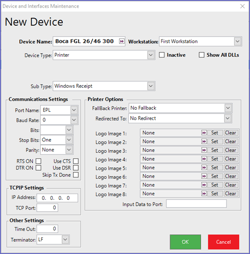
The Device Name must match the device name that the device is called in windows. e.g. Boca FGL 26/46 300 DPI
-
The Device Type set to Printer
-
The Sub Type set to Windows
-
The printer pot name set to "EPL printer"
-
Select OK to save Device
Below is a sample of the Device settings for a Boca Printer
 Printer Format Setup
-
A printer format will need to be setup for the boca printer to print through Bepoz
-
login to Backoffice
-
Select Operational Setup > Printer Formats
-
From the printer formats header select 'Add Printer Format' button
-
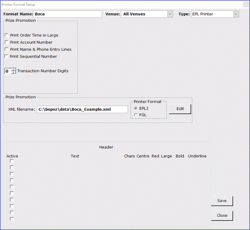
Select the 'Type' feild to EPL Printer
-
Enter The 'Format Name'
-
Enter the .XML pathname of the xml file for the boca printer
-
Select the FGL radial button
-
Select OK to Save
-
-
Below is an example of the Printer Format
 Creating or Editing the XML File
-
The XML Editor can edit and create the xml files for the boca printer
-
To create or edit the XML file you will need to locate and run 'xmleditorhost.exe' in the Bepoz\\Programs directory
Creating an XML File
-
From the XML Editor select File > New > FGL
Editing the XML File
-
From the XML Editor select File > Open
-
Enter the Width in millimeters
-
Enter the Hight in millimeters
-
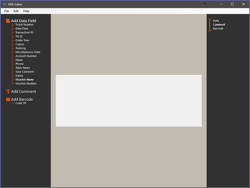
Right Click to Add Element, you will have 3 options to select from
|
Data |
|
|
Comment |
|
|
Barcode |
|
-
Highlight Data and you will see 16 Data fields
|
Ticket Number |
|
|
Date/Time |
|
|
Transaction ID |
|
|
Till ID |
|
|
Order Time |
|
|
Copies |
|
|
Training |
|
|
Miscellaneous Data |
|
|
Account Number |
|
|
Name |
|
|
Phone |
|
|
Table Name |
|
|
Saved Comment |
|
|
Expiry |
|
|
Voucher Name |
|
|
Voucher Number |
|
-
Right Click to Add Background
-
When adding a background, the backgrouind will need to be the same size dimentions as the voucher size. e.g. if the voucher size is 140mm x 50mm then the background image will need to be 140mm x 50mm