
Overview
This article covers the setup that is required to configure the Till Function button for Pay@Table.
Prerequisites
Minimum Bepoz version of 4.7.3.3
Minimum .NET version of 4.8
The applicable Operator Privileges will need to be enabled:
Operator Maintenance 'General' Tab
System Setup: "Maintain Till Function Maps" flag
Venue Maintenance "Main" Tab (General Settings)
All “System Setup” Flags
Pay@Table Till Function Button Setup
To set up the Till Function button for Pay@Table for SmartPOS Mobile transactions, navigate to the Till Function Maps option under System Setup in the BackOffice side Menu bar
This will open the Till Function Override Setup tab; select the desired Function Map from the available list of Function Maps and click on Edit Highlighted Function Map
Note: If there are no Function Maps, please click on Adding a Till Function Map button to add a new Function Map
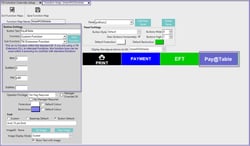
This will open the Function Map tab which will display the Function Map menu as it would appear on SmartPOS Mobile
Click on the desired Button space and then configure the Button Settings as follows:
In the Button Text field enter the text that will display on the Till Function Button on SmartPOS Mobile
Set the Function drop-down to 'Custom Function'
Set the Sub-Function to 'Till Extension Function'
In the Item field, enter '0', SubItem as '0', Key as p@t and save the Function Map
SmartPOS Mobile App Setup Articles
To complete the full & correct setup of the SmartPOS Mobile App, the Operator must follow & execute these articles provided in the given chronological order:
SmartPOS Mobile Workstation Setup
SmartPOS Mobile Venue Maintenance Setup
SmartPOS Mobile Till Function Map Setup Guide
SmartAPI Host Usage
SmartPOS Mobile App Configuration Screen