
In This Article
Unmapping A Payment in Backoffice
Remapping A Payment in Backoffice
Overview
We have enhanced the Aged Debtors functionality to allow users the ability to allocate an account payment to a specific account charge(s). This can be handled through Backoffice or SmartPOS. The user also has the option of reassigning payments from Backoffice if a mistake has been made.
Specifications
Version: 4.8.0.0
Released:
Products: SmartPOS & Backoffice
Key Features & Capabilities
- Assign payment(s) to charge(s) from Backoffice
- Reassign payment(s) to ocharge(s) from Backoffice
- Assign a payment to a charge from SmartPOS
- Track charge & payment statuses from the user account
- View the balance owing of each account charge
Configuration
Prerequisites
Please read through our Aged Debtors - Phase 1 documentation before progressing. You will find instruction on how to enable the feature.
Aged Debtor Form Explained
There are two transaction types for Aged Debtors: Account Charges and Account Payments.
An Account Charge occurs when a customer utilizes the 'Account Charge' option to draw upon a credit balance on their account. In contrast, an Account Payment refers to a transaction where a customer makes a payment towards their account, typically using cash or EFTPOS payment methods.
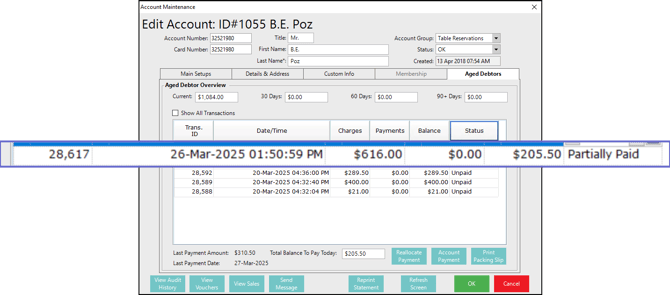
The status of a specific transaction along with the remaining balance can be found in the Aged Debtors tab of the Account Maintenance form as shown below:

What is the balance used for?
Every transaction includes a balance field indicating the total outstanding amount. For charges, this balance is what needs to be settled, while for payments, it represents the amount applied to settle a charge.
As shown in the screenshot, transactions marked as 'Paid' or 'Allocated' have a zero balance, indicating full usage of the balance. Conversely, 'Partially Paid' or 'Partially Allocated' transactions have a balance that differs from the total, signifying partial usage. Transactions labeled as 'Not Allocated' or 'Unpaid' will have a balance that matches the 'Charge' or 'Payment' amount.
What are the different statuses?
- Account Charge Statuses
-
-
Unpaid -> No payment has been assigned to this charge
-
Partially Paid -> A payment(s) has been assigned to the charge, but it was not enough to cover the entire balance
-
Paid -> A payment(s) has been assigned to the charge, and the full balance has been covered
-
-
Account Payment Statuses
-
Not Allocated -> No charge has been assigned to the payment
-
Partially Allocated -> A charge(s) has been assigned, but there is a remaining balance to be allocated
-
Allocated -> A charge(s) has been assigned, and the full balance has been allocated
-
Payment Mapping in Backoffice
- Select the charge(s) you wish to allocate a payment to, notice the 'Total Balance To Pay Today' field updates with the associated total based on the charges selected.

- Select 'Account Payment'
- If you would like to enter a comment with the payment, you can choose to do so here

- Select the Till you want to register the payment against

- Proceed to process the payment. The amount shown will be the balance owing based on the charges selected in screen 1.

- Select the Payment Media

- Once the payment has been processed, the status of the charges will be updated to paid / partially paid.
Unmapping A Payment in Backoffice
You may find yourself in the scenario where a payment has been incorrectly allocated. If you need to unmap a payment completely, you can follow the below steps:
- Select the payment you wish to unmap, and select 'Reallocate Payment'

- Select 'NO' to unmap the payment from all charges

- A confirmation prompt will show the TransactionID and confirmaton it has been unlinked

- The payment status will be updated to 'Not Allocated'

Reallocate A Payment in Backoffice
You may find yourself in the position where you need to reallocate a payment from one charge to another. You can follow the steps below:
- Select the payment you wish to unmap, and select 'Reallocate Payment'
- Select 'YES' to reallocate the payment to a different charge
- A prompt will advise you to select the charge(s) you want to allocate the payment to

- Select the charge(s) you want to allocate the payment to and click 'Reallocate Payment'

- A confirmation prompt will be shown, showing the reallocation ID's

- The charge status will be updated to Paid / Partially Paid

Payment Mapping in SmartPOS
Typically, users will handle account payments directly through SmartPOS. To map a payment to an existing account charge, follow these steps:
- Log into SmartPOS, open the relevant user account and proceed to process an account payment.

- Select YES, to apply the payment as an account charge
- A list of available charges will be displayed, with 4 options:

- Select charge(s) from the list, the list allows for multiple charges to be selected
- Select date, and select a range of charges to choose from

- Select ALL, to attach payment to all charges
- Select CANCEL to move back to the payment workflow
- The relevant statuses will be updated

Viewing Payment Allocations
You may find yourself in the position, where you are attempting to confirm which payments have been mapped to which charges. This can be viewed from within the Account Summary Detail window.
Create a new report view with the following fields:
- AccActivtyID -> Unique ID for account activity records
- Linked Account Activity -> Tracks the AccActivityID to the amount being mapped
- Charges -> Charge amount
- Payments -> Payment amount

The Linked Account Activity field will list the ID's that are linked, along with the balances being utilized. In the example above you can see there are two payments linked to the one charge, which totals to $410.50.
This results in the charge being set to 'Partially Paid' with a balance remaining of $205.50 as seen below
Feature Walkthrough
Further Reading