
This page explains the procedure for implementing the Bepoz interface to Assembly Payments.
Assembly is an integrated online payment platform that strives to "help businesses manage multiple payment workflows and move funds, so they can pay and get paid without delays."
The setup for this interface involves configuring an EFTPOS Device as well as SmartPOS setup afterward.
Prerequisites
- To begin the implementation process, the Implementation Operator must have the following privileges enabled:
- Main Tab (General Settings) - Venue Maintenance
- All "System Setup" Flags
Assembly Payments EFTPOS Device
- This EFTPOS Device must be added to each workstation that requires integration to Assembly
- Please see the image and setup notes below for instructions:
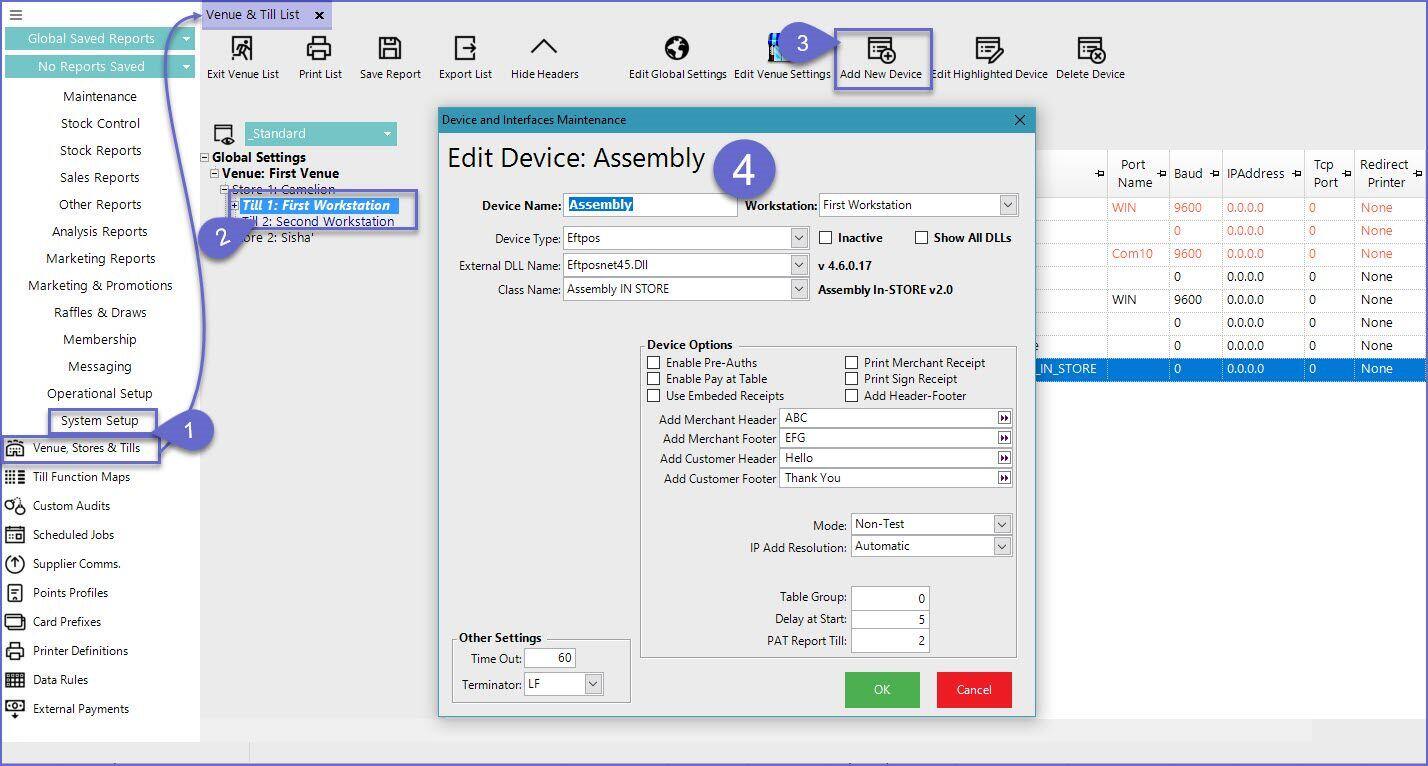
EFTPOS Device Setup Instructions
- After adding a new Device, enter a Device Name and then set it as follows:
- Device Type: EFTPOS
- External DLL Name: Eftposnet45.Dll
- Class Name: Assembly IN STORE
- Set the Device Options as follows:
| Device Option | Description |
| Enable Pre Auths | This flag allows operators to enable pre-auth for the device |
| Enable Pay at Table | This flag allows operators to enable Pay at Table |
| Use Embedded Receipts | This flag allows operators to use embedded receipts |
| Print Merchant Receipts | This flag allows operators to print two receipts: one for Merchant and the other for customer |
| Print Merchant Receipts | This flag allows operators to print sign receipts |
| Add Header-Footer | This flag allows operators to add a custom header and footer to the receipt |
| Add Merchant Header | Once the 'Add Header- Footer' flag is ticked; a custom footer can be added for merchant receipts from this section |
| Add Merchant Footer | Once the 'Add Header- Footer' flag is ticked; a custom footer can be added for merchant receipts from this section |
| Add Customer Header | Once the 'Add Header- Footer' flag is ticked; a custom header can be added for customer receipts from this section |
| Add Customer Footer | Once the 'Add Header- Footer' flag is ticked; a custom header can be added for customer receipts from this section |
| Mode | Select the mode for TEST or NON-TEST |
| IP Address Resolution | Set the IP resolution for the local server |
| Table Group | Select the table group that will use Assembly Payments |
| Delay at Start | Set the delay time for Assembly initialisation when the SmartPOS starts This gives operators some time to unpair the device (if they need to) |
| PAT Report Till | This will select the Till against which Pay at Table Report will be generated |
- Click OK to save the Device
- Repeat these steps for all required Tills