
This article covers the integration process of Bematech LS6000. Even though the current version Bematech LS8000 is mostly in use, there are still some clients who are using the former version. So, this page can be referred to while making any changes in the integration.
Bepoz can interface to a generic Kitchen display system that can receive standard Printer output. These simply convert the printed output to a video display.
Bepoz also interfaces to the Bematech Kitchen Display System 6000 via the Logic Controls KDS Manager software. This is a purpose-built Kitchen Video System.
Bepoz can Interface to this via XML Files or a Direct connection TCP/IP Socket.
Prerequisites LS6000 Hardware Settings- Connect Bump Bar, Video, and power cables to LS6000
- Bump Bar is Option C template
- Bump Bar cable plugs into the port labeled "To Computer"
- When booting the LS6000, press the Blue Right Arrow key to enter the Setup Screen
- Setup Screen Navigation
- Green Down Arrow moves to the right
- Red Up Arrow moves the left
- Blue Right Arrow Moves Down
- Orange Left Arrow Changes Selection
- In LS6000 Firmware Menu
- Assign Static IP to LS6000
- Assign Unique Station Number "Station Address" to each LS6000(Range: 01 thru 20)
- Red Bump Item button to Save and Exit
- Green Menu button to confirm
- Click the link below to download the KDS Manager.
KDS Server Windows Settings
1 Station must be designated as the KDS Server to run the KDS software (KDS Manager)
- Windows will need to assign Static IP
- Install KDS Manager Software
- You will need to create File Sharing permissions to C:\Program Files\Logic Controls KDS\orderinfo
- Set new firewall rule for Inbound rule type PORT and rule applies to TCP, Specific local Port 8888
- Set new firewall rule for Inbound rule type PROGRAM: C:\Program Files\Logic Controls KDS\KDS_Manager.exe
KDS Manager System Settings
- Create a directory under the local drive called Bematech
- Share the Bematech directory to everyone
- Within the Bematech directory you will need to create 3 directories called:
- Orders
- Status
- Notification
- Run KDS Manager Software
- Click Sys Settings Icon > System Settings
- In the general tab, you will need to set the order Source Files location - C:\Bepoz\Bematech\Orders
- In the general tab, you will need to set the order Source TCP/IP Port - 8888
- In the general tab, you will need to set the Path locations for Order Status Folder - C:\Bepoz\Bematech\status
- In the general tab, you will need to set the Path locations for Bump Notification Folder - C:\Bepoz\Bematech\Notification
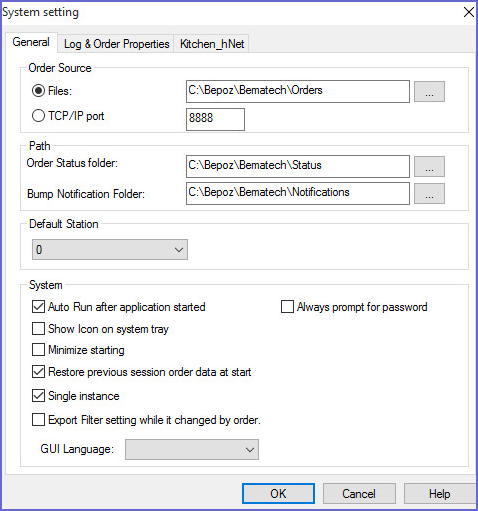
- Click OK to save settings
- KDS Manager LS6000 Station Settings
- Double click "Default" to control global settings for all LS6000 devices
- Double click LS#XX to configure settings for individual LS6000 devices (especially the IP address and port)
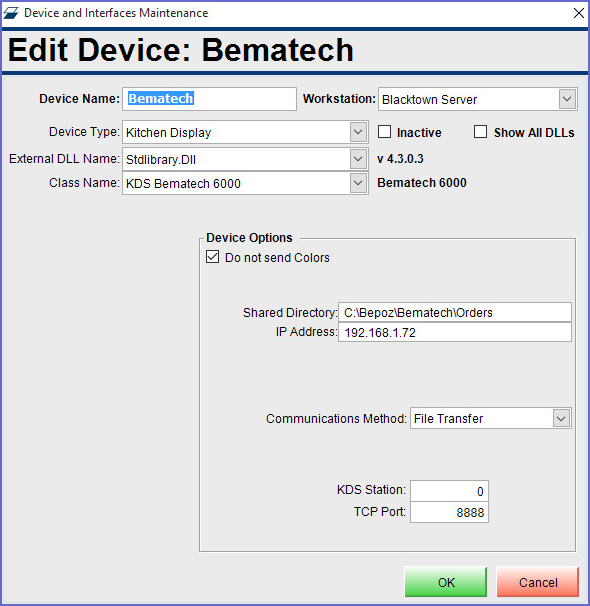
Add KDS Device
- Each Till sending orders must have the KDS Device added
- Open BackOffice.exe
- Go to the System Setup Tab
- Click Venues, Stores, & Tills
- Use the mouse to highlight a Till to add the KDS Device
- Click Add New Device
- Select Blank Device
- Device Name: (Create Name)
- Device Type: Kitchen Display
- External DLL Name: Stdlibrarly.Dll
- Class Name: KDS Bematech 6000
- KDS Station: Same as Station # assigned to LS6000 device
- Shared Directory created on the KDS server : C:\Bepoz\Bematech\Orders
- Communications Method : File Transfer
- TCP/IP: Enter IP Address Where KDS Manager is Installed
- TCP/IP: Enter Port 8888
- Click OK to save settings
- Add KDS Device to all order entry Tills
BackOffice Printing Setups Remote Printer Type Names
- In BackOffice.exe, go to the System Setup Tab
- Click Venues, Stores, & Tills
- Double click the Venue where the KDS is being installed
- Click the Names Tab
- Locate the "Printers" section
- Enter names for Printer Types that will be dedicated to the KDS system
- Click OK to save settings
Create Printer Profile
- In BackOffice.exe, go to the System Setup Tab
- Click Printer Profiles
- Click Add Printer Profile
- Select KDS Printer Types for this Profile as desired
- Multiple Printer Profiles may be created for Products that route to different combinations of KDS Devices
Create Printer Format
- Go to Operational Setup | Printer Formats
- Create a new format for KDS
- Type = Kitchen Display System
Map KDS Devices to Printer Types
- In BackOffice.exe, go to the System Setup Tab
- Double click a Till to configure
- Locate the Printer Setup section on the right of the Till Edit screen
- In the Printer column, click the drop down arrow to assign a KDS Device for each Printer Type as desired for the Till
- In the Format colunn, select the KDS format that was just created
- Click OK to save settings
- Follow this procedure for all Order Entry Tills
Assign Products to Printer Profile
- In BackOffice.exe, go to the Maintenance Tab
- Click Products to view existing Products
- Double click a Product to modify
- Locate the Printer Profile setting and click the drop down menu
- Select the desired Printer Profile for the item
- Click OK to save settings
Testing
- Run SmartPOS.exe on the Till
- Run SmartPrint32.exe on the Till
- If Bepoz system is live, switch to Training Mode
- Ring up sale for the Product that was just configured above
- Verify that order displays on KDS
LS 6100 KDS Feature
- 256 text foreground and background colour
- Icon display continuously showing connection status of Ethernet and keyboard
- Touch-screen support (serial interface)
- Status line display for showing status, messages, help items, alerts, or on-screen touch function keys (with touch screen support enabled)
- Beep tone pitch controllable in command such that each station can beep with different pitch for easier identification
- 16 automatic timers individually displayable at any location on the screen
- 4 display modes (40-column, 60-column, 80-column and 106-column)
- Display bit-map files for build-card display support
There are 2 Station Functions to Normal or Expeditor:
Expeditor Function
If one station is set as Expeditor, all orders will be automatically sent to this Expeditor station. Thus, at this station, the operator is able to quickly visualise all orders currently being processed at the kitchen and the staff at the front counter can handle different items from different preparation stations.
In addition, if any item/order is bumped off from a normal station, that item/order will be marked in the Expeditor station. So waiters can check the status of the orders on the fly.
Items Showing Method
Items can be shown in three different ways on the screen. The default Items showing Method is "on the Fly" If users choose on the fly users can see all the items on the screen right after the xml order was processed by KDS Manager.
If users choose "one item behind", the last item sent is always hidden at each station. When the order status changed to "paid" (the POS writes and xml order file with <OrderStatus>1</OrderStatus>) the last item will be shown.
If users choose "when order is paid", items will be displayed when the order is "paid".
Smart Order
This option enriches the process of food preparation at the kitchen by using a powerful delay algorithm that allows items to be served / prepared at the right time. If users check this opinion, the KDS Manager will handle the order in its smart way . There are two different options to work with order items that are not yet to be prepared: Dimmed and Hidden. When dimmed is selected (default), waiting items appear on the screen with light gray colors. When hidden is selected; only the items that are ready to be prepared are shown on the screen.
Filters and Status Bar
Item Filter Setting
This option allows users to specify how the order items (by category or individually) will be displayed at the kitchen stations. Double-click "LS#0" on left column, a "LS Default Setting" window will pop-up. Select "Filter and Status Bar" node on the left side, and click "Change Item Setting" button to display "Item Filter Setting" window. In this window, if users have sent any items to KDS already, they will be shown here. You specify the primary station for any item in this screen. After done, save and exit. Restart KDS by clicking "start" button on top toolbar.
You can route items to different preparation stations. For instance, an order may contain a hamburger and a salad. The burger can be redirected to preparation station 0 and the salad can be sent to station 1, streamlining the processing flow in the kitchen. An item can also be routed at the item level, overwriting the Primary station specified at the Category
Set up categories and items
In the "LS# Settings" window, click"filters and status bar". On the right panel, click 'Change Item Setting', an "Items Filter Settings" window will pop up. On This window, it will automatically display the received categories & items. Normally KDS Manager will automatically add categories and items to its database by reading the transferred orders, but users still can manually add categories and items by the following 3 methods
Bump Bar Operation for Kitchen Station
Function |
Bump Bar Key 1 |
Bump Bar Key 2 |
| Move highlight to Next | Right arrow | Ctrl+6 |
| Move highlight to Previous | Left arrow | Ctrl+7 |
| Bump order | Enter | Ctrl+0 |
| Unbump order | Ctrl | Ctrl+2 |
| Select next item | Down Arrow | Ctrl+8 |
| Summary Panel On/Off | - | Ctrl+5 |
| Change # Panels/Screen | Space | Ctrl+3 |
| Play video/Build Card On/Off (If applicable) | Space + Enter | Ctrl+4 |
| Sort orders by | Space | |
| Park Order | 2 | |
| Parked orders list | Ctrl + Space | |
| Help | Ctrl+1 |
Bematech Bumps Job Setup
|

Job OptionsFileSpec to Import- this is the form of Orser*.xml Search Directory- this is the full path name of the directory that holds the .xml dump files Processed Directory- this is the path name of the directory to move processed bumps to. All bump files that matching the file spec will be moved here SMS Message 1- this field is where you can set the SMS message to send to customer. the field is limited to 100 characters SMS Message 2- this field is where you can set the SMS s message to send to customer. the field is limited to 100 characters Bematech Till- This is the till that phone orders are attributed to Bump Type- There are eight Bump types to select from
Device ConfigurationSetup Mode (Device Bios Mode)To enter the setup program, as soon as the system information screen appears during boot up, quickly press [Delete] or [Down Arrow] key on the bump bar or keyboard. Scroll to Ethernet menu to set up the IP address and TCP port. Check with system administrator for proper settings. Note that the IP address must match the IP group of All LS6000 must have their unique IP addresses different from each other and any other computer equipment on the network. If any parameters have been changed, press [F10] or [Ctrl] key to save the parameters and exit setup. After booting up normally, a blue screen with configuration box should appear on the VGA screen. The Ethernet status line should display "Connected" , otherwise check the cable connections. The IP address and TCP port number will also be shown in the configuration box on the screen. Setup the IP addresses to assure that the Server, POS terminals, and LS6000 Station(s) are within the same subnet. To see the IP address of LS6000, plug in the power adapter and press the bump bar "down arrow" button to enter into the setup menu. Next press a side arrow button to choose the Ethernet menu. Press the down arrow button again to modify the IP address. TCP/IP PortIf the user selects this option, the POS software will interface with KDS manager through a TCP/IP socket instead of the regular dropping file mechanism (usually in a network shared source folder). Users can select the port that KDS manager listens to, as shown below:
KDS Display OptionsThe KDS controls the display of the 'Order Caption Content'
|


