This article explains how to setup and configure the Transaction Queue and External Payment Device which are both required for the interface between iVvy and Bepoz.
These will:
- Support sending Transactional line information to iVvy
- Support Refunding items from SmartPOS and updating in iVvy
- Map Cost Centers with Bepoz sorts/types/groups so transactions can be translated
Prerequisites
- In order to access the device setup; following operator prerequisites have to be fulfilled
-
Operator Maintenance 'General' Tab - System Setup Flags
iVvy Transaction Queue
- After logging into BackOffice, complete the following steps to create & configure an iVvy Transaction Queue:
- Navigate to the System Setup component in the sidebar, expand, and select Venue, Stores & Tills to open the Venue & Till List Tab
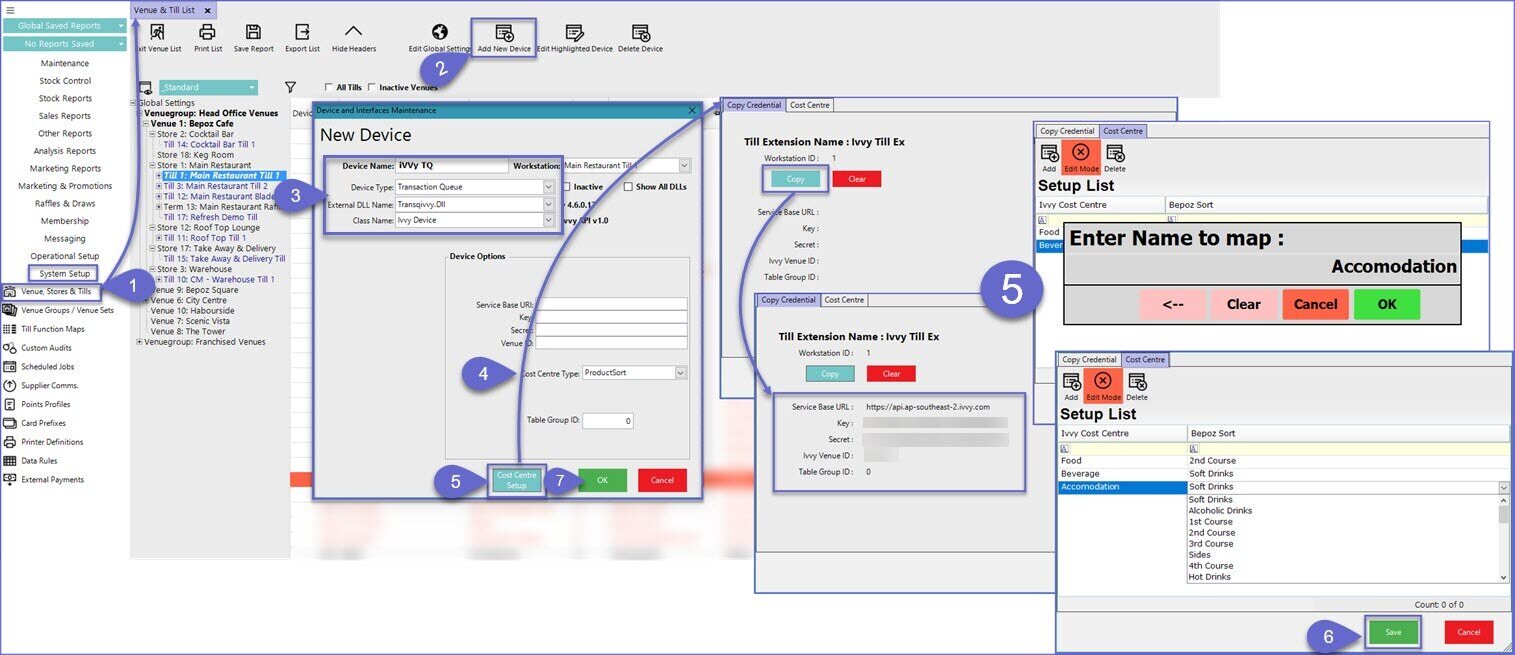
- Highlight the desired Till and click on the Add New Device button in the header; when prompted select 'Blank Device' and a New Device and Interfaces Maintenance window will open
- Enter a relevant Device Name, set the Device Type to 'Transaction Queue', the External DLL Name to 'Transqivvy.Dll', and the Class Name to 'Ivvy Device'
- Within the Device Options, use the Cost Centre Type drop-down to choose from Product Sort, Product Type, Product Sort Group, or Product Type Group
- These will be used when mapping iVvy Cost Centres to the corresponding Sort/Type within Bepoz
- Click the Cost Centre Setup button at the bottom of the window; this window is broken up into two (2) tabs:
- Copy Credential - use this tab to Copy the following information from the same Workstation's iVvy Till Extension:
- Service Base URL
- Key
- Secret
- iVvy Venue ID
- Table Group ID
- Cost Centre - use this tab to map iVvy Cost Centres to Bepoz Sorts/Types (this will depend on the Cost Centre Type selected in Step 4); these can be maintained using the Add, Edit, and Delete buttons at the top of the window
- When finished with Copying Credentials and Cost Centre Setup, click Save
- Click OK to save the Transaction Queue
- Navigate to the System Setup component in the sidebar, expand, and select Venue, Stores & Tills to open the Venue & Till List Tab
- Highlight the desired Till and click on the Add New Device button in the header; when prompted select 'Blank Device' and a New Device and Interfaces Maintenance window will open
- Enter a relevant Device Name, set the Device Type to 'Transaction Queue', the External DLL Name to 'Transqivvy.Dll', and the Class Name to 'Ivvy Device'
- Within the Device Options, use the Cost Centre Type drop-down to choose from Product Sort, Product Type, Product Sort Group, or Product Type Group
- These will be used when mapping iVvy Cost Centres to the corresponding Sort/Type within Bepoz
- Click the Cost Centre Setup button at the bottom of the window; this window is broken up into two (2) tabs:
- Copy Credential - use this tab to Copy the following information from the same Workstation's iVvy Till Extension:
- Service Base URL
- Key
- Secret
- iVvy Venue ID
- Table Group ID
- Cost Centre - use this tab to map iVvy Cost Centres to Bepoz Sorts/Types (this will depend on the Cost Centre Type selected in Step 4); these can be maintained using the Add, Edit, and Delete buttons at the top of the window
- When finished with Copying Credentials and Cost Centre Setup, click Save
- Click OK to save the Transaction Queue
iVvy External Payment Link
- To create & configure an iVvy External Payment Link, complete the following steps after logging into BackOffice:
- Navigate to the System Setup component in the sidebar, expand, and select Venue, Stores & Tills to open the Venue & Till List Tab
- Highlight the desired Till and click on the Add New Device button in the header; when prompted select 'Blank Device' and a New Device and Interfaces Maintenance window will open
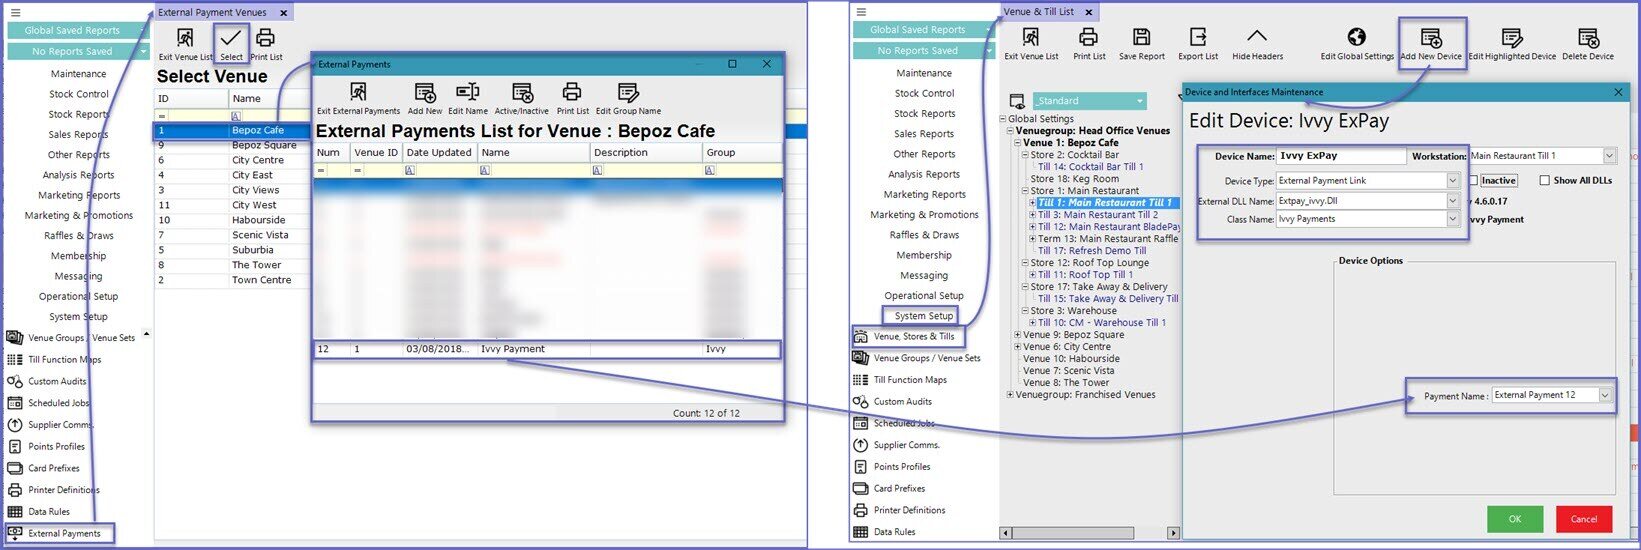
- Enter a relevant Device Name, set the Device Type to 'External Payment Link', the External DLL Name to 'Extpay_ivvy.Dll', and the Class Name to 'Ivvy Payments'
- Within the Device Options section, select the appropriate External Payment Name from the drop-down which was created to be used in conjunction with the iVvy External Payment Device
- This should be the same External Payment configured in the Till Extension
- NB: An External Payment Definition to be used specifically for iVvy will first need to be created in the BackOffice
External Payments component - Click OK to save the External Payment Link