
This article explains the procedure for implementing the integration to Tyro Connect.
Tyro Connect is a newer platform designed to supersede previous Tyro platforms and offers multiple integrated workflows:
-
Sales Sending
-
Aggregated Ordering
-
Bookings
However, for the purposes of this integration, Bepoz has only implemented the Sales Sending functionality at this time.
Prerequisites- To begin the implementation process, the Implementation Operator must have the following privileges enabled:
- Ability to use BackOffice
- Access to & maintenance of Venue, Stores & Tills
- Please note that the OpenTable integration is available as of the Bepoz release version 4.6.1.20+
Tyro Connect Transaction Queue Device
- Adding a Transaction Queue Device is required so that we can configure the necessary settings for the Sales Data to Send to Tyro as expected.
- For the initial activation during Device setup, we're able to request an authorization token to facilitate secure communication. Upon request, we will automatically retrieve the authorization token along with other required data.
- After the Transaction Queue Device is added and configured correctly, all sales data will be sent to the Tyro Connect Server
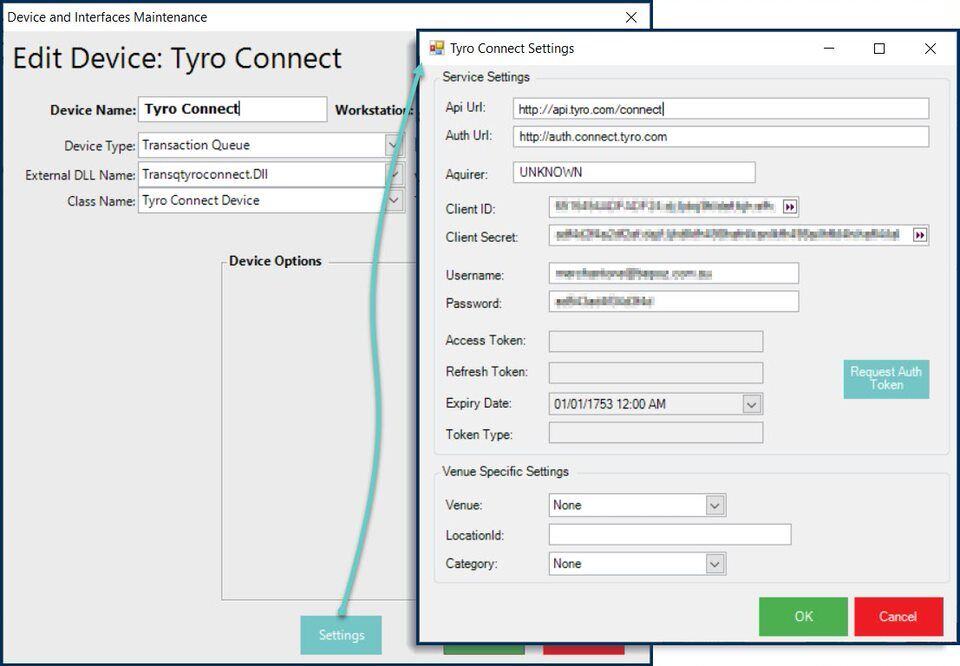
- After adding a New Device, enter a Device Name and then set it as follows:
- Device Type: Transaction Queue
- External DLL Name: Transqtyroconnect.Dll
- Class Name: Tyro Connect Device
- To access additional settings, click the "Settings" button at the bottom of the window
Tyro Connect Settings
- Service Settings
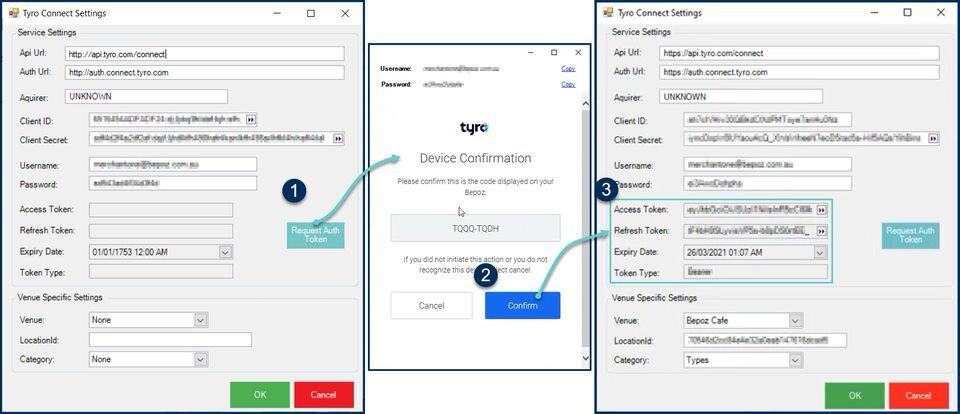
- These will be supplied by Tyro and most will be unique per Venue
| Field | Description |
| API URL | This is the base URL used to connect to Tyro: http://api.tyro.com/connect |
| Auth URL | This is the URL that is used to request the authorisation token: http://auth.connect.tyro.com |
| Acquirer |
This is an open text field for entering a label related to non-EFTPOS Payment Types All non-EFTPOS payments will be sent labeled as the text entered here It is recommended to be "UNKNOWN" |
| Client ID | This is provided by Tyro |
| Client Secret | This is provided by Tyro |
| Username | This is provided by Tyro |
| Password | This is provided by Tyro |
| Access Token | Leave blank; this will be retrieved automatically upon request (see below) |
| Refresh Token | Leave blank; this will be retrieved automatically upon request (see below) |
| Expiry Date | Leave blank; this will be retrieved automatically upon request (see below) |
| Token Type | Leave blank; this will be retrieved automatically upon request (see below) |
- After all Service Settings (except for the Access Token, Refresh Token, Expiry Date, and Token Type) click the 'Request Auth Token' button to connect to the Tyro server
- A pop-up window will display; click 'Confirm'
- The Access Token, Refresh Token, Expiry Date, and Token Type will be automatically retrieved
- Note: using the Refresh Token, Client ID & Secret, a new Access Token will be requested and automatically retrieved every 23 hours
Venue Specific Settings
| Field | Description |
| Venue |
For multi-venues, select the Venue which will be mapped to the location ID (below) which is used as an identifier by Tyro This is used to identify the Venue that has completed the Transaction; i.e. for a Table, where each Table is closed |
| LocationId | This is provided by Tyro |
| Category | Choose from either Types, TypeGroups, Sorts, or SortGroups; this determines which data categories are sent to Tyro |
- Once all settings are complete, save the Device and restart SmartController