Summary
This article explains how to set up a loyalty program, including earning and reward rules, as well as optional engagement and birthday rewards to boost customer loyalty and retention.
Step One
- Start by logging into the OOLIO Portal and selecting the Loyalty Application.

- Enable OOLIO Loyalty: Activate the program with a simple click of a button.
OOLIO Orders is required to be enabled before setting up Loyalty. To learn more about OOLIO Orders, select here;
- Edit Program Settings: Adjust settings at any time under the program settings.
- Customise Loyalty Name: Update the loyalty name to align with the venue.
- Add Logo and Brand Colors: Personalise with the store logo and brand colours.
- Customize Points Alias: Add a Points Alias for a more tailored experience.
- Program Description: Include a description to explain the loyalty program.
- Set Enrollment Page Slug: Create a URL for customer sign-ups and to view points balance.
- Note: Avoid changing the slug URL once set to prevent confusion.

Step Two
-
Locate Earning Rules: Under the Earning Rules section, there is a default rule that cannot be deleted.
-
Edit the Default Rule:
- If there is only one rule in place, it is recommended to edit this default rule rather than create a new one.
- To edit, click the pen icon next to the rule.
-
Create Additional Rules:
- If it is desired to have more than one earning rule, click the green plus icon to add a new rule.

-
Update Rule Name:
- Ensure the name of the earning rule matches the fields below
-
Assign to Specific Venue (if applicable):
- If a multi-venue setup is enabled, ensure the relevant location is selected where the earning rule will apply

-
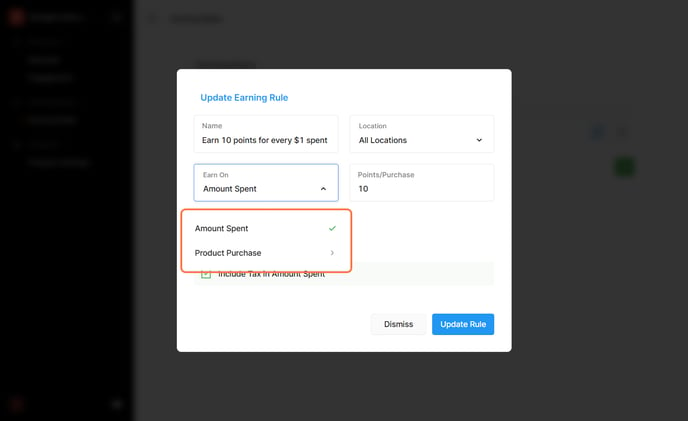
To create the rule itself select "Earn On":
- Choose between Product Purchase or Amount Spent.
-
Product Purchase:
- If Product Purchase is selected, customers will earn points based on the products that are purchased during the transaction.
-
Amount Spent:
- If Amount Spent is selected, customers will earn points based on the total amount spent in the transaction.
- Ensure Include Tax in Amount Spent is ticked.

- Once the rules have been set up, select Update Rule to finalise.
Step Three
-
Locate Rewards: Under the Rewards section, is a default reward that cannot be deleted.
-
Edit the Default Reward:
- If there is only one reward in place, it is recommended to edit this default reward rather than creating a new one.
- To edit, click the pen icon next to the rule.
-
Create Additional Rewards:
- If it is desired to have more than one reward, click the green plus icon to add a new reward.

- Rewards are set up with two components, details and limits.
-
Update Reward Name:
- Ensure the name of the Reward matches the fields below
-
Assign to Specific Venue (if applicable):
- If a multi-venue setup is enabled, ensure the relevant location is selected where the reward will apply
-
Select Reward Type:
- Under the Reward Type section, choose one of the following options:
-
Order Discount:
- This option allows the customer to redeem a preset value of points for a discount across their entire order.
-
Product Discount:
- With this option, the customer can redeem a preset value of points for a discount on selected products only.
-
Free Item:
- This option allows customers to redeem points for a free item from the list of configured products.
-
- Under the Reward Type section, choose one of the following options:

-
After filling out the reward details, there is the option to add limits to the reward customers can redeem:
- Select the Limits tab at the top of the pop-up
- Set Minimum Spend:
- Add a minimum spend to create rewards like "Spend over $100 to receive 10% off."
- Configure Redeemable Quantity/Order:
- Set limits on how many times a customer can redeem the same reward in one transaction or how many times they can earn the reward.
- Set Expiry:
- If the reward is time-sensitive, enable the Expiry option to set a limit on how long the reward is available.

- Once complete, select Update Reward. From here the earnings and rewards are complete and are now integrated into the POS and Online Store
Optional: Step Four
As an option, there is the ability to set up engagement rules to encourage customers to enrol in the program:- Sign-Up Reward:
- A sign-up reward can be created which a customer would receive upon sign-up, which can be configured just like regular rewards.
These rules are designed to encourage customer interaction and enrollment in the loyalty program.

- Birthday Reward:
- A birthday reward can be created which a customer would receive automatically and which can be redeem within the month of their birthday. This reward can be configured just like regular rewards.


