
-
End-User | Products & SmartPOS
-
End-User | Stock Control
-
End-User | Table Service and Kitchen Operations
-
End-User | Pricing, Marketing, Promotions & Accounts
- Prize Promotions
- Points, Points Profiles and Loyalty
- Product Promotions
- Repricing & Discounts in SmartPOS
- Vouchers
- Account Till Functions
- Pricing, Price Numbers and Price Modes
- Raffles & Draws
- Marketing Reports
- Accounts and Account Profiles
- Rewards
- SmartPOS Account Functions
- Troubleshooting
- Product Labels
- Packing Slips
-
End-User | System Setup & Admin
-
End-User | Reporting, Data Analysis & Security
-
End-User | Membership & Scheduled Billing
-
End-User | Operators, Operator Permissions & Clocking
-
Interfaces | Data Send Interfaces
-
Interfaces | EFTPOS & Payments
- NZ EFTPOS Interfaces
- Linkly (Formerly PC-EFTPOS)
- Adyen
- Tyro
- ANZ BladePay
- Stripe
- Windcave (Formerly Payment Express)
- Albert EFTPOS
- Westpac Presto (Formerly Assembly Payments)
- Unicard
- Manager Cards External Payment
- Pocket Voucher
- OneTab
- Clipp
- eConnect-eConduit
- Verifone
- AXEPT
- DPS
- Liven
- Singapore eWallet
- Mercury Payments TRANSENTRY
- Ingenico
- Quest
- Oolio - wPay
-
Interfaces | SMS & Messaging
-
Interfaces | Product, Pricing, Marketing & Promotions
- Metcash Loyalty
- Range Servant
- ILG Pricebook & Promotions
- Oolio Order Manager Integration
- Ubiquiti
- Product Level Blocking
- BidFood Integration
- LMG
- Metcash/IBA E-Commerce Marketplace
- McWilliams
- Thirsty Camel Hump Club
- LMG Loyalty (Zen Global)
- Doshii Integration
- Impact Data
- Marsello
- IBA Data Import
- Materials Control
- Last Yard
- Bepoz Standard Transaction Import
-
Interfaces | Printing & KDS
-
Interfaces | Reservation & Bookings
-
Interfaces | Database, Reporting, ERP & BI
-
Interfaces | CALink, Accounts & Gaming
- EBET Interface
- Clubs Online Interface
- Konami Interface
- WIN Gaming Interface
- Aristocrat Interface
- Bally Interface
- WorldSmart's SmartRetail Loyalty
- Flexinet & Flexinet SP Interfaces
- Aura Interface
- MiClub Interface
- Max Gaming Interface
- Utopia Gaming Interface
- Compass Interface
- IGT & IGT Casino Interface
- MGT Gaming Interface
- System Express
- Aristocrat nConnect Interface
- GCS Interface
- Maxetag Interface
- Dacom 5000E Interface
- InnTouch Interface
- Generic & Misc. CALink
-
Interfaces | Miscellaneous Interfaces/Integrations
-
Interfaces | Property & Room Management
-
Interfaces | Online Ordering & Delivery
-
Interfaces | Purchasing, Accounting & Supplier Comms
-
SmartPOS | Mobile App
-
SmartPDE | SmartPDE 32
-
SmartPDE | Denso PDE
-
SmartPDE | SmartPDE Mobile App
-
MyPlace
-
MyPlace | myPLACE Lite
-
MyPlace | Backpanel User Guides
- Bepoz Price Promotions
- What's on, Events and tickets
- Staff
- System Settings | Operational Settings
- Vouchers & Gift Certificates
- Member Onboarding
- Members and memberships
- System Settings | System Setup
- Reports and Reporting
- Actions
- Offers | Promotions
- Messaging & Notifications
- System Settings | App Config
- Surveys
- Games
- User Feedback
- Stamp Cards
-
MyPlace | Integrations
-
MyPlace | FAQ's & How-2's
-
MyPlace | Release Notes
-
YourOrder
-
YourOrders | Backpanel User Guides
-
YourOrders | YourOrder Kiosk User Guide
-
YourOrders | Merchant App User Guide
-
WebAddons
-
Installation / System Setup Guides
- SmartPOS Mobile App | Setup
- SmartPOS Mobile App | SmartAPI Host Setup
- SmartPOS Mobile App | BackOffice Setup
- SmartPOS Mobile App | Pay@Table setup
- SmartKDS Setup 4.7.2.7 +
- SmartKDS Setup 4.6.x
- SQL Installations
- Server / BackOffice Installation
- New Database Creation
- Multivenue Setup & Config.
- SmartPOS
- SmartPDE
- Player Elite Interface | Rest API
- Interface Setups
- Import
- KDSLink
- Snapshots
- Custom Interface Setups
-
HOW-2
- Product Maintenance
- Sales and Transaction Reporting
- SmartPOS General
- Printing and Printing Profiles
- SQL
- Repricing & Discounts
- Stock Control
- Membership
- Accounts and Account Profiles
- Miscellaneous
- Scheduled Jobs Setups
- Backoffice General
- Purchasing and Receiving
- Database.exe
- EFTPOS
- System Setup
- Custom Support Tools
-
Troubleshooting
-
Hardware
2 | Accounts Flow BackOffice Setup
Following on from the Accounts Flow Product Summary Page, the setup guide in thi
Following on from the Accounts Flow Product Summary Page, the setup guide in this article covers the integration configuration requirements to be setup in BackOffice.Prerequisites
- Minimum Bepoz version of 4.6 and onwards
- To setup Accounts Flow, the applicable Operator Privileges will need to be enabled
-
Operator Maintenance 'General' Tab - System Setup: "Maintain Supplier Comms" Flag
-
Operator Maintenance 'Maintenance' Tab - Suppliers: "View Suppliers" Flag
- Suppliers: "Create New Suppliers" Flag
- Suppliers: "Edit Suppliers" Flag
Accounts Flow BackOffice Setup
Supplier Setup
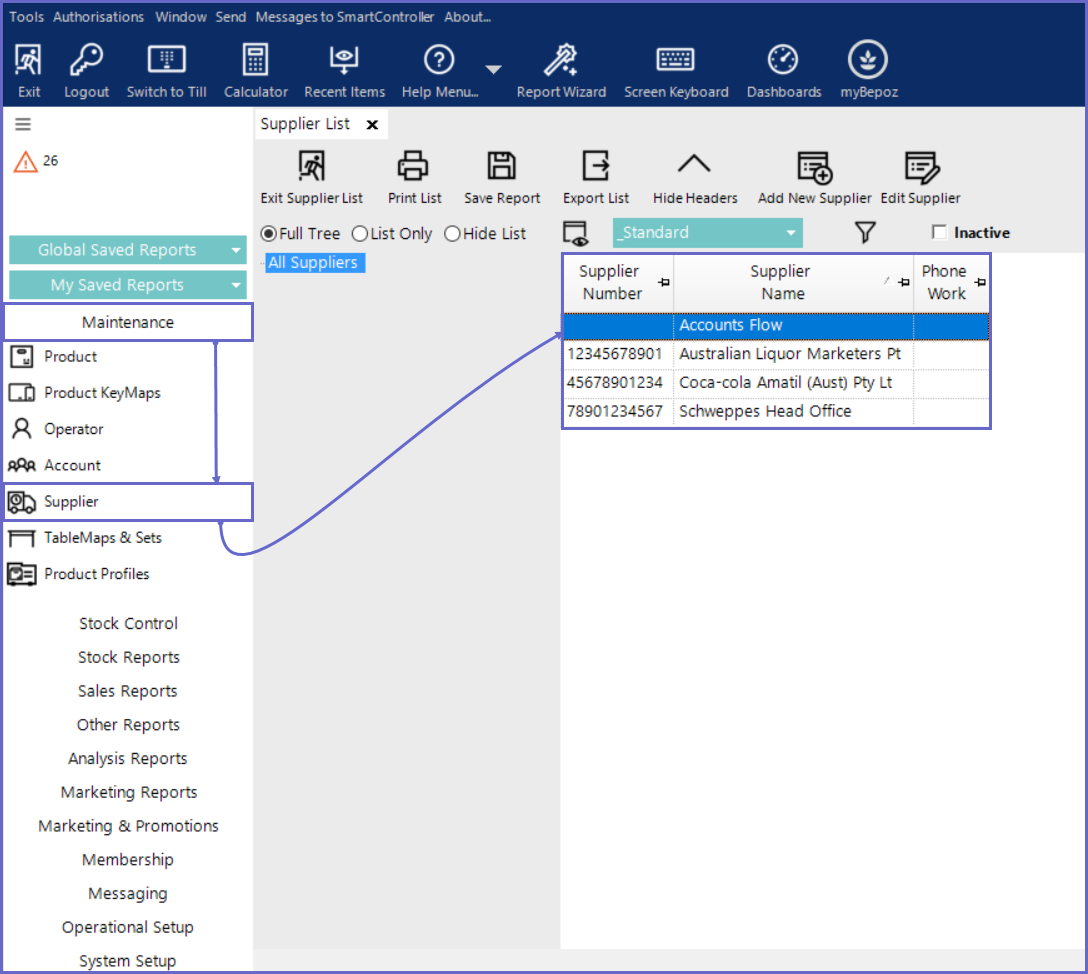
- To begin Supplier setup for this integration in BackOffice, begin by navigating to the Maintenance component in the sidebar menu and select 'Supplier' to open the list of Suppliers
- Select the desired Supplier within the Supplier list & make sure to enter the ABN number (no spaces) for their Supplier Number; e.g., Supplier ALM: Supplier Number 12345678912
- Repeat for all additional required Suppliers in the Supplier List
- The next step is to add a Supplier to the Supplier List called 'Accounts Flow', but without specifying a Supplier Number
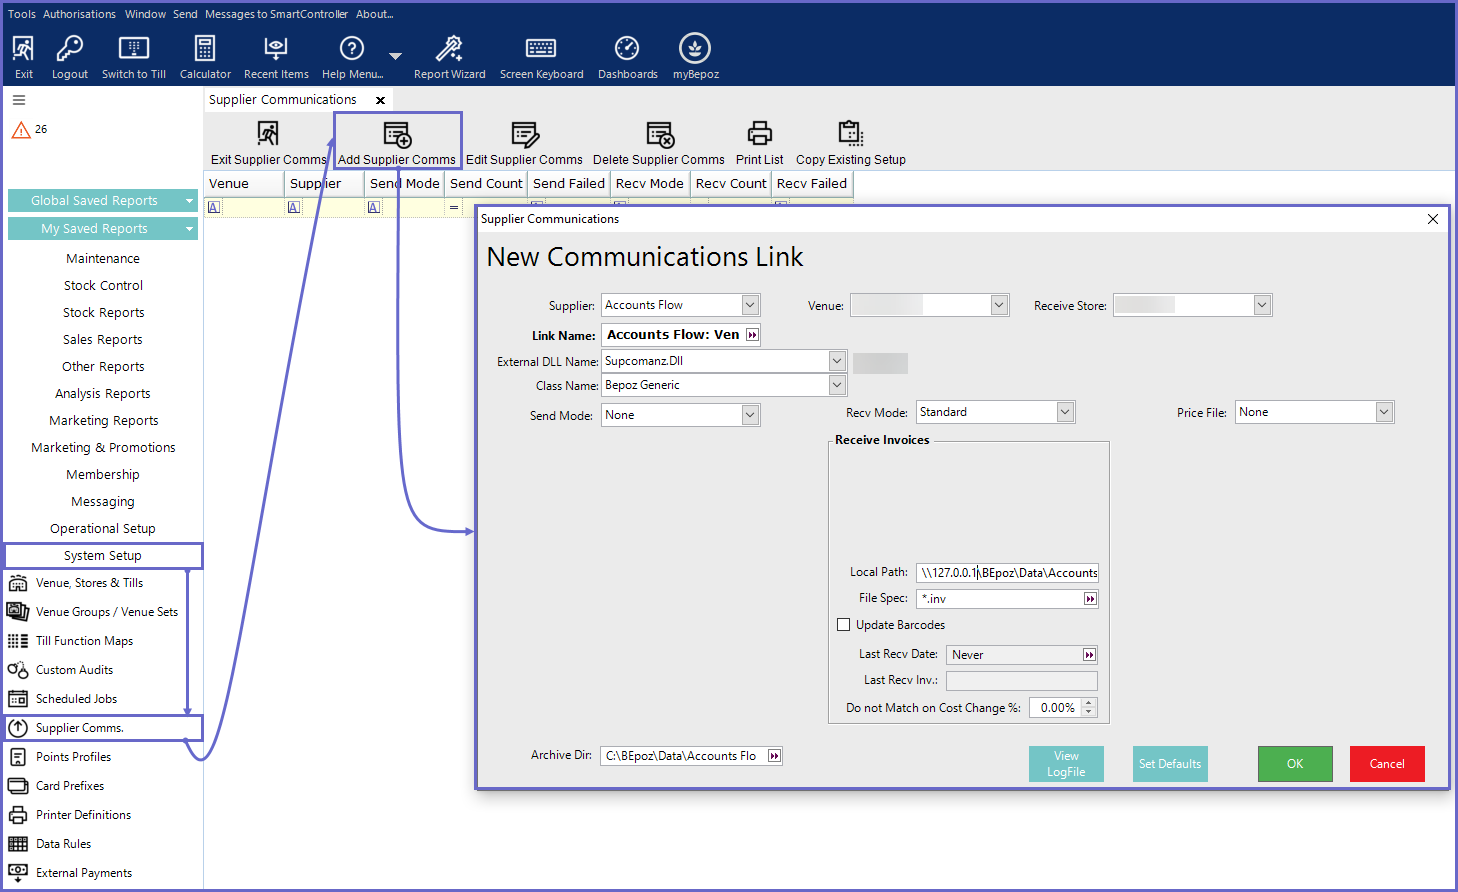
Supplier Comms Setup
- Next is to configure the Supplier Comms portion of the setup - navigate to System Setup component in the sidebar menu and select 'Supplier Comms.'
- Click on the 'Add Supplier Comms' button to add a New Supplier Communication for Accounts Flow
- The 'New Communication Link' dialog box will appear and must be filled accordingly:
- Supplier: Select 'Accounts Flow' supplier created in the above step
- Venue: Select the Venue to connect Accounts Flow to
- Note: If running a multi-venue environment and wanting to connect Accounts Flow to each Venues, a separate Supplier Comms must be set up for each
- Receive Store: This is the default inward Store for stock
- Link Name: This is filled automatically once the Supplier is selected
- External DLL Name: Supcomanz.Dll
- Class Name: Bepoz Generic
- Send Mode: None
- Receive Mode: Standard
- Local Path: The Local Path name is automatically generated by Bepoz
- This needs to be changed
- The path name will be \\[HO Server IP Address]\Bepoz\data\Accounts Flow\import; e.g., \\127.0.0.1\Bepoz\data\Accounts Flow\import
- File Spec: *.inv
- Update Barcodes: If ON, when any product is received that also has barcode data with it, these barcodes will be added to Bepoz
- Do not Match on Cost Change %: This is the percentage that a Product's Price is multiplied by to get the Points required to purchase the product
- Archive Dir: An Archive Location must be configured to allow the imported file to be deleted
- Price File Mode: None
Accounts Flow Setup Articles
- To complete the setup of the Accounts Flow integration, follow & execute the articles provided in the given chronological order:
-
Accounts Flow BackOffice Setup (this one) -
Accounts Flow Flow Downloader Setup