-
End-User | Products & SmartPOS
-
End-User | Stock Control
-
End-User | Table Service and Kitchen Operations
-
End-User | Pricing, Marketing, Promotions & Accounts
- Prize Promotions
- Points, Points Profiles and Loyalty
- Product Promotions
- Repricing & Discounts in SmartPOS
- Vouchers
- Account Till Functions
- Pricing, Price Numbers and Price Modes
- Raffles & Draws
- Marketing Reports
- Accounts and Account Profiles
- Rewards
- SmartPOS Account Functions
- Troubleshooting
- Product Labels
- Packing Slips
-
End-User | System Setup & Admin
-
End-User | Reporting, Data Analysis & Security
-
End-User | Membership & Scheduled Billing
-
End-User | Operators, Operator Permissions & Clocking
-
Interfaces | Data Send Interfaces
-
Interfaces | EFTPOS & Payments
- NZ EFTPOS Interfaces
- Linkly (Formerly PC-EFTPOS)
- Adyen
- Tyro
- ANZ BladePay
- Stripe
- Windcave (Formerly Payment Express)
- Albert EFTPOS
- Westpac Presto (Formerly Assembly Payments)
- Unicard
- Manager Cards External Payment
- Pocket Voucher
- OneTab
- Clipp
- eConnect-eConduit
- Verifone
- AXEPT
- DPS
- Liven
- Singapore eWallet
- Mercury Payments TRANSENTRY
- Ingenico
- Quest
- Oolio - wPay
-
Interfaces | SMS & Messaging
-
Interfaces | Product, Pricing, Marketing & Promotions
- Metcash Loyalty
- Range Servant
- ILG Pricebook & Promotions
- Oolio Order Manager Integration
- Ubiquiti
- Product Level Blocking
- BidFood Integration
- LMG
- Metcash/IBA E-Commerce Marketplace
- McWilliams
- Thirsty Camel Hump Club
- LMG Loyalty (Zen Global)
- Doshii Integration
- Impact Data
- Marsello
- IBA Data Import
- Materials Control
- Last Yard
- Bepoz Standard Transaction Import
-
Interfaces | Printing & KDS
-
Interfaces | Reservation & Bookings
-
Interfaces | Database, Reporting, ERP & BI
-
Interfaces | CALink, Accounts & Gaming
- EBET Interface
- Clubs Online Interface
- Konami Interface
- WIN Gaming Interface
- Aristocrat Interface
- Bally Interface
- WorldSmart's SmartRetail Loyalty
- Flexinet & Flexinet SP Interfaces
- Aura Interface
- MiClub Interface
- Max Gaming Interface
- Utopia Gaming Interface
- Compass Interface
- IGT & IGT Casino Interface
- MGT Gaming Interface
- System Express
- Aristocrat nConnect Interface
- GCS Interface
- Maxetag Interface
- Dacom 5000E Interface
- InnTouch Interface
- Generic & Misc. CALink
-
Interfaces | Miscellaneous Interfaces/Integrations
-
Interfaces | Property & Room Management
-
Interfaces | Online Ordering & Delivery
-
Interfaces | Purchasing, Accounting & Supplier Comms
-
SmartPOS | Mobile App
-
SmartPDE | SmartPDE 32
-
SmartPDE | Denso PDE
-
SmartPDE | SmartPDE Mobile App
-
MyPlace
-
MyPlace | myPLACE Lite
-
MyPlace | Backpanel User Guides
- Bepoz Price Promotions
- What's on, Events and tickets
- Staff
- System Settings | Operational Settings
- Vouchers & Gift Certificates
- Member Onboarding
- Members and memberships
- System Settings | System Setup
- Reports and Reporting
- Actions
- Offers | Promotions
- Messaging & Notifications
- System Settings | App Config
- Surveys
- Games
- User Feedback
- Stamp Cards
-
MyPlace | Integrations
-
MyPlace | FAQ's & How-2's
-
MyPlace | Release Notes
-
YourOrder
-
YourOrders | Backpanel User Guides
-
YourOrders | YourOrder Kiosk User Guide
-
YourOrders | Merchant App User Guide
-
WebAddons
-
Installation / System Setup Guides
- SmartPOS Mobile App | Setup
- SmartPOS Mobile App | SmartAPI Host Setup
- SmartPOS Mobile App | BackOffice Setup
- SmartPOS Mobile App | Pay@Table setup
- SmartKDS Setup 4.7.2.7 +
- SmartKDS Setup 4.6.x
- SQL Installations
- Server / BackOffice Installation
- New Database Creation
- Multivenue Setup & Config.
- SmartPOS
- SmartPDE
- Player Elite Interface | Rest API
- Interface Setups
- Import
- KDSLink
- Snapshots
- Custom Interface Setups
-
HOW-2
- Product Maintenance
- Sales and Transaction Reporting
- SmartPOS General
- Printing and Printing Profiles
- SQL
- Repricing & Discounts
- Stock Control
- Membership
- Accounts and Account Profiles
- Miscellaneous
- Scheduled Jobs Setups
- Backoffice General
- Purchasing and Receiving
- Database.exe
- EFTPOS
- System Setup
- Custom Support Tools
-
Troubleshooting
-
Hardware
3 | Adyen - BackOffice Setup (4.7.2.2+)
Adyen BackOffice Setup allows users to understand the various steps required in order to setup the Adyen device so that it is connected to SmartPOS to accept EFTPOS payments.
Adyen BackOffice Setup allows users to understand the various steps required in order to setup the Adyen device so that it is connected to SmartPOS to accept EFTPOS payments.Prerequisites
- Minimum Bepoz version of 4.7.2.3 and above
- To setup Adyen within BackOffice, the applicable Operator Privileges will need to be enabled
-
Operator Maintenance 'General' Tab - General Settings: "Use BackOffice" Flag
- System Setup: "Access Venue, Stores & Tills" Flag
- System Setup: "Maintain Venue, Stores & Tills" Flag
Adyen EFTPOS Device
- Complete the following steps to set up the Adyen EFTPOS Device:
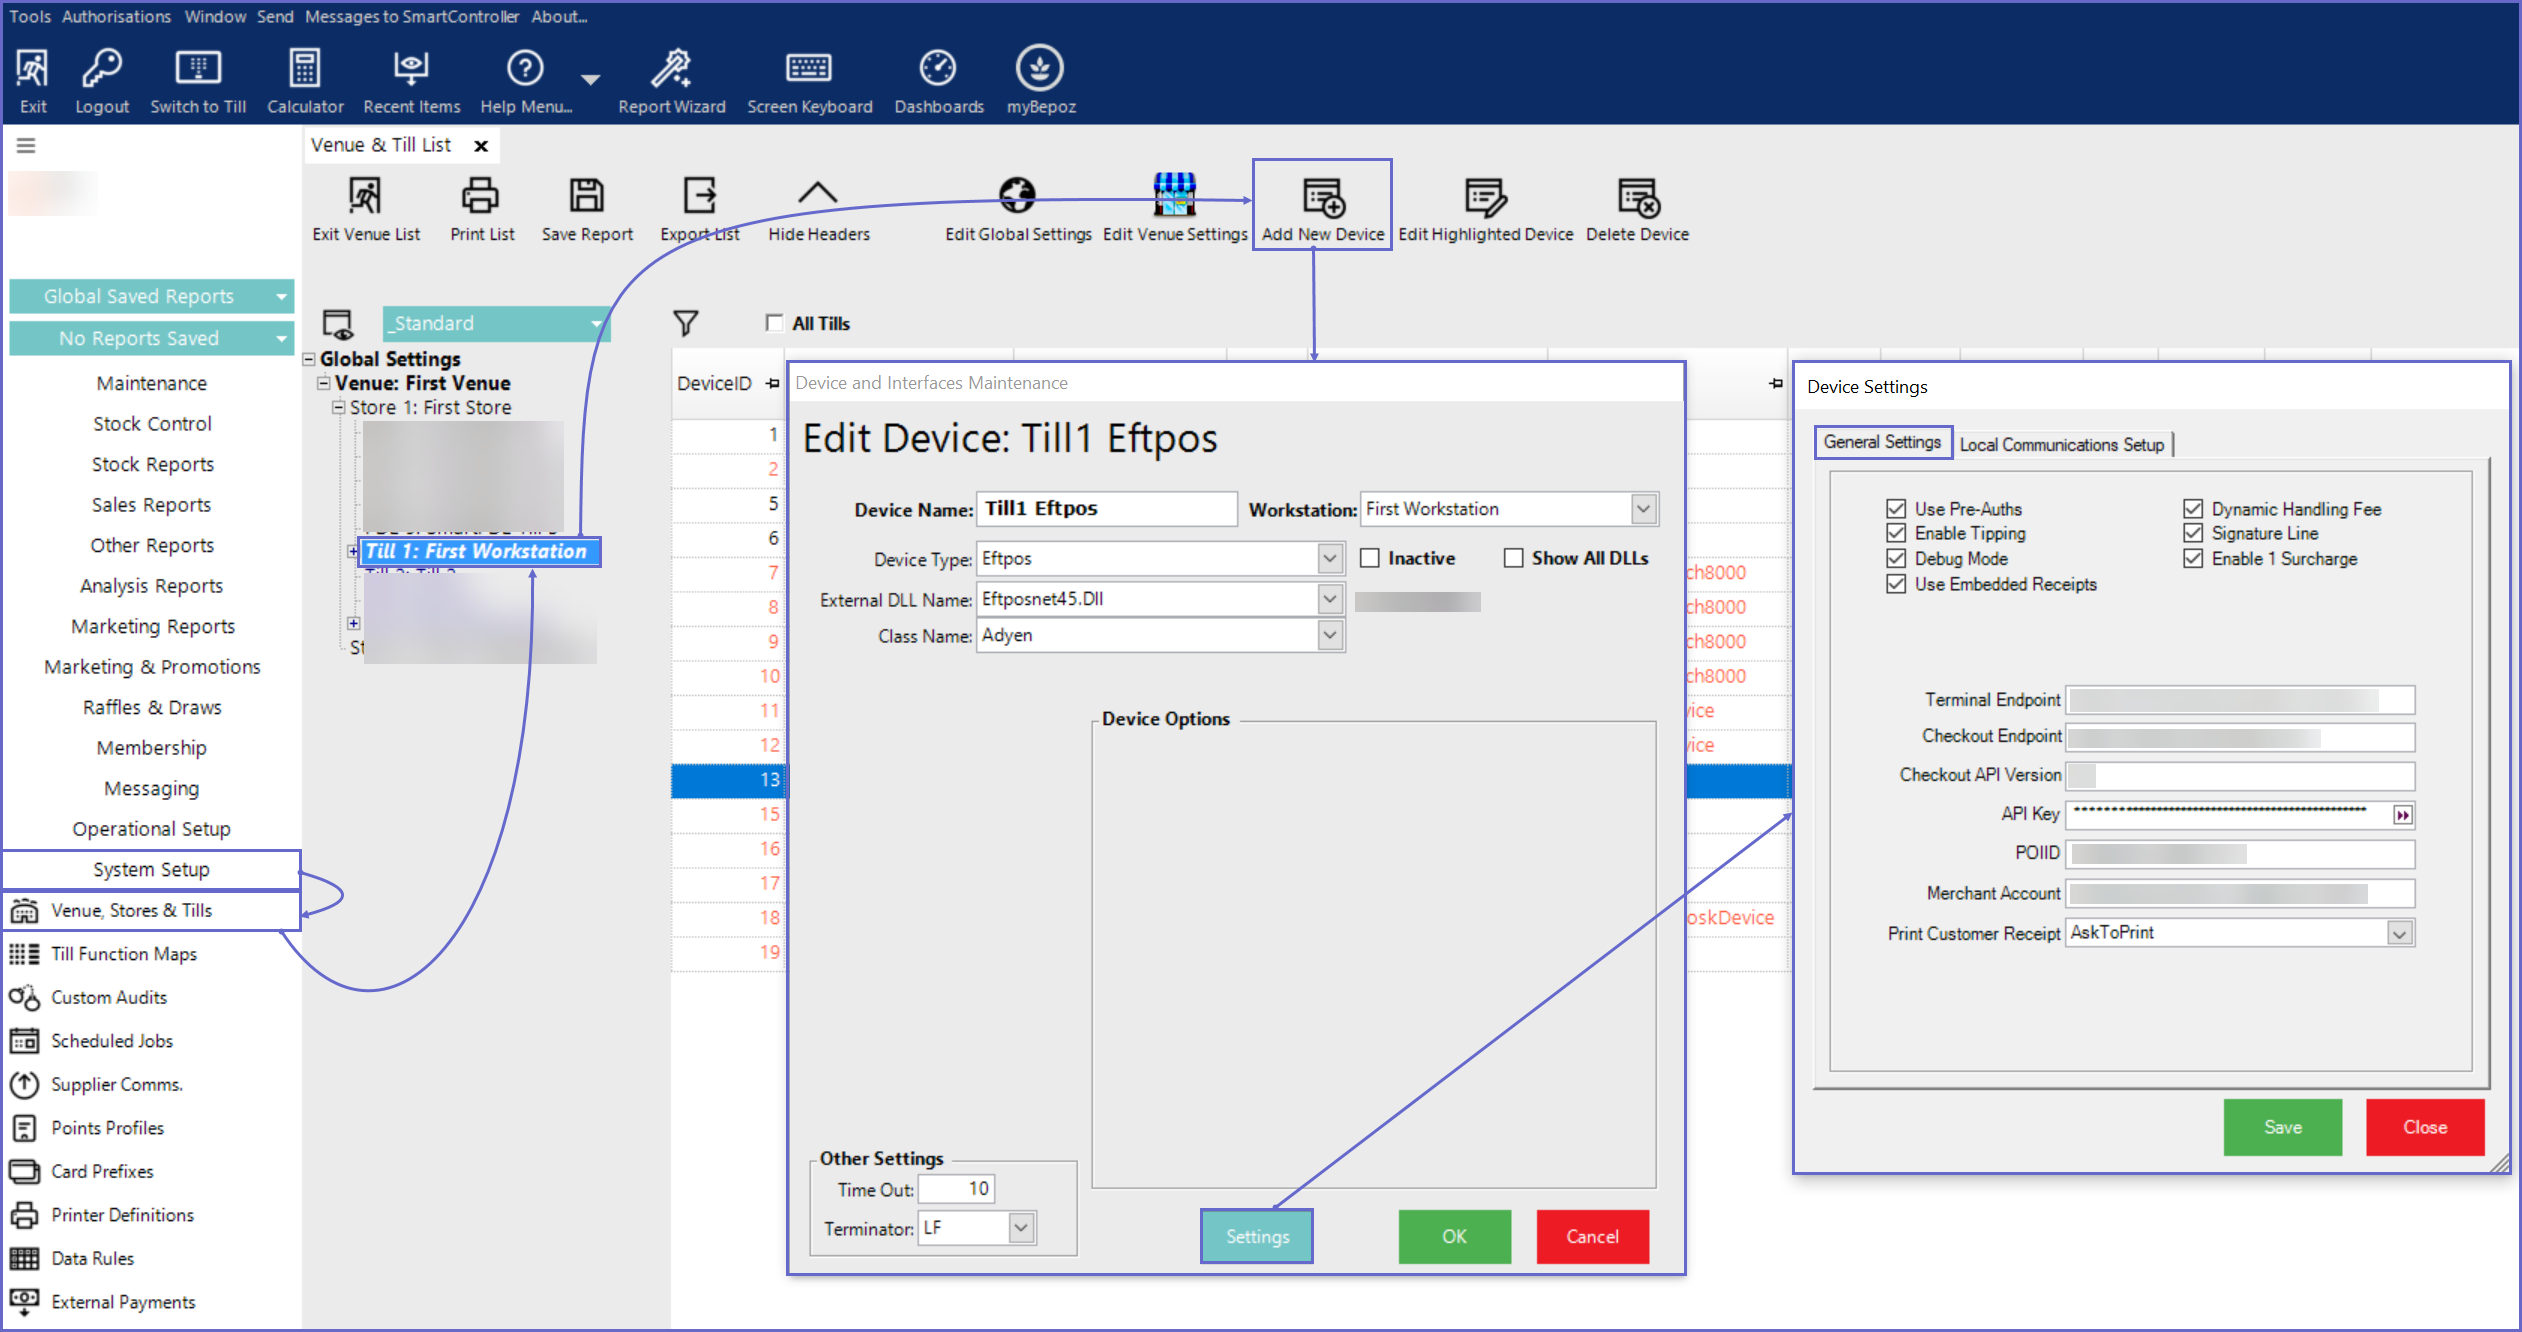
- Go to the System Setup tab from the side menu and select 'Venue, Stores & Till'
- Select the desired Till within the desired Store within the desired Venue where the Adyen EFTPOS device will be connected to
- Click on 'Add New Device' and a Device and Interfaces Maintenance screen pops up, fill in with the following details:
- Device Name: As desired
- Device Type: Eftpos
- External DLL Name: Eftposnet45.Dll
- Class Name: Adyen
- Settings
- Clicking on the Settings button displays the Device Options dialog box which contains both General Settings and Local Communications Setup; both General Settings and Local Communications Setup are explained below:
- General Settings:
- Use Pre-Auths:
- ON: When the flag is enabled, the Pre-auth on table transactions are allowed
- OFF: When the flag is disabled, the Pre-auth on table transactions are not allowed
- Dynamic Handling:
- ON: When the flag is enabled, EPTFOS terminal dynamic handling fees are accepted within Bepoz
- OFF: When the flag is disabled, EFTPOS terminal dynamic handling fees are not accepted within Bepoz
- Enable Tipping:
- ON: When the flag is enabled, this will allow tipping through the EFTPOS device
- OFF: When the flag is enabled, this will not allow tipping through the EFTPOS device
- Signature Line:
- ON: When the flag is enabled, the signature line will be included in the Merchant receipt
- OFF: When the flag is disabled, the signature line will not be included in the Merchant receipt
- Debug Mode:
- ON: When the flag is enabled, requests and responses sent to the API are logged and saved in a file
- OFF: When the flag is disabled, requests and responses sent to the API are not logged
- Enable 1 Surcharge:
- ON: When the flag is enabled, the POS handling fee is applied, and terminal surcharge will not apply
- If there is no POS handling fee, a terminal surcharge may apply
- OFF: When the flag is enabled, both the POS handling fee and Terminal surcharge can be applied to the transaction
- Use Embedded Receipts:
- ON: When the flag is enabled, the receipt is printed on terminal
- OFF: When the flag is disabled, the receipt is printed on the Till's printer
- Card Present Refunds Only:
- ON: When the flag is enabled,
- Terminal Endpoint: Provided by Oolio
- Note: The current default API Terminal Endpoint for Adyen is 'https://terminal-api-test.adyen.com/sync'
- Checkout Endpoint: Provided by Oolio
- Note: The current default Checkout endpoint for Adyen is 'https://checkout-test.adyen.com'
- Checkout API Version: Adyen API version
- Note: The current default API version for Adyen is '68'
- API Key: Provided by Oolio
- Note: The API Key is masked when entered
- POIID: Combination of (Terminal Model name - Serial number) e.g. V400cPlus-XXXXXXXXX
- Note: Please note that the POIID value is case sensitive
- Merchant Account: Provided by Oolio
- Print Customer Receipt: This option is to print the customer receipts; the operator can select any one option from the dropdown list
- DoNotPrint: When this option is selected, the customer receipt is not printed
- PrintAutomatically: When this option is selected, the customer receipt is automatically printed out
- AskToPrint: When this option is selected, the operator will be prompted & asked if they want to print the customer receipt
- Based on the prompt options, the operator can either opt to print or reject not to print
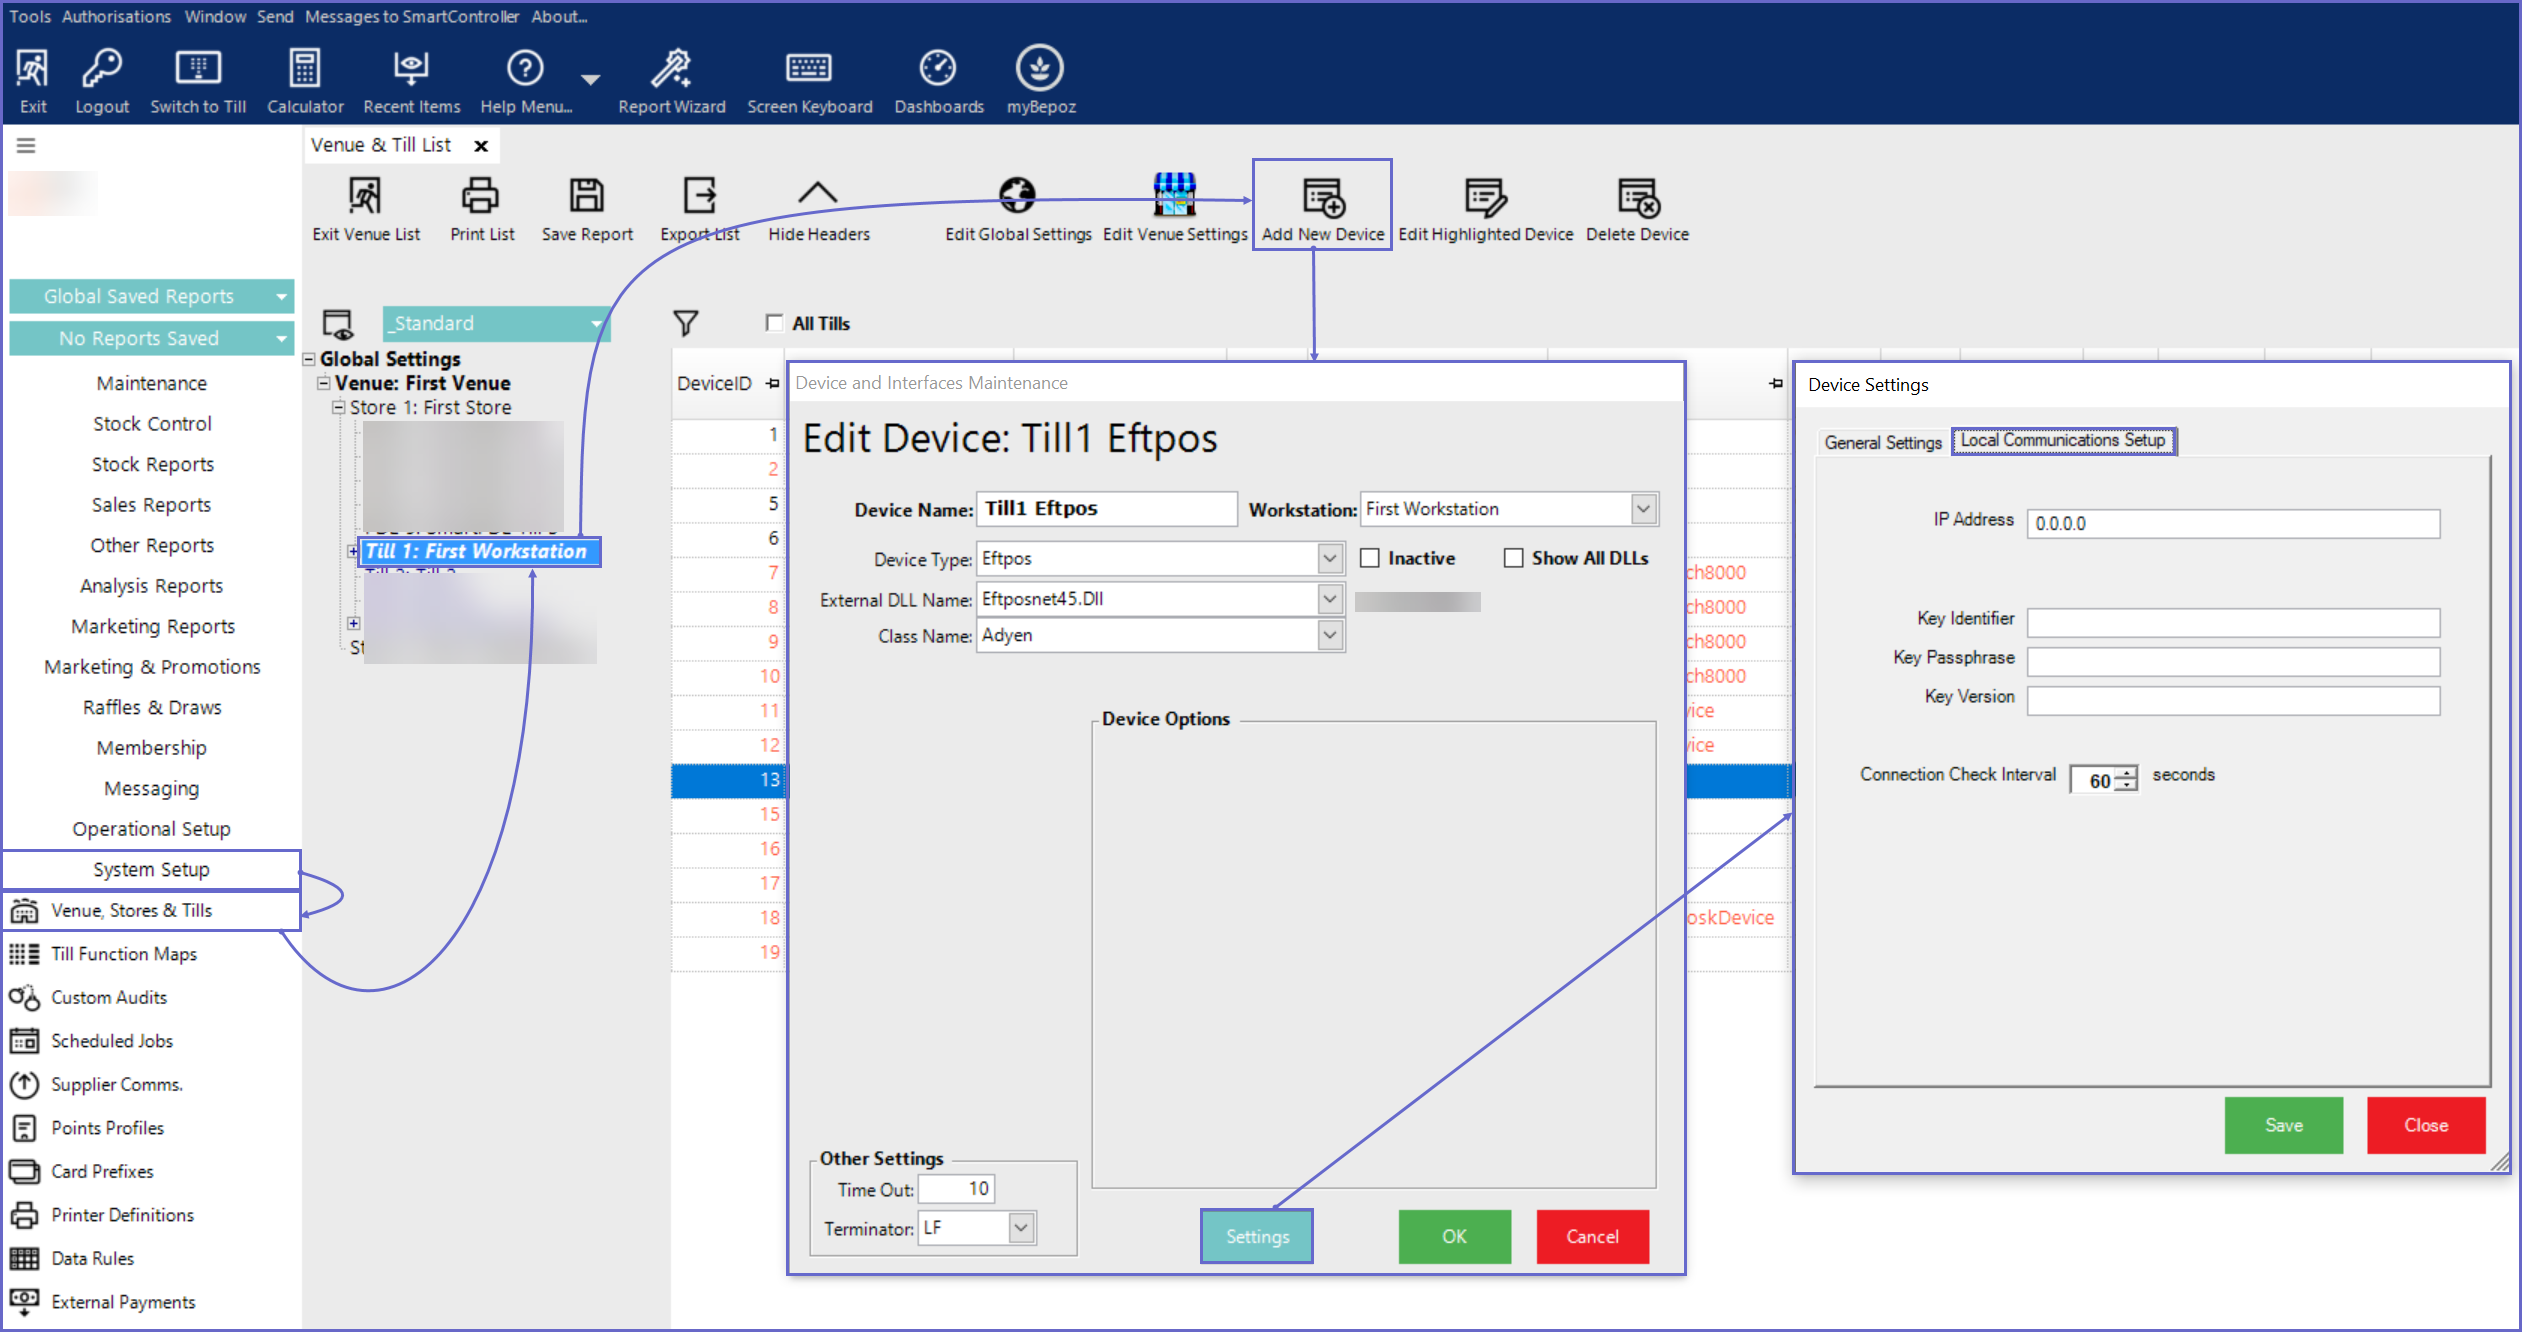
- Local Communications Setup:
- IP Address: The IP Address of the terminal
- Key Identifier: Key Identifier set in Terminal Settings in the Adyen portal
- Key Passphrase: Key Passphrase set in Terminal Settings in the Adyen portal
- Key Version: Key Version is set in Terminal Settings in the Adyen portal
- Connection Check Interval: Connection Check Interval in seconds


- Click OK to save the Device
- Repeat these steps for all required Tills
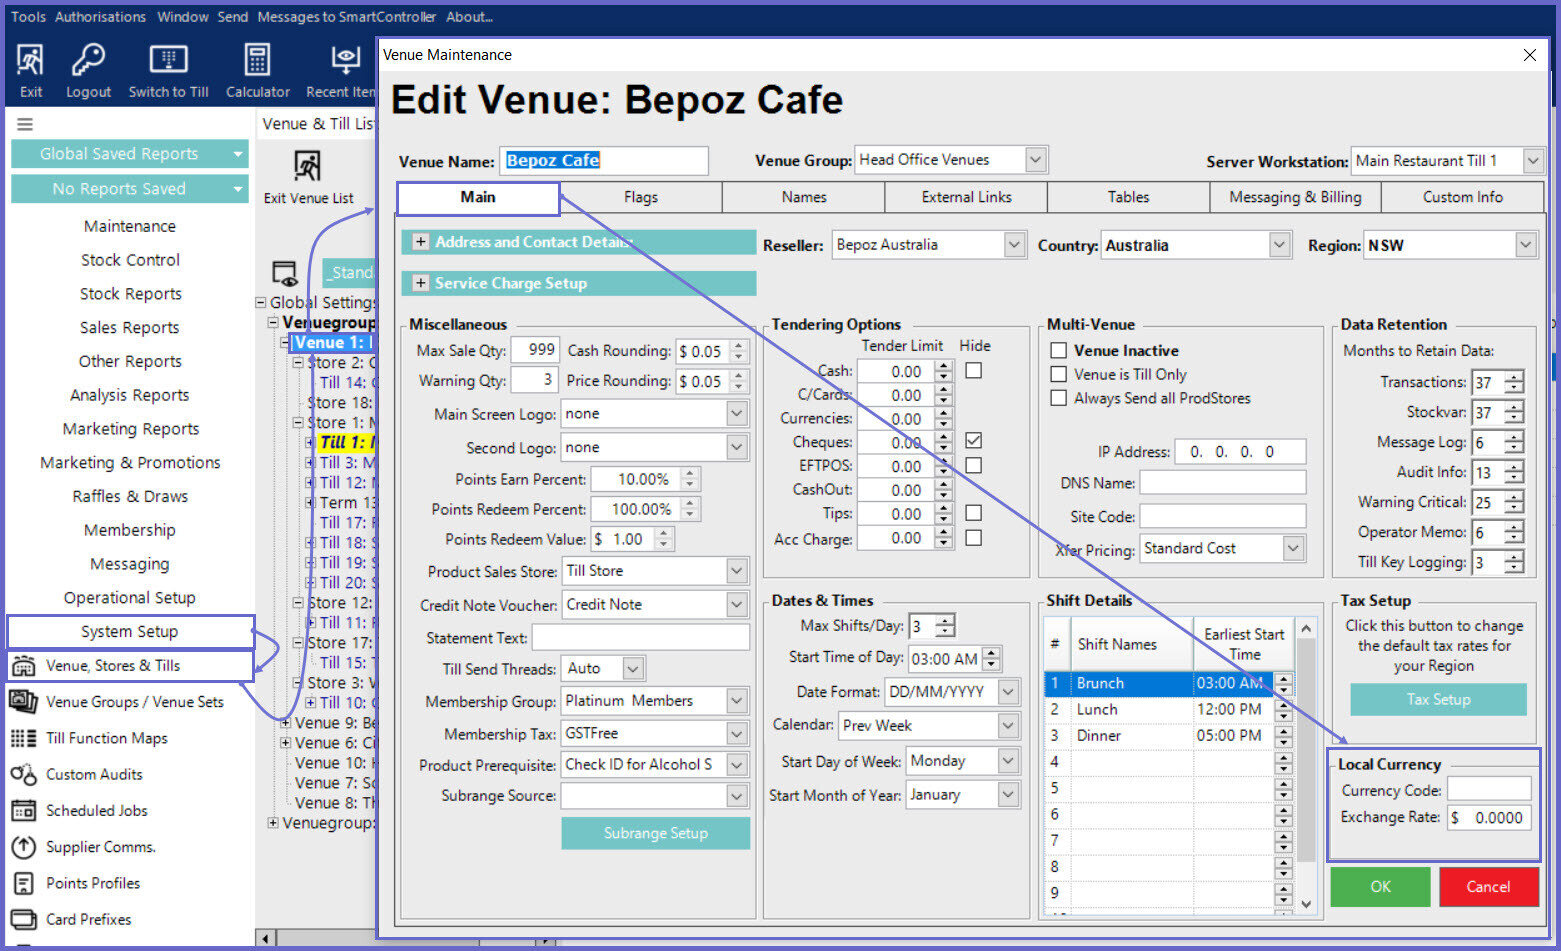
- Note: By default, the Adyen device configured sends payment request using 'AUD' as a country code
- However, if the Adyen interface being used in any other demographic other than Australia, please set the 'Currency code' under the 'Local Currency' settings within Venue Maintenance -->'Main' tab
- On how to set a Currency code, please click
here

