
This article outlines how to setup Bematech hardware and software.
This article outlines how to setup Bematech hardware and software.
This user manual details the KitchenGo Premium KDS Solution including:
- System Overview
- LS8000 Hardware Setup & Installation
- Software settings & configurations
Prerequisites
N/A

KitchenGo Premium
KitchenGo Premium
Kitchen Display System
User Manual 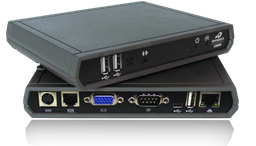
 Ver 1.0
KitchenGo Premium KDS Solution
KitchenGo Premium is an innovative Kitchen Display Solution – the next generation of kitchen printers - that helps automatically distributes the orders from the front POS systems to the back kitchen stations (display the orders on the station's screens and/or print the orders as well). Kitchen staff can easily operate the orders (bump, unbump, show summary, and so on). It helps the kitchen staff to do their job effectively and update the front POS staff of where any particular order is in the cooking process can help a busy restaurant to manage this process more efficiently.
Worrying less about your kitchen printers running out paper and with live order display in the kitchen allows your kitchen staff focus their attention on food preparation that enhance food preparing processor.
System Overview
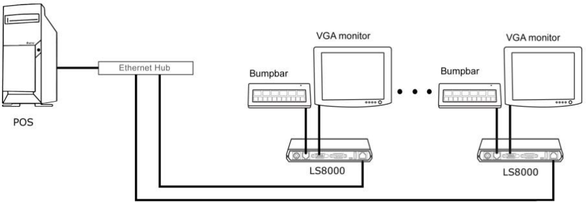
The KitchenGo Premium Kitchen Display System consist of the following:
- LS8000 KDS Station Controller with Android
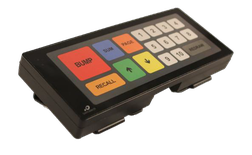
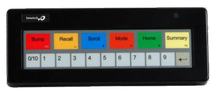
- KB9000/KB1700 bump bar
- VGA monitor / Touch monitor
- KitchenGo Premium Android App
Th KitchenGo Premium Android App is pre-installed in the LS8000 to provide operational features of the kitchen display system. Orders are transmitted from the POS stations to KitchenGo Premium through Ethernet network connection and displayed on the VGA monitor. Either a bump bar (KB9000/KB1700) or touch monitor (LE1015/LE1015W) can be used to control operations of the stations. Printers (LR2000) can also be connected to the LS8000 units to print out tickets in the kitchen for dispatching with the food items.
Hardware Setup
Remove the LS8000 from its box and follow LS8000 Installation Guide to set up the LS8000 in your environment and connect the hardware.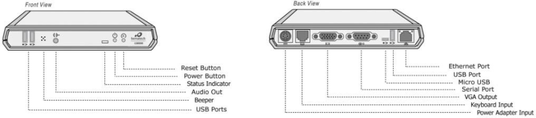
Connect the Bumpbar to the LS8000 using either PS/2 (RJ11 connector) or USB connection depend on your Bumpbar connection type.
Connect VGA monitor to LS8000 VGA output.
If touch monitor operation is desired, connect the LE1015/LE1015W monitor VGA input to the LS8000 VGA output and connect USB cable between touch monitor and LS8000 USB connectors. USB mouse and USB keyboard are recommended for application installation and setup if touch monitor is not used. If necessary, connect the ticket printer to the LS8000 using either Serial or USB connection; you may also connect the printer to the Ethernet router if the printer has an Ethernet connection;
Note:
Refer to "Printer setting", "Bumpbar setting" for information on how to setup the printer and the Bumpbar.
For USB printer, only Bematech LR2000 is supported.
KitchenGo Premium Installation
The KitchenGo Premium KDS and KitchenGo Premium Router software app are pre-installed in the LS8000 hardware, therefore you don't need to do any extra installation unless an update is required.
Manual Installation / Update
KitchenGo Premium comes with 2 app: KitchenGo Premium KDS and KitchenGo Premium Router. KitchenGo Premium can have two different setups: 1) KitchenGo Premium KDS + KitchenGo Premium router; 2) only KitchenGo Premium KDS. Please check with POS software support on which setup your system will be.
Below are steps to install/update KitchenGo Premium:
- Put the KitchenGo Premium KDS.apk & KitchenGo Premium Router.apk into a USB flash drive;
- Connect the USB flash drive to the LS8000;
- Go to the desktop of LS8000 and click
 ;
; - Click "USB Storage" and navigate to the path where you store the app;
- Click the app you want to install and follow the screen to finish.
KitchenGo Premium - KitchenGo Premium KDS
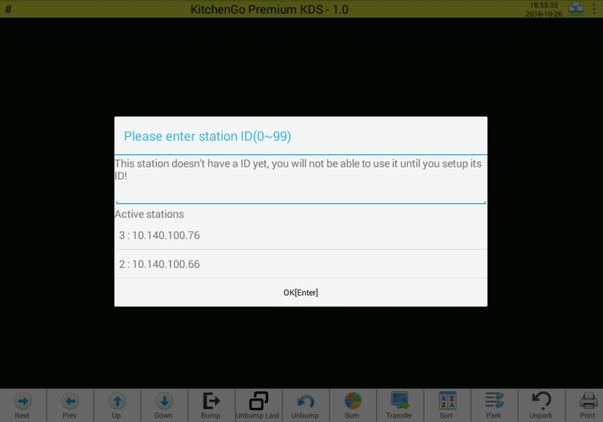
KitchenGo Premium KDS is the main app that display all your kitchen orders, there are various options in setting that enrich your order display by allowing you to change font/color/highlight of the display and orders. When you open the KDS first time, it will ask you to input a unique station ID(you can also change this ID later). If there are other stations available, it will show under Active stations list:
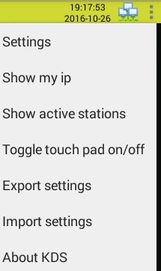
Settings
Settings: Go to KitchenGo Premium KDS settings
Show my IP: Display the IP address of LS8000
Show active stations: Display a list of active stations
Toggle Touch pad: Show/Hide on screen touch buttons
Export settings: Exporting KitchenGo Premium KDS's settings&database, easiest way for duplicate setting (E.G.: order screen setting) on a chain store without going through all the setup again
Import settings: Importing setting&database from selected location
About KDS: Display current KitchenGo Premium KDS version
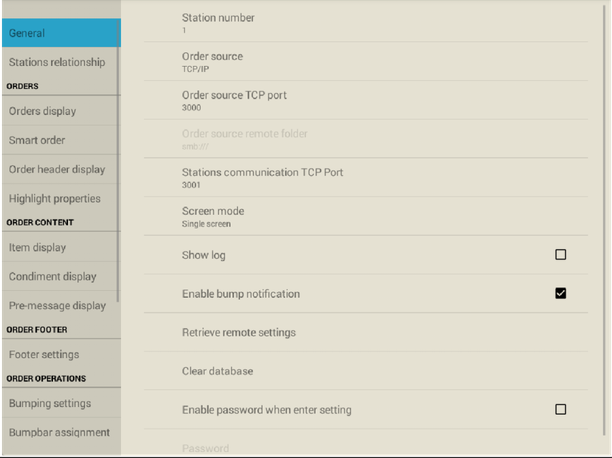
General Settings
Station number: Select a must have a unique ID in the system indicates which KDS station it is. Valid volume are 0 to 99
Order source: Select where to get order files. Choice of "TCP/IP" & " Remote Folder" : if you are using KitchenGo Premium Router, please keep the Data source as "TCP/IP" and leave the port 3000 unchanged
Order source TCP port: Select the port either your POS software or KitchenGo Premium Router will communicate with this port for order data processing
Order source remote folder: Select a shared folder in the network typically on the PC where your POS software runs if the order source is "Remote folder"
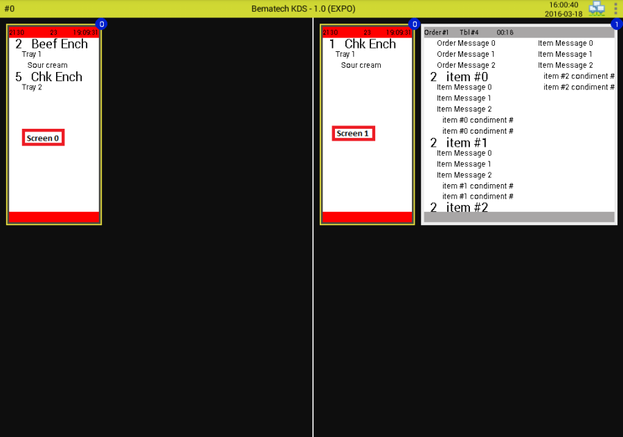
Split Screen
Screen mode: This feature enables users to choose split screen which enables screen splits into two separated order panels(sample screen below), so it will act as 2 stations
Show log: show log on the bottom of the screen
Bump notification
Enable bump notification: When bump notification is enabled, KDS will create a bump notification xml file contains order receive time and bump time into the order source folder once kitchen staffs bump/unbump orders. This notification can be used to tell the customer that the food is ready in the kitchen, we have POS partner uses this for food pickup/ready text message alert.
There are total 6 bump NotifyType as defined below:
<NotifyType> tag definition:
1 – kitchen station item bump 2 – kitchen station order bump
3 – expeditor station item bump 4 – expeditor station order bump 5 – kitchen station item unbump 6 – kitchen station order unbump
7 – expeditor station item unbump 8 – expeditor station order unbump
Here is one item bump example:
<Transaction NotifyType="1" FileName="2016_10_27_18_15_26_2001_1_1_10.140.100.158.xml">
<Order>
<ID>2001</ID>
<GUID>3f423828eb8c456fbdcb746eabb755bf</GUID>
<PosTerminal>2</PosTerminal>
<TransType>1</TransType>
<OrderStatus>1</OrderStatus>
<OrderType/>
<WaiterName>Annie</WaiterName>
<Destination>EAT IN</Destination>
<GuestTable/>
<UserInfo/>
<Received_Time>2016-10-27 18:15:16</Received_Time>
<Bumpoff_Time>2016-10-27 18:15:26</Bumpoff_Time>
<Item LocalBumped="1">
<ID>1</ID>
<GUID>2dd84eb0d2a84cf6ac913da6d3d9bc8b</GUID>
<TransType>2</TransType>
<Name>Minestrone</Name>
<Category>Soups</Category>
<Quantity>1.00</Quantity>
<RGBColor BG="0" FG="0"/>
<KDSStation>1</KDSStation>
<ItemDelay>0.00</ItemDelay>
<BuildCard/>
<TrainingVideo/>
<SumTrans SumNameEnabled="0"/>
</Item>
<BumpType>1</BumpType>
<IPAddr>10.140.100.158</IPAddr>
</Order>
</Transaction>
Retrieve remote settings: Getting settings from other station, use for duplicating setting from one station to other
Clear database: Clear the current on-screen orders and bumped orders of this station, use this to reset station after testing
Password protection
Enable password when enter setting: Select this option to enable settings password control, this can prevent un-authorize kitchen staff changing station settings
Password: Alphanumeric password for settings, can be any length
Stations relationship
A must have unique table that shows the relationship between all stations, it only needs to setup once in one of the stations and use "Save & Update to all" button to push this stations relationship table to all online stations over the network. User can also setup station's function here (Normal or Expeditor), Advance Expo feature, and their "Slave Function" including Backup, Mirror, Auto workload distribution and duplicate station
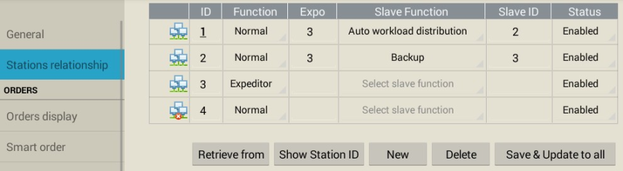
ID: Stations' unique ID that uses to route order items to assigned stations; the underline number 1 in above picture means station 1 is the station user currently on
Expeditor station
Function: Select the function of this station, if one station is set as Expeditor, all orders will be automatically sent to this Expeditor station. Thus, at this station, the operator is able to quick visualize all orders currently being processed at the kitchen and the staff at the front counter can handle different items from different preparation stations. In addition, if any item/order is bumped off from a normal station, that item/order will be marked in the Expeditor station. So waiters can check status of the orders on the fly. This behavior is configured on the "Item display" Tab, on the section shown below.
Expo: Select stations' Expeditor station, normally when user changes a station to Expo station, it will add itself to the Expo column, so all normal station's item will goes to this Expo station directly. But if users decide they don't want certain normal station's item to go to Expo station, user can simple remove the Expo station from its Expo column; One example - Kitchen has 5 stations, Station1,2,3 are normal stations, station4,5 are Expeditor stations, by default, all station1,2,3's order will go to both Expeditor 4&5; but let's say station 3 is a bar station, it handles all its orders, then user can remove both Expo 4&5 from its Expo column.
Backup Station Function(Automatic order transfer)
Backup: The order will displayed on the backup station when its primary station is offline; E.G.: In the setup above, if station 2 is offline, its orders will automatically go to station 3
Mirror Station Function
Mirror: The order is displayed on both stations (self-station & station you put down in Slave ID column). After users bump an order from either station, the orders will bump off on both stations
Duplicate Station Function
Duplicate station: Similar to the Mirror function, in order duplicate mode, the order is also displayed on both stations. The difference is that they are independent station which means when one station can only bump order off its station, it will not affect other station.
Auto workload Distribution Function
Auto workload distribution: Under this mode, the orders will go to the station with fewer items on it automatically
Status: When the status is disabled, no order can go to this station
Icons: means current station relationship table is not saved, either there is a new change or this is a new setup
 means current station is online;
 means current station is offline; E.G.: Station 4 in setup above is offline;
  means there is error on station relationship table, you will need to fix it.
Order display
Customization for main order screen where you can customize main screen's properties here.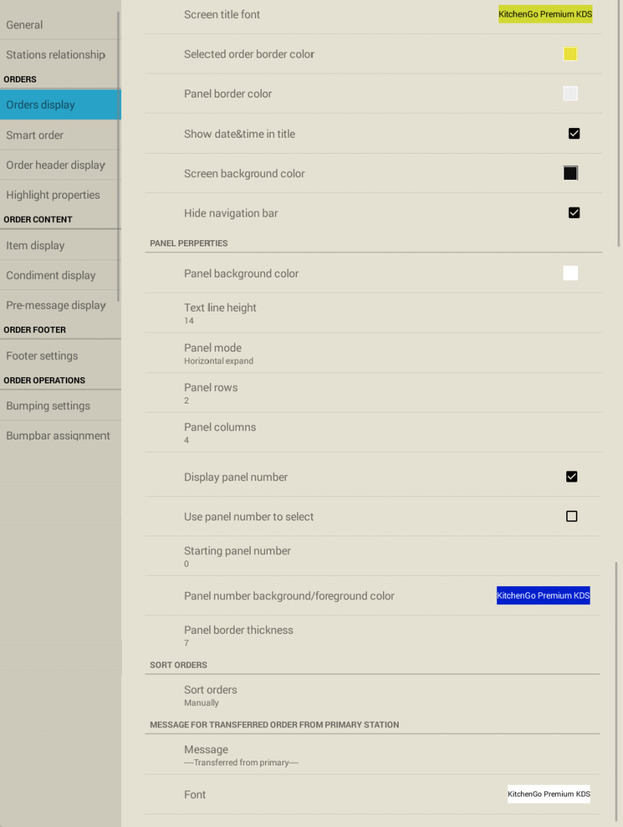
Screen Fonts/Colors
Screen title font: Select the font's properties in screen title, including : font style, font size, font foreground color & font background color
Selected order border color: Select the border color of selected (focused one) order
Panel border color: Select the border color of orders(not focused)
Show date&time in title: Display today's date and current time in title (top right corner of display)
Screen background color: Select the background color of order scree
Full Screen support
Hide navigation bar: Enable/disable the navigation on KitchenGo App, this will make KDS full screen without the Android navigation bar at bottom
Panel background color: Select the background color of panel
Text line height: Select the font size to use in panel rows
Panel mode (Traditional MxN panels or Flexible vertical expand panels)
Panel mode: Select how to display order panel, choices of "Horizontal expand" as fix panel size and length & " Vertical expand" as flexible panel size and length from top left down to bottom right
Panel rows: Select the row of panel (1~4)
Panel columns: Select the column of panel (2~8)
Display panel number: Show/hide panel number on order panels
Use panel number to select: When enabled, user is able to use bump's key pad to select orders
Legend Sheet B support (Panel start with 1)
Starting panel number: Select the starting panel number of first order, selection 1 is for users with Bumpbar legend B
Panel number background/foreground color: Select the background/foreground color of panel number
Panel border thickness: Select the thickness of order panel border
Order Sorting
Sort orders: Select how the orders should be displayed in default by choosing the order sorting method
Message: Select the message to display in backup station which appear in the backup orders when its primary station is offline
Font: Select the font's properties in the message for transfer orders, including : font style, font size, font foreground color & font background color
Smart Order
This option enriches the process of food preparation at the kitchen by using a powerful delay algorithm that allows items to be served / prepared at the right time. If users check this opinion and set the preparation time, the KDS will handle the order in its "smart way". E.G.: A steak combo comes with a med-well steak + mashed potato + mix vege, since the times to cook steak takes more time which is 7 mins, and mashed potato takes 3 mins and mix vege takes 2 mins, the way smart order works in here is when the kitchen receive the order, it will only display the steak first since it takes more time to cook, after 4 mins passed, the mashed potato will come up since it takes 3mins which is the time to finish
cooking the steak; then after another minute, the mix vege will come up, since it takes only 2 mins, so with the help of smart order, all items will finish at the same time for the steak combo.
Note: To have smart order working, either your POS software already support it in the order xml or user will need to configure the item filter setting in KitchenGo router(Please see User guide for Router for details). 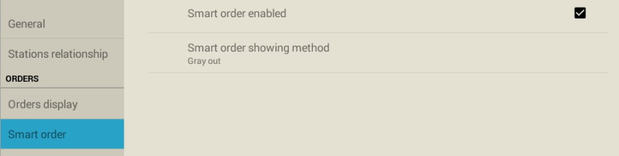
Smart order enabled: Enable/disable the smart order feature
Smart order showing method: Select how to display orders with smart order, choice of "Gray out" as items with shorter pre-prepare time is gray until cook time is meet & "Hidden" as items with shorter pre-prepare time is hidden(not show) until cook time is meet
Order Header Display
Customization for order header where you can customize order header's properties here.
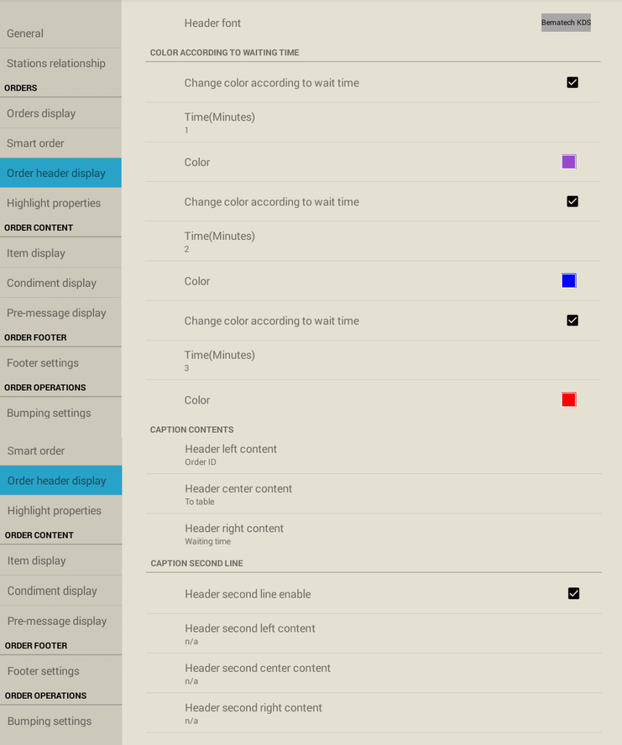
Header font: Select the font's properties of order header, including : font style, font size, font foreground color & font background color
Change color according to wait time: Enable/disable the color change of order header after certain time, useful timer to alert kitchen staff how long has passed for the order, it has total three level of warning
Time(Minutes): Select the time when color change happens; Color: Select the color the order header will change to
Header left content: Select the content to display on the left position of order header
Header center content: Select the content to display on the center position of order header
Header right content: Select the content to display on the right position of order header
Header second line enable: Enable/disable the second line for order header, if you want to display more info on the order header, you can enable this
Highlight Properties
Customize order highlight properties for order type = rush order or fire order, and orders contains destination.
Note: To have highlight working, you will need to enable its display in either header or footer content.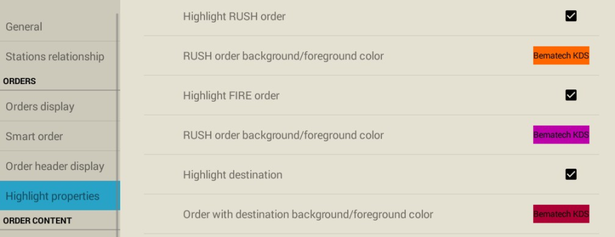
Rush/Fire Order
Highlight RUSH order: Enable/disable the highlight for Rush order
RUSH order background/foreground color: Select the foreground & font background color for rush order
Highlight FIRE order: Enable/disable the highlight for Rush order
FIRE order background/foreground color: Select the foreground & font background color for rush order; Highlight destination order: Enable/disable the highlight for destination order
Destination order background/foreground color: Select the foreground & font background color for rush order
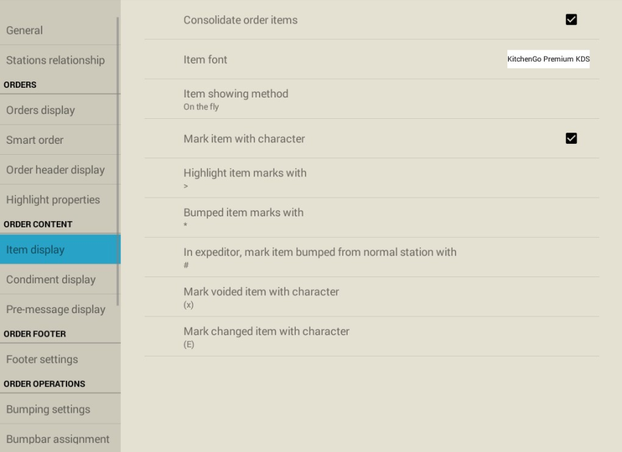
Item Display
Customization for items' properties where you can also choose how to display item within orders.
Items Fonts/Colors
Consolidate order items: Enable/disable combining item for same item
Item font: Select the items font's properties in order, including : font style, font size, font foreground color & font background color
Mark item with character: Enable/disable character mark for items instead of symbols
Highlight item marks with: Select the leading mark for highlighted items
Bumped items marks with: Select the leading mark for bumped items
In expeditor, mark item bumped from normal station with: Select the leading mark for expeditor station items after it finished in normal station
Mark voided item with character: Select the leading mark for voided item (Only works with order TransType=6 right now)
Mark changed item with character: Select the leading mark for changed item (Only works with order TransType=6 right now)
Condiment Display
Customization for condiment's properties where you can also choose where to display condiment.
Condiment font: Select the condiments font's properties in order, including : font style, font size, font foreground color & font background color
Condiment position: Select the position to display condiment
Pre-Message Display
Customization for order message & pre-modifier's properties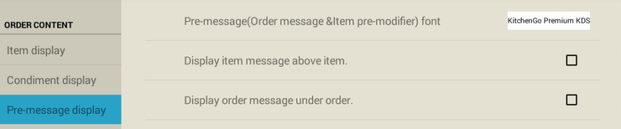
Pre-message (Order message & item pre-modifier) font: Select the order message & item pre-modifier font's properties in order, including : font style, font size, font foreground color & font background color
Display item message above item: Select this option to enable showing item pre-modifier above item, default is below item
Display order message under order: Select this option to enable showing order message at bottom, default is on the top
Footer Settings
Customization for footer setting and its font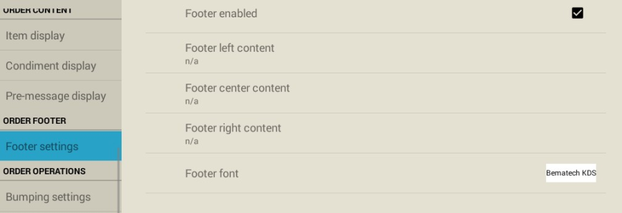
Footer enabled: Enable/disable footer display
Footer left content: Select the content to display on the left position of order footer
Footer center content: Select the content to display on the left position of order footer
Footer right content: Select the content to display on the left position of order footer
Footer font: Select the footer font's properties in order, including : font style, font size, font foreground color & font background color
Bumping Settings
Customization for bumping options
Note: You can use Ctrl + Enter(Top first key + Bottom last key) to bring up the Setting menu when you are on order screen, and you can also use Ctrl + Enter to Exit the setting in setting screen. When you are
in setting screen, use the - key for arrow up if you are using Legend sheet A; for other legend sheets, the Top 2nd to Top 5th keys are Arrow up, arrow down, arrow left and arrow right. 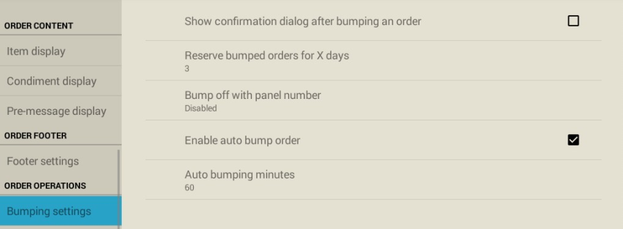
Show confirmation dialog after bumping an order: Enable/disable confirmation pop up after an order is bumped
Reserve bumped order for X days: Select how many days the bumped order keeps in KDS
Panel Bump
Bump off with panel number: Enable/disable bumping using panel number with double clicking
Enable auto bump order: Select this option to enable auto bump order without pressing the bump bar, default bump time is 60 min means if user if on the screen for an hours, it will automatically bump off
Auto bumping minutes: Select the time to auto bump off order
Bumpbar Assignment
Customization for Bumpbar key assignment
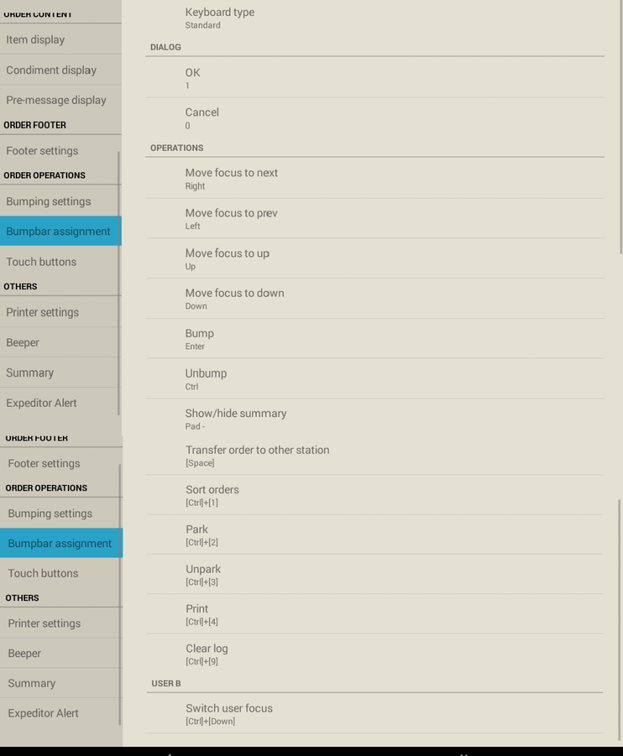
Keyboard type: Select which keyboard to use, after you change the keyboard type, the operations key will also change according to the Bumpbar type
Dialog: Select the key assignment for popup dialog's "OK" and "Cancel" button
Move focus to next: Select next order or move to next available option
Move focus to prev: Select previous order or move to previous option
Move focus to down: Select first item when order is selected or move to next available option
Bump: After item or order is finished, press Bump to finish the order, so it will not show on current active order screen
Unbump: Bringing up a new windows shows all bumped orders, you can use this to recall bumped orders back to active order screen
Show/hide summary: Show or hide the summary panel that show total number of items on order screen
Transfer order to other station: Transfer selected order to a different kitchen station
Sort orders: Sort current active orders in user's choice
Park: Park the order in park windows for later
Unpark: Bringing up a new windows shows all parked orders, you can use this to recall parked orders back to active order screen
Print: Printing out selected order if user have a printer setup
Clear log: Clear current on-screen log if you have log enable
Switch user focus: Switching the focus to different user if you have two user mode enabled
Touch Buttons
Customization for touch buttons
Touch button font: Select touch button's properties in order, including : font style, font size, font foreground color & font background color
Enable [XXX] touch button: Enable/disable this button on order screen
Printer Settings
Customization for printer setup
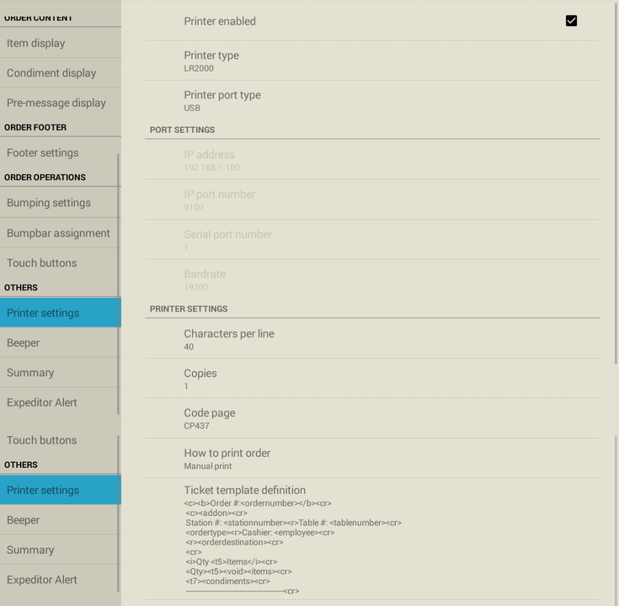
Printer enabled: Enable/disable printer function
Printer type: Select the model of the printer will be used
Printer port type: Select the connection type of the printer
IP address: Select the IP address of the printer, only apply when it is a Ethernet printer
IP port number: Select the port of the printer, only apply when it is a Ethernet printer and it has a fix port 9100
Serial port number: Select the serial port printer connects to, only apply when it is a Serial printer and it has a fix port of COM4
Baud rate: Select the baud rate of the serial printer, please note if the baud rate in the setting doesn't match the bard rate in the serial printer, it will not print correctly
Characters per line: Select the number of characters per line in the receipt
Copies: Select the number of copy you want for the printed receipts
Code page: Select the code page for the printer
How to print order: Select the condition to print orders
Ticket template definition: A default template for printing orders
Beeper
Customization for beeper setup

Beeper enabled: Enable/disable beeper
When does it beep?: Select the condition to beep -"Receive any order" means whenever KDS receives any order, it will beep; "Just rush order" means KDS will only beep only when it receives Rush order
Summary
Customization for summary panel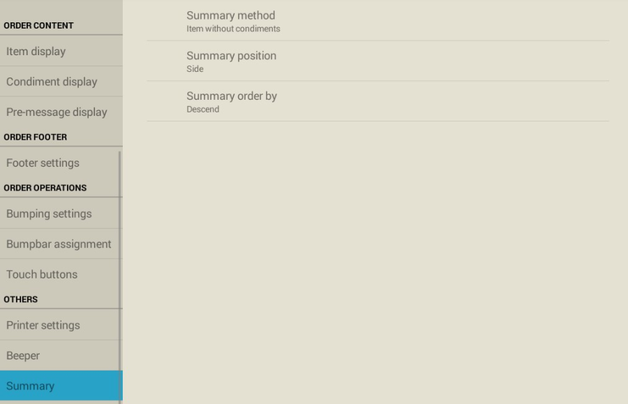
Summary method: Summary panel shows total number of items on current station, user can choose to sum item without condiments or item with condiments
Summary position: Select where to display summary panel
Summary order by: Select the sorting for summary, default is descend means the summary panel will show large quantity item on top
Expeditor Alert
This feature adds a new type of item called Expeditor item, this item will only shows in Expo station but not normal food preparing station which it will make your food preparing station "clean" with less items, so chef only needs to focus on their dishes. If your POS software supports Expeditor alert feature, you can customize how the Expeditor should be in here. E.G.: In some of the kitchen, certain foods/items(salad dressings are one of the examples) are only prepared in the Expo station, they don't need to show up in normal food prepared station, once the food dishes are ready, waiter/waitress can then add the Expeditor item(salad dressing) into the salad.
Customization for expeditor alert feature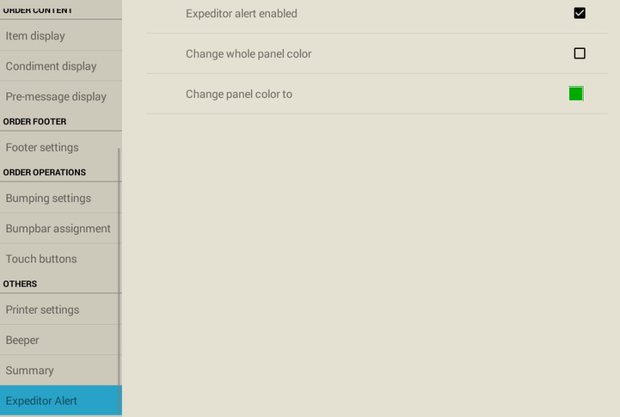
Expeditor alert enabled: Enable/disable expeditor alert feature
Change whole panel color: Enable/disable whole panel color change for expeditor alert feature, when disable, only items' color get changed
Change panel color to: Select the color to use in expeditor alert
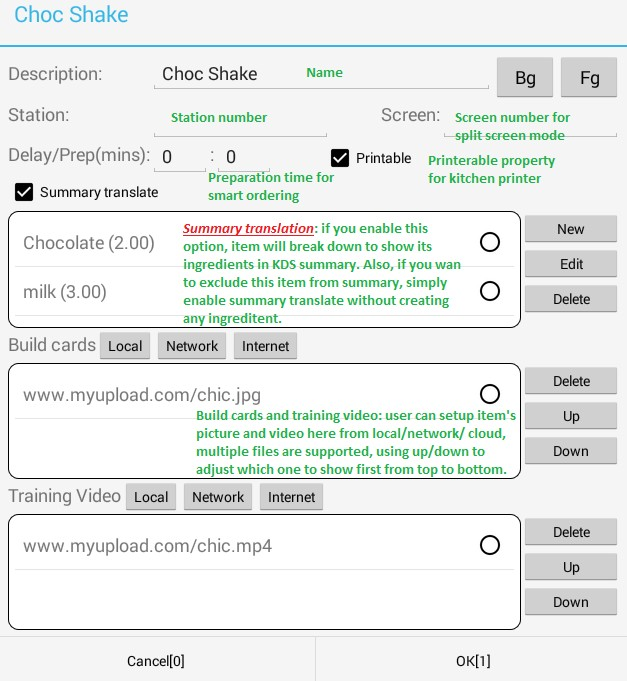
Build Card/Training
This feature allows users to add pictures and videos for a specific item, it supports local, network and cloud media files. For local media and network files support, KitchenGo Premium router is needed.
There are two ways to add a media files into a specific item: 1) directly intergraded with the XML order file or 2) using Router's item filter setting to add media files manually(Please see User guide for Router for details).
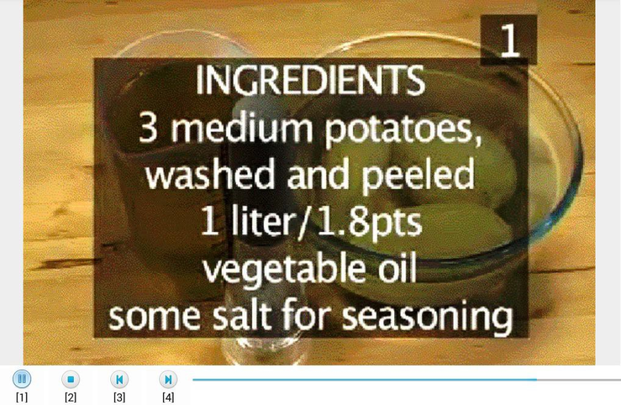
After pictures/videos are assigned to the item, kitchen staff can then select that item and press Build card/Training key to bring up the pictures/videos.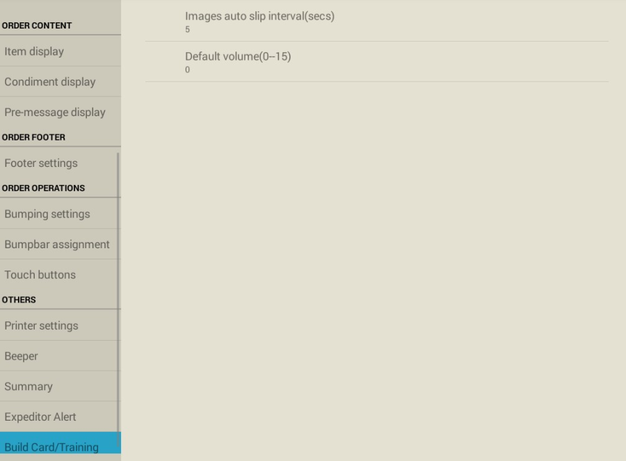
Customization for Build Card and Training video
Images auto slip interval(secs): Time to play one picture, default is 5 seconds for one single picture; if you put 0, you will need to manually move to the next picture
Default volume(0--15): Select volume for playing video, default is 0 since LS8000 doesn't have audio output, it only has a buzzer that makes beep sound; To play volume/audio from LS8000 you will need to connect a speaker
KitchenGo Premium Router
KitchenGo Premium Router is a add on application that enable order routing though this application. If the POS software already included order routing function, it is not necessary to enable the order router of KitchenGo Premium. If the POS software does not have order routing function, the KitchenGo Premium router can be enabled to provide advanced order routing function and features. 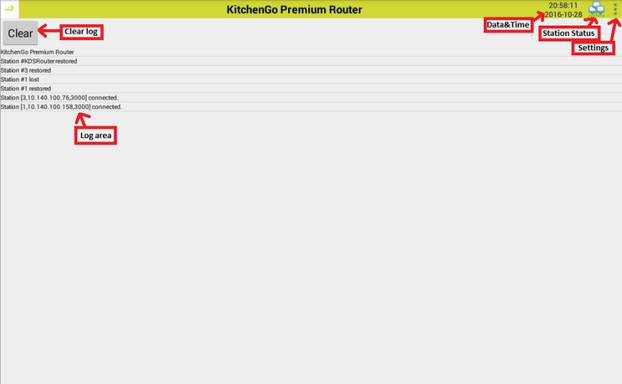
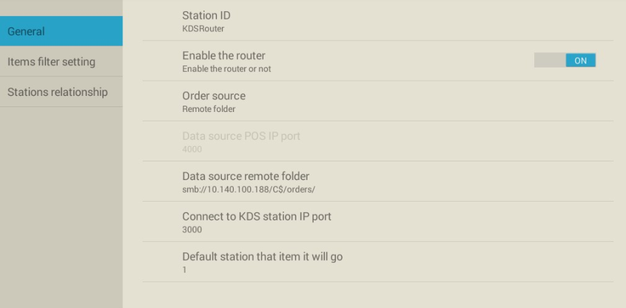
General
Station ID: Input the ID of current router, you can leave it as default
Enable the router: Default is off, if you are using router, please enable it
Order source: Select where to get order files. Choice of "TCP/IP" & " Remote Folder" : if you are using KitchenGo Premium Router, please keep the Data source as "TCP/IP" and leave the port 3000 unchanged
Data source POS IP port: Select the port either your POS software will communicate with router for order data processing
Data source remote folder: Select a shared folder in the network typically on the PC where your POS software runs if the order source is "Remote folder"
Connect to KDS station IP port: Select the port for Router connects to KDS stations, unless there the port 3000 is already in use in your network, you don't need to change it(WARNING: if you change this port, you will also need to change the port in KDS, otherwise the system will not work)
Default station that item it will go: Select the default station ID items will go to when there is no station assign to the items
Items Filter Setting
Click "Database setting" to enter item filter setting, user can assign categories/items to their desire station, setup its preparation time(For smart ordering) and printable property for kitchen printer.
Categories and items are automatically created when KDS get item information from the POS. Sample example below: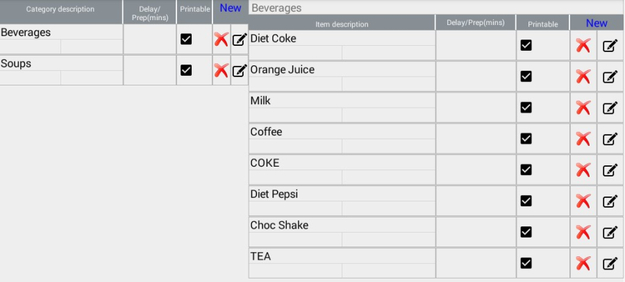
Left side shows Beverages and soup category, right side shows items belongs to selected category - Beverages.
Manually add/edit category or item:
Click New to create a new category or item, you can also click the  to edit existing item, please see below picture for detail (Explanation in green color).
Category setup: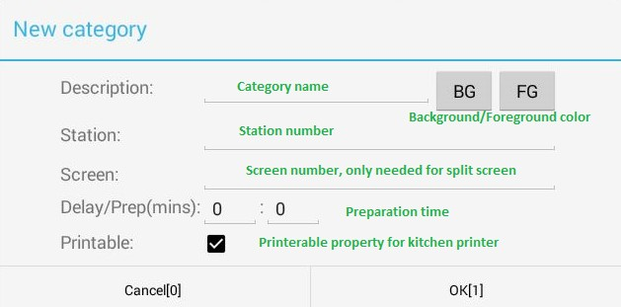
Item setup:
ICONS:  : Create new category or new item;
  : Delete current category or item;
  : Edit existing category or item;
Stations Relationship
KitchenGo Premium Router also has a stations relationship setting, it is same as the stations relationship setting in KitchenGo Premium KDS. Please check above for details.
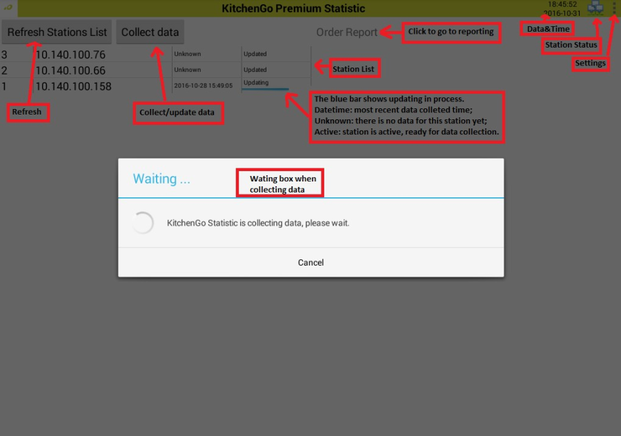
Statistic Report
With KitchenGO Premium Statistic app, you will be able to view different kind of reports for your kitchen operation including: total order count, total order preparation time, average order preparation time per order within set period of time(E.G.: daily report, weekly report or even every Friday night from 6:00 - 10:00 pm). The statistic app also supports sending xml reports through TCP if POS software supports it. User can go to setting to setup it up. You can also configure how many days you want to keep the old report data, default is keep reports for 180 days.
There are two type of report formats you can choose from, Order Count or Order Prep Timer(Top right corner of below picture). With order count, you can see the order count for set time, and with order timer, you can see the total order preparation time for the set time. To get report, choose the report
format and station configuration, then click Display report to show report. You may also click  or
or  to move report date periods.
The reporting data will be saved for 180 days by default, this can be change in Setting - Database. User can also get a TCP xml report in Setting - Enable auto generate report if POS software support it.
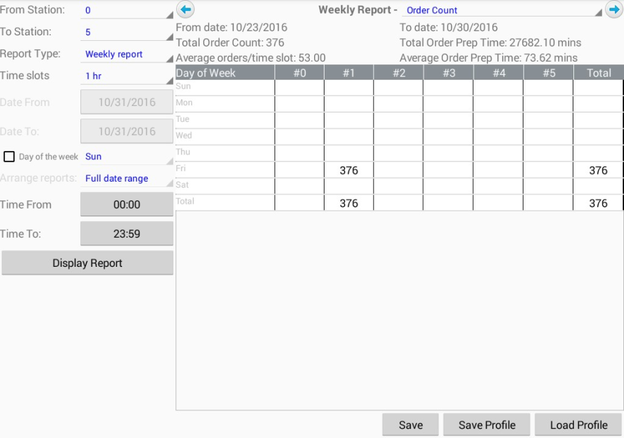
From Station: Choose the starting station to be shown in the report
To Station: Choose the ending station to be show in the report
Report Type: Select the report type, choices of "Daily report", "Weekly report", "Monthly report ","One Time report
Time Slots: Select the time range in the report
Date From: Select report starting date when One Time Report is selected
Date To: Select report ending date when One Time Report is selected
Day of the week: Select this option if you only want to see the day you want to view in the report when One Time Report is selected, E.G. Only Monday
Arrange reports: Select the report range when displaying the report
Time From: Select the starting time of report
Time To: Select the ending time of report
Save: Save report to file, the files path will be internal storage ./KDSStatisticReport
Save Profile: Save the report setting in file, E.G.: daily report, monthly report
Load Profile: Load the saved setting in file and display the report