-
End-User | Products & SmartPOS
-
End-User | Stock Control
-
End-User | Table Service and Kitchen Operations
-
End-User | Pricing, Marketing, Promotions & Accounts
- Prize Promotions
- Points, Points Profiles and Loyalty
- Product Promotions
- Repricing & Discounts in SmartPOS
- Vouchers
- Account Till Functions
- Pricing, Price Numbers and Price Modes
- Raffles & Draws
- Marketing Reports
- Accounts and Account Profiles
- Rewards
- SmartPOS Account Functions
- Troubleshooting
- Product Labels
- Packing Slips
-
End-User | System Setup & Admin
-
End-User | Reporting, Data Analysis & Security
-
End-User | Membership & Scheduled Billing
-
End-User | Operators, Operator Permissions & Clocking
-
Interfaces | Data Send Interfaces
-
Interfaces | EFTPOS & Payments
- NZ EFTPOS Interfaces
- Linkly (Formerly PC-EFTPOS)
- Adyen
- Tyro
- ANZ BladePay
- Stripe
- Windcave (Formerly Payment Express)
- Albert EFTPOS
- Westpac Presto (Formerly Assembly Payments)
- Unicard
- Manager Cards External Payment
- Pocket Voucher
- OneTab
- Clipp
- eConnect-eConduit
- Verifone
- AXEPT
- DPS
- Liven
- Singapore eWallet
- Mercury Payments TRANSENTRY
- Ingenico
- Quest
- Oolio - wPay
-
Interfaces | SMS & Messaging
-
Interfaces | Product, Pricing, Marketing & Promotions
- Metcash Loyalty
- Range Servant
- ILG Pricebook & Promotions
- Oolio Order Manager Integration
- Ubiquiti
- Product Level Blocking
- BidFood Integration
- LMG
- Metcash/IBA E-Commerce Marketplace
- McWilliams
- Thirsty Camel Hump Club
- LMG Loyalty (Zen Global)
- Doshii Integration
- Impact Data
- Marsello
- IBA Data Import
- Materials Control
- Last Yard
- Bepoz Standard Transaction Import
-
Interfaces | Printing & KDS
-
Interfaces | Reservation & Bookings
-
Interfaces | Database, Reporting, ERP & BI
-
Interfaces | CALink, Accounts & Gaming
- EBET Interface
- Clubs Online Interface
- Konami Interface
- WIN Gaming Interface
- Aristocrat Interface
- Bally Interface
- WorldSmart's SmartRetail Loyalty
- Flexinet & Flexinet SP Interfaces
- Aura Interface
- MiClub Interface
- Max Gaming Interface
- Utopia Gaming Interface
- Compass Interface
- IGT & IGT Casino Interface
- MGT Gaming Interface
- System Express
- Aristocrat nConnect Interface
- GCS Interface
- Maxetag Interface
- Dacom 5000E Interface
- InnTouch Interface
- Generic & Misc. CALink
-
Interfaces | Miscellaneous Interfaces/Integrations
-
Interfaces | Property & Room Management
-
Interfaces | Online Ordering & Delivery
-
Interfaces | Purchasing, Accounting & Supplier Comms
-
SmartPOS | Mobile App
-
SmartPDE | SmartPDE 32
-
SmartPDE | Denso PDE
-
SmartPDE | SmartPDE Mobile App
-
MyPlace
-
MyPlace | myPLACE Lite
-
MyPlace | Backpanel User Guides
- Bepoz Price Promotions
- What's on, Events and tickets
- Staff
- System Settings | Operational Settings
- Vouchers & Gift Certificates
- Member Onboarding
- Members and memberships
- System Settings | System Setup
- Reports and Reporting
- Actions
- Offers | Promotions
- Messaging & Notifications
- System Settings | App Config
- Surveys
- Games
- User Feedback
- Stamp Cards
-
MyPlace | Integrations
-
MyPlace | FAQ's & How-2's
-
MyPlace | Release Notes
-
YourOrder
-
YourOrders | Backpanel User Guides
-
YourOrders | YourOrder Kiosk User Guide
-
YourOrders | Merchant App User Guide
-
WebAddons
-
Installation / System Setup Guides
- SmartPOS Mobile App | Setup
- SmartPOS Mobile App | SmartAPI Host Setup
- SmartPOS Mobile App | BackOffice Setup
- SmartPOS Mobile App | Pay@Table setup
- SmartKDS Setup 4.7.2.7 +
- SmartKDS Setup 4.6.x
- SQL Installations
- Server / BackOffice Installation
- New Database Creation
- Multivenue Setup & Config.
- SmartPOS
- SmartPDE
- Player Elite Interface | Rest API
- Interface Setups
- Import
- KDSLink
- Snapshots
- Custom Interface Setups
-
HOW-2
- Product Maintenance
- Sales and Transaction Reporting
- SmartPOS General
- Printing and Printing Profiles
- SQL
- Repricing & Discounts
- Stock Control
- Membership
- Accounts and Account Profiles
- Miscellaneous
- Scheduled Jobs Setups
- Backoffice General
- Purchasing and Receiving
- Database.exe
- EFTPOS
- System Setup
- Custom Support Tools
-
Troubleshooting
-
Hardware
1 | Clipp Interface Setup
This article covers the required configuration process in BackOffice to set up the interface with Clipp. Clipp allows Customers certain discounts depending on their spending within a particular Venue and is configured as an External Payment Link Device.
This article covers the required configuration process in BackOffice to set up the interface with Clipp.
Clipp allows Customers certain discounts depending on their spending within a particular Venue and is configured as an External Payment Link Device.
Prerequisites
- External Payment Systems Link will need to be authorised and a new auth received, prior to completion of the below steps
Installing Clipp POS Adaptor Terminal Adapter
- Copy the ‘Installer’ folder to the site server
- Run ‘setup.exe’
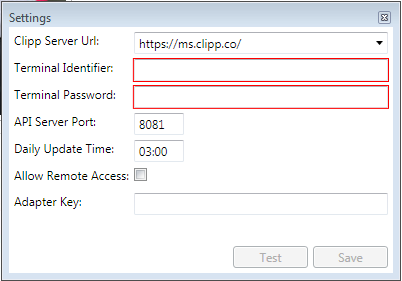
- After installation, you will be prompted with the following screen

- Ensure you select https://ms.clipp.co/ as the URL
- Insert the ‘Terminal Identifier’ usually the site name and ‘Terminal Password’ provided by Clipp
- Leave ‘API Server Port’ and ‘Daily Update Time’ as default settings
- Tick ‘Allow Remote Access’
- Enter ‘Adapter Key’ this will be used in the device setup, the minimum requirement is 10 characters, recommended is “SITENAME4safet$”
- Click test and if everything is correctly configured you should get a confirmation message
- Notes: If you need to re-configure the adaptor after installation run the following command from CMD.exe:
- “C:\Program Files\Clipp\Clipp POS Terminal Adapter\Clipp.PosAdapter.exe” –configure
How to find Clipp Adaptor Key
- You will need to run CMD.exe and then type the following command
- "C:\Program Files\Clipp\Clipp POS Terminal Adapter\Clipp.PosAdapter.exe" – configure
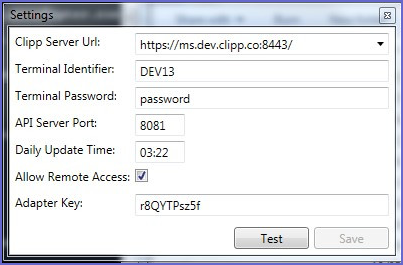
- Wait about 5 seconds and a window will appear it will look similar to the image below

- NOTE: The image above is a sample of what it would look like
- The actual site settings will have a different Clipp Server URL called {+}https://ms.clipp.co/+[ |https://ms.clipp.co/]also a unique Terminal Identifier, unique Terminal Password, and a unique adapter Key
- Below in that window, you will see Adapter Key, you will need to make a note of your Adapter Key
- Also, make sure Remote Access is flagged. If already flagged just close the window down
- If you have Tick the 'Allow Remote Access' option then you will need to update the adapter key as necessary; click Test then save
Setting up the Clipp Adaptor in Bepoz
- Under Venue, Stores and Tills you will need to select the server that Clipp is installed on (Typically it should be the smart controller server)
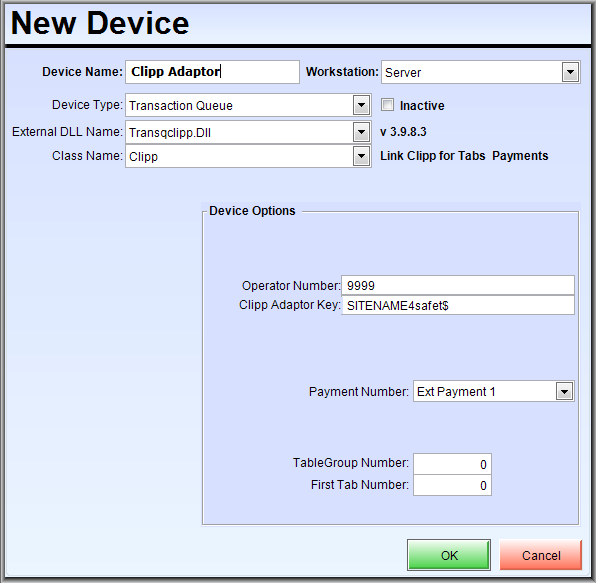
- Add a device on the server named ‘Clipp Adaptor’, Device Type ‘Transaction Queue’, External DLL Name ‘Transqclipp.Dll’ and Class Name ‘Clipp’

- As shown in the figure above; the device setups are as follows:
- Device type: transaction Queue
- External Dll Name: Transqclipp.Dll
- Class Name: Clipp
- It also shows Device options as below:
- Operator number – Enter an operator Number
- Clipp Adaptor Key – Unique Clipp Adaptor Key
- Payment Number – This is the external Payment totaliser that will report the payments done through Clipp
- Table Group Number – the table Group Number that Clipp Will Use
- First Tab Number – Starting Tab Number that Clipp will use
- The operator should not be a usable operator and ‘9999’ support is OK to use, the ‘Clipp Adaptor Key’ is as per setup in Installing Clipp POS Adaptor Terminal Adapter in point 8 above
- Please create a Clipp user 8222
- The Payment Number ‘Ext Payment 1 or 2’ are for reporting purposes and can be set to either but whichever one you use MUST BE renamed CLIPP
- Table Group Number should be on its own table group (eTabs)
- The First Tab Number should be set at a table number range so as to not conflict with existing tables OR existing Clipp customers, the default will be 800 but Clip will advise in case of conflict. Advise to start from 1000
- Ensure that the table group used for Clipp has the flag “Do Not Ask Close” flagged
Setting up the Clipp Payment Device
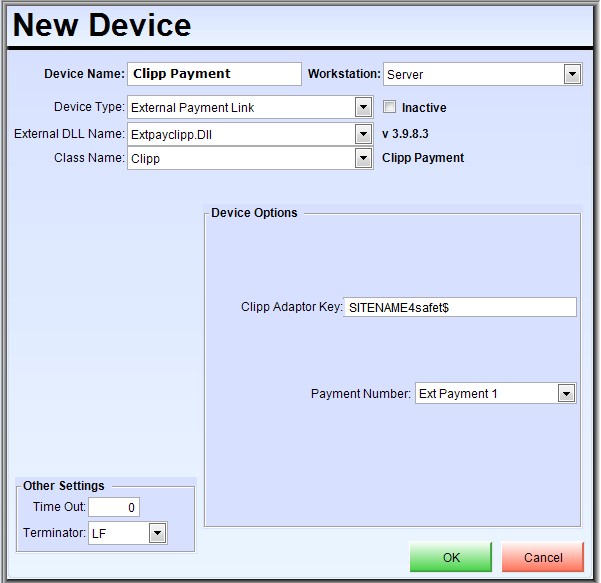
- Add a device on the server and EVERY till named ‘Clipp Payment’, Device Type ‘External Payment Link’, External DLL Name ‘Extpayclipp.Dll’ and Class Name ‘Clipp’
- This device must be set up on all tills that are going to use Bar Tabs with Clipp
- The image below shows an example of the device setup on the till

- The ‘Clipp Adaptor Key’ is as per setup in Installing Clipp POS Adaptor Terminal Adapter in point 8
- The Payment Number must be the same as set up in Setting up the Clipp Adaptor in Bepoz in point 3
- Restart SmartControl
- As shown in the image, the device setup is:
- Device type: External payment Link
- External Dll Name: Extpayclipp.Dll
- Class Name: Clipp
- Device Options:
- Clipp Adaptor Key: Unique Clipp Adaptor Key.
- Payment Number: This is the external payment totaliser that will report the payments done through Clipp
- After you have set all devices that are required to run Clipp you will need to restart Smartcontrol to initialise the connection to Clipp
Using Clipp in Bepoz
- Clipp should provide customer training on the full usage of Clipp functionality, however, please ensure that a FULL test is completed prior to handover to Clipp
- Please email tim@clipp.co for access to test venues before they go live with Clipp for testing purposes
Troubleshooting
- Firewall – open 8081 IN/OUT
- Allow Clipp POS Terminal Adapter
- “Unable to connect to Remote Server” in Clipp job
- Restart SmartControl
