
This article will outline a step-by-step guide to creating a Voucher in Bepoz and assigning it to a Prize Promotion. Vouchers are rewards that contain a discount on certain products. The discounts can be a fixed amount, percentage or a fixed price.
This article will outline a step-by-step guide to creating a Voucher in Bepoz and assigning it to a Prize Promotion.
Vouchers are rewards that contain a discount on certain products. The discounts can be a fixed amount, percentage or a fixed price.
A Bepoz Voucher will be used to connect to Myplace Vouchers
Prerequisites
- To access Voucher Setup features, the applicable Operator Privileges
-
Marketing & Promotions Tab - Promotions: "Maintain Voucher Setups" Flag
- Promotions: "Issues/Edit Vouchers " Flag
Vouchers
- Bepoz vouchers can be linked to Myplace Vouchers, which are then used as a reward for completion of a stamp card
- To set up a new or existing Voucher and assign it to a prize promo, Follow the procedure below after signing into BackOffice
Procedure
Step 1 - Navigation to Voucher Window
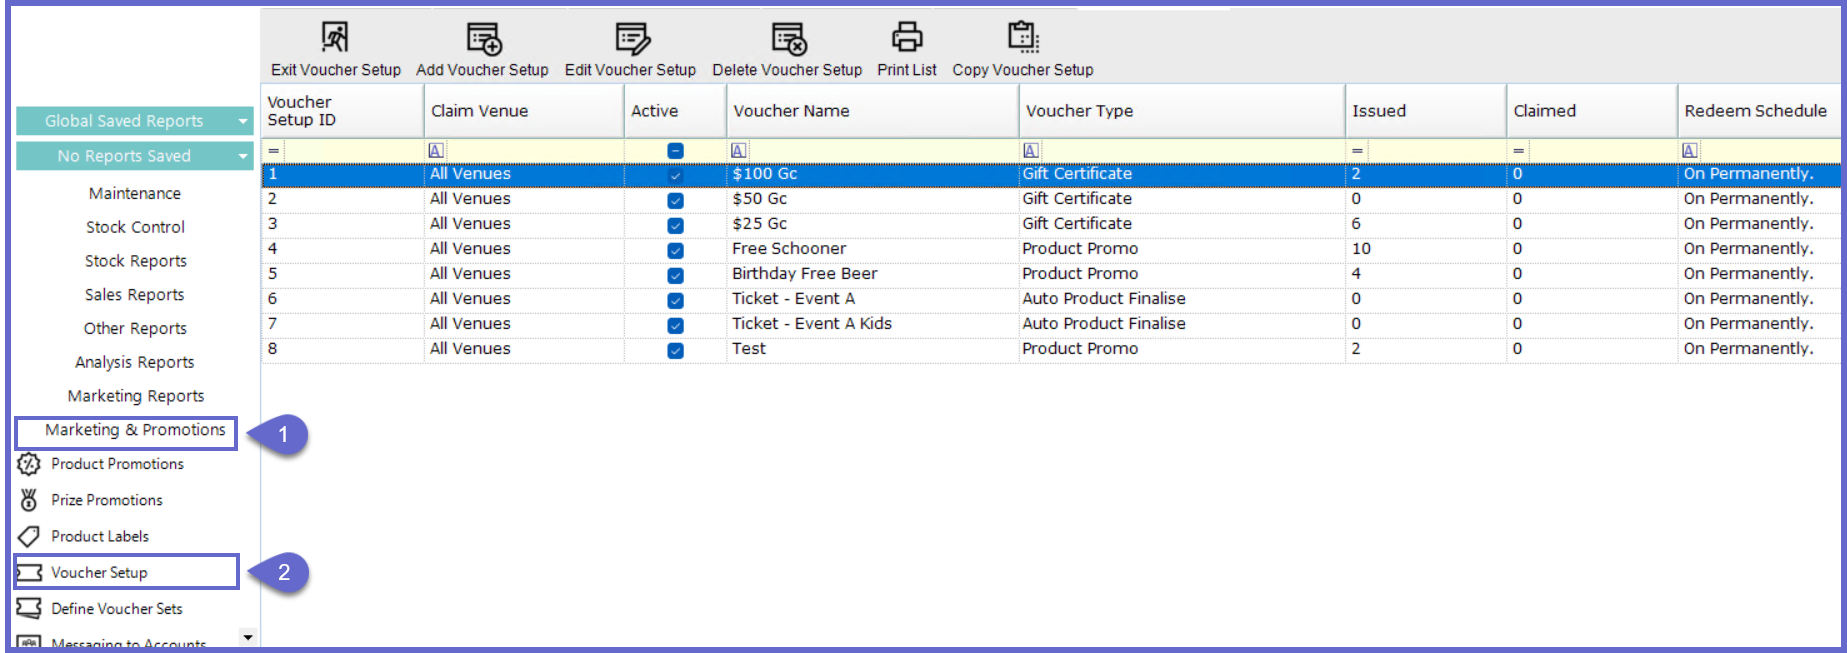
- To access the Voucher page from the BackOffice main page. Follow the process below:
- Click Marketing & Promotions in the menu sidebar
- Click Voucher Setup and a new window will appear
Step 2 - Add or Edit a Voucher
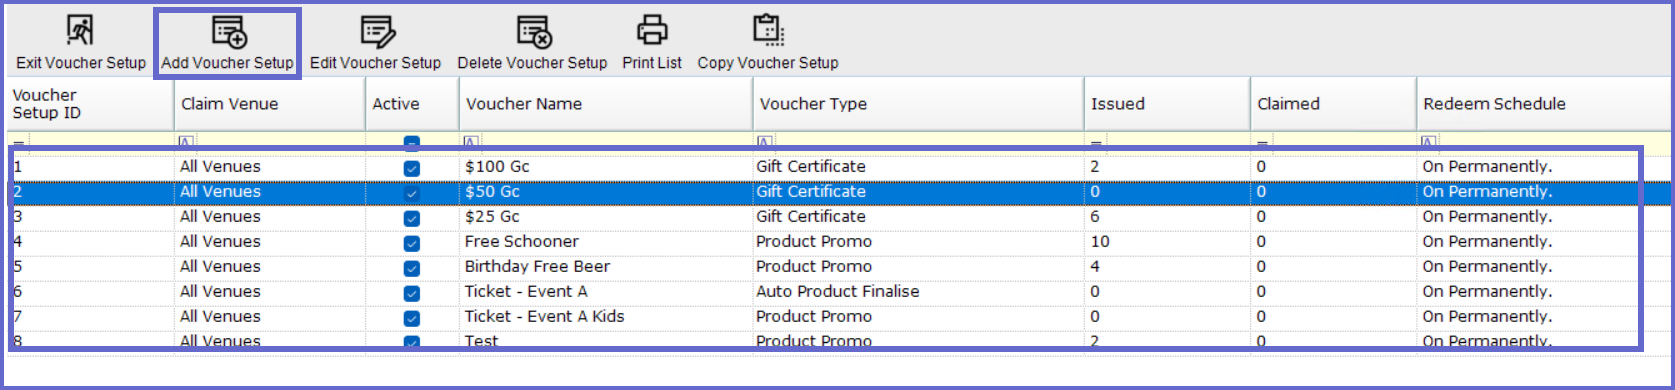
- To add, press "Add Voucher Setup" in the header or double-click a row in the list to edit an existing voucher
- Both paths will open the 'Voucher Setup' panel
Step 3 - Voucher Setup Panel
- This window is where users can configure a Bepoz Voucher
- This step will outline different sections within the Voucher Setup Window that will be needed for Stamp Cards
General Settings

- Voucher Name
- A title for the voucher. It is suggested to include the discount amount and product names within this label
- Stop All Redeems Flag
- This will stop any of these particular voucher from being redeemed.
- ON: This voucher cannot be redeemed in any case
- OFF: This voucher can be redeemed
- Voucher Type
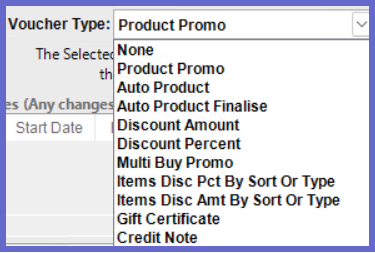
- A dropdown list that displays the different kinds of vouchers that are available in Bepoz
- All voucher types can be used in Myplace besides None
- Each type will have some unique fields displayed in the Voucher Details section
- Types:
- Product Promo - A product promotion is applied to the current product
- Auto Product - A selected product will be sold using a product promotion
- Auto Product Finalise - A selected product will be sold using a product promotion and is then finalised using Cash
- Discount Amount - A entered amount will be applied as the discount
- Discount Percent - A entered percentage will be applied as the discount
- Multi Buy Promo - A MultiBuy Promotion can be attached
- Items Disc Pct By Sort Or Type - A entered percentage will apply to products that match the chosen Sort/Type setting
- Items Disc Amt By Sort Or Type - A entered amount will apply to products that match the chosen Sort/Type setting
- Gift Certificate - A certificate that contains a value
- Credit Note - A credit note used for refunds TBC
- Inactive
- Enable/Disable the voucher on the system
- ON: Voucher is disabled and cannot be linked to Myplace
- OFF: Voucher is enabled and can be connected to Myplace
- Claim Venue and Store
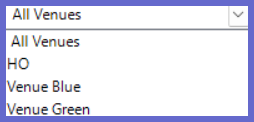
- This area consists of two fields that can place different limits on where the voucher can be applied to.
- All Venues - First Field
- A dropdown list that shows Venues that are set up in Backoffice.
- If All Venue is selected then the voucher can be used in all venues
- If a specific venue is selected then the voucher will only apply to that venue
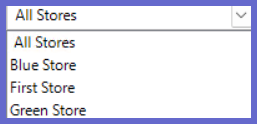
- All Stores - Second Field
- A dropdown list that shows Stores that are set up in Backoffice.
- If All Stores is selected then the voucher can be used in all stores
- If a specific store is selected then the voucher will only apply to that store
Schedules
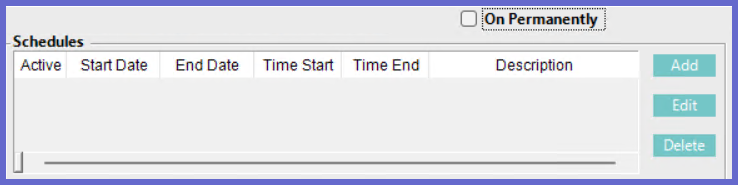
- On Permanently Flag
- ON: Voucher will run forever with no end date
- OFF: Schedules configuration will be available. if no schedule is added and this flag is off the Voucher cannot be
- Schedules
- Lets users set a start and end time/date for the voucher to be active. Any time/date outside the set schedule will not allow the vouchers to be redeemed
- Add: When users click this button a 'New Schedule' panel will appear
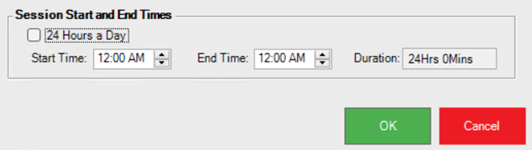
- Overall Start and End Dates click the boxes next to the start/end date to choose the current date or click the down arrows next to the start/end date to open a calendar and choose a date

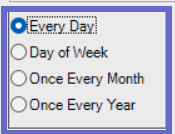
- Choose the repetition period by clicking the radio button next to the desired option
- By default 24 Hours a Day flag will be ON. This will mean the session start time will start when the schedule is created and end in 24 hours
- If this flag is OFF, then users can choose a start and end time by inputting a time or using the arrows
- Click OK to save OR cancel to discard
- Edit: First choose an existing schedule in the schedules list. When the edit button is clicked it will open the configurations of the selected schedule
- Delete: First choose an existing schedule in the schedules list. When the Delete button is clicked the selected schedule will be removed
Voucher Details
- This section can vary based on the selection made in the Voucher Type field. Each Voucher type will have some unique fields that will display when selected. Refer to Article, Voucher Type for more details on each voucher types unique field
- The consistent fields that will appear on all Voucher Types are the Start Type and Expiry Type
- Start Type
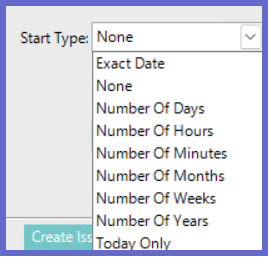
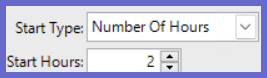
- This field will have a dropdown list to select a starting date/time. Leaving it as 'None' will have the current date and time as the start value. When another option is clicked a field will appear underneath, where users can specify a value.
- Expiry Type
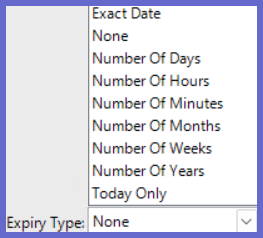

- This field will have a dropdown list to select an Expiry date/time. Leaving it as 'None' will set the voucher to never expire. When another option is clicked a field will appear underneath .where users can specify a value.
Options Flags
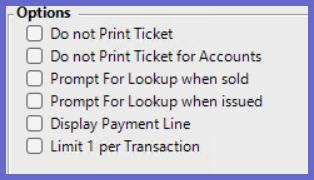
- Do not Print Ticket
- A voucher ticket will not be printed
- Do not Print Ticket for Accounts
- A voucher ticket will not be printed for an account holder
- Prompt For Lookup when sold
- Asks issuer to scan the digits for a sold voucher that may already have a physical copy
- Prompt For Lookup when issued
- Asks issuer to scan the digits for an issued voucher that may already have a physical copy
- Display Payment Line
- Displays the payment line on a transaction where a voucher has been redeemed. This will not appear for Gift Certificates
- Limit 1 per Transaction
- Each transaction can only have one voucher redemption
Statistics
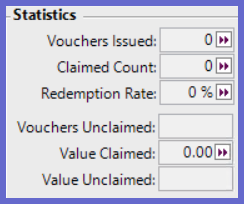
- Displays the details of issued and claimed vouchers
- Vouchers Issued
- The number of vouchers that are given. This includes both unclaimed and claim vouchers
- Claimed Count
- The number of issued vouchers that have been used on a transaction
- Redemption Rate
- Shows the total rate of redeemed Vouchers in a percentage value
- Vouchers Unclaimed
- The number of issued vouchers that are yet to be redeemed
- Value Claimed
- Displays the total amount that has been claimed by this voucher
Step 4 - Save
- Click the OK button at the bottom of the panel to save the configurations for the voucher list. Click cancel or the X button on the top right to discard the changes
Step 5 - Assigning to a Prize Promotion
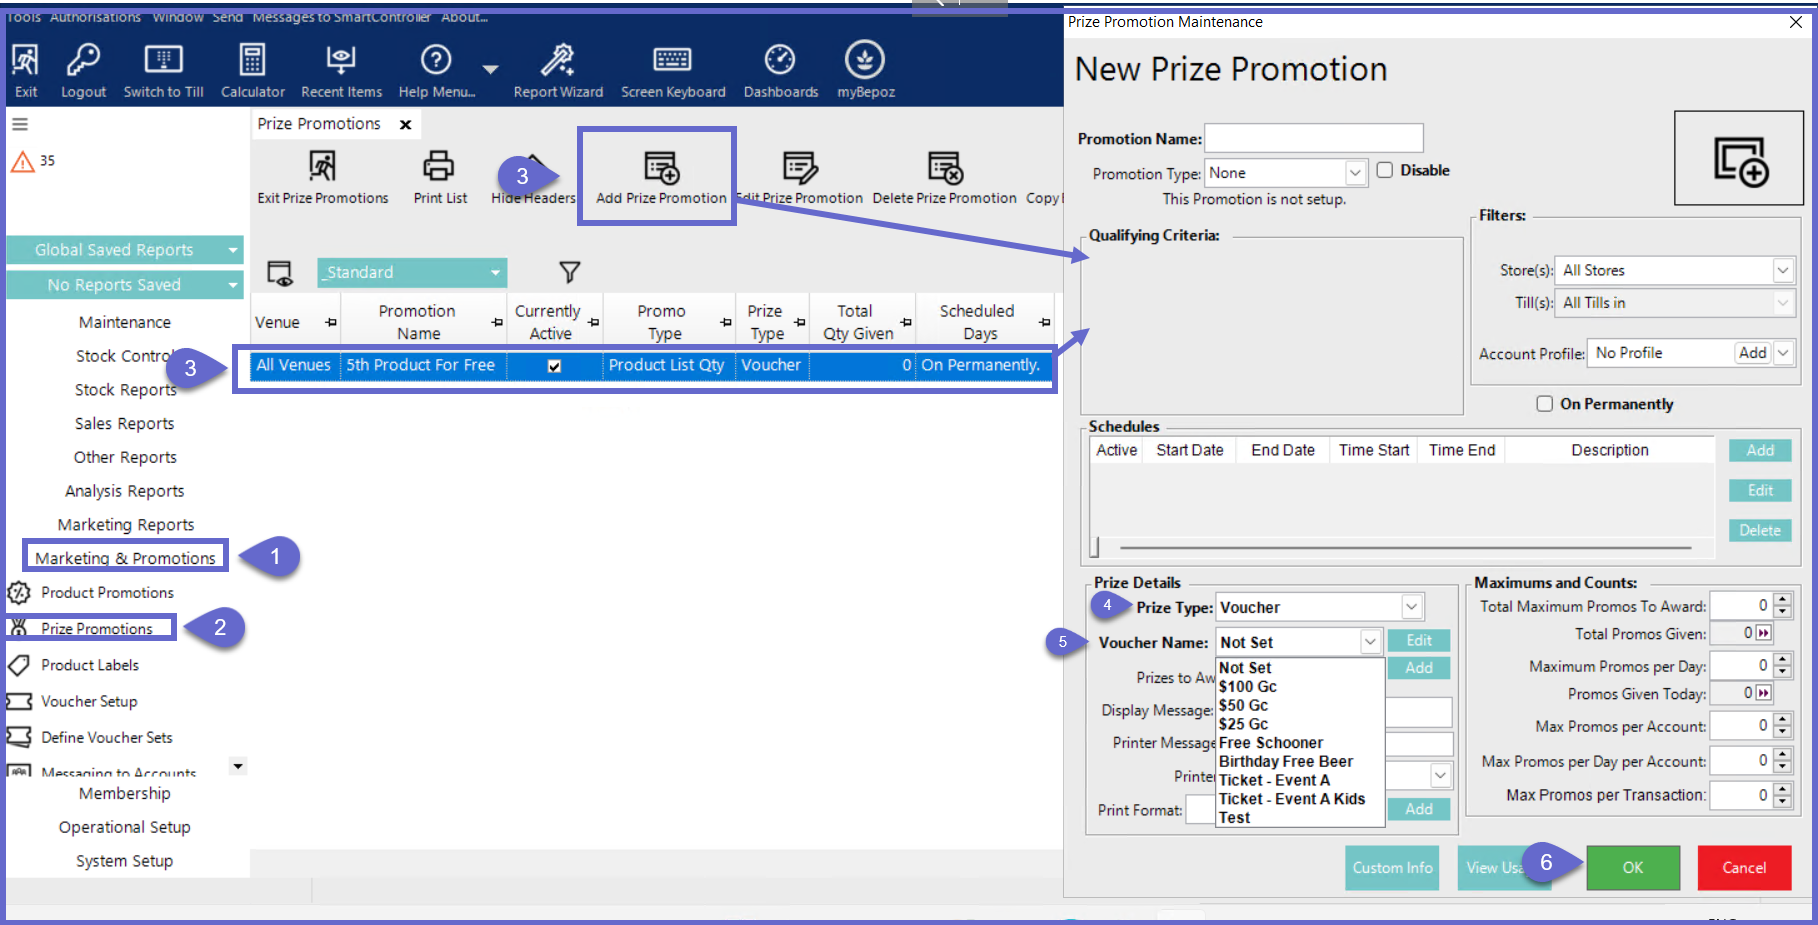
- Assigning a Voucher to a Prize Promotion allows a completed promotion to issue a reward, this being the voucher
- To connect voucher to a prize promotion. Follow the guide below after saving the voucher configurations
- On the menu sidebar, the Marketing & Promotion title should be expanded already. If not click this.
- In the expanded list, click Prize Promotion
- Double click an existing promotion from the list OR add a new one. Refer to "Creating a Bepoz Prize Promotion" to add a new promotion or edit an existing one
- In the Prize Promotion Maintenance menu. locate the Prize Details section. Click Prize Type and change to Voucher if this is not set
- Press the Voucher Name dropdown list and select an existing voucher or click add to make a new one
- Click OK at the bottom right of the panel to save