
-
End-User | Products & SmartPOS
-
End-User | Stock Control
-
End-User | Table Service and Kitchen Operations
-
End-User | Pricing, Marketing, Promotions & Accounts
- Prize Promotions
- Points, Points Profiles and Loyalty
- Product Promotions
- Repricing & Discounts in SmartPOS
- Vouchers
- Account Till Functions
- Pricing, Price Numbers and Price Modes
- Raffles & Draws
- Marketing Reports
- Accounts and Account Profiles
- Rewards
- SmartPOS Account Functions
- Troubleshooting
- Product Labels
- Packing Slips
-
End-User | System Setup & Admin
-
End-User | Reporting, Data Analysis & Security
-
End-User | Membership & Scheduled Billing
-
End-User | Operators, Operator Permissions & Clocking
-
Interfaces | Data Send Interfaces
-
Interfaces | EFTPOS & Payments
- NZ EFTPOS Interfaces
- Linkly (Formerly PC-EFTPOS)
- Adyen
- Tyro
- ANZ BladePay
- Stripe
- Windcave (Formerly Payment Express)
- Albert EFTPOS
- Westpac Presto (Formerly Assembly Payments)
- Unicard
- Manager Cards External Payment
- Pocket Voucher
- OneTab
- Clipp
- eConnect-eConduit
- Verifone
- AXEPT
- DPS
- Liven
- Singapore eWallet
- Mercury Payments TRANSENTRY
- Ingenico
- Quest
- Oolio - wPay
-
Interfaces | SMS & Messaging
-
Interfaces | Product, Pricing, Marketing & Promotions
- Metcash Loyalty
- Range Servant
- ILG Pricebook & Promotions
- Oolio Order Manager Integration
- Ubiquiti
- Product Level Blocking
- BidFood Integration
- LMG
- Metcash/IBA E-Commerce Marketplace
- McWilliams
- Thirsty Camel Hump Club
- LMG Loyalty (Zen Global)
- Doshii Integration
- Impact Data
- Marsello
- IBA Data Import
- Materials Control
- Last Yard
- Bepoz Standard Transaction Import
-
Interfaces | Printing & KDS
-
Interfaces | Reservation & Bookings
-
Interfaces | Database, Reporting, ERP & BI
-
Interfaces | CALink, Accounts & Gaming
- EBET Interface
- Clubs Online Interface
- Konami Interface
- WIN Gaming Interface
- Aristocrat Interface
- Bally Interface
- WorldSmart's SmartRetail Loyalty
- Flexinet & Flexinet SP Interfaces
- Aura Interface
- MiClub Interface
- Max Gaming Interface
- Utopia Gaming Interface
- Compass Interface
- IGT & IGT Casino Interface
- MGT Gaming Interface
- System Express
- Aristocrat nConnect Interface
- GCS Interface
- Maxetag Interface
- Dacom 5000E Interface
- InnTouch Interface
- Generic & Misc. CALink
-
Interfaces | Miscellaneous Interfaces/Integrations
-
Interfaces | Property & Room Management
-
Interfaces | Online Ordering & Delivery
-
Interfaces | Purchasing, Accounting & Supplier Comms
-
SmartPOS | Mobile App
-
SmartPDE | SmartPDE 32
-
SmartPDE | Denso PDE
-
SmartPDE | SmartPDE Mobile App
-
MyPlace
-
MyPlace | myPLACE Lite
-
MyPlace | Backpanel User Guides
- Bepoz Price Promotions
- What's on, Events and tickets
- Staff
- System Settings | Operational Settings
- Vouchers & Gift Certificates
- Member Onboarding
- Members and memberships
- System Settings | System Setup
- Reports and Reporting
- Actions
- Offers | Promotions
- Messaging & Notifications
- System Settings | App Config
- Surveys
- Games
- User Feedback
- Stamp Cards
-
MyPlace | Integrations
-
MyPlace | FAQ's & How-2's
-
MyPlace | Release Notes
-
YourOrder
-
YourOrders | Backpanel User Guides
-
YourOrders | YourOrder Kiosk User Guide
-
YourOrders | Merchant App User Guide
-
WebAddons
-
Installation / System Setup Guides
- SmartPOS Mobile App | Setup
- SmartPOS Mobile App | SmartAPI Host Setup
- SmartPOS Mobile App | BackOffice Setup
- SmartPOS Mobile App | Pay@Table setup
- SmartKDS Setup 4.7.2.7 +
- SmartKDS Setup 4.6.x
- SQL Installations
- Server / BackOffice Installation
- New Database Creation
- Multivenue Setup & Config.
- SmartPOS
- SmartPDE
- Player Elite Interface | Rest API
- Interface Setups
- Import
- KDSLink
- Snapshots
- Custom Interface Setups
-
HOW-2
- Product Maintenance
- Sales and Transaction Reporting
- SmartPOS General
- Printing and Printing Profiles
- SQL
- Repricing & Discounts
- Stock Control
- Membership
- Accounts and Account Profiles
- Miscellaneous
- Scheduled Jobs Setups
- Backoffice General
- Purchasing and Receiving
- Database.exe
- EFTPOS
- System Setup
- Custom Support Tools
-
Troubleshooting
-
Hardware
6 | Creating and Editing a Stamp Card
This article is a guide on how to add/edit Stamp cards. It will also outli
This article is a guide on how to add/edit Stamp cards.
It will also outline the settings on the Create/Update Stamp Card pages, which is where all changes to a Stamp Card is conducted
Prerequisites
- To access the "Stamp Card" settings the follow privileges are required:
- Marketing Role Prilveges will need to be enabled
- Roles "Role Maintenance" Panel
- Privilege Flags: "Marketing"
- Stamp Card and Stamp Card Won will need to be active
- Feature Control "Side Nav" tab
- "Show Hidden?" Flag
- Stamp Card: ON (Blue)
- Stamp Card Won: ON (Blue)
- For a full configuration of a stamp card the two components are required:
- A Myplace voucher that is linked to a Bepoz Voucher
- A Bepoz Prize Promotion
Add/Edit a Stamp Card
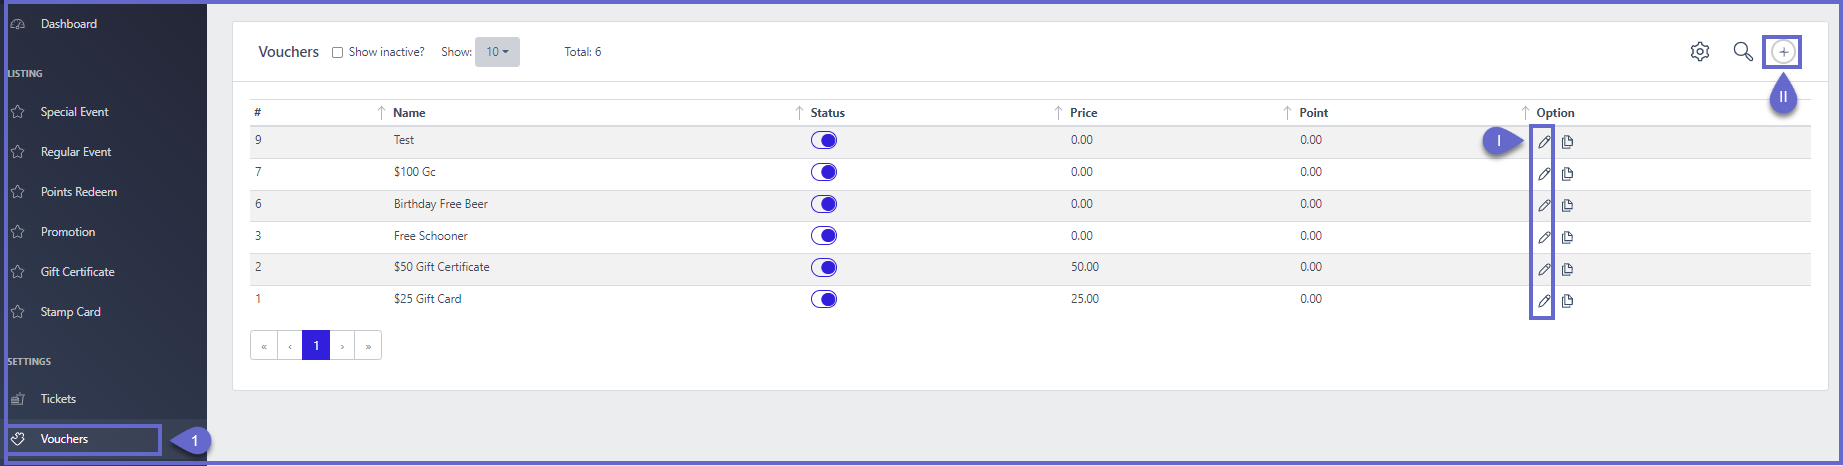
- After signing into Myplace backpanel, use the following procedure to a Stamp card or add a new one
Steps
- Click Stamp Card in the menu sidebar. if this is not available check that all prerequisites have been met
- Choose between the Add icon, to create a new voucher and Edit icons, to update existing ones
- I. Click the Add icon and the Add Stamp Card page will appear
- II. Click the Edit Icon and the Update Stamp Card page will appear
Create/Update Stamp Card
- When either the edit or add icon is clicked. A new page will display.
- Both pages will have the same settings, the only differences are the page titles and the 'update stamp card' page will have populated fields
- The guide below will outline the steps to configure a Stamp Card. Use this, after following the Add/Edit a Stamp Card section above
Step 1 - Prize Promotion

- Click the Prize Promotion Field and a dropdown list will appear with all active prize promotions that have been created in Backoffice
- When an option is selected then the 'Prize Promotion Required Quantity' field will automatically update using the Required Qty value from the promotion in Bepoz
- If no options appear, refer to "Creating a Bepoz Prize Promotion" to make a new one before proceeding
Step 2 - General Settings
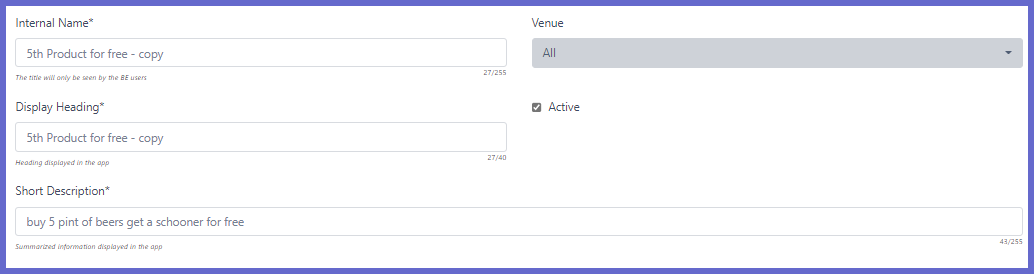
- Internal Name*
- A required field. which will open a prompt if left empty
- Input a title for the stamp card, that is used inside Myplace but is never displayed on the app
- Display Heading*
- A required field. which will open a prompt if left empty
- Input text that will be used as a label for the stamp card. This label will be displayed on the Myplace app
- Short Description*
- A required field. which will open a prompt if left empty
- A small sentence to describe the stamp card. It is recommended to include, actions to complete the stamp card and the reward upon completion
- Venue
- A dropdown to select which venues the stamp card will be applied to
- 'All venue' selection applies this to every site on the Myplace app. This does not mean that the stamp card progression will accumulate between venues. Each card will still have separate progress
- Active
- A flag to set the stamp card as inactive/active
- ON: The stamp card will be enabled and can be used throughout Myplace
- OFF: It will disable the stamp card from being used in Myplace
Step 3 - Image

- An image that will display as a background for the stamp card
- Follow the process to add a new or update an image
- Steps
- Click the image area
- The file explorer will open. select a picture and click open
- A new panel will appear with the picture and a rectangle selection box
- Scale using the corners or move the selection box by clicking and dragging, until it covers the desired area
- Click Confirm to apply the picture
- If an image may is not selected correctly or appears pixelated. Users can click UNDO IMAGE CHANGE to revert it
Step 4 - Schedule
- Notification
- There is a toggle that allows sending messages to users about new stamp cards
- ON (Blue): Notification settings will appear and users send a message. The notification will be sent out on the assigned start date of a schedule. To show that a new stamp card is available
- Notification Settings
- Push Notification
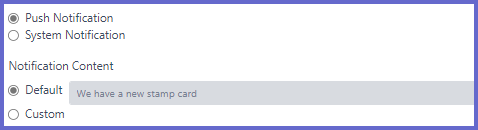
- Notification Content
- Default: Uses the default message, "We have a new stamp card" as the notification text
- Custom: Input a desired message to be used in notification
- System Notification
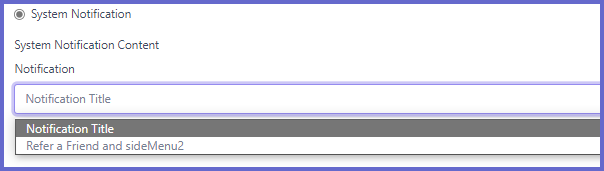
- System Notification Content
- A dropdown field with options of all available Notification setups in Myplace Backpanel
- Press an option to apply
- Tiers
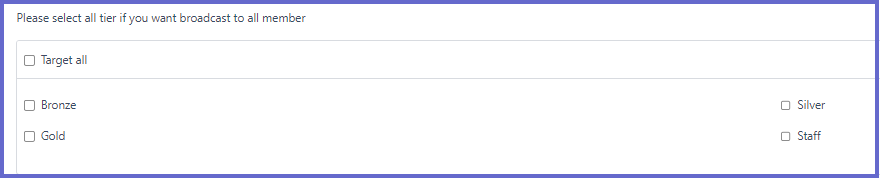
- Select which member groups will receive the notification
- Click "Target All", to send it to every member or tick the boxes next a tier to select it
- OFF (Red): Notification settings are hidden and no message will be sent
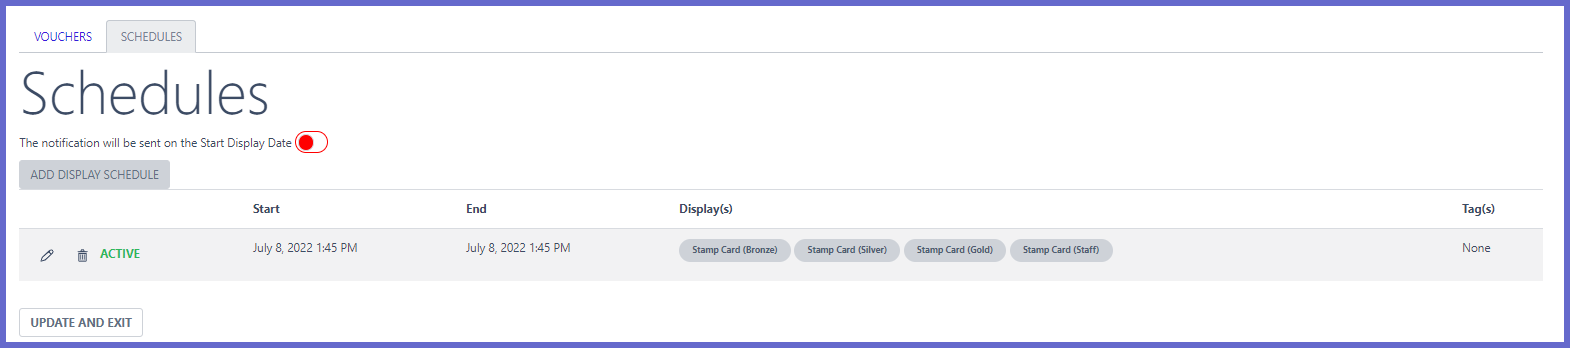
- ADD DISPLAY SCHEDULE
- Schedules can be attached to a stamp card to create a time period where it will display on the app and be available to use
- Click this button to open the "Create Schedule" panel for adding new timeframes
- Create Schedule
- Start Date
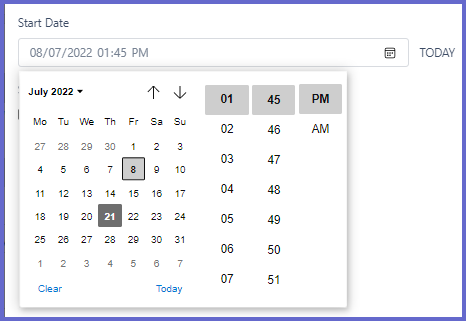
- A beginning date and time for the schedule
- Click the calendar icon in the field to choose a date/time or click TODAY next to the field to use the current date/time
- End Date
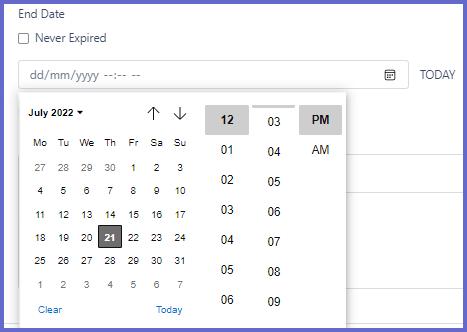
- A finish date and time for the schedule
- Never Expired flag
- ON: The schedule will not be assigned an end date and the schedule will run forever. This will hide the field below for selecting end date/time
- OFF: below field for end date selection is available. Click the calendar icon in the field to choose a date/time or click TODAY next to the field to use the current date/time
- Tier selection
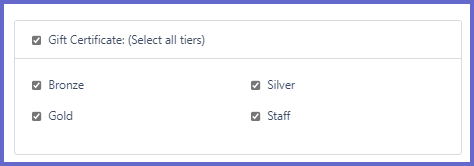
- select the member tiers that the stamp card is available for, within this schedule
- Click Gift Certificate (Select all tiers) to choose every tier or individually tick each box next to desired tiers
- SUBMIT/Cancel
- Click SUBMIT to save and add the schedule to the list or cancel to discard it
- Edit
- Click the icon on the left to change settings of existing schedules. It will open the "Create Schedule" panel. The panel configurations are outlined in 'ADD DISPLAY SCHEDULE' located above
- Delete
- Click the icon to remove the schedule from the list
Step 5 - Save
- Click Save and Exit at the bottom to keep all new configurations.
- Clicking any button that will move the user to a new screen will discard the changes