- INTERNAL - Bepoz Help Guides
- End-User | System Setup & Admin
- SmartPOS Till Modes & Extensions
-
End-User | Products & SmartPOS
-
End-User | Stock Control
-
End-User | Table Service and Kitchen Operations
-
End-User | Pricing, Marketing, Promotions & Accounts
- Prize Promotions
- Points, Points Profiles and Loyalty
- Product Promotions
- Repricing & Discounts in SmartPOS
- Vouchers
- Account Till Functions
- Pricing, Price Numbers and Price Modes
- Raffles & Draws
- Marketing Reports
- Accounts and Account Profiles
- Rewards
- SmartPOS Account Functions
- Troubleshooting
- Product Labels
- Packing Slips
-
End-User | System Setup & Admin
-
End-User | Reporting, Data Analysis & Security
-
End-User | Membership & Scheduled Billing
-
End-User | Operators, Operator Permissions & Clocking
-
Interfaces | Data Send Interfaces
-
Interfaces | EFTPOS & Payments
- NZ EFTPOS Interfaces
- Linkly (Formerly PC-EFTPOS)
- Adyen
- Tyro
- ANZ BladePay
- Stripe
- Windcave (Formerly Payment Express)
- Albert EFTPOS
- Westpac Presto (Formerly Assembly Payments)
- Unicard
- Manager Cards External Payment
- Pocket Voucher
- OneTab
- Clipp
- eConnect-eConduit
- Verifone
- AXEPT
- DPS
- Liven
- Singapore eWallet
- Mercury Payments TRANSENTRY
- Ingenico
- Quest
- Oolio - wPay
-
Interfaces | SMS & Messaging
-
Interfaces | Product, Pricing, Marketing & Promotions
- Metcash Loyalty
- Range Servant
- ILG Pricebook & Promotions
- Oolio Order Manager Integration
- Ubiquiti
- Product Level Blocking
- BidFood Integration
- LMG
- Metcash/IBA E-Commerce Marketplace
- McWilliams
- Thirsty Camel Hump Club
- LMG Loyalty (Zen Global)
- Doshii Integration
- Impact Data
- Marsello
- IBA Data Import
- Materials Control
- Last Yard
- Bepoz Standard Transaction Import
-
Interfaces | Printing & KDS
-
Interfaces | Reservation & Bookings
-
Interfaces | Database, Reporting, ERP & BI
-
Interfaces | CALink, Accounts & Gaming
- EBET Interface
- Clubs Online Interface
- Konami Interface
- WIN Gaming Interface
- Aristocrat Interface
- Bally Interface
- WorldSmart's SmartRetail Loyalty
- Flexinet & Flexinet SP Interfaces
- Aura Interface
- MiClub Interface
- Max Gaming Interface
- Utopia Gaming Interface
- Compass Interface
- IGT & IGT Casino Interface
- MGT Gaming Interface
- System Express
- Aristocrat nConnect Interface
- GCS Interface
- Maxetag Interface
- Dacom 5000E Interface
- InnTouch Interface
- Generic & Misc. CALink
-
Interfaces | Miscellaneous Interfaces/Integrations
-
Interfaces | Property & Room Management
-
Interfaces | Online Ordering & Delivery
-
Interfaces | Purchasing, Accounting & Supplier Comms
-
SmartPOS | Mobile App
-
SmartPDE | SmartPDE 32
-
SmartPDE | Denso PDE
-
SmartPDE | SmartPDE Mobile App
-
MyPlace
-
MyPlace | myPLACE Lite
-
MyPlace | Backpanel User Guides
- Bepoz Price Promotions
- What's on, Events and tickets
- Staff
- System Settings | Operational Settings
- Vouchers & Gift Certificates
- Member Onboarding
- Members and memberships
- System Settings | System Setup
- Reports and Reporting
- Actions
- Offers | Promotions
- Messaging & Notifications
- System Settings | App Config
- Surveys
- Games
- User Feedback
- Stamp Cards
-
MyPlace | Integrations
-
MyPlace | FAQ's & How-2's
-
MyPlace | Release Notes
-
YourOrder
-
YourOrders | Backpanel User Guides
-
YourOrders | YourOrder Kiosk User Guide
-
YourOrders | Merchant App User Guide
-
WebAddons
-
Installation / System Setup Guides
- SmartPOS Mobile App | Setup
- SmartPOS Mobile App | SmartAPI Host Setup
- SmartPOS Mobile App | BackOffice Setup
- SmartPOS Mobile App | Pay@Table setup
- SmartKDS Setup 4.7.2.7 +
- SmartKDS Setup 4.6.x
- SQL Installations
- Server / BackOffice Installation
- New Database Creation
- Multivenue Setup & Config.
- SmartPOS
- SmartPDE
- Player Elite Interface | Rest API
- Interface Setups
- Import
- KDSLink
- Snapshots
- Custom Interface Setups
-
HOW-2
- Product Maintenance
- Sales and Transaction Reporting
- SmartPOS General
- Printing and Printing Profiles
- SQL
- Repricing & Discounts
- Stock Control
- Membership
- Accounts and Account Profiles
- Miscellaneous
- Scheduled Jobs Setups
- Backoffice General
- Purchasing and Receiving
- Database.exe
- EFTPOS
- System Setup
- Custom Support Tools
-
Troubleshooting
-
Hardware
5 | Door Entry Terminal Device Setup
This article covers how to set up a Workstation Door Entry Terminal in BackOffice. A Door Entry Terminal is a Till that has no Till functionality; the terminal can be configured in a monitor as well. The monitor will display a slideshow of the photos and videos in the Media zipfile when waiting for members to swipe their card.
This article covers how to set up a Workstation Door Entry Terminal in BackOffice. A Door Entry Terminal is a Till that has no Till functionality; the terminal can be configured in a monitor as well. The monitor will display a slideshow of the photos and videos in the Media zipfile when waiting for members to swipe their card.
When the customer or member swipes, a photo or message will be displayed and any prize promotions that apply will be displayed and awarded. Here, tickets can also be printed from an attached printer or another printer (barrel printer).
Prerequisites
- To access Door Entry Terminal Settings, the applicable Operator Privileges
-
Operator Maintenance 'General' Tab - System Setup: "Access Venue, Stores & Tills" Flag
- System Setup: "Maintain Venue, Stores & Tills" Flag
Device Setup
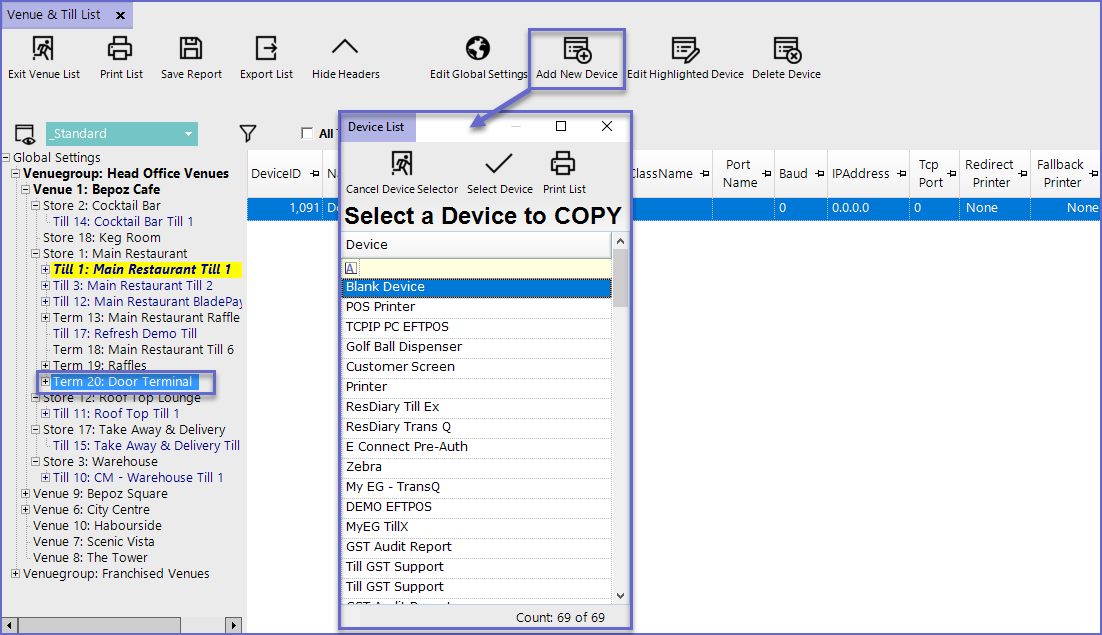
- Navigate through Venue, Stores & Tills and highlight the new Door Entry Terminal
- This will display a row of icons in the header as shown below
- Click on the 'Add New Device' to add a device for the terminal

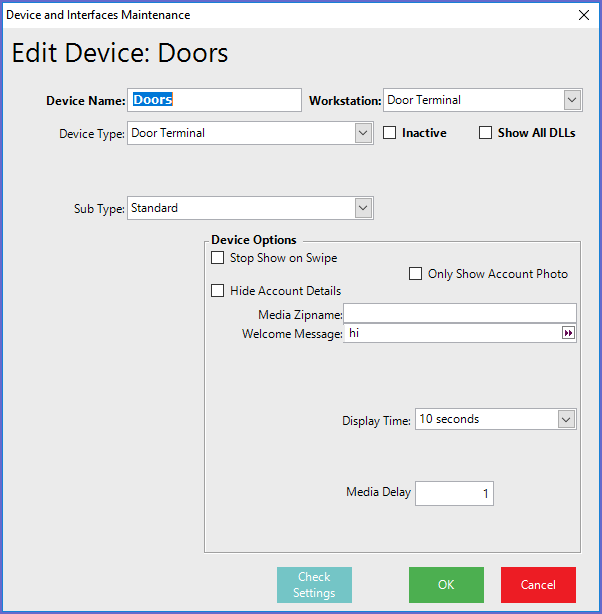
- Once a blank device has been selected, it will open the Device and Interfaces Maintenance

- Device Type
- Set the Device Type as Door Terminal
- Sub Type
- Set the Sub Type as Standard
Device Options
- Stop Show on Swipe
- The Slideshow will pause when a card is swiped
- Media Zipname
- This should be a Zipfile in the Severs Shared Data Directory
- The Media Zipname should contain files of Photos and/or videos that will be displayed on a Slideshow; these files can be
- jpg (preferred)
- gif
- bmp
- avi
- wmv(preferred)
- If a directory is specified in the filename, the file will NOT be sent to the Till; it is expected that same directory can be accessed directly by the Terminal (either manually maintained or a network shared)
- The file will be sent to the Till and extracted into the Till's Local Data Directory
- This is based on the File Date and if the zip file setup name or file date has not changed since the last download; the file will not re-sent
- Welcome Message
- This will default to "Please Swipe your Member Card" if left blank
- Media Delay
- This is the seconds' delay for each photo for a slideshow
- Once the Device has been set up, the Till can now be used by the operator
Standard Photo Filenames
- Additionally, there are standard Photo Filenames which will be displayed if they exist in the Till's Local Data Directory (or are in the Tills Media File zipfile)
- TransAccount.jpg
- The default photo to display
- AccountExpire15.jpg
- Displayed if an account will expire in the next 15 days
- AccountExpire30.jpg
- Displayed if an account will expire in the next 30 days
- AccountExpire60.jpg
- Displayed if an account will expire in the next 60 days
- AccountExpired.jpg
- Displayed if an Account is Expired #
- AccountStopped.jpg
- Displayed if an account is Stopped #
- AccountNotAuth.jpg
- Displayed if an account is for a different venue#
- All the above filenames with .wmv will be looked for and displayed if the .jpg does not exist
- The filenames with # mean that a written error message will display only if the special photo file is not found
