This article covers the Schedule Jobs setup guide for the Doshii Integration wit
This article covers the Schedule Jobs setup guide for the Doshii Integration with Bepoz.Prerequisites
- Minimum Bepoz version of v4.7 and onwards
- For an Operator to be able to setup Doshii Integration, the following Operator privileges must be enabled:
-
Venue Maintenance "Main" Tab (General Settings) - All “System Setup” Flags
-
Operator Maintenance 'General' Tab - System Setup: “Maintain Schedule Job” Flag
- System Setup: “Access Venue, Stores, Tills” Flag
Doshii Schedule Job
- This scheduled job, once configured allows the SmartController to communicate with Doshii; that, in turn, will send the current Product menu, Table data, and Till data from Bepoz to the Doshii platform
- Separate iterations of this Scheduled Job will need to be created for sending Menu data, Table data, and Till Data or a single Schedule Job can be created where the Send Menu, Send Tables, Send Tills flags are enabled
Job Setup Instructions
- To set up the BackOffice schedule job, log into BackOffice and complete the following steps:
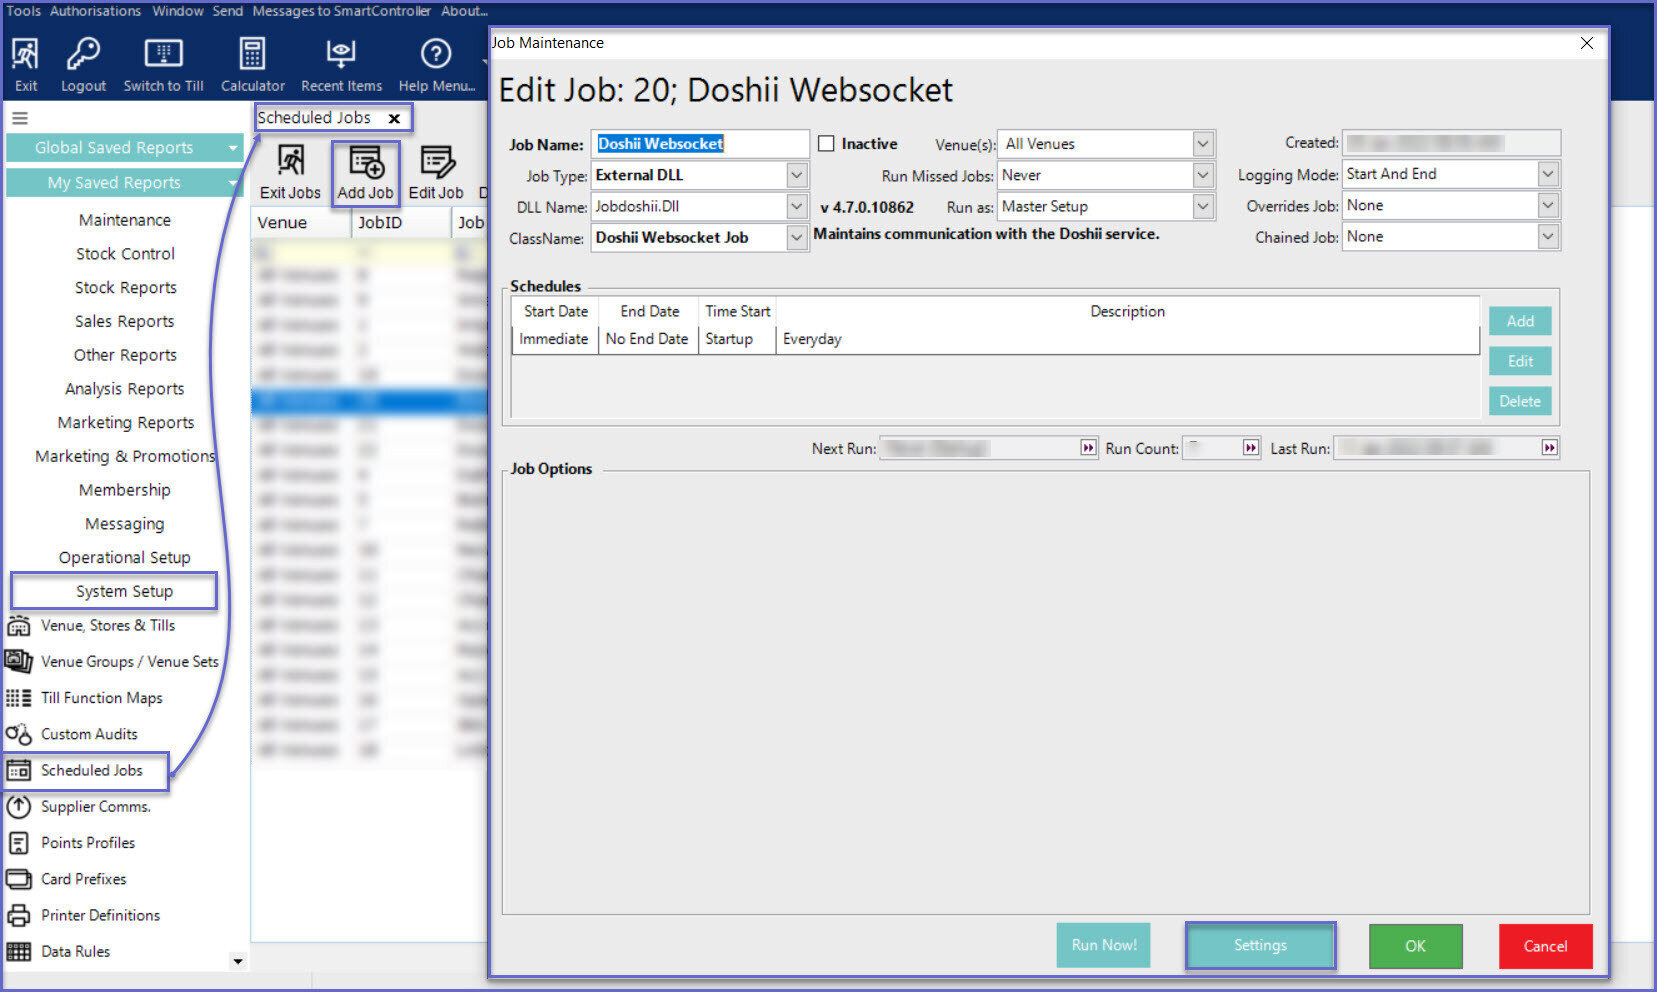
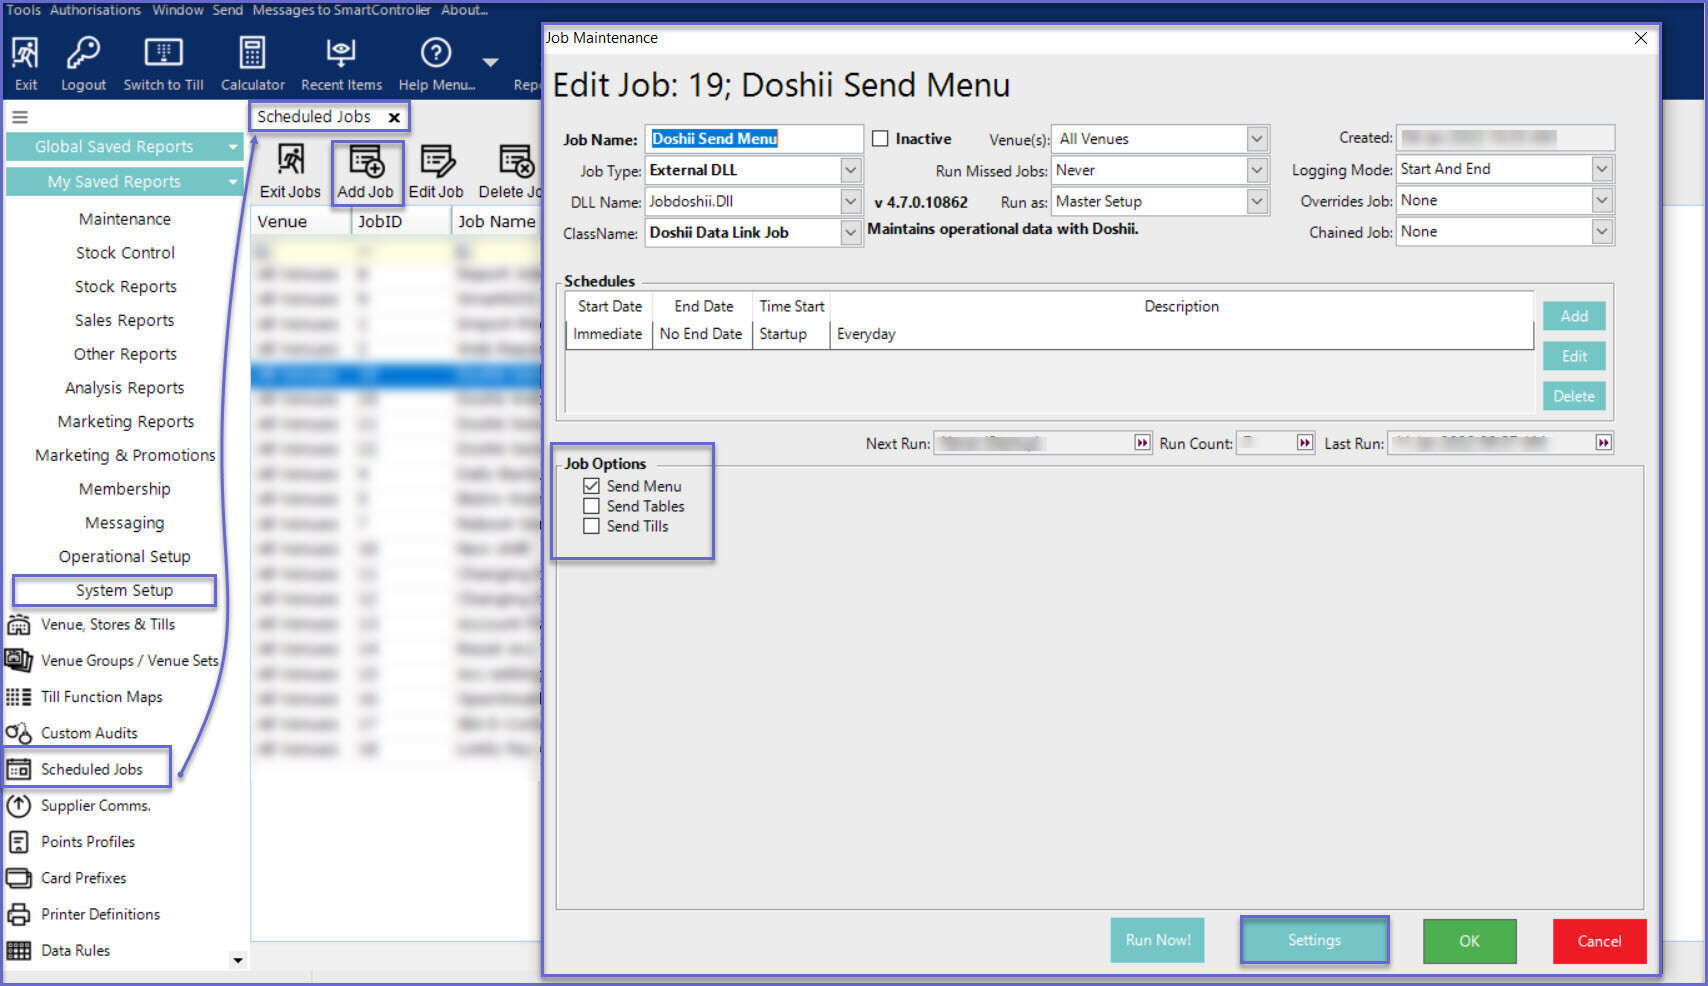
- Navigate to System Setup and select Scheduled Jobs
- Select Add Job button and the Job Maintenance window will open
- There are a number of credentials that need to be input and they include
- Job Name: Give the job a relevant name
- Job Type: External DLL
- DLL Name: Jobdoshii.Dll
- Class Name: Doshii Data Link Job
- Set any other required configurations such as "Run Missed Jobs", "Run as", etc.
- Configure any required schedule(s) (recommended to run at least once daily)
- Within the Job Options, select the appropriate flag to send the Menu, Tables, or Tills as needed
- Separate iterations of this Scheduled Job will need to be created for sending Menu data, Table data, and Till Data or a single Schedule Job can be created where the Send Menu, Send Tables, Send Tills flags are enabled at the same time
- When separate Schedule Jobs are created for Send Menu, Send Tables and Send Tills the respective checkbox has to be enabled and click on the ‘Settings’ button at the bottom of the window to access the required Doshii Data Link Settings
- When a single Schedule Job is created for Send Menu, Send Tables and Send Tills, all the three checkboxes are enabled and click on the ‘Settings’ button at the bottom of the window to access the required Doshii Data Link Settings
- Note: When the Send Tables flag is enabled, Bepoz sends a range of tables to Doshii. Please refer to
Venue Maintenance "Tables" Tab for further information
Doshii Data Link Settings
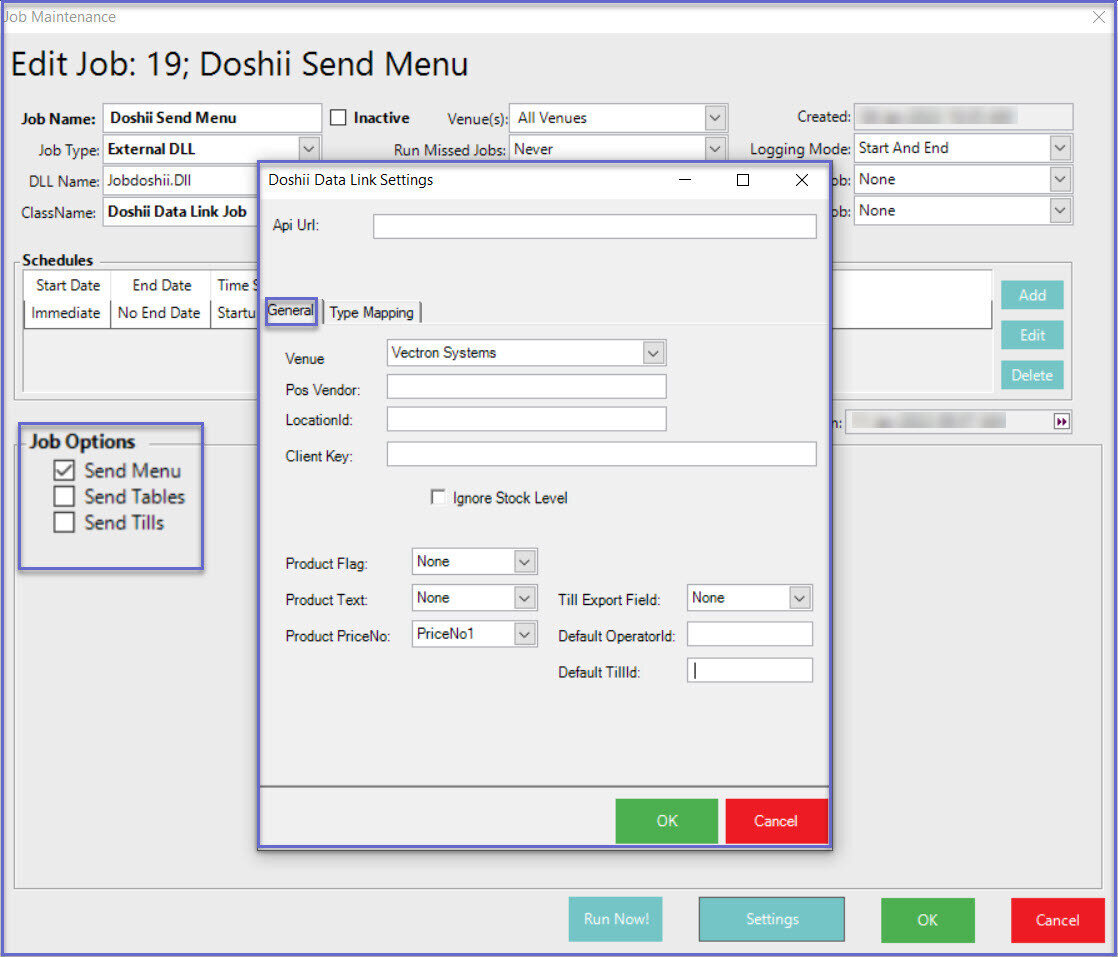
- Within the Settings
- API Url: This is the URL provided by Doshii
- General:
- Venue: Select the venue from the drop down list
- Pos Vendor: Enter the POS system Id provided by Doshii. Note: The value provided should be in lower case
- LocationId: This is the location Id provided by Doshii
- Client Key: This is the Client Key provided by Doshii
- Ignore Stock Level:
- ON: When flag is ON, all the products will be sent to Doshii as available
- OFF:When flag is OFF, it respects the existing workflow. Only the products which have stock on hand are sent to Doshii as available and all other products are sent as unavailable
- Note: This flag is available from v4.7.2.9 and onwards
- Product Flag: This is a dropdown to select what products to be sent to Doshii
- When the custom flag name is selected from the dropdown, the products with this custom flag are sent to Doshii
- When 'All products' option is selected from the dropdown, this allows Venues to bulk send all products to Doshii
- Note: This option to send all products to Doshii is available from v4.7.2.9 and onwards
- Product Text: This is the custom text field set on the product
- Product PriceNo: Select the PriceNo from the drop down list. The selected PriceNo will be chosen when a menu is sent to Doshii
- Promo Flag: This is the custom flag set on a promotion. This indicates whether a promotion should go to Doshii. Select one from the dropdown list. Note: Doshii supports only Product Price Promotion
- Note: From v4.7.2.5, the promotions to Doshii are not supported. Doshii does not have the capability to support Bepoz promotions. The Promo Flag is deprecated from v4.7.2.5 and onwards
- Till Export Field: This is the field where Doshii Till ID is stored; select one of the Till Export values from the drop-down list
- Default OperatorId: Enter the default Operator Id
- Default Till Id: Enter the default Till Id
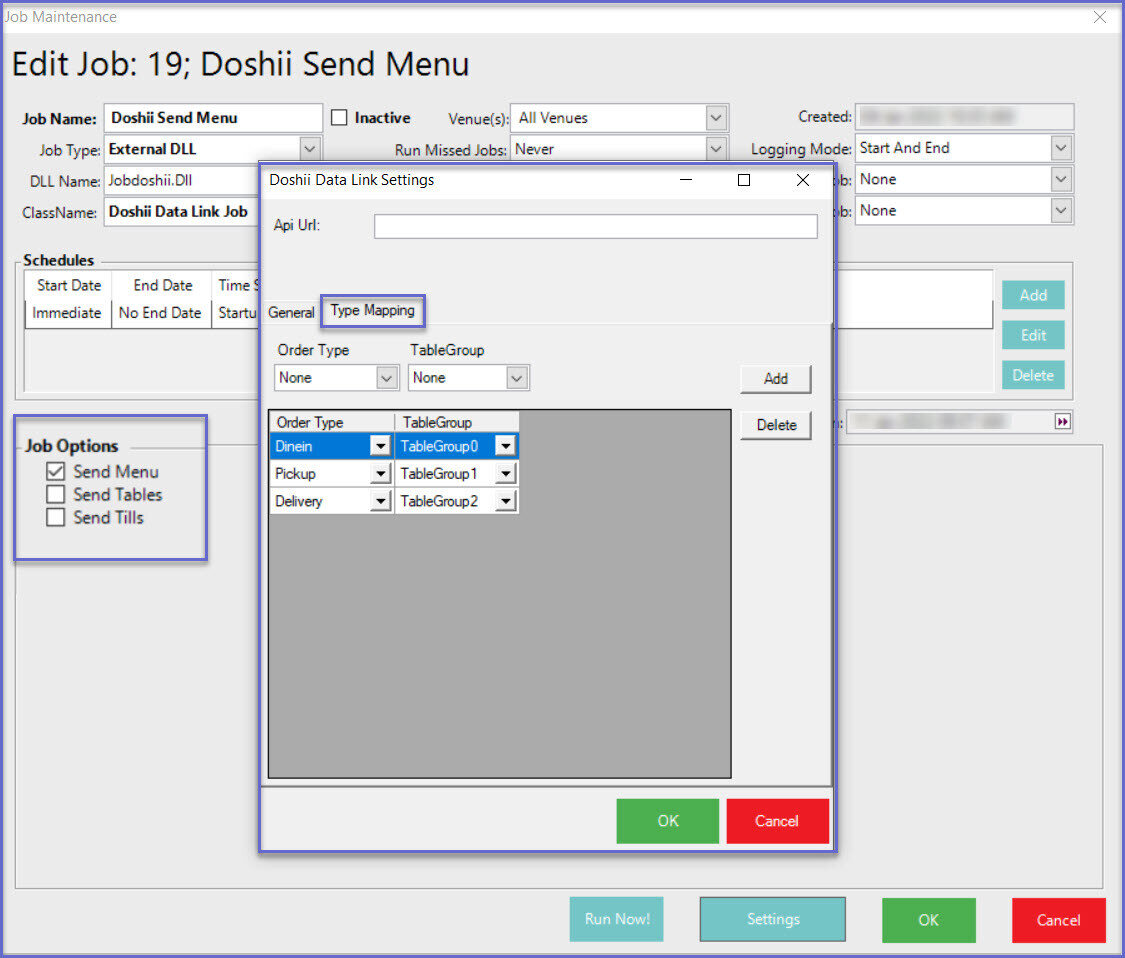
- Type Mapping:
- Map the TableGroup to each Order Type
- Select the Order Type and Table Group respectively from the drop down and click on ‘Add’ button to add the selection
- Note: The TableGroup for Doshii Delivery and Pickup order types must be created at the Venue Maintenance
Venue Maintenance "Tables" Tab
2. Click ‘OK’ to save the settings and this will exit from the Doshii Data Link Settings window
3. Click on 'Ok' again on the Job Maintenance window to save the Doshii Schedule Job settings
Repeat these steps to create two (2) other iterations of this schedule job for each Job Options, e.g., to ‘Send Tables’ and ‘Send Tills’
Doshii Websocket Job
- This job must be create and run for the system to maintain active communication with Doshii
Job Setup Instructions
- To set up this Schedule Job, log into BackOffice and complete the following steps:
- Navigate to System Setup and select Scheduled Jobs
- Select Add Job button and the Job Maintenance window will open
- There are a number of credentials that need to be input and they include
- Job Name: Give the job a relevant name
- Job Type: External DLL
- DLL Name: Jobdoshii.Dll
- Class Name: Doshii Websocket Job
- Set any other required configurations such as "Run Missed Jobs", "Run as", etc.
- Configure any required schedule(s) - recommended to run this job at least once daily
- Click on the 'Settings’ button at the bottom of the window to make the required settings
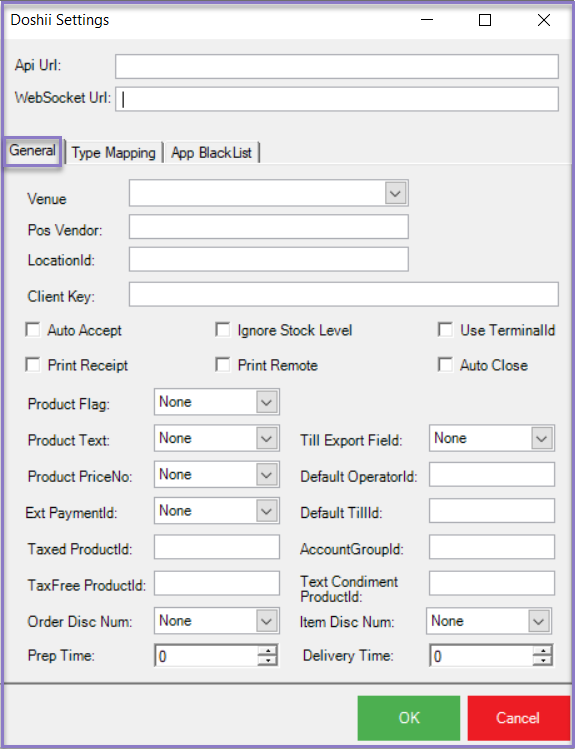
Doshii Settings
- API Url: This is the URL provided by Doshii
- WebSocket Url: This is the Url provided by Doshii
General:
- Venue: Select the venue from the drop-down list
- Pos Vendor: Enter the POS system Id provided by Doshii; NB: the value provided should be in lower case
- LocationId: Enter the location ID provided by Doshii
- Client Key: Enter the Client Key provided by Doshii
- Auto Accept: This will auto-accept all the orders from Doshii
- ON: When the flag is on, the orders are accepted automatically and sent to SmartPOS
- OFF: When the flag is off, the orders sent to SmartPOS are waiting for acceptance or rejection
- Ignore Stock Level: This is the custom flag for stock of the products; stock of the products is considered all the times unless the flag is ON
- Use TerminalId: This flag is to override the terminal IDs; the default would be that Bepoz ignores the Terminal ID which is sent through
- Print Receipt: When enabled, a receipt is printed for every transaction made
- Print Remote: This controls whether the print job is queued to the remote printers (Kitchen printers) for the products
- Auto Close: This will auto-close all the accepted orders from Doshii
- ON: When the flag is on, the Doshii orders which are accepted at SmartPOS are closed automatically
- OFF: When the flag is off, the orders are not auto closed, the operator has to manually process the orders at SmartPOS
- Product Flag: This is the custom flag that has been created and set for the Products; the Products with this custom flag on are sent to Doshii
- Product Text: This is the custom text field set for the Product
- Product PriceNo: Select the Price Number from the drop-down list; the selected Price Number will be used when a menu is sent to Doshii
- External PaymentId:
Create an external payment for Doshii and select the External Payment ID from the drop-down list - Taxed
- TaxFree ProductId: If any non-tax item sold at Doshii will be available / mapped into POS as Product item specify with this ProductID; note: this should be the Product ID of a Product in the System's database that was created to be used specifically for this purpose and setup as GSTFree, Non-Stock, Zero Cost and Price
- Order Disc Num: This is the default Order discount totaliser
- Note: This field is available from v4.7.2.6 and onwards
- Promo Flag: This is the custom flag set on a promotion and indicates whether a promotion should go to Doshii; select one from the drop-down list. Note: Doshii supports only Product Price Promotion
- Note: From v4.7.2.5, the promotions to Doshii are not supported. Doshii does not have the capability to support Bepoz promotions. The Promo Flag is deprecated from v4.7.2.5 and onwards
- Till Export Field: This is the field where Doshii Till ID is stored; select one of the Till Export values from the drop-down list
- Default OperatorId: Enter the default Operator ID to be used
- Default Till Id: Enter the default Till ID to be used
- Account
- Text Condiment ProductId: This is the default text condiment product Id used when a Doshii order has an open/unknown condiment
- Note: This field is available from v4.7.2.6 and onwards
- Item Disc Num: This is the default Item discount totaliser
- Note: This field is available from v4.7.2.9 and onwards
- Prep Time: This is the time to prepare the order
- Delivery Time: This is the time get the order ready for delivery
- Print Recovered Order Threshold:
- In case of an event where Websocket Job was down and orders from Doshii were not received into Bepoz, Bepoz does support retrieving these missed orders when the Doshii websocket scheduled job recovers
- When these missed orders are recovered, the 'Print Recovered Order Threshold' determines if the order still needs to be printed to the kitchen or not
- If the time when the order is retrieved after the websocket job recovered is within the time interval set, then the order is printed to kitchen to kitchen with a 'Recovered Order' text on the header receipt
- If the time is outside the threshold has elapsed, the order is retrieved but not printed to kitchen
- Note: The Print Recovered order option is only available from v4.7.4.0
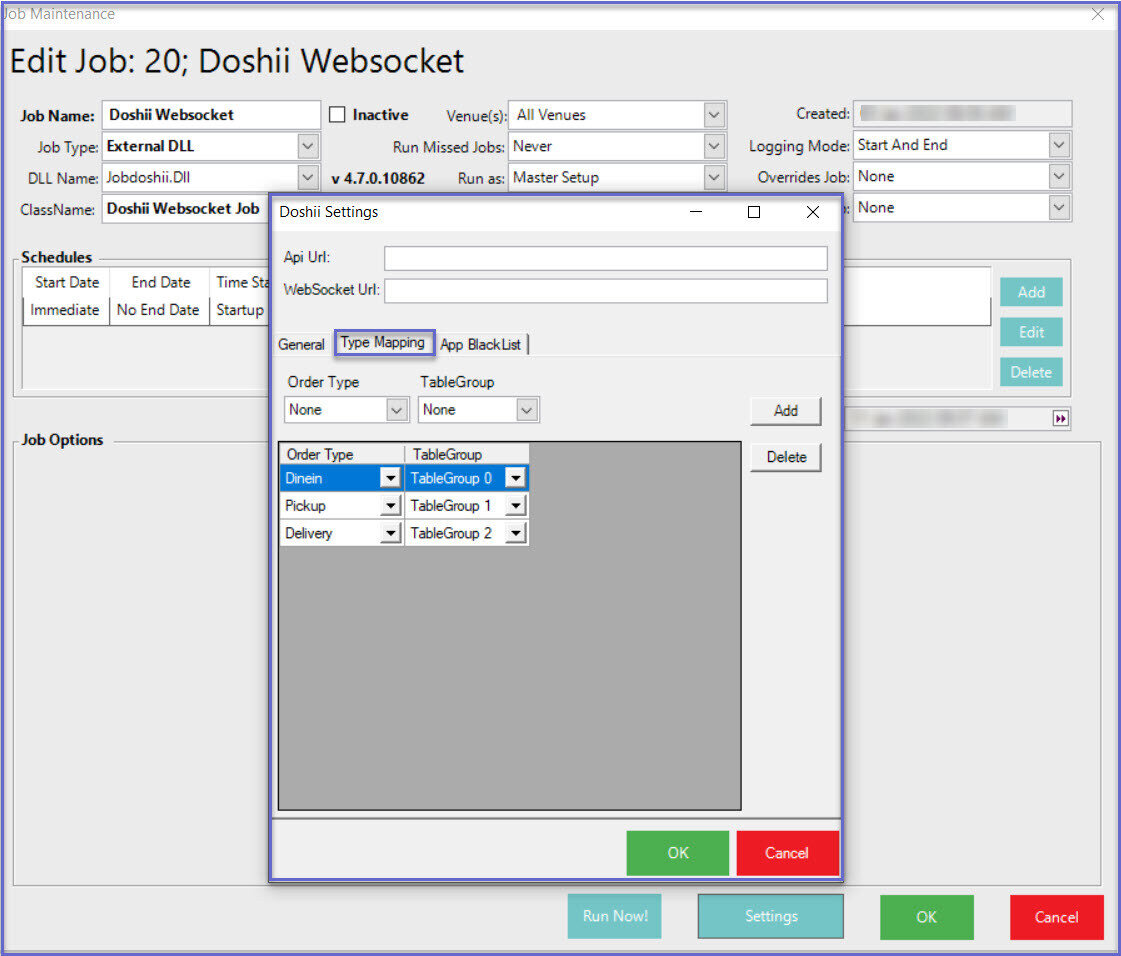
Type Mapping:
- Map the TableGroup to each Order Type
- Select the Order Type and Table Group respectively from the drop down and click on the ‘Add’ button to add the selection
- Note: The TableGroup for Doshii Delivery and Pickup order types must be created within the
Venue Maintenance "Tables" Tab
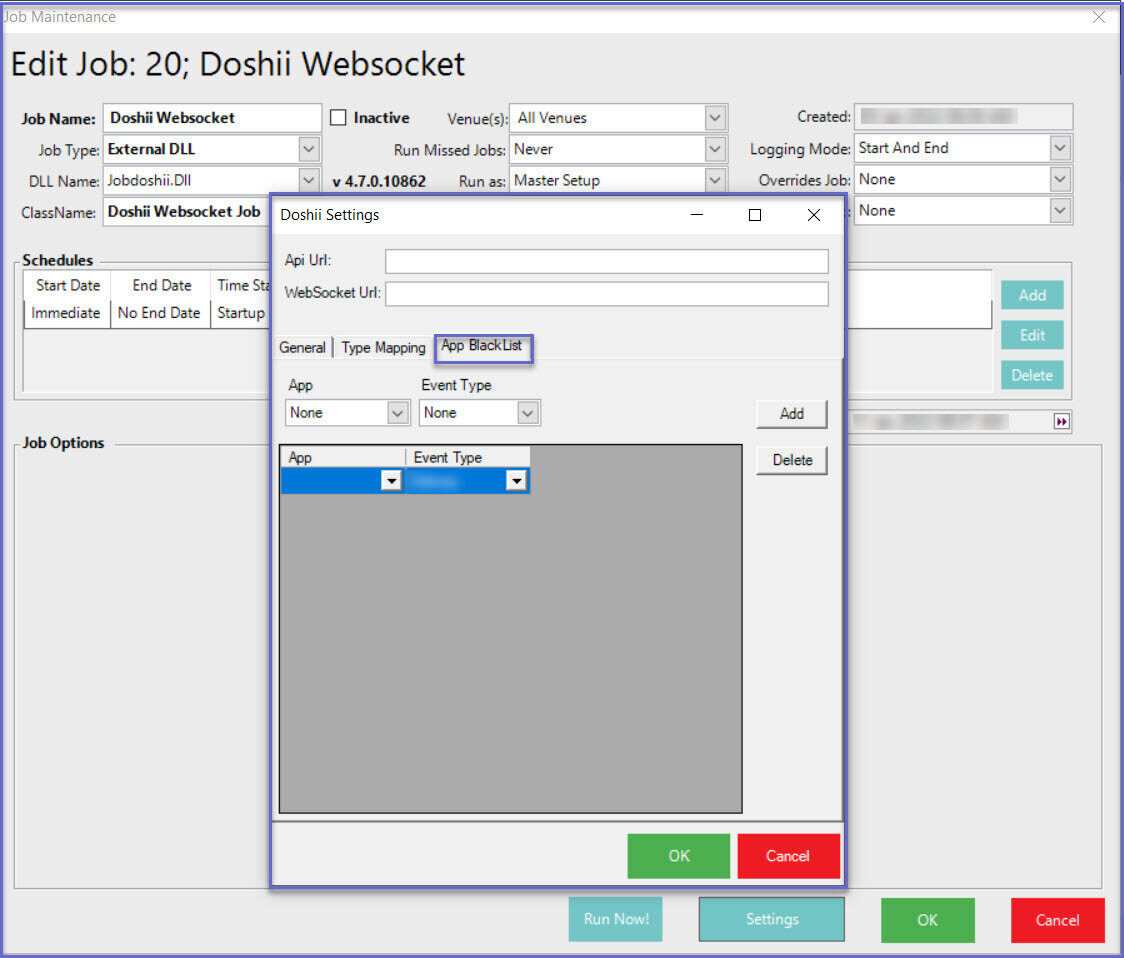
App BlackList:
- Map the App and Event Type to add to the Blacklist
- App is the unique application ID for each applications
- The App ID which is selected here will not be accepted by Bepoz for the corresponding event type selected
2. Click ‘OK’ to save the settings and this will exit from the Doshii Data Link Settings window
3. Click on 'OK' again on the Job Maintenance window to save the Doshii Schedule Job settings