-
End-User | Products & SmartPOS
-
End-User | Stock Control
-
End-User | Table Service and Kitchen Operations
-
End-User | Pricing, Marketing, Promotions & Accounts
- Prize Promotions
- Points, Points Profiles and Loyalty
- Product Promotions
- Repricing & Discounts in SmartPOS
- Vouchers
- Account Till Functions
- Pricing, Price Numbers and Price Modes
- Raffles & Draws
- Marketing Reports
- Accounts and Account Profiles
- Rewards
- SmartPOS Account Functions
- Troubleshooting
- Product Labels
- Packing Slips
-
End-User | System Setup & Admin
-
End-User | Reporting, Data Analysis & Security
-
End-User | Membership & Scheduled Billing
-
End-User | Operators, Operator Permissions & Clocking
-
Interfaces | Data Send Interfaces
-
Interfaces | EFTPOS & Payments
- NZ EFTPOS Interfaces
- Linkly (Formerly PC-EFTPOS)
- Adyen
- Tyro
- ANZ BladePay
- Stripe
- Windcave (Formerly Payment Express)
- Albert EFTPOS
- Westpac Presto (Formerly Assembly Payments)
- Unicard
- Manager Cards External Payment
- Pocket Voucher
- OneTab
- Clipp
- eConnect-eConduit
- Verifone
- AXEPT
- DPS
- Liven
- Singapore eWallet
- Mercury Payments TRANSENTRY
- Ingenico
- Quest
- Oolio - wPay
-
Interfaces | SMS & Messaging
-
Interfaces | Product, Pricing, Marketing & Promotions
- Metcash Loyalty
- Range Servant
- ILG Pricebook & Promotions
- Oolio Order Manager Integration
- Ubiquiti
- Product Level Blocking
- BidFood Integration
- LMG
- Metcash/IBA E-Commerce Marketplace
- McWilliams
- Thirsty Camel Hump Club
- LMG Loyalty (Zen Global)
- Doshii Integration
- Impact Data
- Marsello
- IBA Data Import
- Materials Control
- Last Yard
- Bepoz Standard Transaction Import
-
Interfaces | Printing & KDS
-
Interfaces | Reservation & Bookings
-
Interfaces | Database, Reporting, ERP & BI
-
Interfaces | CALink, Accounts & Gaming
- EBET Interface
- Clubs Online Interface
- Konami Interface
- WIN Gaming Interface
- Aristocrat Interface
- Bally Interface
- WorldSmart's SmartRetail Loyalty
- Flexinet & Flexinet SP Interfaces
- Aura Interface
- MiClub Interface
- Max Gaming Interface
- Utopia Gaming Interface
- Compass Interface
- IGT & IGT Casino Interface
- MGT Gaming Interface
- System Express
- Aristocrat nConnect Interface
- GCS Interface
- Maxetag Interface
- Dacom 5000E Interface
- InnTouch Interface
- Generic & Misc. CALink
-
Interfaces | Miscellaneous Interfaces/Integrations
-
Interfaces | Property & Room Management
-
Interfaces | Online Ordering & Delivery
-
Interfaces | Purchasing, Accounting & Supplier Comms
-
SmartPOS | Mobile App
-
SmartPDE | SmartPDE 32
-
SmartPDE | Denso PDE
-
SmartPDE | SmartPDE Mobile App
-
MyPlace
-
MyPlace | myPLACE Lite
-
MyPlace | Backpanel User Guides
- Bepoz Price Promotions
- What's on, Events and tickets
- Staff
- System Settings | Operational Settings
- Vouchers & Gift Certificates
- Member Onboarding
- Members and memberships
- System Settings | System Setup
- Reports and Reporting
- Actions
- Offers | Promotions
- Messaging & Notifications
- System Settings | App Config
- Surveys
- Games
- User Feedback
- Stamp Cards
-
MyPlace | Integrations
-
MyPlace | FAQ's & How-2's
-
MyPlace | Release Notes
-
YourOrder
-
YourOrders | Backpanel User Guides
-
YourOrders | YourOrder Kiosk User Guide
-
YourOrders | Merchant App User Guide
-
WebAddons
-
Installation / System Setup Guides
- SmartPOS Mobile App | Setup
- SmartPOS Mobile App | SmartAPI Host Setup
- SmartPOS Mobile App | BackOffice Setup
- SmartPOS Mobile App | Pay@Table setup
- SmartKDS Setup 4.7.2.7 +
- SmartKDS Setup 4.6.x
- SQL Installations
- Server / BackOffice Installation
- New Database Creation
- Multivenue Setup & Config.
- SmartPOS
- SmartPDE
- Player Elite Interface | Rest API
- Interface Setups
- Import
- KDSLink
- Snapshots
- Custom Interface Setups
-
HOW-2
- Product Maintenance
- Sales and Transaction Reporting
- SmartPOS General
- Printing and Printing Profiles
- SQL
- Repricing & Discounts
- Stock Control
- Membership
- Accounts and Account Profiles
- Miscellaneous
- Scheduled Jobs Setups
- Backoffice General
- Purchasing and Receiving
- Database.exe
- EFTPOS
- System Setup
- Custom Support Tools
-
Troubleshooting
-
Hardware
6 | Doshii Integration - SmartPOS User Guide
This article explains how to use the Till Function Buttons in SmartPOS that are
This article explains how to use the Till Function Buttons in SmartPOS that are used as part of the integration with the Doshii.Prerequisites
- Minimum Bepoz version of v4.7 and onwards
- To access Till Function Settings, the applicable Operator privileges will need to be enabled
-
Operator Maintenance 'General' Tab - System Setup: "Maintain Till Function Maps" flag
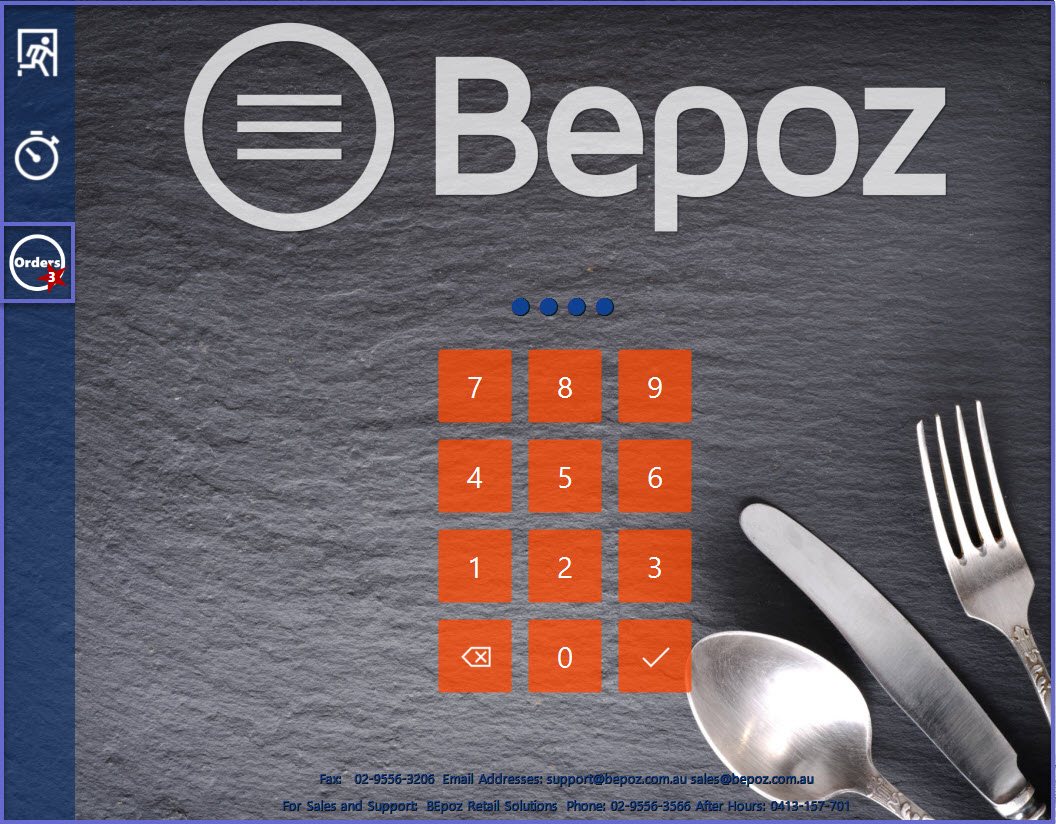
Order Summary Widget at SmartPOS
- A new widget at SmartPOS login which shows the number of pending orders received from Doshii
- The number of pending orders is displayed on the widget till the operator actions on them. To view the pending orders, the operator clicks on the widget and login to SmartPOS
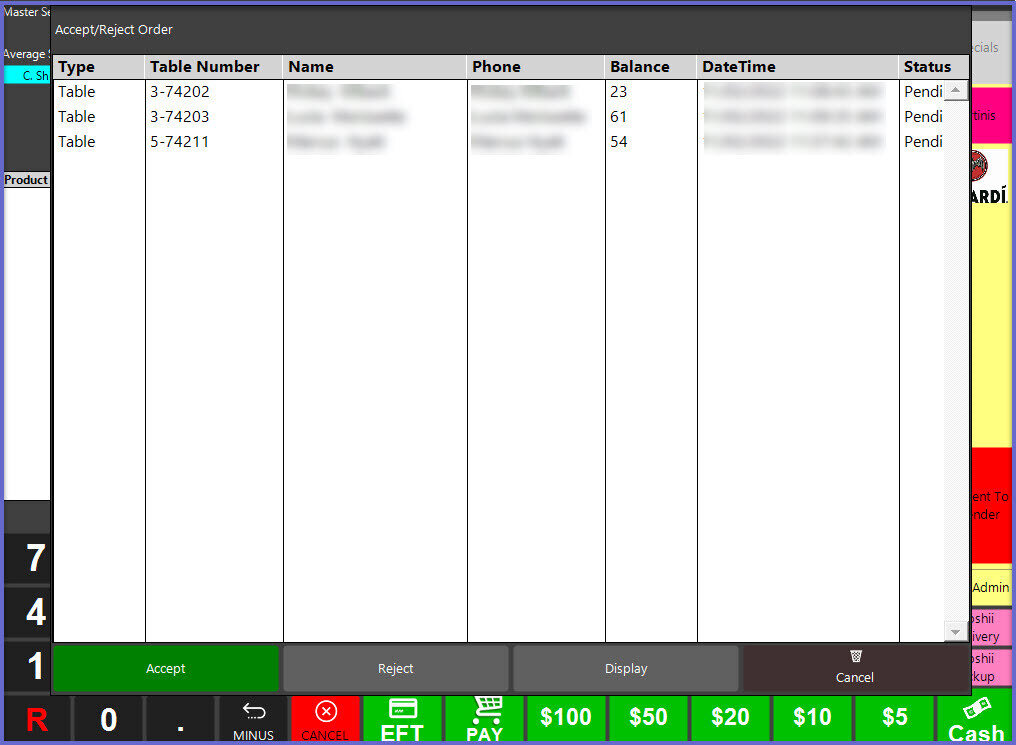
- When logged into SmartPOS, a list of pending orders is displayed for the operator to either accept or reject the orders
- The order status is in 'Pending' until the operator either accepts or rejects the order
Till Functions & Workflows
- After setup for the integration with Doshii has been completed, there should be Till Function Buttons available in SmartPOS for retrieving Doshii Orders and then handling them once they're active on the screen
- Firstly, there will be a Till Function button that you will use to retrieve current Doshii Orders and display them in SmartPOS
- This may look similar to the image below, however as each Venue will have a customised SmartPOS experience and buttons, it will not look exact and will most likely be located in a different spot
- The button may also be labelled something different and will most likely be coloured differently
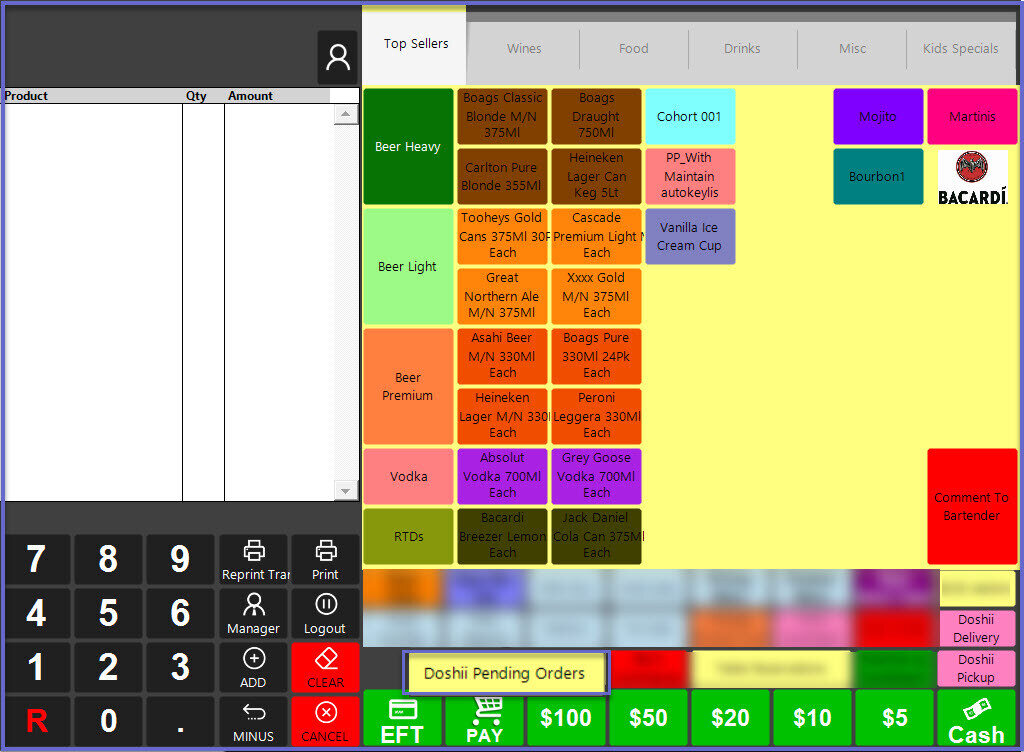
- Regardless of what the button looks like, the process of using the button that's been configured to retrieve Doshii Orders will remain the same
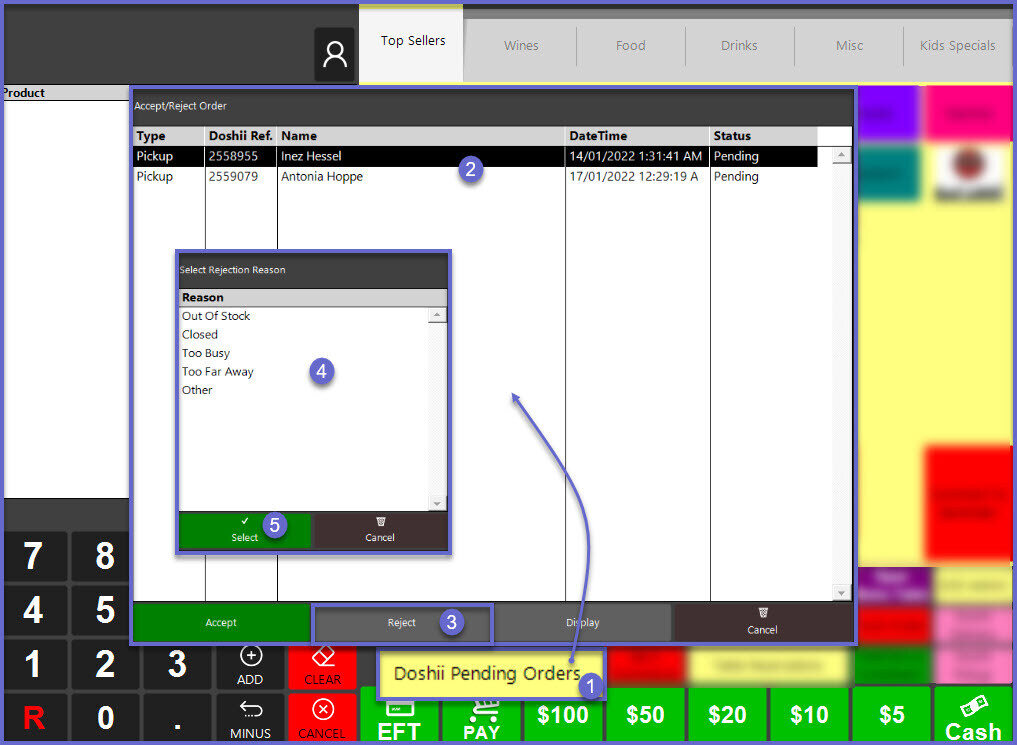
- After clicking on the 'Doshii Pending Orders' button, current Doshii Orders will be displayed in a list similar to below:
"This is the list of pending orders which can be accessed from the Order Summary Widget when the operator logs out of SmartPOS".
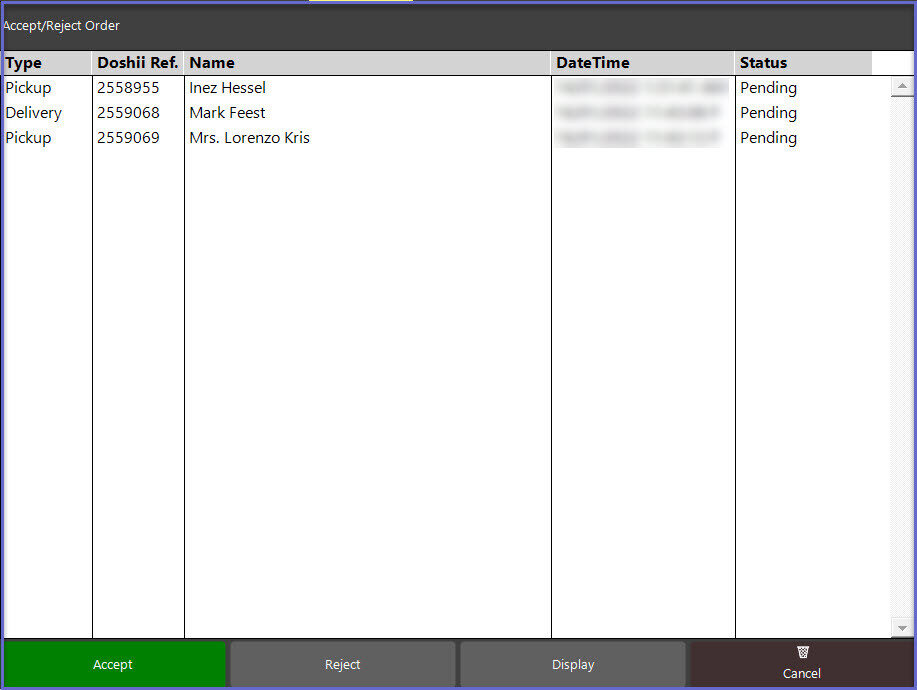
- Since Doshii Orders are either set for Pickup, Delivery or Dine-In by the customer, when Orders are retrieved in SmartPOS, you will be able to see the Order Type of either "Pickup" or "Delivery" or "Dine-in" and can then use the additional Till Function Buttons (see below) to handle each Order
- The list of Doshii Orders shows columns as given below starting on the left:
- Type; either:
- Pickup
- Delivery
- Dine-in
- Doshii Ref.
- This is the Doshii reference id for each order
- This is a unique value for the orders received from Doshii
- Name:
- This displays the name of the customer for each order received from Doshii
- DateTime
- This displays the order date and time
- The format is, dd/mm/yyyy hh:mm:ss
- Status:
- The status of the orders received from Doshii will initially be in 'Pending' status
- There are options on the bottom of the window to either Accept, Reject, or Display a selected Order
- These are explained below
Accept Orders
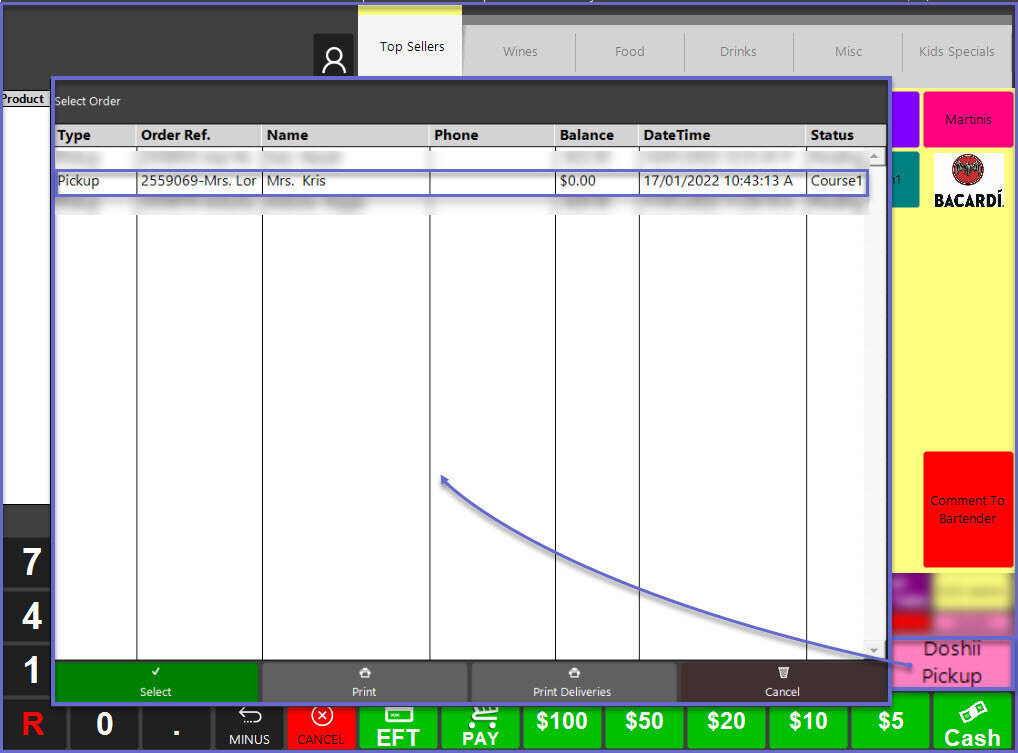
- After selecting the Order, tap on the 'Accept' button; the selected order moves out from the Accept/Reject Order list and the order status will be updated to ''Course#" for the corresponding order type
- Check the below screenshot for an example of a Doshii Pickup Order that has been accepted in SmartPOS:
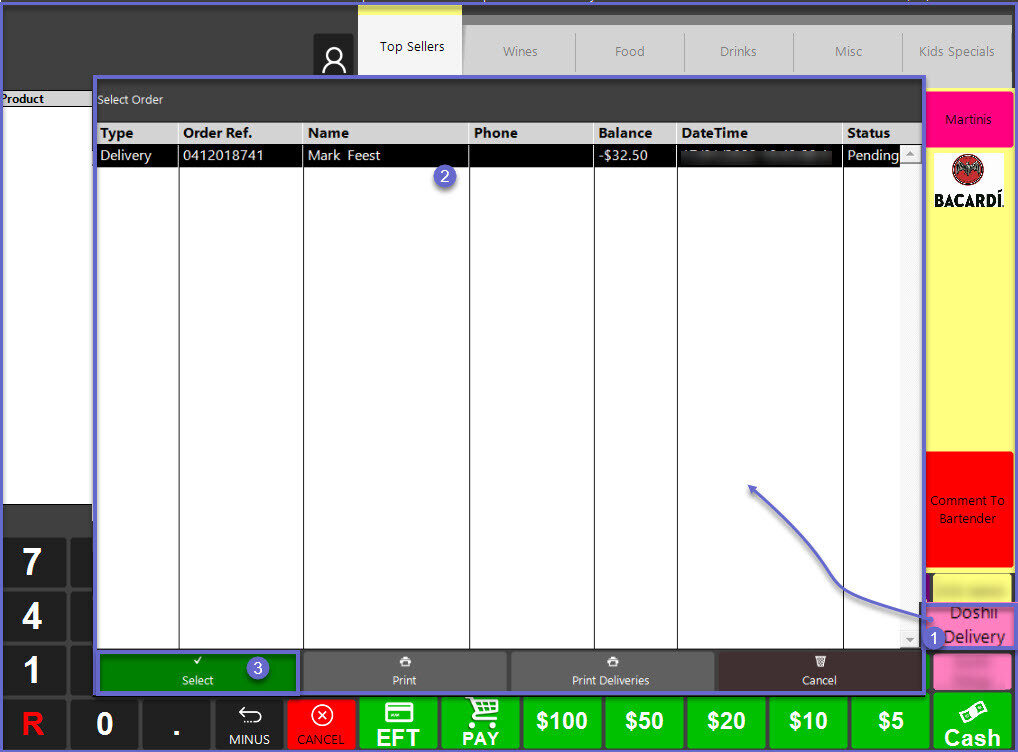
- Alternatively, Orders can also be Accepted or Rejected by clicking on the Pickup or Delivery button at SmartPOS
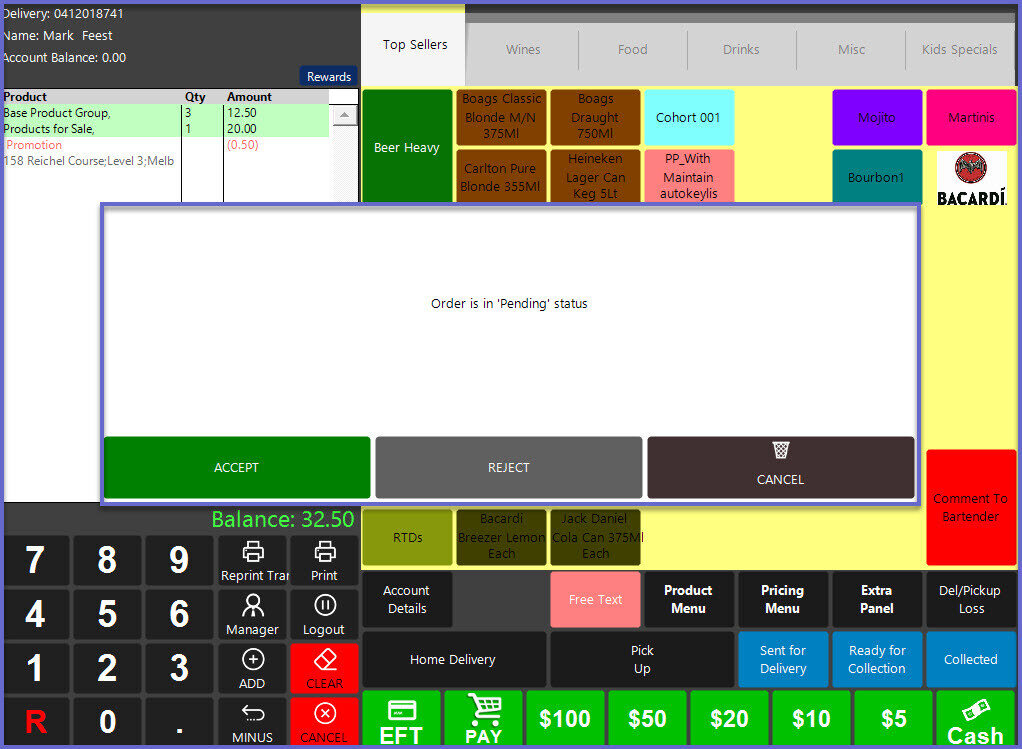
- When the order is highlighted, tap the "Select" option which will open the Order Transaction similar to other Transactions, however the Order cannot be changed and there will be three (3) options for handling the Order: "Accept" / "Reject" / "Cancel"
- The Operator can either Accept or Reject the order at this point
- Note: The balance is shown as a negative value since the order is not yet Accepted and is in pending status
- The payment associated with the order is not yet accepted and hence the negative balance.
- When the Order is Accepted, the payment is also accepted
- Once the order is Paid, the Operator can select Print or not to Print the Receipt
Reject Orders
- After selecting the Order from "Pending Orders" and tapping on "Reject", a list of Rejection Reasons display
- Choose one of the reasons to Reject the order and the Rejected Order now moves out from the Accept/Reject Order list
