
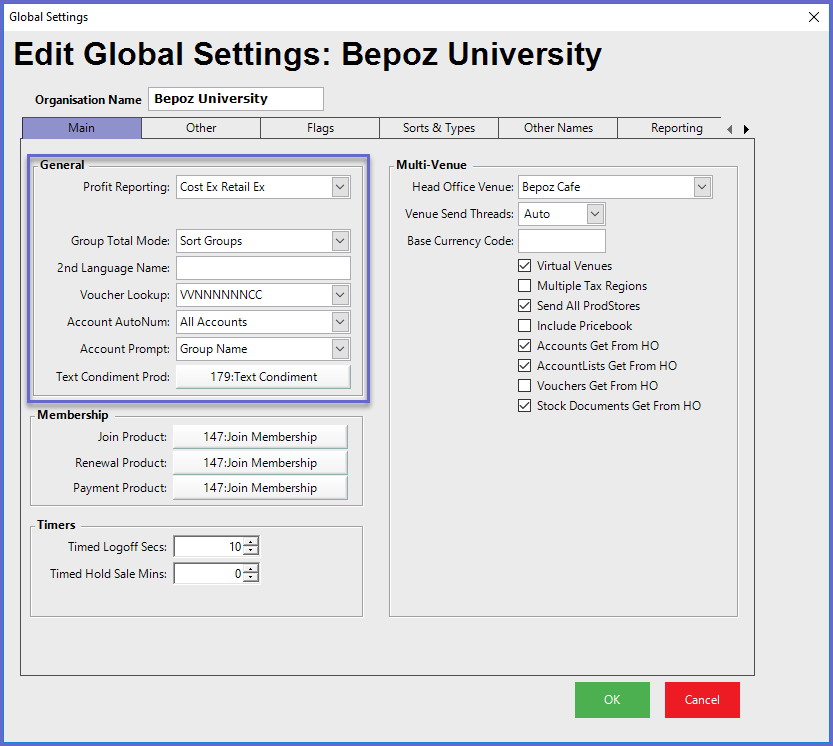
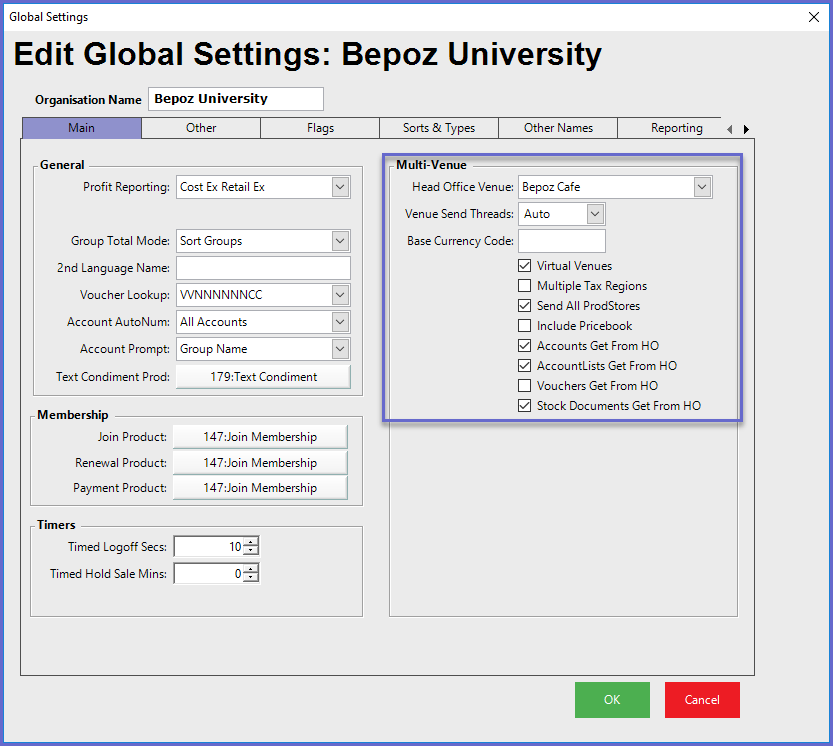
This article focuses on the "Main" Tab of Global Settings which covers General, Membership, Multi-Venue, and Timers settings. Global Settings defines settings for the entire Organization overall including all Venues, all Stores, and all Tills. This is where the Head Office Venue is defined for a Multi-Venue environment.
This article focuses on the "Main" Tab of Global Settings which covers General, Membership, Multi-Venue, and Timers settings.
Global Settings defines settings for the entire Organization overall including all Venues, all Stores, and all Tills. This is where the Head Office Venue is defined for a Multi-Venue environment.
Prerequisites- To access Global Settings, the applicable Operator Privileges will need to be enabled
- Operator Maintenance 'General' Tab
- System Setup: "Access Venue, Stores & Tills" Flag
- System Setup: "Maintain Global Settings" Flag
General Settings
Configuration Option |
Description |
| Profit Reporting |
|
| Group Total Mode |
|
| 2nd Language Name |
|
| Voucher Lookup |
|
| Account AutoNum |
|
| Account Prompt |
|
| Text Condiment Prod |
|


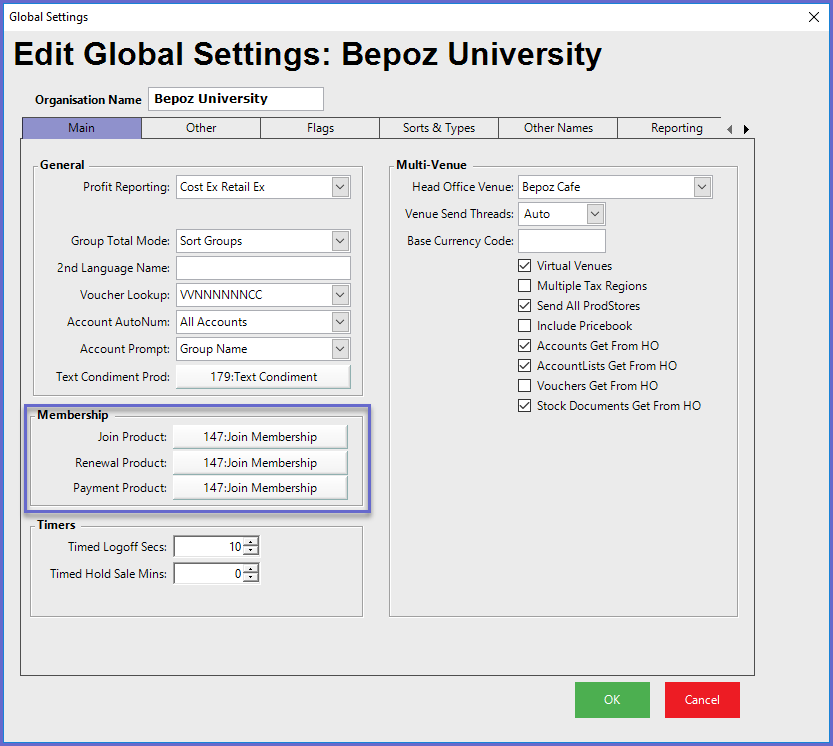
Membership Settings
-
When using Memberships, a Product or Products must first be created in the database's Product List which will be used when selling the associated fees of Joining and Renewing Members
-
The Membership Product/s will then need to be allocated to their respective configurations to allow for use when selling Joining Fees and Renewal Fees
-
To assign, simply click on the desired Product button - which will open a Product List window - and select the Membership Product from the list
Timers
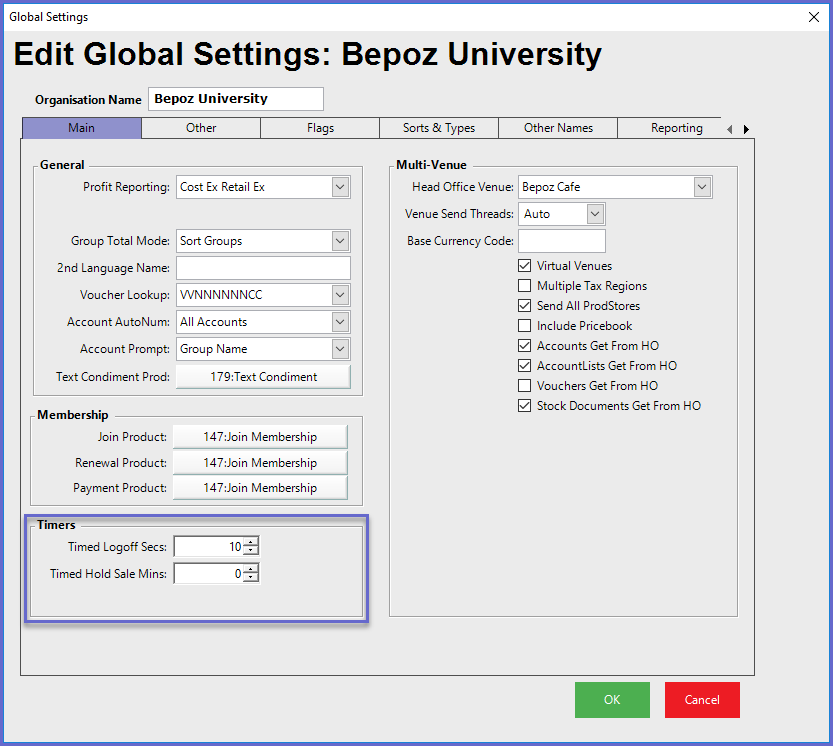
- The Timed Logoff Secs setting will control the timeout (in seconds) when using Timed Logoff at SmartPOS Workstations
- In conjunction with this, the Timed LogOff flag must be enabled via Workstation Maintenance for each SmartPOS Workstation that will use this timer
- If '10' is entered into the field, the SmartPOS Workstation will logoff an Operator after 10 seconds of inactivity if they aren't in a Transaction
- The Timed Hold Sale Mins is a Timer that can be set regarding Held Sales that will place an Expiration on the length of time that a Sale can be placed on Hold
- When a Transaction is placed on Hold, a countdown will begin based on the number of Minutes set in the Timed Hold Sale Mins field
- When the countdown reaches zero (0), the Held Sale has reached its Expiration and an Alert prompt will be triggered to display via SmartPOS
- If this field is set to zero (0), then there is no timer
- The Expiry Warning by Operator flag determines where the Alert will appear
- If this flag is enabled, the Alert will appear on the SmartPOS Workstation where the Operator who placed the Sale on Hold is logged in at the time that the Alert is triggered
- Alternatively, if this flag is disabled, the Alert will appear on the SmartPOS Workstation where the Held Sale was created and will disregard where the Operator who placed the Sale on Hold is currently logged in
- I.e., this flag controls whether the Hold Sale Expiration Alert moves with the Operator or stays with the Workstation
Example
- With the Timed Hold Sale Mins set to 15, after a Sale has been on Hold for 15 minutes, the Hold Sale Expiration Alert will display on the SmartPOS Workstation screen as determined by the Expiry Warning by Operator flag
- If SmartPOS is performing another Transaction at the time of the Hold Sale Expiration, the Alert will not appear until the other Transaction is complete

- If Yes is selected, the Sale will be Recalled and will become the active Transaction to allow for it to be Finalized and/or amended by the Operator
- However, if No is selected, the Sale will be Cleared
- This will create an Audit in BackOffice
Multi-Venue
Configuration Option |
Description |
| Head Office Venue |
|
| Venue Send Threads |
|
| Base Currency Code |
|
| Virtual Venues |
|
| Multiple Tax Regions |
|
| Send All ProdStores |
|
| Include Pricebook |
|
| Accounts Get From HO |
|
| AccountLists Get From HO |
|
| Vouchers Get From HO |
|
| Stock Documents Get From HO |
|
