
This article covers an overview of the "Hold Fire" Till Functions and how they are used within BackOffice. "Hold And Fire" is a feature which is to be used for delaying the Printing of Table Orders' Products to Remote Kitchen Printers and display on KDS to a later time. This requires setup in Venue Maintenance settings via the Tables Tab. Utilizing the full range of Hold Fire Functionality also requires Till Function Map buttons to be configured.
This article covers an overview of the "Hold & Fire" Till Functions and how they are used within BackOffice.
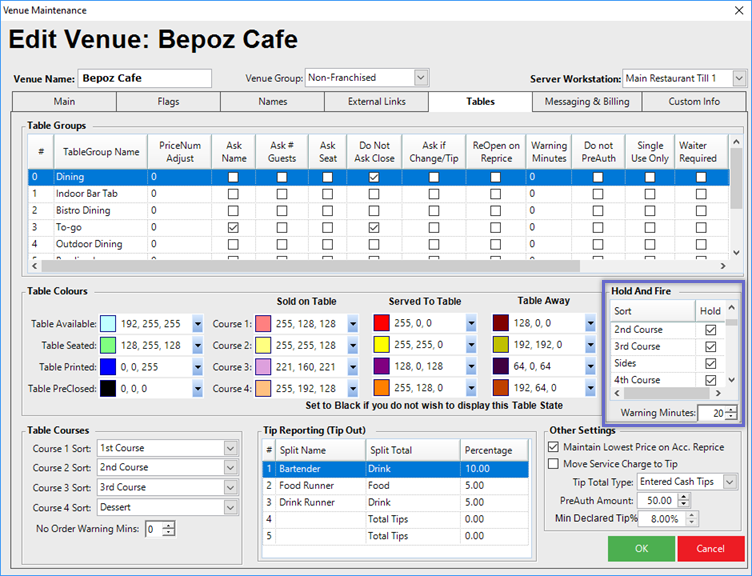
"Hold And Fire" is a feature which is to be used for delaying the Printing of Table Orders' Products to Remote Kitchen Printers and display on KDS to a later time. This requires setup in Venue Maintenance settings via the Tables Tab.
Utilizing the full range of Hold & Fire Functionality also requires Till Function Map buttons to be configured.
The Products to be Held from Printing can be specified manually or by their Product Sort. Held Products can be manually selected to Print when ready, a Timer can be set for them to be Printed automatically, or a specific Time and Date can be set.
NB: in the following article, "Printing" refers to Printing dockets to remote Kitchen Printers as well as Displaying Products on a KDS screen.
Supported KDS Interfaces
- Bematech
- >>QSR and SmartKDS not supported at present<<
Prerequisites
- To access Hold & Fire Features, the applicable Operator Privileges
-
Operator Maintenance 'Till Privileges' Tab - General: "Operate Tills" Flag
- Tables: "Table Sales" Flag
The Three Till Functions
- There are three (3) different Till Functions which apply to the Hold & Fire feature:
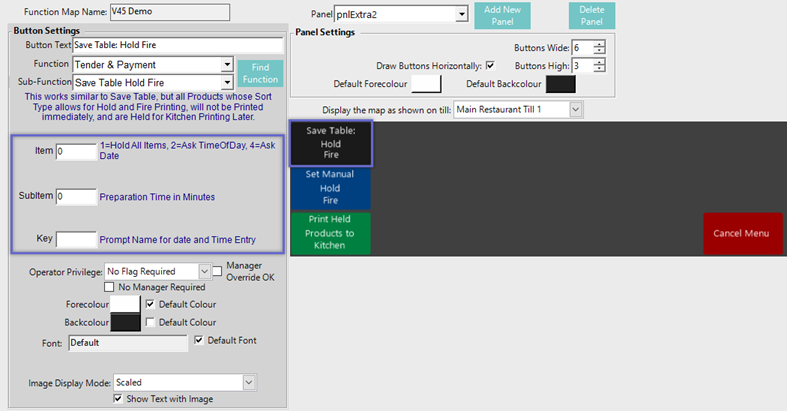
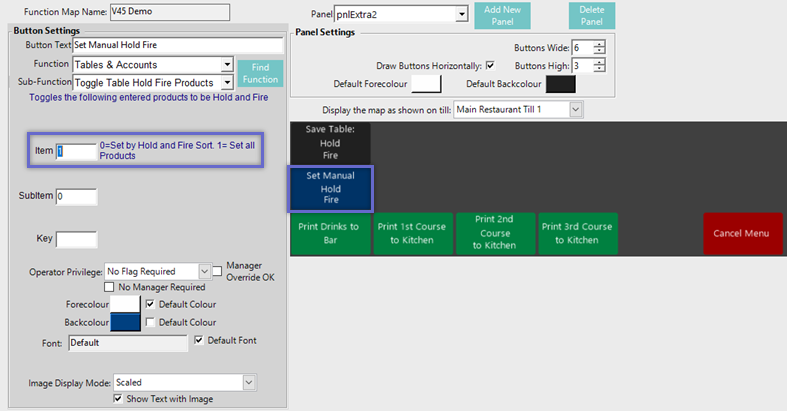
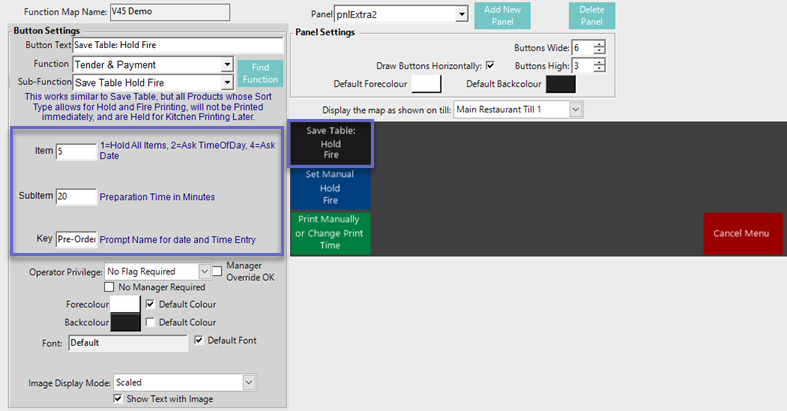
- Save Table Hold Fire which works similar to the standard Save Table function, however, when using this Function all Products whose Product Sort allows for Hold & Fire Printing won't be Printed immediately and will be Held for Printing until a later time
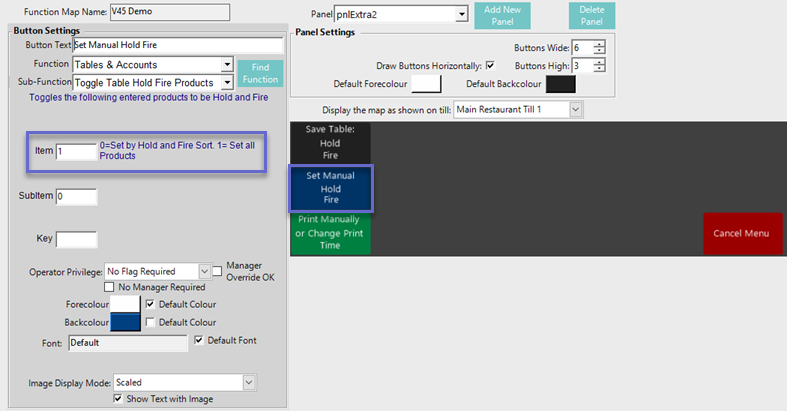
- Toggle Table Hold Fire Products toggles the following entered Products to be Hold & Fire; i.e., after the Function button is initially selected (toggled on) Products added to the Transaction will be Held from Printing until the Function button is selected again (toggled off)
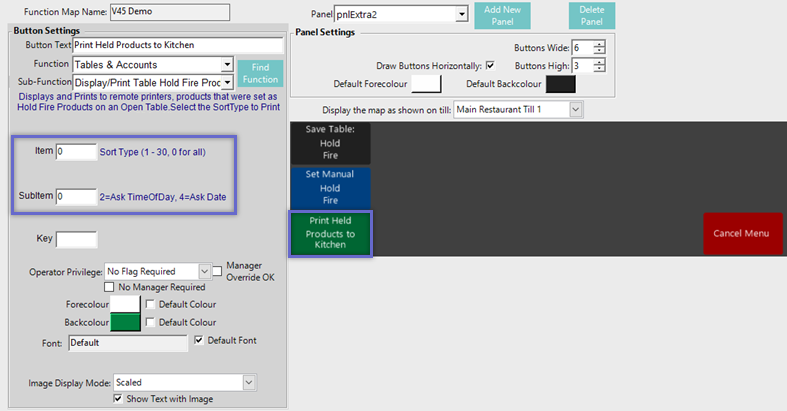
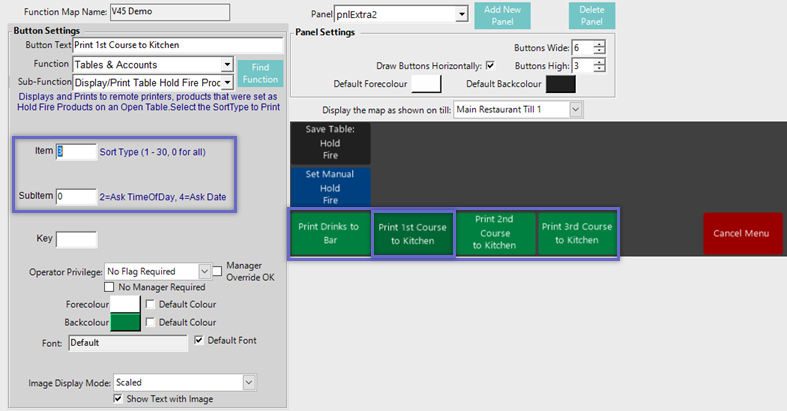
- Display/Print Table Hold Fire Products will allow an Operator to select Held Products to be Printed immediately or set a timer to determine when Products will Print
Usage Examples
- Given that there are a multitude of combinations of configuration options available between the Venue Maintenance Hold And Fire settings and the 3 Till Functions, the entirety of this feature cannot be demonstrated with one example, or even a handful of examples, so while an attempt will be made to document a wide range of usage scenarios, they cannot all be covered in this article
- In the following Examples, configurations which affect the functionality of the Hold & Fire feature will be explained first and then workflows will be shown
- For more on Till Function configurations, please see the related articles in the System Admin Course Type > Till Function Configurations Course > "Tables & Accounts" Function Module
- The same Venue Maintenance Hold And Fire configurations will be used throughout these examples, where only the selected Product Sorts are enabled for Holding:
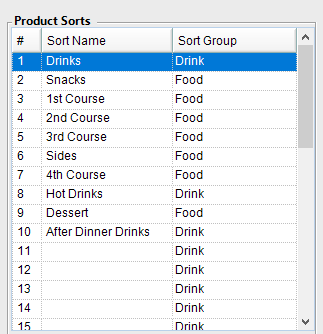
- For reference, the demonstration database being used has the following Product Sorts configured in Global Settings:
- For more on Hold And Fire configuration in Venue Maintenance, please refer to the article: System Admin > System Setup > Venue, Stores, Tills, & Devices > Venue Maintenance "Tables" Tab
Example 1
- This example demonstrates a basic, bare-bones usage of Hold & Fire by Holding the configured Product Sorts from Printing using the Save Table Hold Fire function and then the Toggle Table Hold Fire (manual) function
- Lastly, the different Hold & Fire Print options will be covered
- This configuration and workflow may be used in Venues where multiple courses are Ordered and entered into SmartPOS together, however, only Drinks and 1st Courses should be Printed straight away with an option for Operators to add more Hold & Fire Products manually and also Print later courses (2nd, 3rd, Dessert, etc.) at the Operator's discretion
- NB: For this scenario to be used, Product Sorts would need to set-up as Course #s and be assigned to Products accordingly - similar to the set-up in this demonstration database
Till Function Configurations

SmartPOS Workflow
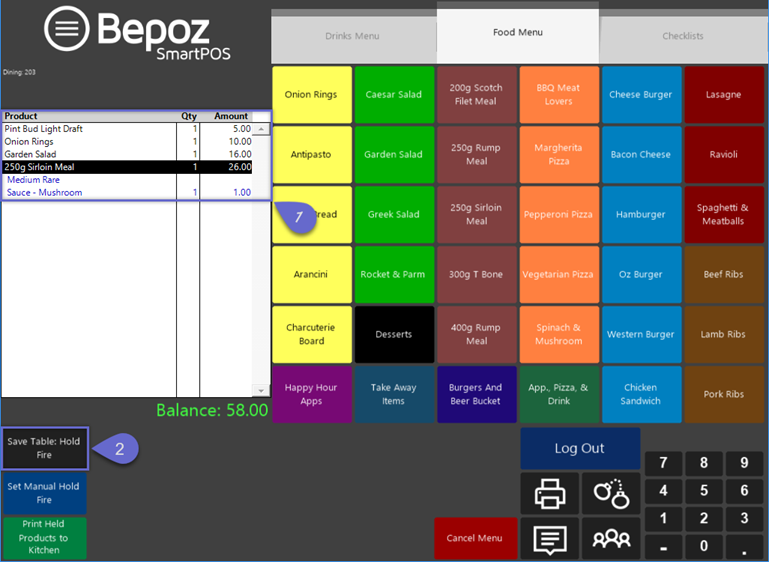
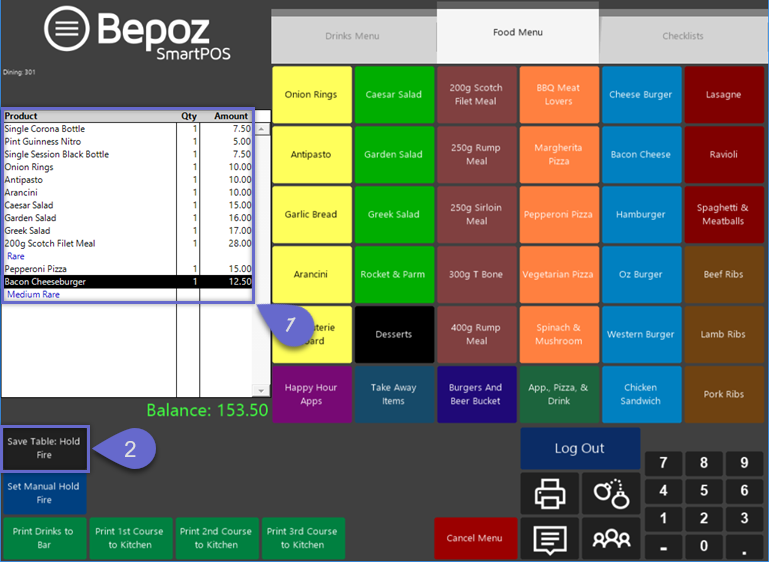
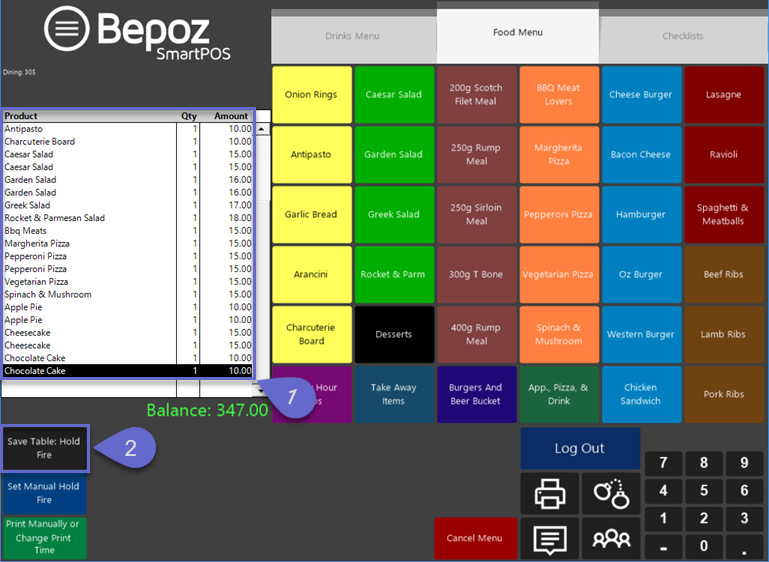
- Begin by logging into SmartPOS, opening a new Table Transaction and adding all of the required Products to the Transaction
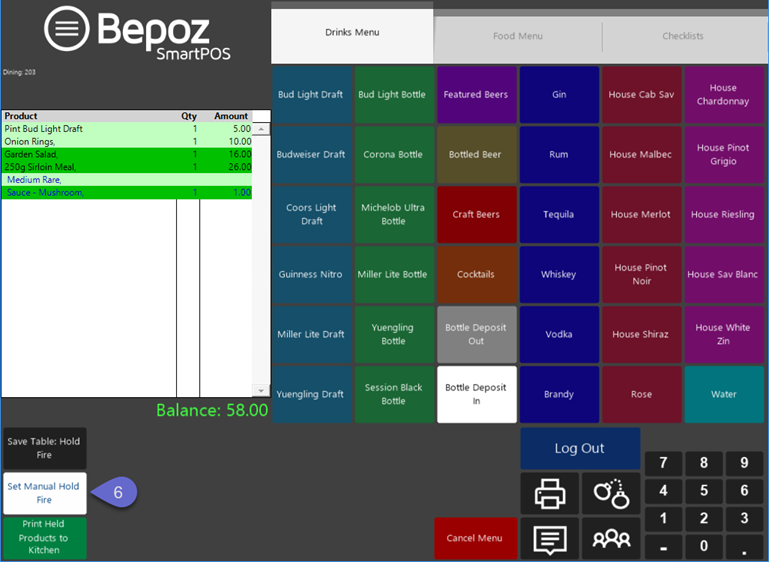
- Select the Save Table Hold Fire function from the Till Function Map
- In this example, due to the configuration of the Till Function button, only the Products with the Products Sorts that are configured to he Held will be Held
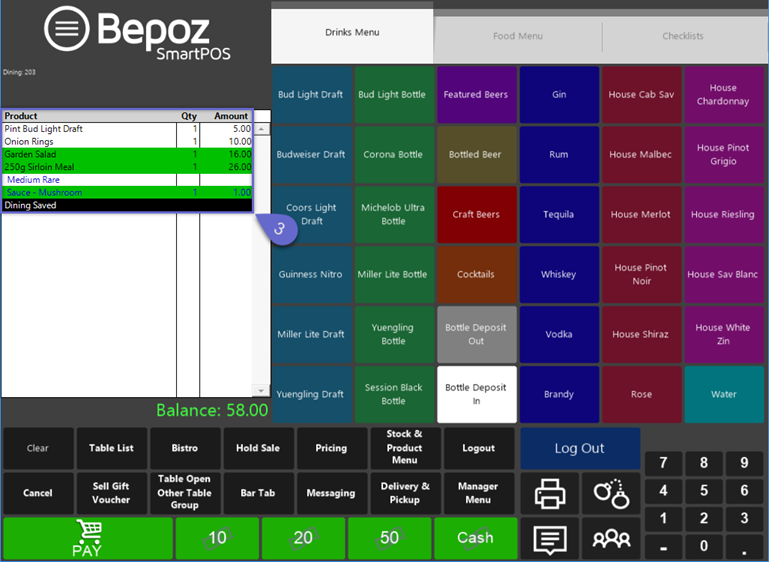
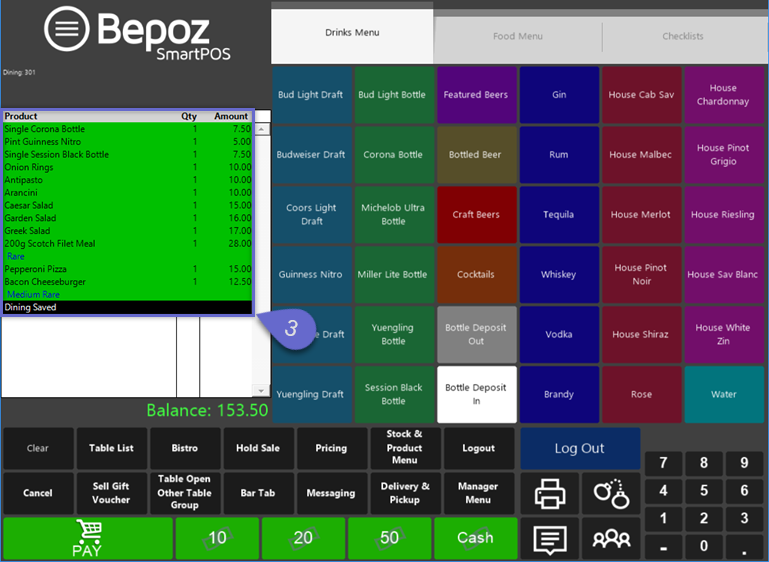
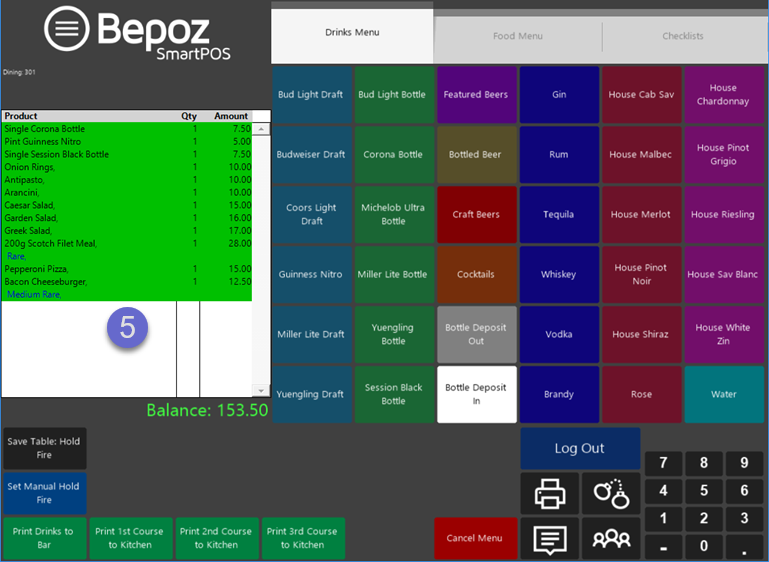
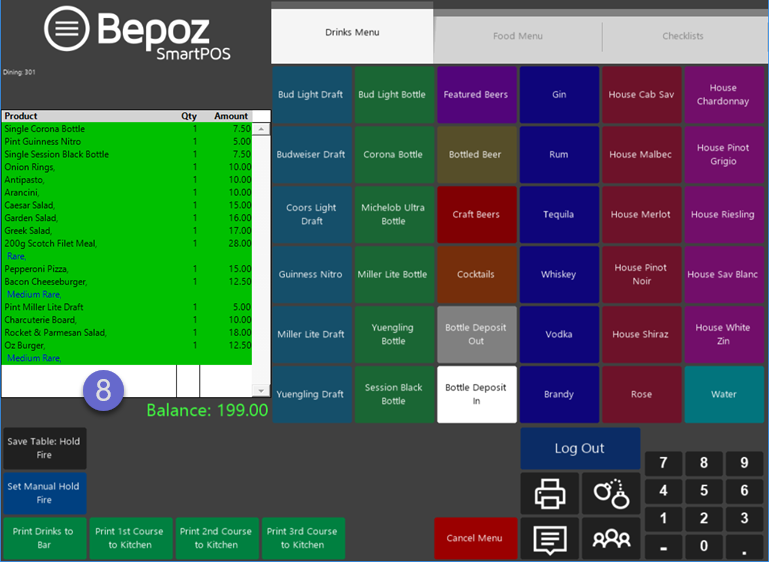
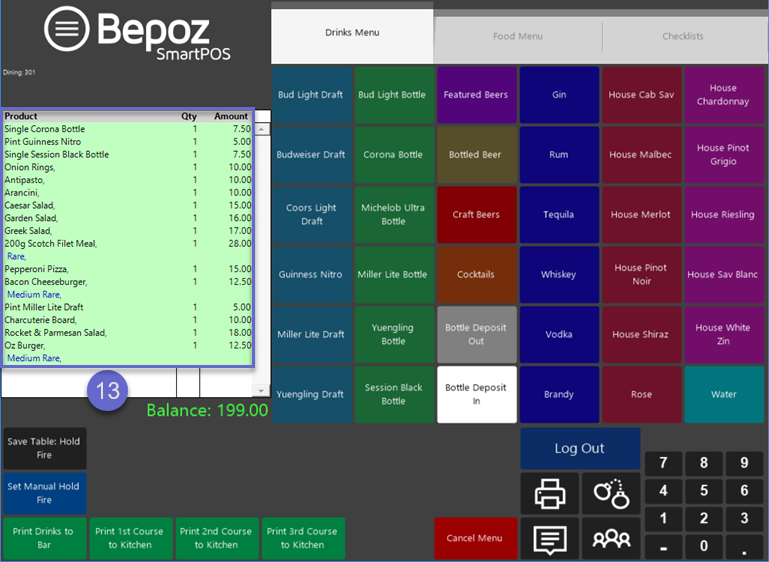
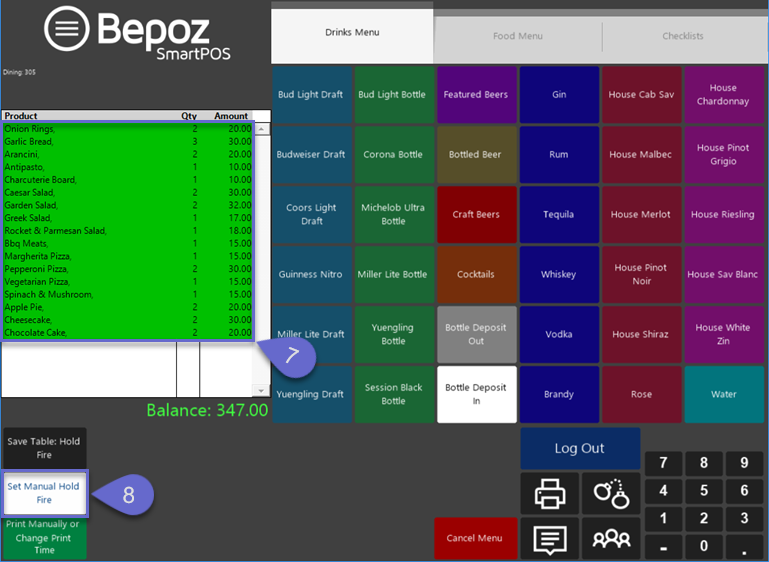
- The Transaction will be Saved and the Products in the Transaction which have the Product Sorts configured in Venue Maintenance to be Held from Printing will be highlighted in green and will not yet be Printed, while the other Products will be Printed immediately
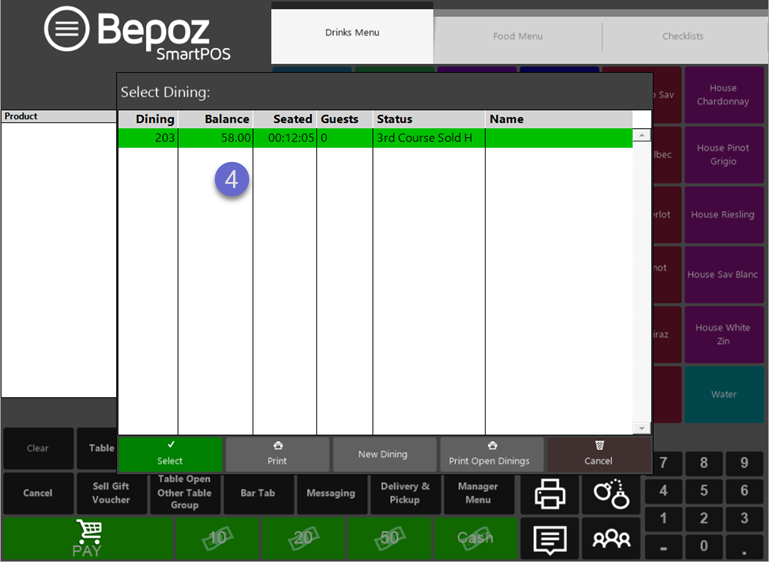
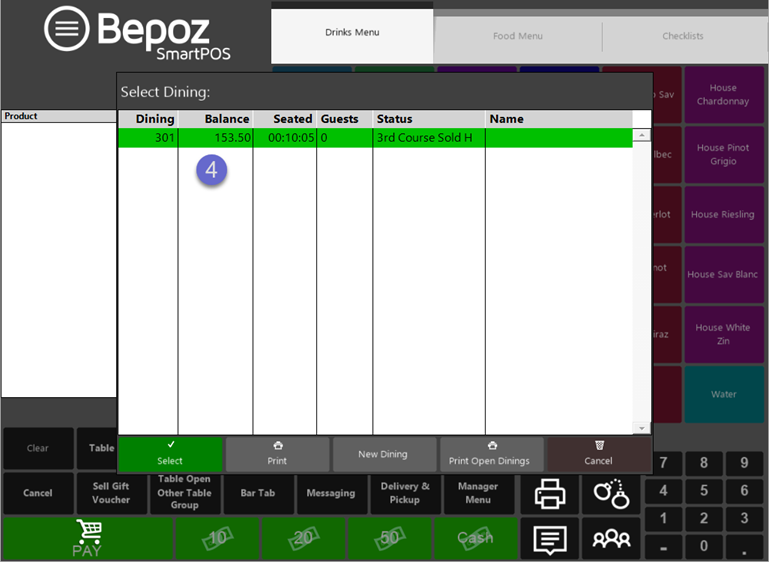
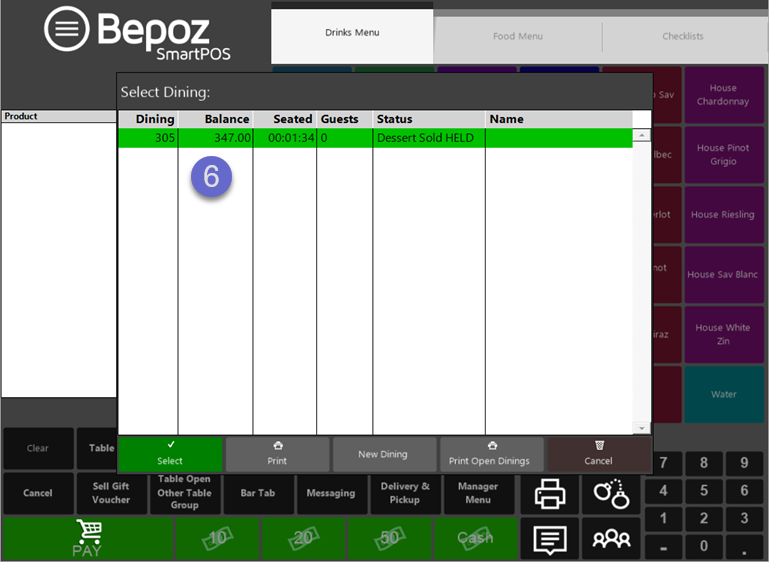
- Navigate to the Table List; the Transaction will be highlighted in green due to having Hold And Fire Products being Held currently; Re-Open the Transaction
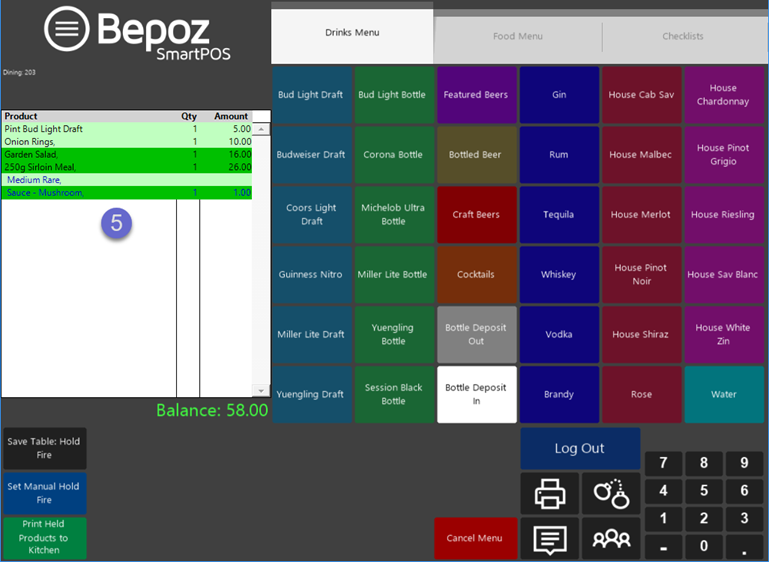
- The same Products will still be highlighted in green as they have not yet been Printed
- At this point in the workflow, Operators could choose to add more Products to the Transaction without using Hold & Fire at all, could Print currently Held Products, or could use the Toggle Table Hold Fire Products function to manually add more Products to the Transaction and use the Hold & Fire feature for the additional Products; this example will use the latter
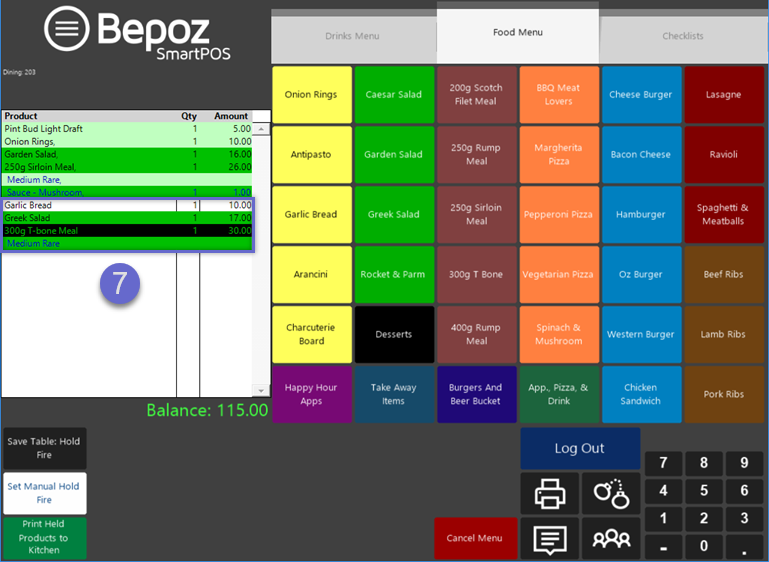
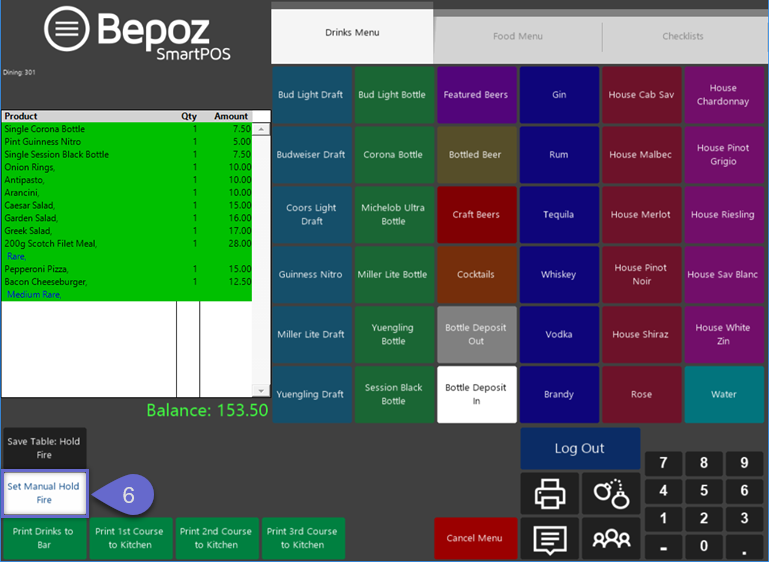
- Select the Toggle Table Hold Fire Products function button and the button will change to show inverted colors
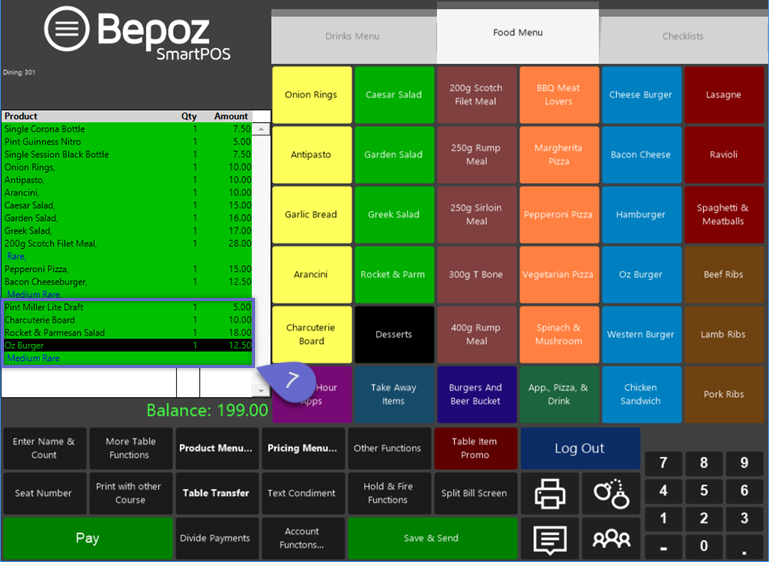
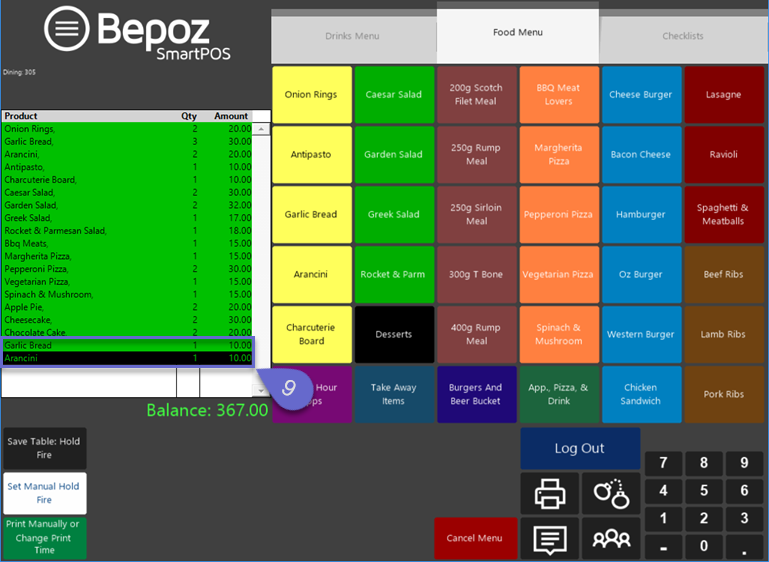
- With this button toggled on, add additional required Products to the Transaction and the Products added while the button is toggled on will be Held from Printing when the Transaction is saved
- In this example, due to the configuration of the Till Function, only the Products with the Products Sorts that are configured to be Held in Venue Maintenance will be Held
- The button can be toggled off allowing for Products to be added to the Transaction which will not use Hold & Fire; i.e., within the same Transaction some Products can be selected to use Hold & Fire and others can be selected to not use Hold & Fire - just toggle the button into the desired position and add the Products
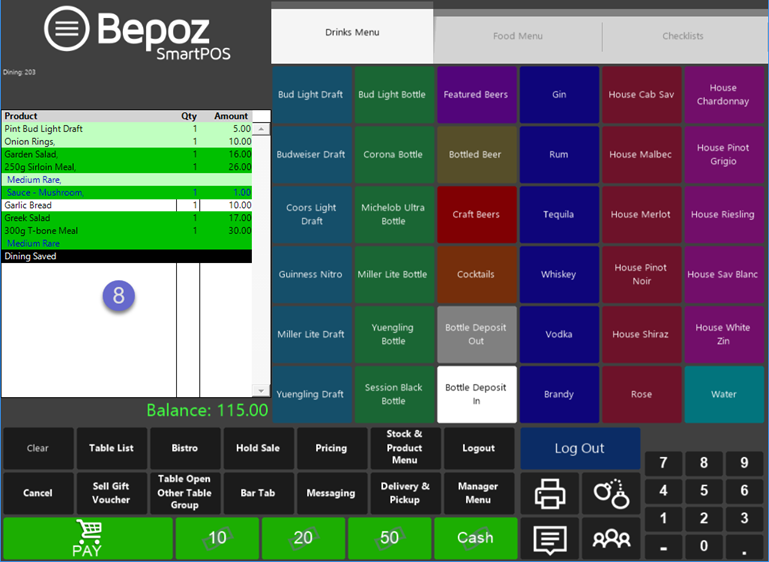
- Save the Transaction again, then repeat Steps 4 & 5
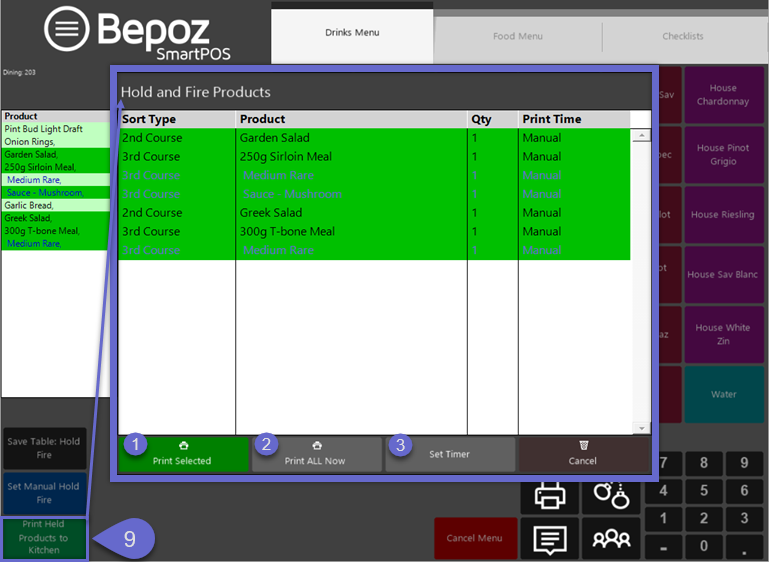
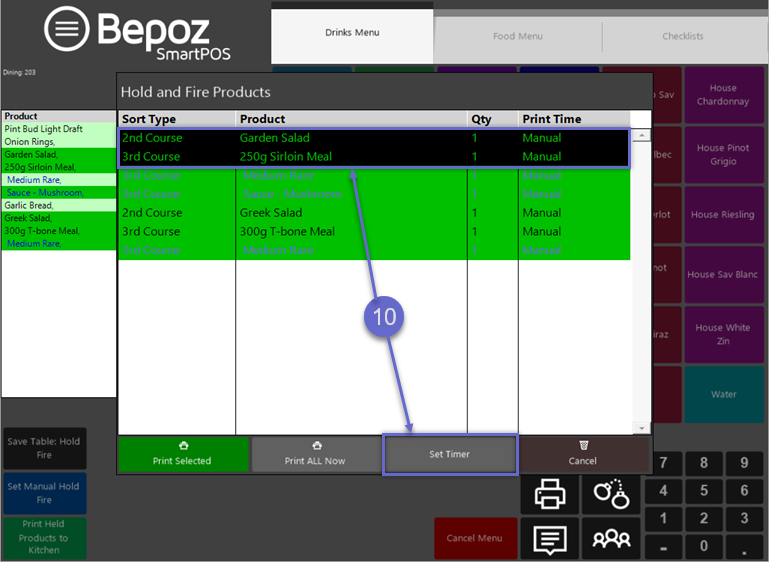
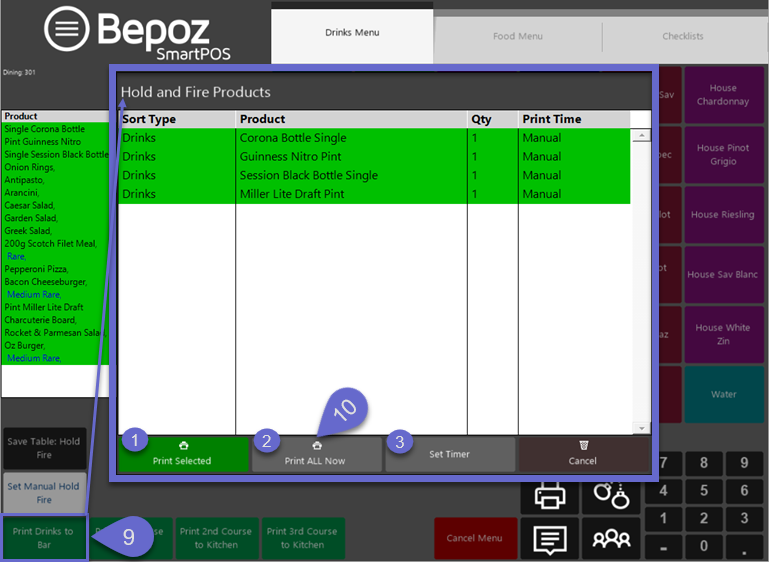
- Select the Display/Print Table Hold Fire function button; a window will open on the screen showing all of the Products on the Transaction that are currently Un-Printed
- Each Product will display the Product Sort Type, Quantity, and Print Time (if no Timer has been set this will read as 'Manual')
- From this window there are three (3) options available (besides Cancel):
- Print Selected will Print any selected Products now
- Print ALL Now will Print all Products now
- Set Timer will allow for a Timer to be set for any selected Products to Print at a later Time
- This example will proceed with setting a Timer
- Highlight the desired Product/s to Set a Timer for and then select the Set Timer button
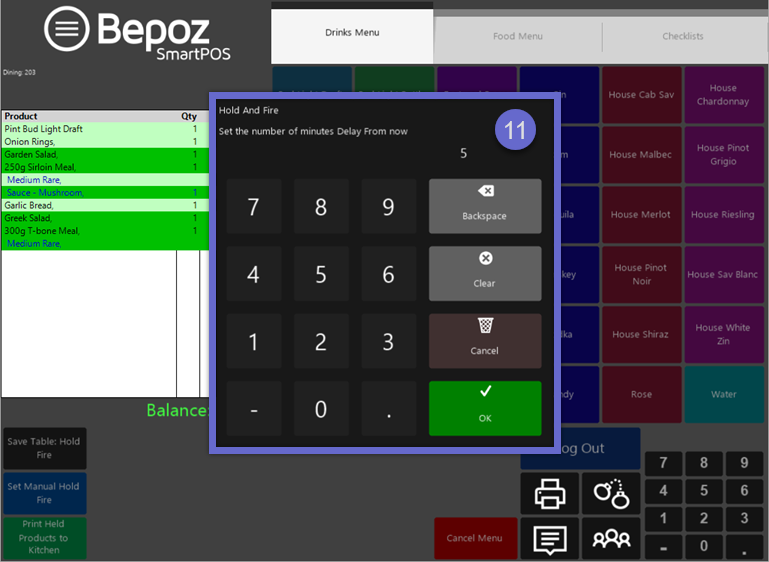
- Another small window will open to allow for setting the Timer - the number of minutes Delay from now; enter the desired number of minutes and click OK
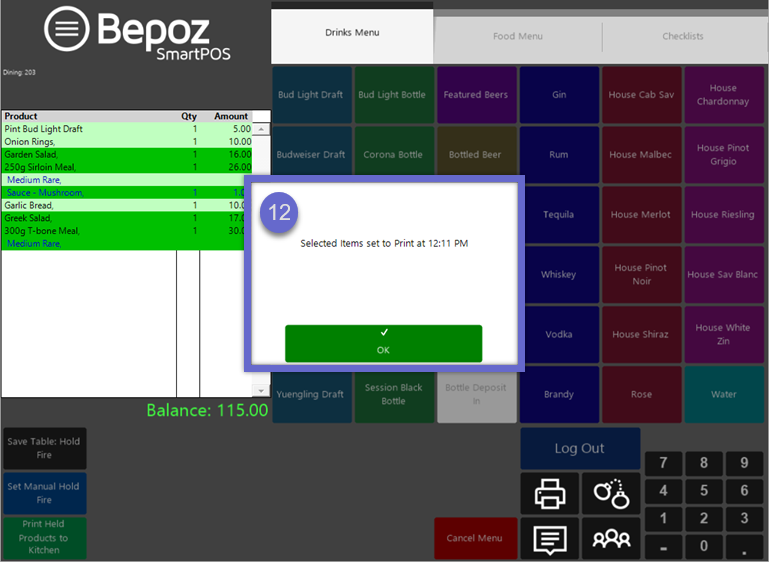
- A prompt will appear on the screen showing the actual Time that the selected Products will be Printed
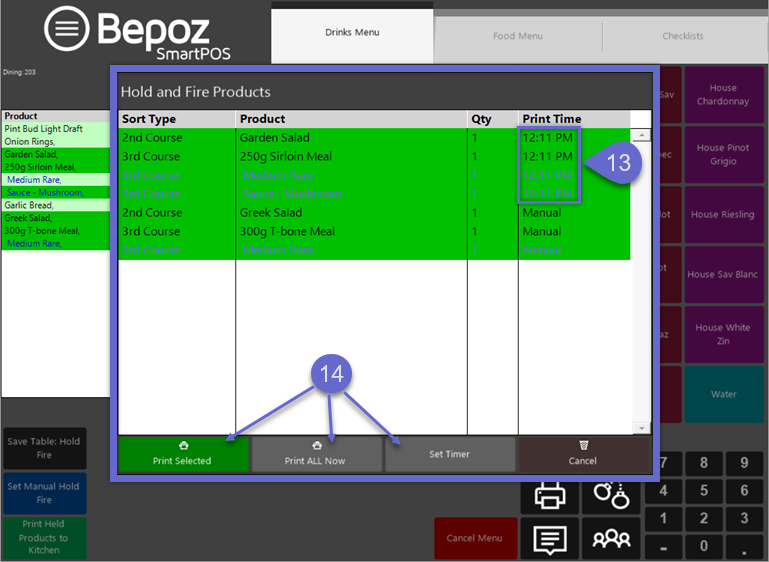
- Repeat Step 9; Products for which the Timer was set will display the new Print Times
- Select any Products as desired to Print immediately, set additional Timers, or Print All Now
- NB: At any time, this workflow can be deviated from and additional Products can be added to the Transaction, Held from Printing if required (or not), and then Printed when necessary
Example 2
- In this example, all Products will initially be Held from Printing (ignoring the Venue Maintenance Product Sort configuration for Hold And Fire) whether using the Save Table Hold Fire function or the Toggle Table Hold Fire (manual) function
- Each Product Sort (Course #) will then have a separate Till Function button configured to allow Operators to Print Products belonging to the respective Product Sort
Till Function Configurations

SmartPOS Workflow
- Begin by logging into SmartPOS, opening a new Table Transaction and adding all of the required Products to the Transaction
- Select the Save Table Hold Fire function from the Till Function Map
- In this example, due to the configuration of the Till Function, all Products will be Held regardless of the Product Sorts and the Venue Maintenance Hold And Fire settings
- The Transaction will be Saved and all Products in the Transaction will be highlighted in green and will not yet be Printed
- Navigate to the Table List; the Transaction will be highlighted in green due to having Hold And Fire Products being Held currently; Re-Open the Transaction
- All of the Products will still be highlighted in green as they have not yet been Printed
- At this point in the workflow, Operators could choose to add more Products to the Transaction without using Hold & Fire, could Print current Products in the Transaction, or could use the Toggle Table Hold Fire Products function to add more Products to the Transaction, which in this case, will also be Held from Printing due to the Till Function configuration; this example will use the latter
- Select the Toggle Table Hold Fire Products function button and the button will change to show inverted colors
- With this button toggled on, add any additional required Products to the Transaction and the Products added while the button is toggled on will be Held from Printing when the Transaction is saved
- The button can be toggled off allowing for Products to be added to the Transaction which will not use Hold & Fire; i.e., within the same Transaction some Products can be selected to use Hold & Fire and others can be selected to not use Hold & Fire - just toggle the button into the desired position and add the Products
- Save the Transaction again, then repeat Steps 4 & 5
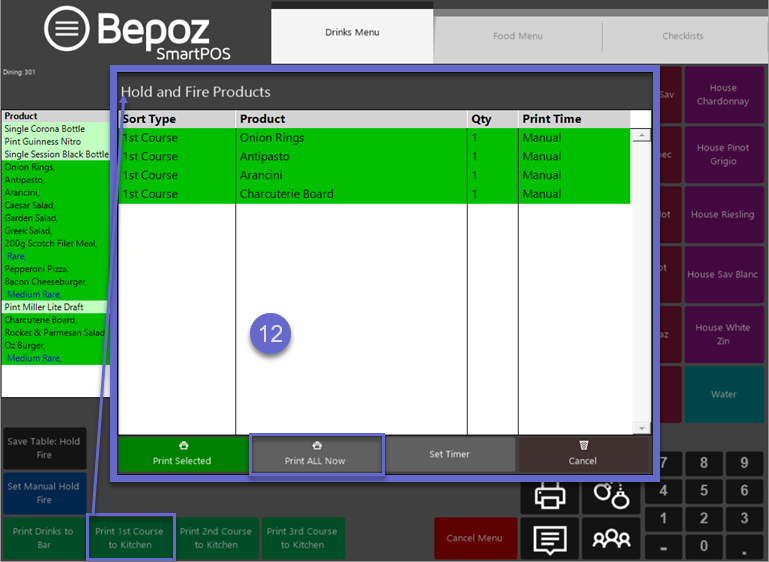
- Select one of the Display/Print Table Hold Fire function buttons - in this instance since each of these Till Function buttons is configured to a different Product Sort Type which, in turn, are related to Courses - a window will open on the screen showing all of the Products on the Transaction that are currently Un-Printed and belong to the Product Sort Type as configured by the Till Function
- Each Product will display the Product Sort Type, Quantity, and Print Time (if no Timer has been set this will read as 'Manual')
- From this window there are three (3) options available (besides Cancel):
- Print Selected will Print any selected Products now
- Print ALL Now will Print all Products now
- Set Timer will allow for a Timer to be set for any selected Products to Print at a later Time
- This example will Print all Products now
- Click the Print ALL Now button
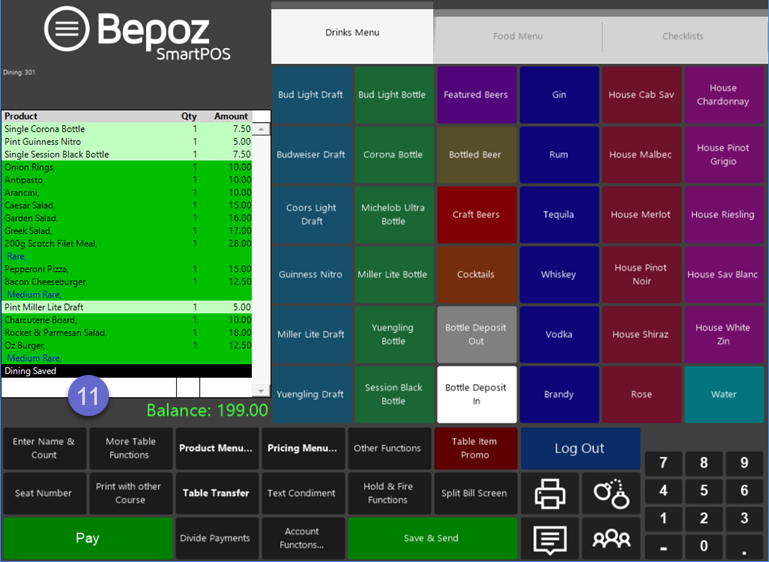
- Navigate to the Table List and Re-Open the Transaction; note that the Products which were just printed are highlighted in a lighter shade of green than the Products which had not yet been Printed
- Repeat Steps 9 & 10 for other Product Sorts (Courses) that require Printing until all Products have been Printed and there aren't any which are still being Held
- NB: At any time, this workflow can be deviated from and additional Products can be added to the Transaction, Held from Printing if required (or not), and then Printed when necessary
- After all of the Products have been Printed, all of the Products' lines in the Transaction Window will be highlighted in light-green to signify that they've been Printed
Example 3
- In this example:
- All Products will initially be Held from Printing (ignoring the Venue Maintenance Product Sort configuration for Hold And Fire) using the Save Table Hold Fire function with this Function configured to prompt the Operator for a Date & Time for the Products to be Delivered; the Preparation Time in Minutes setting will also be used and this will determine the actual Print time
- Additional Products will be added to the Transaction using the Toggle Table Hold Fire Products function and then manually have Print times set
- Print Times will be adjusted using the Display/Print Table Hold Fire Products function configured to prompt for a Date & Time
Till Function Configurations

SmartPOS Workflow
- Begin by logging into SmartPOS, opening a new Table Transaction and adding all of the required Products to the Transaction
- Select the Save Table Hold Fire function from the Till Function Map
- In this example, due to the configuration of the Till Function, all Products will be Held regardless of the Product Sorts and the Venue Maintenance Hold And Fire settings
- Because the Till Function is configured as noted in the image above:
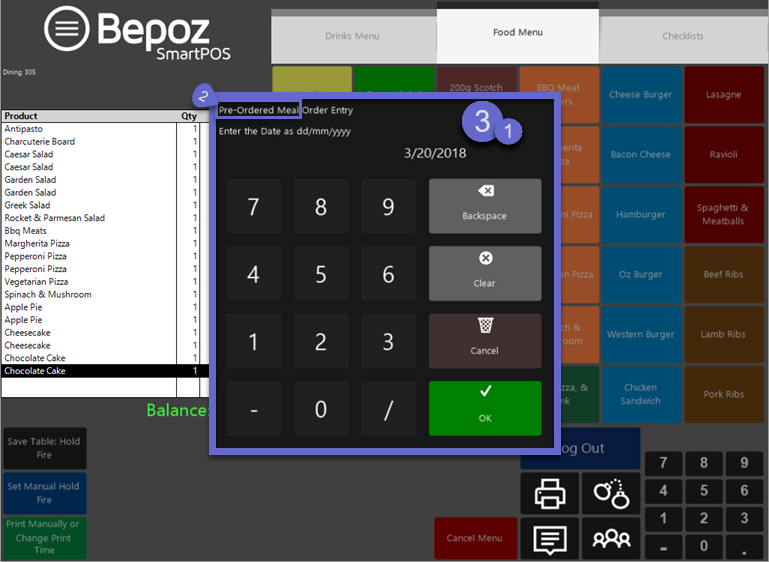
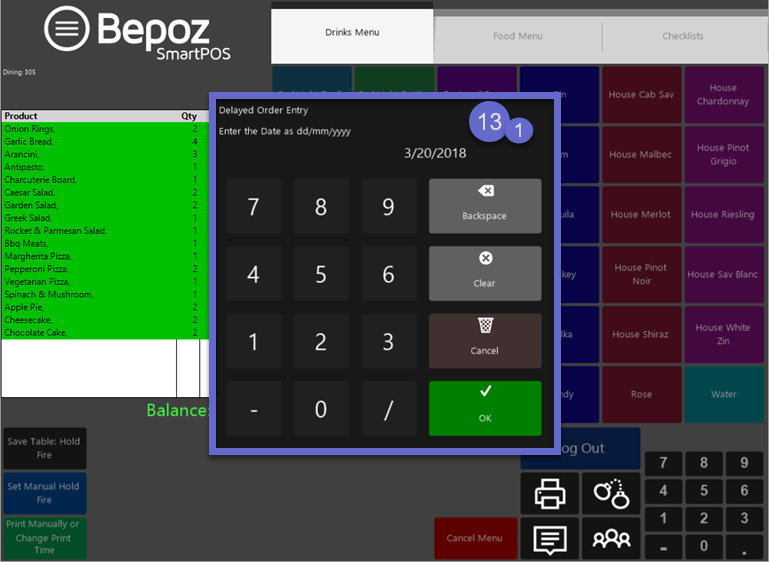
- The Operator will first be prompted to enter a Date for the Products to be Delivered
- By default, this will be set to the next day's Date, however, this can be manually changed using the Number Pad to enter any future Date
- The Prompt Name for date and Time Entry will be displayed at the top of the prompt window
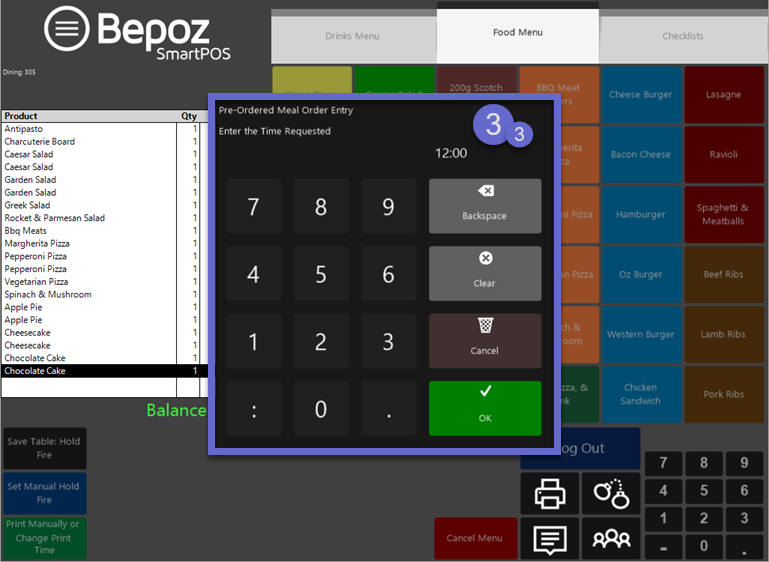
- The Operator will then be prompted to enter a Time
- By default, this will be set to 6:00 AM, however, this can be manually changed using the Number Pad to enter any Time
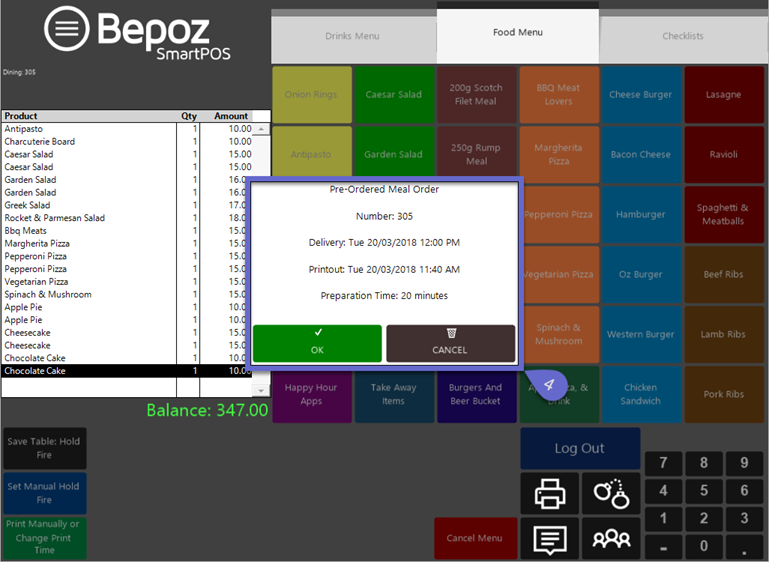
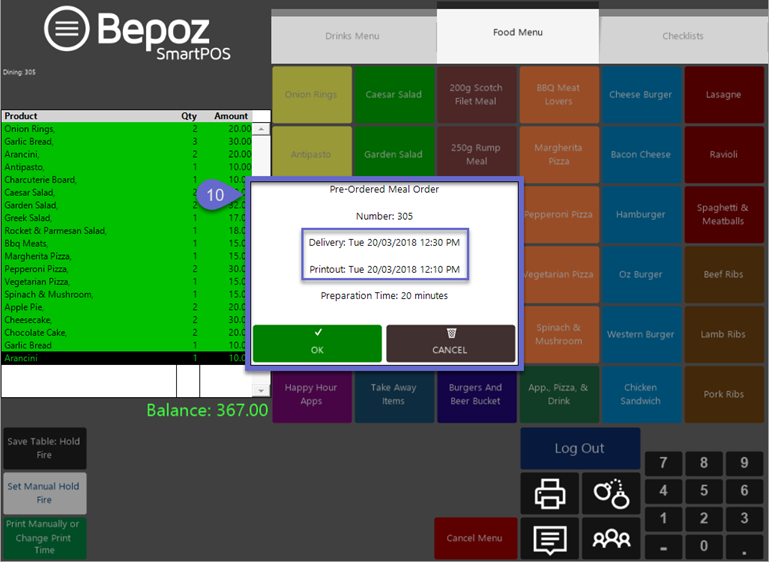
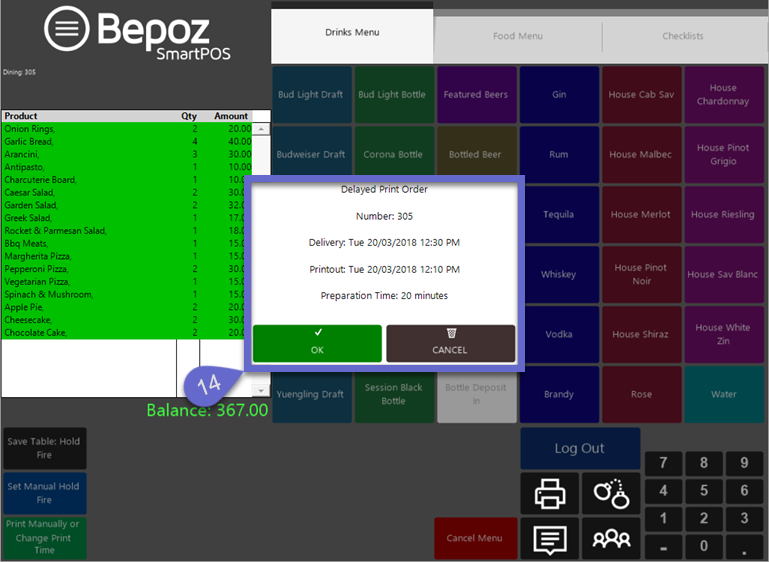
- After entering both the Date & Time, a confirmation will appear on the screen showing:
- The Delivery time which is the Date & Time which were just entered
- The Printout time which is calculated by subtracting the Preparation Time from the Delivery and this is the actual time that the Products will be Printed
- The Preparation Time which is the Preparation Time in Minutes that was configured with the Till Function in BackOffice
- NB: If no Preparation Time in Minutes is configured with the Till Function button, there won't be a "Delivery" time and the Date & Time entered will be the "Printout" time
- The workflow could end here and the Products will then Print out at the set time, however, this example will continue as to demonstrate additional functionality
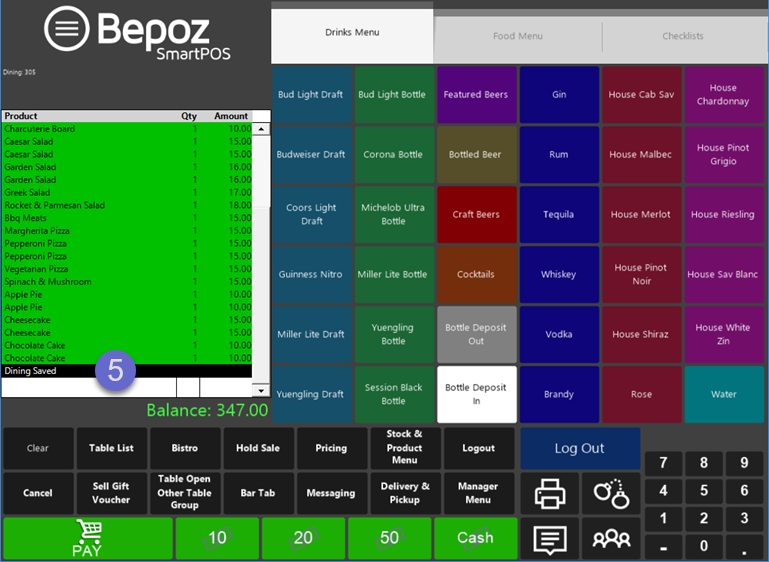
- The Transaction will be Saved and all Products in the Transaction will be highlighted in green and will not yet be Printed
- Navigate to the Table List; the Transaction will be highlighted in green due to having Hold And Fire Products being Held currently; Re-Open the Transaction
- All of the Products will still be highlighted in green as they have not yet been Printed
- At this point in the workflow, Operators could do nothing and simply leave the Products to Print at the set time, could change the set Print time, could Print current Products in the Transaction now, or could use the Toggle Table Hold Fire Products function to add more Products to the Transaction, which in this case, will also be Held from Printing due to the Till Function configuration; this example will use the latter
- Select the Toggle Table Hold Fire Products function button and the button will change to show inverted colors
- With this button toggled on, add any additional required Products to the Transaction and the Products added while the button is toggled on will be Held from Printing when the Transaction is saved
- The button can be toggled off allowing for Products to be added to the Transaction which will not use Hold & Fire; i.e., within the same Transaction some Products can be selected to use Hold & Fire and others can be selected to not use Hold & Fire - just toggle the button into the desired position and add the Products
- Repeat Steps 2 through 4; the added Products have been set to be Delivered and to Print at a different Time than the previously entered Products
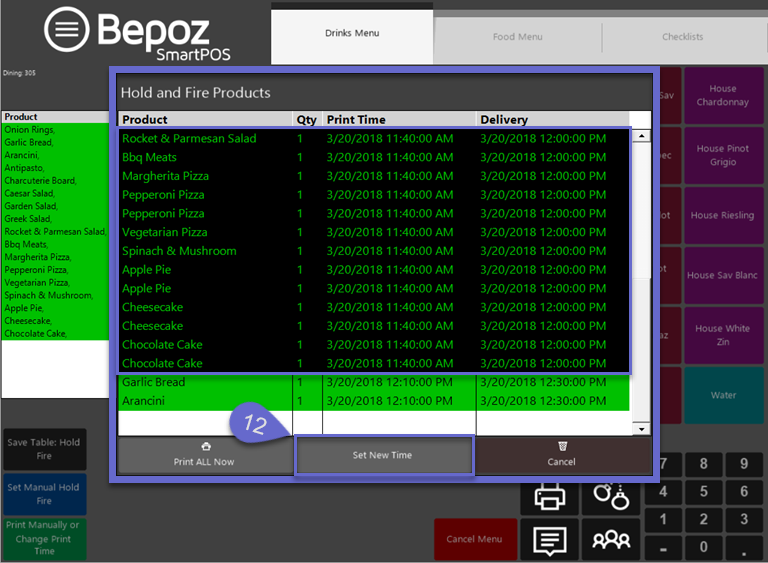
- Repeat Steps 5 through 7 and then select the Display/Print Table Hold Fire function buttons; a window will open on the screen showing all of the Products on the Transaction that are currently Un-Printed
- Each Product will display the Quantity, Print Time, and Delivery Time
- From this window there are three (2) options available (besides Cancel):
- Print ALL Now will Print all Products now
- Set New Time will allow for the previously set Time/s to be changed for any selected Products
- This example will Set New Times
- Highlight any Products that required a New Time and then click the Set New Time button
- Because the Till Function is configured as noted in the image above to ask for a Date and Time, the next Steps will be similar to those from Step 3:
- The Operator will first be prompted to enter a Date for the Delayed Order
- The Operator will then be prompted to enter a Time for the Delayed Order
- Similar to Step 4, after entering both the Date & Time, a confirmation will appear on the screen showing:
- The Delivery time which is the Date & Time which were just entered
- The Printout time which is calculated by subtracting the Preparation Time from the Delivery and this is the actual time that the Products will be Printed
- The Preparation Time which is the Preparation Time in Minutes that was configured on the Save Table Hold Fire function


- The workflow can end here and the Products will be Printed at the set Time
- Alternatively, the Steps can be repeated to Set New Time/s again, or additional Products can be added to the Transaction, or Print All Now can be selected to Print all of the Products immediately