Overview
This step-by-step guide will show how Windows Task Scheduler can be used to Start Programs on Windows Startup
This guide also highlights that Windows Task Scheduler run the application by default at a lower Process Priority which could result in performance degradation for Smartcontroller
Instructions:
Run Windows Task Scheduler via the Windows Start menu
Click on Actions
Select Create a Basic Task
Give the Task a name, click next
Trigger: When I log on, click next
Action: Start a Program, click next
Browse to the Application.exe you would like to run, click next
Click Finish
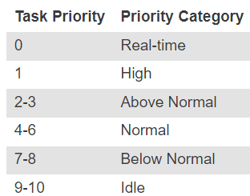
Note: Now click on the newly created task and run it, it will start your application but if you run Task manager and goto to the Details tab, find the process in the list you will see that the Base Priority is set to Below normal
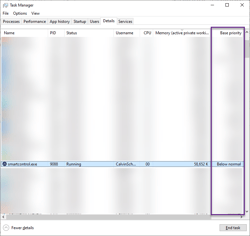
Smartcontroller default Priority is Normal, but Windows Schedule Task have a default Priority of 7 which = Below Normal, this essentially limits the resources Smartcontroller can use within the Windows environment.
To amend this you will have to do the following:
Right-click the newly created Task and select Export
Save the XML file to any destination of your choosing.
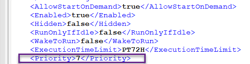
Edit the XML file via notepad
Towards the bottom of the Export, you will see a Priority Parameter
Change the default of 7 to 5 to start an application at Normal Priority.
Save the XML and then Import the Schedule task again
Unforntuanalty within the Schedule Task Wizard, this option is not unavailable.