
This article highlights some of the workflows that may be encountered when beginning and handling split-table Transactions. This also includes an introduction to the Split Table Till Function buttons. Split Table (Split Bill) functionality allows selected Products on a Table to be separately paid by multiple guests; i.e. guest 1 orders and pays for their own food drinks, guest 2 does the same, etc.
This article highlights some of the workflows that may be encountered when beginning and handling split-table Transactions. This also includes an introduction to the Split Table Till Function buttons.
Split Table (Split Bill) functionality allows selected Products on a Table to be separately paid by multiple guests; i.e. guest 1 orders and pays for their own food & drinks, guest 2 does the same, etc.
As well as paying for individual items, Products can also be divided between multiple guests. A common example would be when sharing a bottle of wine, etc.
Split-table transactions are available when the correct BackOffice setups are in place, but exact workflows may differ depending on how the configurations are done.
Prerequisites- To access Table Warning Features, the applicable Operator Privileges will need to be enabled
- Operator Maintenance 'Till Privileges' Tab
- General: "Operate Tills" Flag
- Tables: "Table Sales" Flag
- Tables: "Create New Tables" Flag
- Tables: "Table Payments" Flag
- Tables: "Close Tables" Flag
Background
- In a real-life scenario, there will be times where guests dine in a restaurant and would like the option to pay individually for what they have ordered or split the bill based on certain criteria
- Not all restaurants accept a split bill option but this can hold many benefits for consumers and also for employees such as:
- Facilitates in organizing individual expenses that stem from a single bill
- Eliminates time spent on dividing expenses
- Ensures that customers are paying correct amounts, especially for tables with many diners
Creating Split Bills
Newly Created Tables
- With the correct BackOffice configurations in place, Tables can be automatically Split as soon as the new Table is created in SmartPOS
- To initiate a Split Bill for newly created Tables, complete the following steps:
- Create a new Table either through the Table Map or Table List Till Functions
- Once a Table is created, a prompt will appear asking for the Number of Guests that will be dining
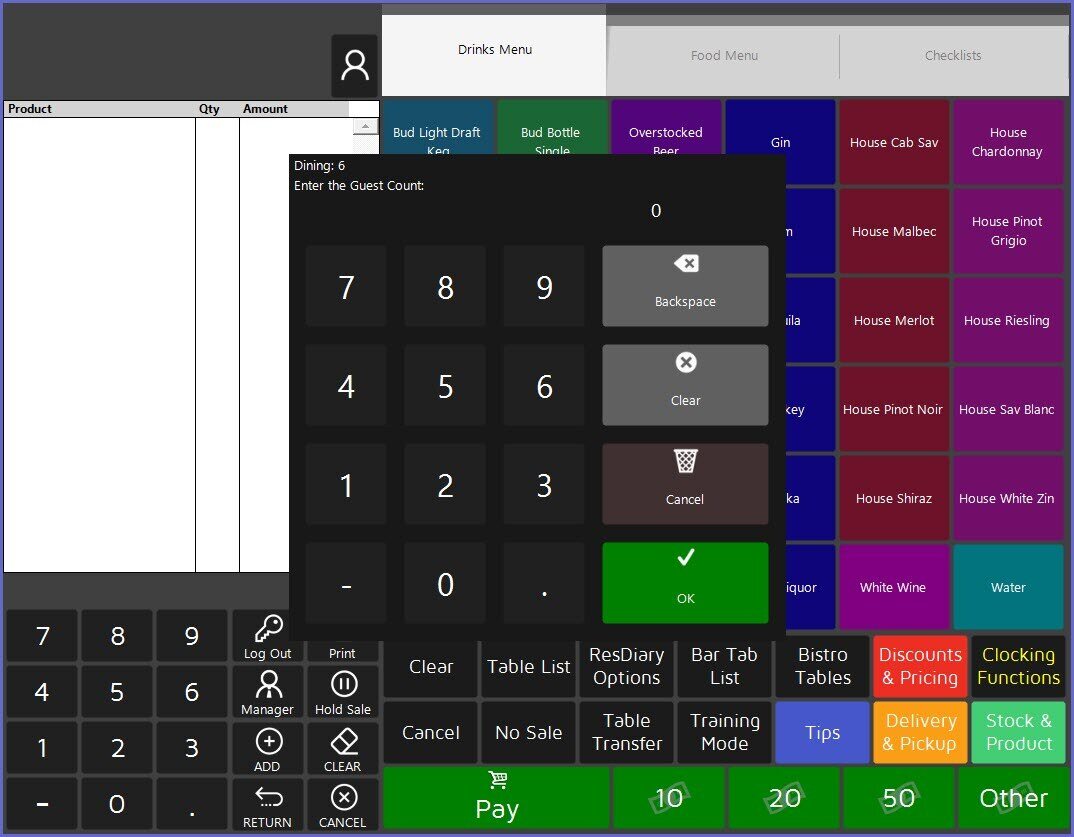
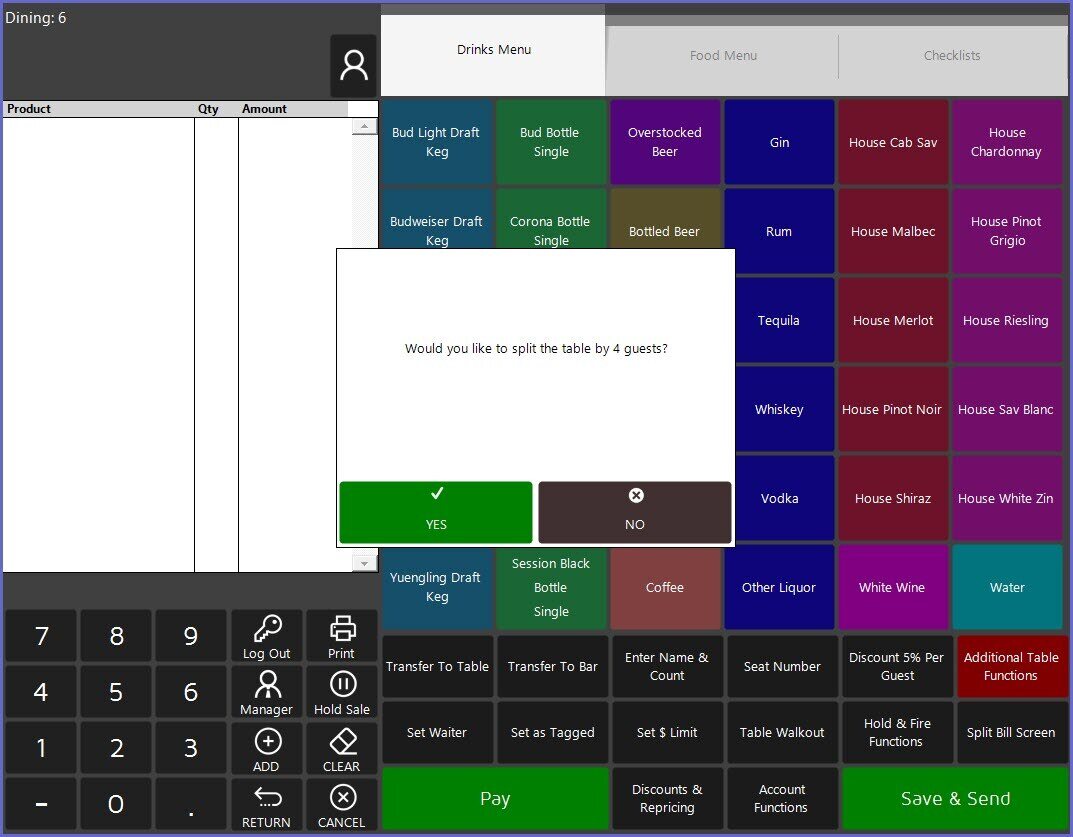
- The Operator will be then given the option to Split the Table by the number of Guests that was previously entered
- From here, the Split Bill Screen will be displayed where individual Splits are created based on the number of guests that were entered
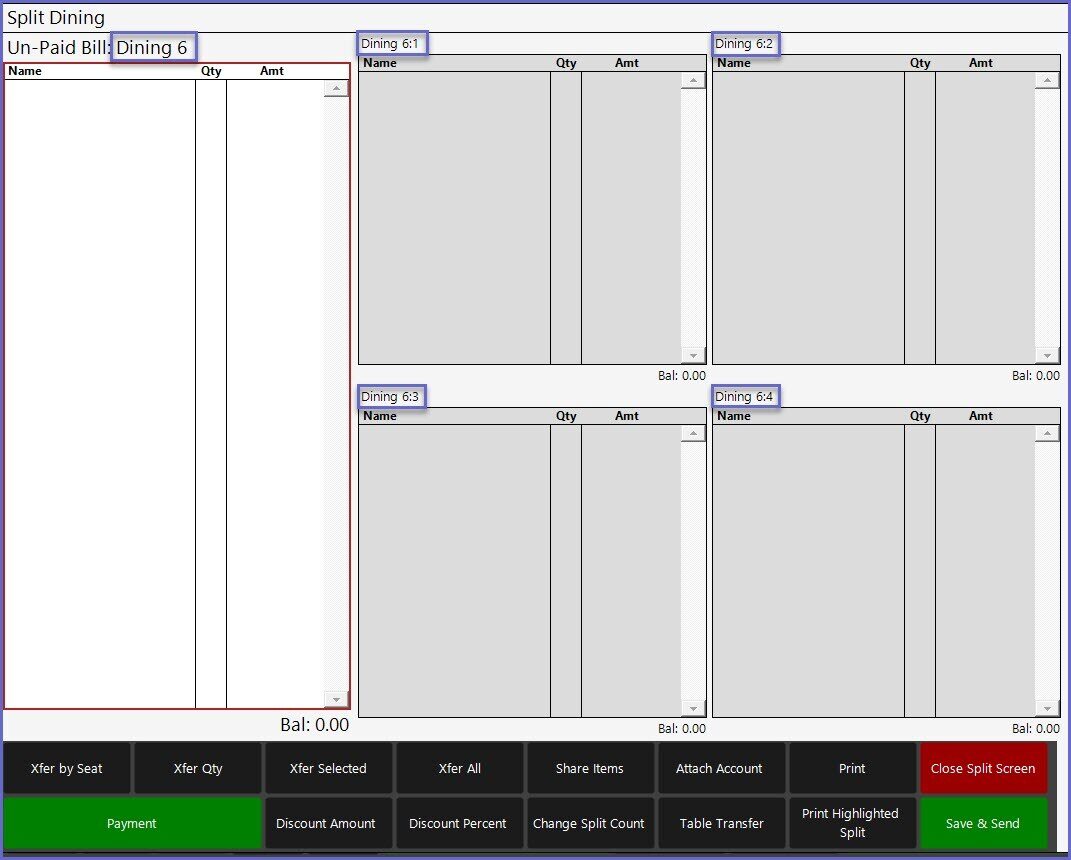
- The Splits will be designated initially by a subset of the Table Number; in this example, the Master Table was named "Dining 6", so the subsequent Splits are initially named "Table 6:1", "Table 6:2", etc.
- By selecting (tapping on) individual Splits, Products can be added and paid per Split as required
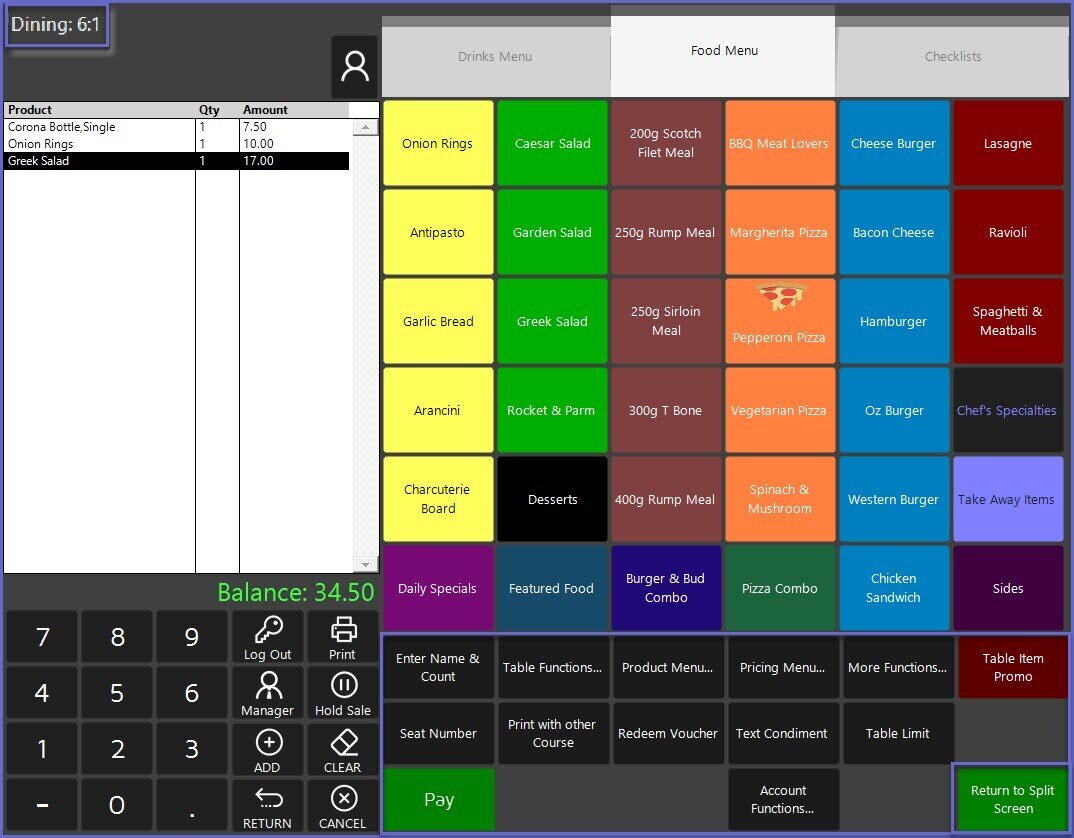
- The Split will become active on the main SmartPOS screen as can be seen with the Split's Products in the Transaction window and the Table:Subset noted above
- At this time, the till function panel will also change automatically to display till functions that are suited for the split-tables
- One of these till function buttons is the "Return to Split Screen" button which the Operator can use to return to the main Splits screen
- From the Split Screen, Products can also be moved between each Split

- When you're satisfied with the necessary Product/s movements, tap on either the "Close Split Screen" button to Save or the "Save & Send" button to both Save the transaction and send Products their designated remote printers
- In contrast to the above workflow, Tables can still be configured into Splits after opening a Saved Table
- To create a Split Bill from an existing Table, complete the following steps after opening a Saved Table that hasn't already been Split:
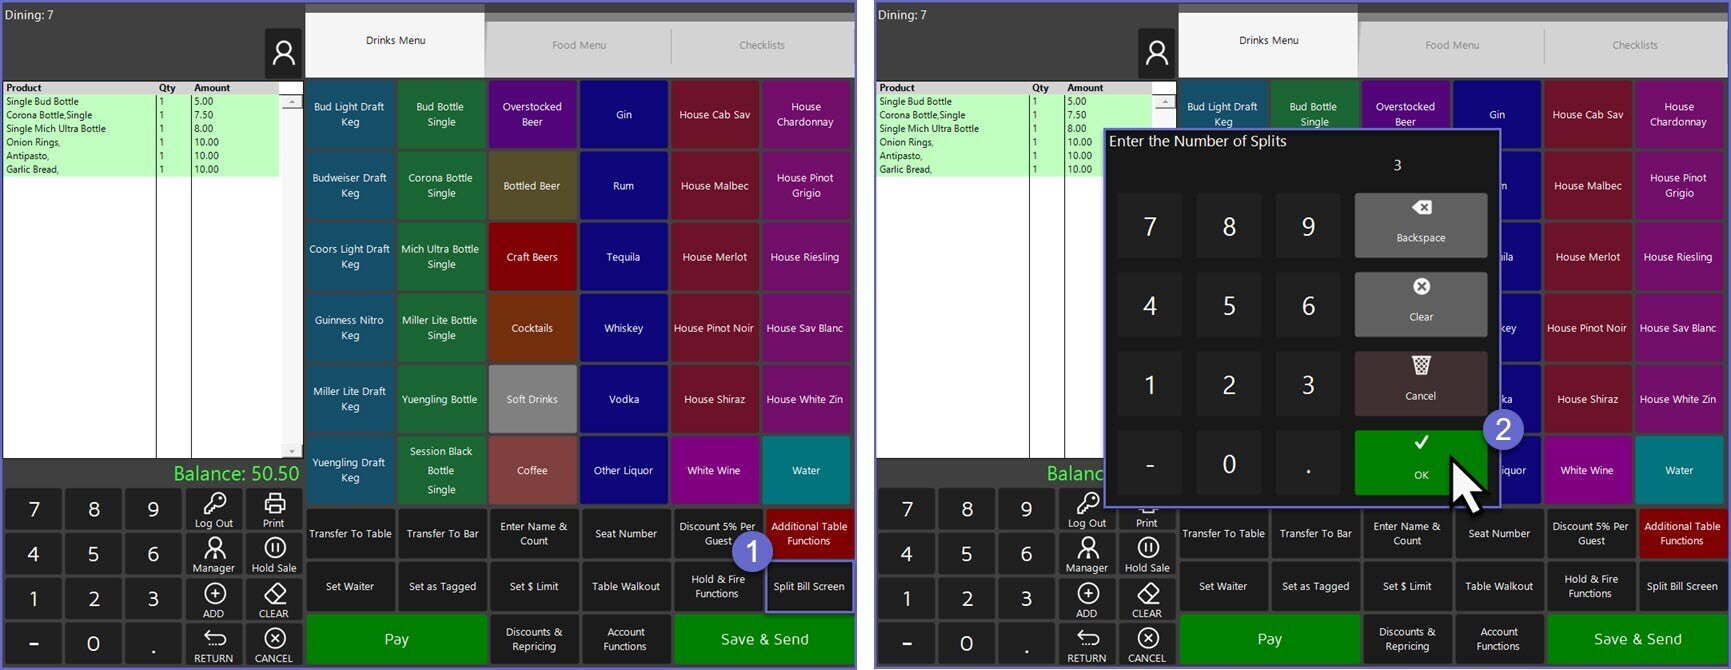
- Tap on the Split Bill Table Function from the Till Function Map whether from a new Table or an opened Saved Table (note that this button may be labeled as "Splits", "Split Bills", "Split Bill Screen", or something similar
- You'll then be prompted to Enter the Number of Splits for the Table
- The Split default is set to two (2); if another Split amount is desired, the Operator will need to change that prior to selecting OK
- After the Number of Splits has been selected, the screen will change to display the Split Table screen which will show the Master Table with all Products on the left and separate windows for each of the desired Number of Splits will be displayed on the screen
- Products can be moved from the Master Table to a Split by simply selecting the Products 1-by-1 and then moving them to their respective Splits
- This step can be repeated until all desired Products have been moved to the appropriate Split
- NB: After a Product has been moved from the Master Table to a Split, it cannot be moved back to the Master, only to another Split
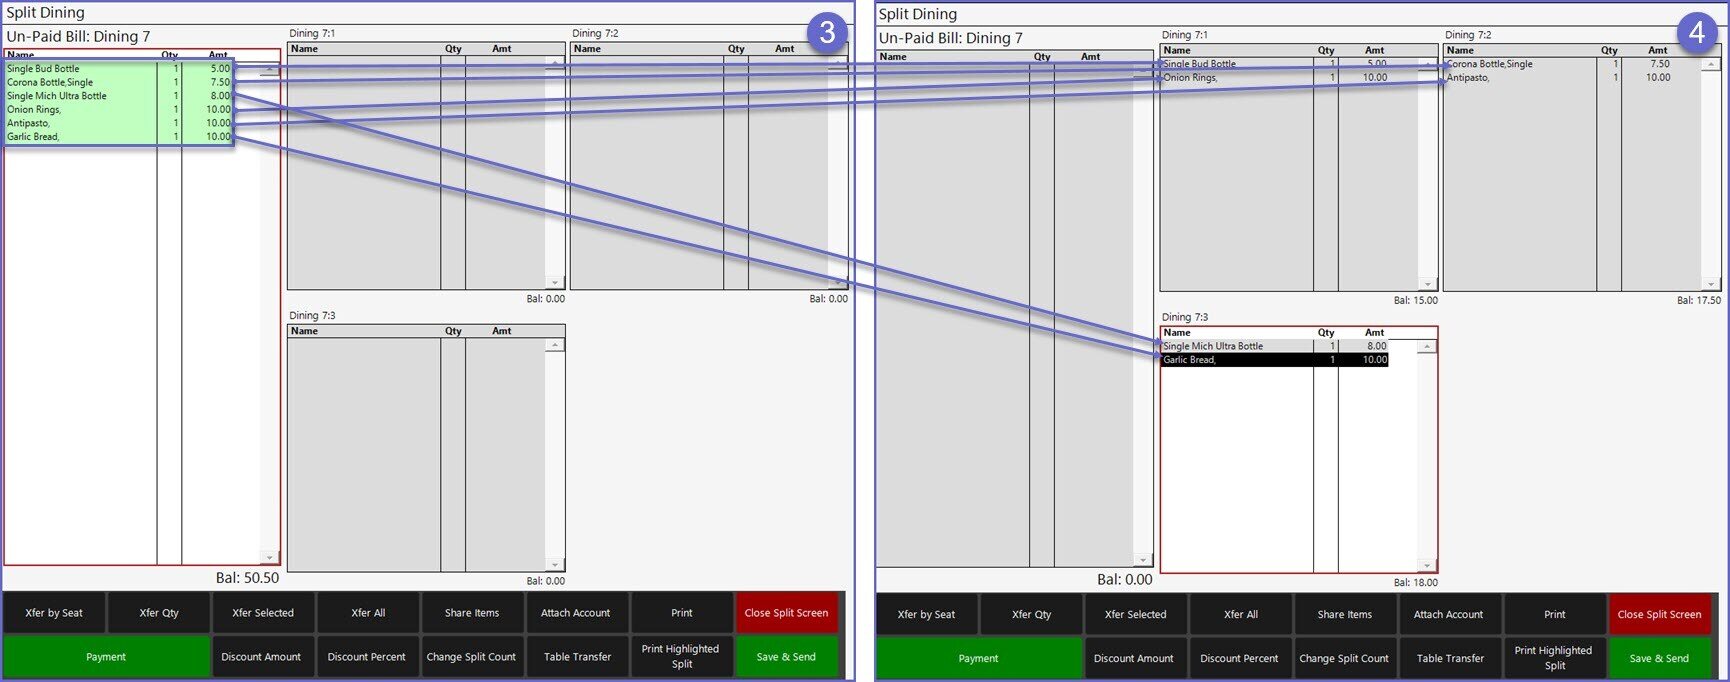
- Once you're satisfied with the necessary Product movements, tap on either the "Close Split Screen" button to Save or the "Save & Send" button to both Save the transaction and send Products their designated remote printers
Introduction to Split Bill Till Functions
- These Till Function Buttons are the default options that are included to be shown in the Till Function Panel when the Split Bill Screen is opened
- NB: The actual till functions options in your system may differ from those seen here due to manual changes that have been done in BackOffice, however, this is the "out of the box" set up

Function Button |
Description and Information |
|
Xfer By Seat |
|
|
Xfer Qty |
|
|
Share Items |
|
| Change Split Count |
|
|
Table Transfer |
|
|
Accounts |
|
|
|
| Close Split |
|
| Payment |
|
| Discount Amount |
|
| Discount Percent |
|
| Redeem Voucher |
|
| Table Promo Item |
|
| Print Highlighted Split |
|
| Save & Send |
|