Overview
This lesson elaborates on iPad RDP Setup for using iPad as a Kiosk and also lists the system requirements for the installation
databasehow-toreseller tools
Overview
iPad RDP Setup allows user to run the iPad as a remote desktop and operate Till functions
Following is a summary of workflow that this lesson covers
Windows User (s ) creation/Settings
Backoffice Till creation
IP settings on server
Shortcut creation/mod ification for ea ch us er
Setup tablets
Setup/connect to Wifi network
Install Thinstuff
Prerequisites
System Requirements
Bepoz 4.5.2.x and above 1 GB per user
Modern PC (preferably an i7 series 6 a nd up)
Enterprise grade Wifi (if not provided by us) tablet with good W ifi (preferably Ipads/Ipad Mini)
Workflow
Firstly we need to set up a Windows User for each tablet, with admin access Generally these are setup as follows :
tablet1 – password Do4safet
tablet2 – password Do4safet
tablet3 – password Do4safet and so on
We then create the tills in BackOffice (one for each tablet) and tick the "no offline " and the "ip fix prompt" flags as on
then we need to add an IP address per tablet on the server (as each smartpos (in each user) will be binding to its own IP in order to work)
We do this as below
Example: Server IP addr ess is 192.168.0.100 W e go into the network interface Settings
Select "internet protocol version 4" then press properties
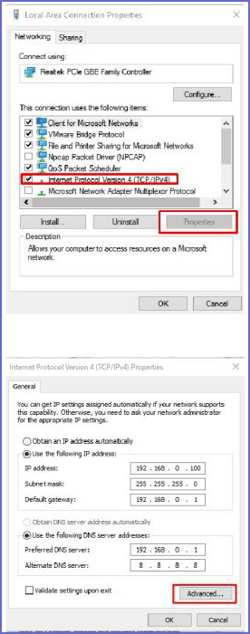
Go to Advanced settings and Press Add button
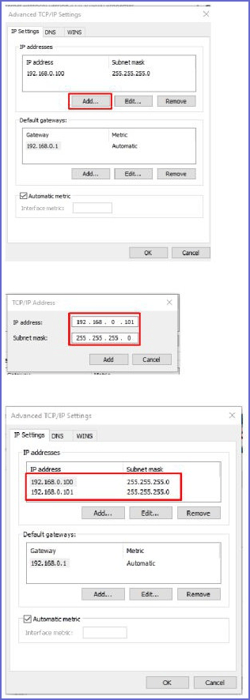
Insert the extra IP's as per previous setup then we end up with 2 IP's (or as many as required)
After this task is complete, we need to log in each user (tablet1, tablet2.. 3 etc) in the server at least ONCE – this is to create the profile local – otherwise any changes we do by logging in remotely will not be saved
SmartPOS has been configured to take command line parameters in 4.5.2 and above
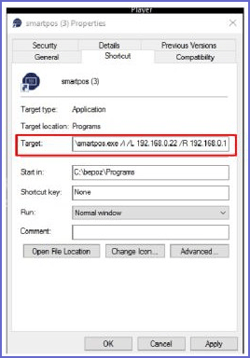
We create a shortcut on the desktop from c:\\bepoz\\programs\\smartpos .exe for each user
Make a table o f the Till Id's & Ip address es you are using example
Till id 1 = 192.168.0.101
Till id 2 = 192.168.0.102
Till id 3 = 192.168.0.103
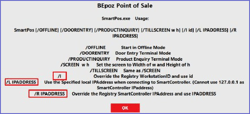
Then replace the line in the shortcut accordingly for each user as below screenshot For tablet 1 user
c:\\bepoz\\pro grams\\smartpos .exe /I 1 /L / 192.168.0.101 /R 192.168.0.100For tablet 2 user
c:\\bepoz\\programs\\smartpos .exe /I 2 /L / 192.168.0.102 /R 192.168.0.100
For tablet 3 user
c:\\bepoz\\pro grams\\smartpos .exe /I 3 /L / 192.168.0.103 /R 192.168.0.100
Once this is finished, we are finished with the bepoz side of the setup
We then need to install a remote desktop application on the Ipad/Tablet
Setup the wireless network if need be – if not just connect to it using their credentials
When connecting the Tablet onto the wireless network it does NOT need a static IP address Please set them as per normal on DHCP
When configuring the RDP client on the tablets configure as follows Server :192.168.0.100 (or whatever you server IP is)
User: Tablet1 (and so on) Password : Do4safet (as set above)
The Apple store Microsoft RDP Client works good
And also install thinstuff software to allow multiuser
Once connected
Follow the appropriate setup below.
Guided Access
To do this with Guided Access, first enable it by opening the Settings app and going to General > Accessibility > Guided Access
Enable the "Guid ed Access" s lider here
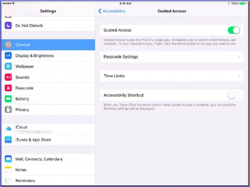
Tap " Passcode Settings" to set a PIN for guided access and choose whether or not you can exit Guided Access with TouchID, if your iPad has a Touch ID sensor
You can use the same PIN you use to unlock the iPad or different one
Next, launch the app you'd like to lock your iPad to. Quickly press the "Home " button three times in a row. The Guided Access screen will appear, and you can use the options here to configure it. By default, the touch screen is enabled and the Sleep/Wake button is disabled. However , you can disable the touch screen and allow people to use the Sleep/Wake button , if you like .
Tap "Start" in the top-right corner of your screen when you 're ready. While in Guided Access mode , the iPad's screen won 't turn off– it'll remain on and unlocked for anyone to use it. You may want to plug the iPad in if you intend on leaving it on. You could also choose to enable the Sleep/Wake button on the Guided Access screen. This will allow anyone to turn off the iPad's screen. Anyone can turn it on and they'll be taken to the app in Guided Access mode without having to enter a PIN.
Single App Mode
Single App Mode requires you put your iPad into Supervised Mode, so it's a bit more work to set up. Single App Mode can also be remotely enabled via a mobile device management (MDM) server if your organization uses one to manage your tablets. If you just need a temporary kiosk and don't want to bother with this, use the above solution . For a more permanent kiosk, this is ideal
To do this without device management server, you'll first need to download and install Apple Configurator from Apple and use it to place your iPad into Supervised Mode. You can then use Apple Configurator to enable Single App Mode. This can only be done on a Mac, as Apple Configurator only runs on Macs
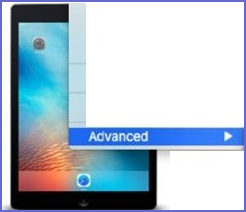
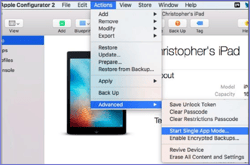
With your iPad in Supervised Mode and connected to your Mac via a USB cable, open the Apple Configurator application and select the connected device. Click the "Actions" menu , point to "Advanced," and select "Start Single App Mode ."
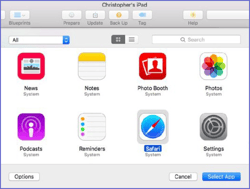
You'll be shown a list of apps installed on your iPad–both system apps and apps you've installed yourself. Select the app you wan t to lock the iPad to .
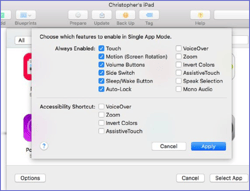
For more options, you can click the "Options " button here. By default, features like the touch screen , volume buttons, sleep/wake button, and auto -lock are all functional
However , you could use these options to disable the touch screen if you don't want anyone actually interacting with the device, or to disable the sleep/wake button and auto-lock. This will ensure the iPad always has its screen on, which may be ideal if you're leaving it plugged in. It's up to you.
Click the "Select App" button when you 're done and the iPad will be truly locked to a single app. People with access to it won't be able to triple-click the "Home" button and attempt to guess your PIN. When the iPad boots up, it'll go right back to that specific app
To disable Single App Mode in the future, connect the iPad to the Mac again, open Apple Configurator , and use the Actions > Advanced > Stop Single App Mode option
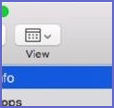
Apple Configurator 2 FileViewStore Window Help Add, Remove, Modift abd Export-> Christopher's iPad ►——------1►►Bo<:0< Up -T•g 1ristophe'rs iPadotilesnsoleRestore Update... Prepare...
Restore from Backup...Apply►)OUtBack UplCopacitySave Unlock Token Clear Passcode To Clear Restrictions PasscodeMode