- INTERNAL - Bepoz Help Guides
- HOW-2
- Accounts and Account Profiles
-
End-User | Products & SmartPOS
-
End-User | Stock Control
-
End-User | Table Service and Kitchen Operations
-
End-User | Pricing, Marketing, Promotions & Accounts
- Prize Promotions
- Points, Points Profiles and Loyalty
- Product Promotions
- Repricing & Discounts in SmartPOS
- Vouchers
- Account Till Functions
- Pricing, Price Numbers and Price Modes
- Raffles & Draws
- Marketing Reports
- Accounts and Account Profiles
- Rewards
- SmartPOS Account Functions
- Troubleshooting
- Product Labels
- Packing Slips
-
End-User | System Setup & Admin
-
End-User | Reporting, Data Analysis & Security
-
End-User | Membership & Scheduled Billing
-
End-User | Operators, Operator Permissions & Clocking
-
Interfaces | Data Send Interfaces
-
Interfaces | EFTPOS & Payments
- NZ EFTPOS Interfaces
- Linkly (Formerly PC-EFTPOS)
- Adyen
- Tyro
- ANZ BladePay
- Stripe
- Windcave (Formerly Payment Express)
- Albert EFTPOS
- Westpac Presto (Formerly Assembly Payments)
- Unicard
- Manager Cards External Payment
- Pocket Voucher
- OneTab
- Clipp
- eConnect-eConduit
- Verifone
- AXEPT
- DPS
- Liven
- Singapore eWallet
- Mercury Payments TRANSENTRY
- Ingenico
- Quest
- Oolio - wPay
-
Interfaces | SMS & Messaging
-
Interfaces | Product, Pricing, Marketing & Promotions
- Metcash Loyalty
- Range Servant
- ILG Pricebook & Promotions
- Oolio Order Manager Integration
- Ubiquiti
- Product Level Blocking
- BidFood Integration
- LMG
- Metcash/IBA E-Commerce Marketplace
- McWilliams
- Thirsty Camel Hump Club
- LMG Loyalty (Zen Global)
- Doshii Integration
- Impact Data
- Marsello
- IBA Data Import
- Materials Control
- Last Yard
- Bepoz Standard Transaction Import
-
Interfaces | Printing & KDS
-
Interfaces | Reservation & Bookings
-
Interfaces | Database, Reporting, ERP & BI
-
Interfaces | CALink, Accounts & Gaming
- EBET Interface
- Clubs Online Interface
- Konami Interface
- WIN Gaming Interface
- Aristocrat Interface
- Bally Interface
- WorldSmart's SmartRetail Loyalty
- Flexinet & Flexinet SP Interfaces
- Aura Interface
- MiClub Interface
- Max Gaming Interface
- Utopia Gaming Interface
- Compass Interface
- IGT & IGT Casino Interface
- MGT Gaming Interface
- System Express
- Aristocrat nConnect Interface
- GCS Interface
- Maxetag Interface
- Dacom 5000E Interface
- InnTouch Interface
- Generic & Misc. CALink
-
Interfaces | Miscellaneous Interfaces/Integrations
-
Interfaces | Property & Room Management
-
Interfaces | Online Ordering & Delivery
-
Interfaces | Purchasing, Accounting & Supplier Comms
-
SmartPOS | Mobile App
-
SmartPDE | SmartPDE 32
-
SmartPDE | Denso PDE
-
SmartPDE | SmartPDE Mobile App
-
MyPlace
-
MyPlace | myPLACE Lite
-
MyPlace | Backpanel User Guides
- Bepoz Price Promotions
- What's on, Events and tickets
- Staff
- System Settings | Operational Settings
- Vouchers & Gift Certificates
- Member Onboarding
- Members and memberships
- System Settings | System Setup
- Reports and Reporting
- Actions
- Offers | Promotions
- Messaging & Notifications
- System Settings | App Config
- Surveys
- Games
- User Feedback
- Stamp Cards
-
MyPlace | Integrations
-
MyPlace | FAQ's & How-2's
-
MyPlace | Release Notes
-
YourOrder
-
YourOrders | Backpanel User Guides
-
YourOrders | YourOrder Kiosk User Guide
-
YourOrders | Merchant App User Guide
-
WebAddons
-
Installation / System Setup Guides
- SmartPOS Mobile App | Setup
- SmartPOS Mobile App | SmartAPI Host Setup
- SmartPOS Mobile App | BackOffice Setup
- SmartPOS Mobile App | Pay@Table setup
- SmartKDS Setup 4.7.2.7 +
- SmartKDS Setup 4.6.x
- SQL Installations
- Server / BackOffice Installation
- New Database Creation
- Multivenue Setup & Config.
- SmartPOS
- SmartPDE
- Player Elite Interface | Rest API
- Interface Setups
- Import
- KDSLink
- Snapshots
- Custom Interface Setups
-
HOW-2
- Product Maintenance
- Sales and Transaction Reporting
- SmartPOS General
- Printing and Printing Profiles
- SQL
- Repricing & Discounts
- Stock Control
- Membership
- Accounts and Account Profiles
- Miscellaneous
- Scheduled Jobs Setups
- Backoffice General
- Purchasing and Receiving
- Database.exe
- EFTPOS
- System Setup
- Custom Support Tools
-
Troubleshooting
-
Hardware
Issuing Account Statements
Overview
This lesson covers the process of Issuing Account statements for Individual Accounts and Account Groups along with the Prerequisites required to enable this function
Overview
-
An Account Statement is a Periodic summary of Account Activity with a beginning date and an ending date
-
Statements can either be printed or emailed within Backoffice
-
The information on this Page will help guide you through the necessary steps to Setup and Issue Account Statements
Prerequisites
Setting Statement Options
-
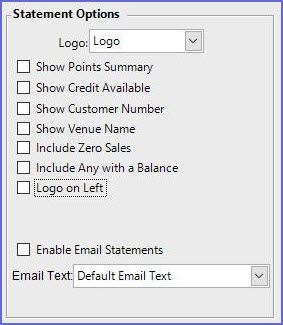
There are a number of Statement Options which are used for the following
-
To determine which information will display on Account Statements
-
Enable Emailing of Statements
-
|
Logo |
|
|
Show Points Summary |
|
|
Show Credit Available |
|
|
Show Customer Number |
|
|
Show Value Name |
|
|
Include Zero Sales |
|
|
Include Any with a Balance |
|
|
Logo on Left |
|
|
Enable Email Statements |
|
Issuing a Statement
-
After Setting Statement Options, Operators can now Issue Account Statements
For an Account Group
-
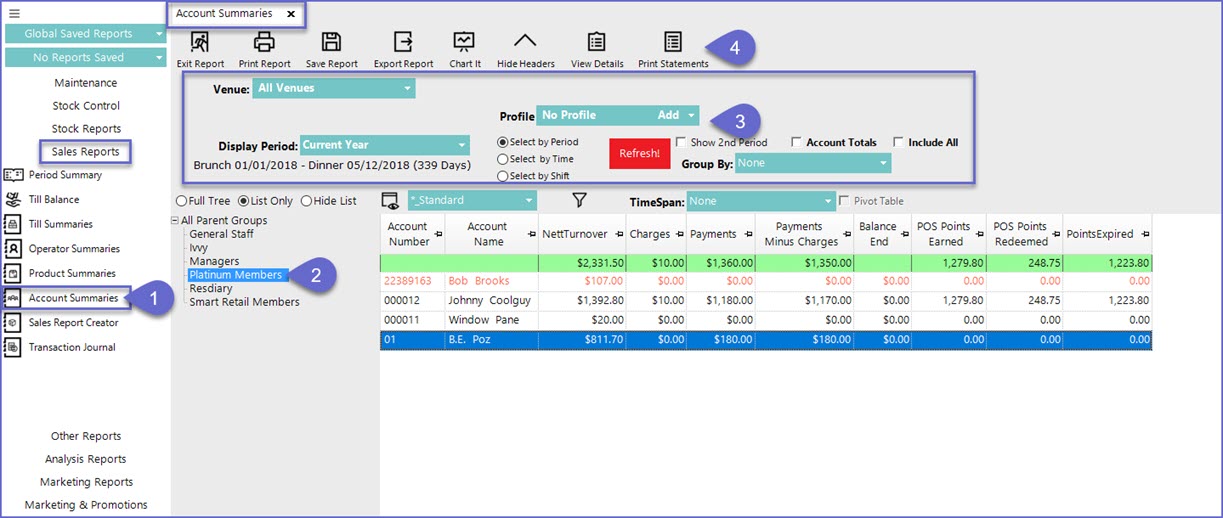
Select Sales Reports from the menu and select Account Summaries beneath that, which will open an Account Summaries Tab
-
Within the Account Summaries Tab, select the Account Group that you would like to Email Account Statements to
-
Use the settings to select the desired Display Period, Profile, etc.
-
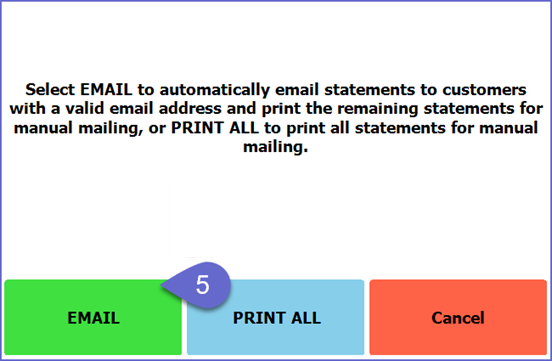
Click on the Print Statements button in the Header Section which will generate the following window
-
Select either the Email or Print option
-
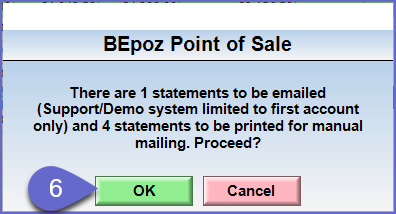
Depending on if you chose to Print or to Email, you will receive 1 of 2 Prompts displaying the number of Statements which will be Emailed, and/or the number of which will be Printed for Manual Mailing, click OK
-
If Emailing Account Statements, any Accounts that do not have Email Addresses assigned will have the option to Print for Manual Mailing
-
This Account Statements will now be Emailed or Printed for Manual Mailing
For an Individual Account
-
To Issue an Account Statement for an Individual Account, complete the following steps in BackOffice
-
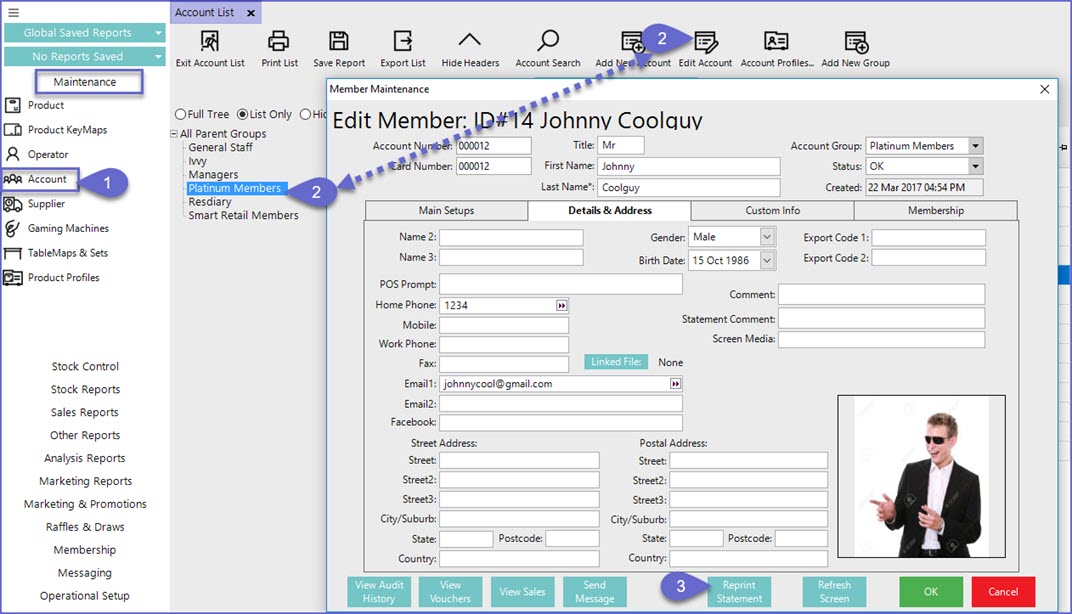
From the menu, select Maintenance and beneath that, select Account which will open the Account List Tab
-
Within the Account List, select the Individual Account to Issue a Statement for and open the Maintenance window for that Account either by double-clicking on the Account or by clicking on the Edit Account button in the Header Section
-
Within the Account/Member Maintenance window, click on the Reprint Statement button on the bottom of the window
-
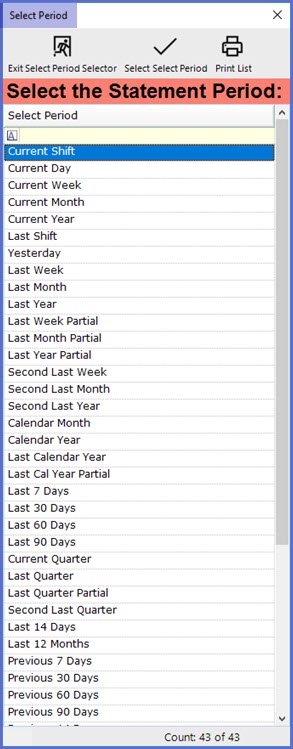
This will open a Select Period window; select the Period that you would like to Issue a Statement for
-
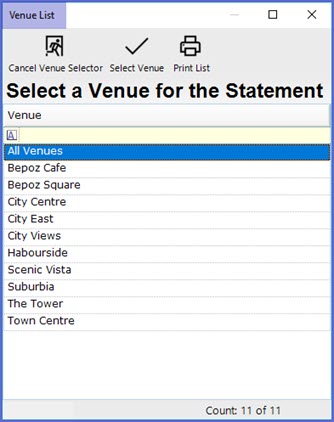
After selecting the Period, a Venue List window will open; Select the Venue for which the Account Statement is to be issued
-
This will only appear in Multi Venue Organisation
-
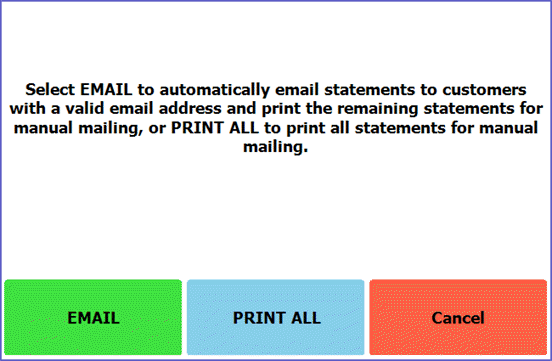
After selecting the Venue, Operators will be prompted to either Email or Print the selected Account Statement
-
If there is no Account Activity for the Account within the selected Venue, Period etc., following message box will pop up

