- INTERNAL - Bepoz Help Guides
- Interfaces | EFTPOS & Payments
- Linkly (Formerly PC-EFTPOS)
-
End-User | Products & SmartPOS
-
End-User | Stock Control
-
End-User | Table Service and Kitchen Operations
-
End-User | Pricing, Marketing, Promotions & Accounts
- Prize Promotions
- Points, Points Profiles and Loyalty
- Product Promotions
- Repricing & Discounts in SmartPOS
- Vouchers
- Account Till Functions
- Pricing, Price Numbers and Price Modes
- Raffles & Draws
- Marketing Reports
- Accounts and Account Profiles
- Rewards
- SmartPOS Account Functions
- Troubleshooting
- Product Labels
- Packing Slips
-
End-User | System Setup & Admin
-
End-User | Reporting, Data Analysis & Security
-
End-User | Membership & Scheduled Billing
-
End-User | Operators, Operator Permissions & Clocking
-
Interfaces | Data Send Interfaces
-
Interfaces | EFTPOS & Payments
- NZ EFTPOS Interfaces
- Linkly (Formerly PC-EFTPOS)
- Adyen
- Tyro
- ANZ BladePay
- Stripe
- Windcave (Formerly Payment Express)
- Albert EFTPOS
- Westpac Presto (Formerly Assembly Payments)
- Unicard
- Manager Cards External Payment
- Pocket Voucher
- OneTab
- Clipp
- eConnect-eConduit
- Verifone
- AXEPT
- DPS
- Liven
- Singapore eWallet
- Mercury Payments TRANSENTRY
- Ingenico
- Quest
- Oolio - wPay
-
Interfaces | SMS & Messaging
-
Interfaces | Product, Pricing, Marketing & Promotions
- Metcash Loyalty
- Range Servant
- ILG Pricebook & Promotions
- Oolio Order Manager Integration
- Ubiquiti
- Product Level Blocking
- BidFood Integration
- LMG
- Metcash/IBA E-Commerce Marketplace
- McWilliams
- Thirsty Camel Hump Club
- LMG Loyalty (Zen Global)
- Doshii Integration
- Impact Data
- Marsello
- IBA Data Import
- Materials Control
- Last Yard
- Bepoz Standard Transaction Import
-
Interfaces | Printing & KDS
-
Interfaces | Reservation & Bookings
-
Interfaces | Database, Reporting, ERP & BI
-
Interfaces | CALink, Accounts & Gaming
- EBET Interface
- Clubs Online Interface
- Konami Interface
- WIN Gaming Interface
- Aristocrat Interface
- Bally Interface
- WorldSmart's SmartRetail Loyalty
- Flexinet & Flexinet SP Interfaces
- Aura Interface
- MiClub Interface
- Max Gaming Interface
- Utopia Gaming Interface
- Compass Interface
- IGT & IGT Casino Interface
- MGT Gaming Interface
- System Express
- Aristocrat nConnect Interface
- GCS Interface
- Maxetag Interface
- Dacom 5000E Interface
- InnTouch Interface
- Generic & Misc. CALink
-
Interfaces | Miscellaneous Interfaces/Integrations
-
Interfaces | Property & Room Management
-
Interfaces | Online Ordering & Delivery
-
Interfaces | Purchasing, Accounting & Supplier Comms
-
SmartPOS | Mobile App
-
SmartPDE | SmartPDE 32
-
SmartPDE | Denso PDE
-
SmartPDE | SmartPDE Mobile App
-
MyPlace
-
MyPlace | myPLACE Lite
-
MyPlace | Backpanel User Guides
- Bepoz Price Promotions
- What's on, Events and tickets
- Staff
- System Settings | Operational Settings
- Vouchers & Gift Certificates
- Member Onboarding
- Members and memberships
- System Settings | System Setup
- Reports and Reporting
- Actions
- Offers | Promotions
- Messaging & Notifications
- System Settings | App Config
- Surveys
- Games
- User Feedback
- Stamp Cards
-
MyPlace | Integrations
-
MyPlace | FAQ's & How-2's
-
MyPlace | Release Notes
-
YourOrder
-
YourOrders | Backpanel User Guides
-
YourOrders | YourOrder Kiosk User Guide
-
YourOrders | Merchant App User Guide
-
WebAddons
-
Installation / System Setup Guides
- SmartPOS Mobile App | Setup
- SmartPOS Mobile App | SmartAPI Host Setup
- SmartPOS Mobile App | BackOffice Setup
- SmartPOS Mobile App | Pay@Table setup
- SmartKDS Setup 4.7.2.7 +
- SmartKDS Setup 4.6.x
- SQL Installations
- Server / BackOffice Installation
- New Database Creation
- Multivenue Setup & Config.
- SmartPOS
- SmartPDE
- Player Elite Interface | Rest API
- Interface Setups
- Import
- KDSLink
- Snapshots
- Custom Interface Setups
-
HOW-2
- Product Maintenance
- Sales and Transaction Reporting
- SmartPOS General
- Printing and Printing Profiles
- SQL
- Repricing & Discounts
- Stock Control
- Membership
- Accounts and Account Profiles
- Miscellaneous
- Scheduled Jobs Setups
- Backoffice General
- Purchasing and Receiving
- Database.exe
- EFTPOS
- System Setup
- Custom Support Tools
-
Troubleshooting
-
Hardware
5 | Linkly TCPIP (v4.6+)
This article covers TCPIP settings for PC-EFTPOS Configuration. PC-EFTPOS TCPIP is the 64bit support for PC-EFTPOS. PC-EFTPOS is a Windows-based system that will provide all the user screens, and communicate with the EFTPOS terminals. This system allows EFTPOS units to share one phone line or leased line. PC-EFTPOS v 4.8.1.0 / (Linkly In-store software v5.6.5) is the recommended version to use with Bepoz. PC EFTPOS Download This Interface is only supported by Windows Tills.
This article covers TCPIP settings for PC-EFTPOS Configuration.
PC-EFTPOS TCPIP is the 64bit support for PC-EFTPOS.
PC-EFTPOS is a Windows-based system that will provide all the user screens, and communicate with the EFTPOS terminals. This system allows EFTPOS units to share one phone line or leased line. PC-EFTPOS v 4.8.1.0 / (Linkly In-store software v5.6.5) is the recommended version to use with Bepoz.
This Interface is only supported by Windows Tills.
Prerequisites- Minimum Bepoz version of 4.6.2.6 and above
- To setup PC-EFTPOS within BackOffice, the applicable Operator Privileges will need to be enabled
- Operator Maintenance 'General' Tab
- General Settings: "Use BackOffice" Flag
- System Setup: "Access Venue, Stores & Tills" Flag
- System Setup: "Maintain Venue, Stores & Tills" Flag
- Operator must firstly install the PC-EFTPOS software on each Windows POS that needs to communicate with an EFTPOS terminal
- See the Standard PC-EFTPOS documentation for configuring the PC-EFTPOS software and EFTPOS terminals
- PC EFTPOS Documents
PC-EFTPOS BackOffice Device Setup

- When the POS Terminal is running a 64Bit OS then this interface MUST be used; NOT the ActiveX option
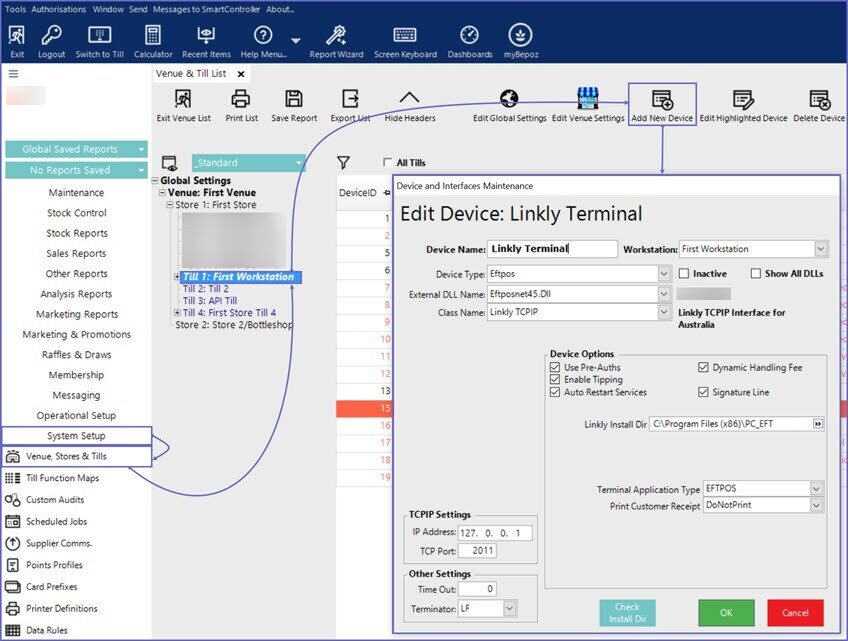
- Go to the System Setup tab from the side menu and select 'Venue, Stores & Till'
- Select the desired Till within the desired Store within the desired Venue where the PC-EFTPOS device will be connected to
- Click on 'Add New Device' and a Device and Interfaces Maintenance screen pops up, fill in with the following details:
- Device Name: As per desired
- Device Type: Eftpos
- External DLL Name: Eftposanz.Dll(4.6) | Eftposnet45.Dll(4.7)
- Class Name: PC_EFTPOS_TCPIP(4.6) | Linkly TCPIP(4.7)
- Device Options:
- Use Pre-Auths:
- ON: When the flag is enabled, the Pre-auth on table transactions are allowed
- OFF: When the flag is disabled, the Pre-auth on table transaction are not allowed
- Enable Tipping:
- ON: When the flag is enabled, this will allow tipping through the EFTPOS device
- OFF: When the flag is enabled, this will not allow tipping through the EFTPOS device
- Auto Restart Services:
- ON: When the flag is enabled, and PC-EPTFOS installation directory is not empty, POS will run PC-EFTPOS services and Client UI when they are not running
- OFF: When the flag is disabled, and PC-EPTFOS installation directory is not empty, POS will not run PC-EFTPOS services and Client UI
- Allow Operator Restart:
- ON: When the flag is enabled, then the Operator will have the option to restart the service when the timeout period has elapsed
- OFF: When the flag is disabled, then the Operator will not have the option to restart the service when the timeout period has elapsed
- Dynamic Handling Fee: (Note: Only available from v4.7.2)
- ON: When the flag is enabled, then EFTPOS terminal dynamic handling fee are accepted
- OFF: When the flag is disabled, then EFTPOS terminal dynamic handling fee are not accepted
- Signature Line:1
- ON: When the flag is enabled, the signature line will be included in the Merchant receipt
- OFF: When the flag is disabled, the signature line will not be included in the Merchant receipt
- PC-EFTPOS Install Dir: The folder within the system where the PC-EFTPOS has been installed
- Terminal Application Type:
- EFTPOS: This option will use the PC-EFTPOS print settings
- Agency: This option will override the PC-EFTPOS settings and use the Bepoz Application settings
- AlbertCBA:
- Print Customer Receipt: This option is to print the customer receipts. The operator can select any one option from the dropdown list
- DoNotPrint: When this option is selected, the customer receipt is not printed
- PrintAutomatically: When this option is selected, the customer receipt is automatically printed out
- AskToPrint: When this option is selected, the operator gets a prompt asking if they want to print the customer receipt or not. Based on the prompt options, the operator can either opt to print or reject not to print
- TCPIP Settings:
- IP Address: IP Address of the PC-EFTPOS Client; if the client is installed on the local machine then you could set the loopback IP address (eg 127.0.0.1)
- TCP Port: Port Number of the PC-EFTPOS Client; by default the port number should be 2011
- Other Settings:
- TimeOut: TimeOut time set in seconds

- Click OK to save the Device
- Repeat these steps for all required Tills
Miscellaneous EFTPOS Functions
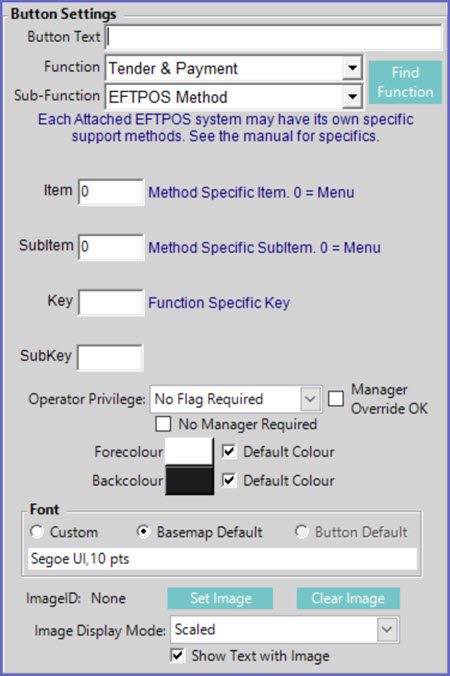
- In function maps there is an “EFTPOS Method” function. This allows for EFTPOS interface specific functions to be performed from within the Tills
- For PC-EFTPOS only the Button Item field is used. Below are the functions that can be accessed from a Till Override Button
- You will need to setup a new panel on the function map if you are going to set multiple EFTPOS functions

| User Selection = 0 | Displays all functions to select from |
| ControlPanel = 1 | Displays the PC EFTPOS ControlPanel |
| SetupPinPad = 2 | Displays the PC EFTPOS SetupPinPad |
| ReceiptPrint = 3 | Displays the PC EFTPOS ReceiptPrint |
| DisplaySettlement = 4 | Displays the PC EFTPOS DisplaySettlement |
| DisplayStatus = 5 | Displays the PC EFTPOS DisplayStatus |
| JournalViewer = 6 | Displays the PC EFTPOS JournalViewer |
| Logon = 7 | Displays the PC EFTPOS Logon |
| SelfTest = 8 | Displays the PC EFTPOS SelfTest |
