This article outlines the steps and configurations in setting up Manual Promotions Import for LMG Liquorfile. Setting up and performing the Manual Import is quick, simple, and ensures that someone in the Organization will be aware of all active Promotions. Begin by adding the BackOffice Extension as described. Then, w ith the Price Promotion and Multibuy Promotion files at the ready, Manually Import via the BackOffice Product Promotions component in just a few more steps.
This article outlines the steps and configurations in setting up Manual Promotions Import for LMG Liquorfile.
Setting up and performing the Manual Import is quick, simple, and ensures that someone in the Organization will be aware of all active Promotions.
Begin by adding the BackOffice Extension as described. Then, with the Price Promotion and Multibuy Promotion files at the ready, Manually Import via the BackOffice Product Promotions component in just a few more steps.
As with the Scheduled Job, Importing Promotions will retrieve Product Information from the files and match it with the Supplier's Pricebook and with the Database's Product List.
Retrieving Product Information can be accessed locally or through an external server.
Other information retrieved includes Promotional Pricing, Required Quantities where applicable, and Promotion Start and End Dates.
Prerequisites
- To access Promotion Import features, the applicable Operator Privileges will need to be enabled
-
Operator Maintenance 'General' Tab - System Setup: "Access Venue, Stores & Tills" Flag
- System Setup: "Maintain Venue, Stores & Tills" Flag
- System Setup: "Maintain Scheduled Jobs" Flag
-
Operator Maintenance 'Stock Control' Tab - Promotions: "Maintain Product Promotions" Flag
BackOffice Extension Device Setup
- In order to Manually Receive Promotions in BackOffice, a BackOffice Extension will first need to be added which will allow for Manual Imports via Product Promotions
- To set up the BackOffice Extension, log in to BackOffice and complete the following steps:
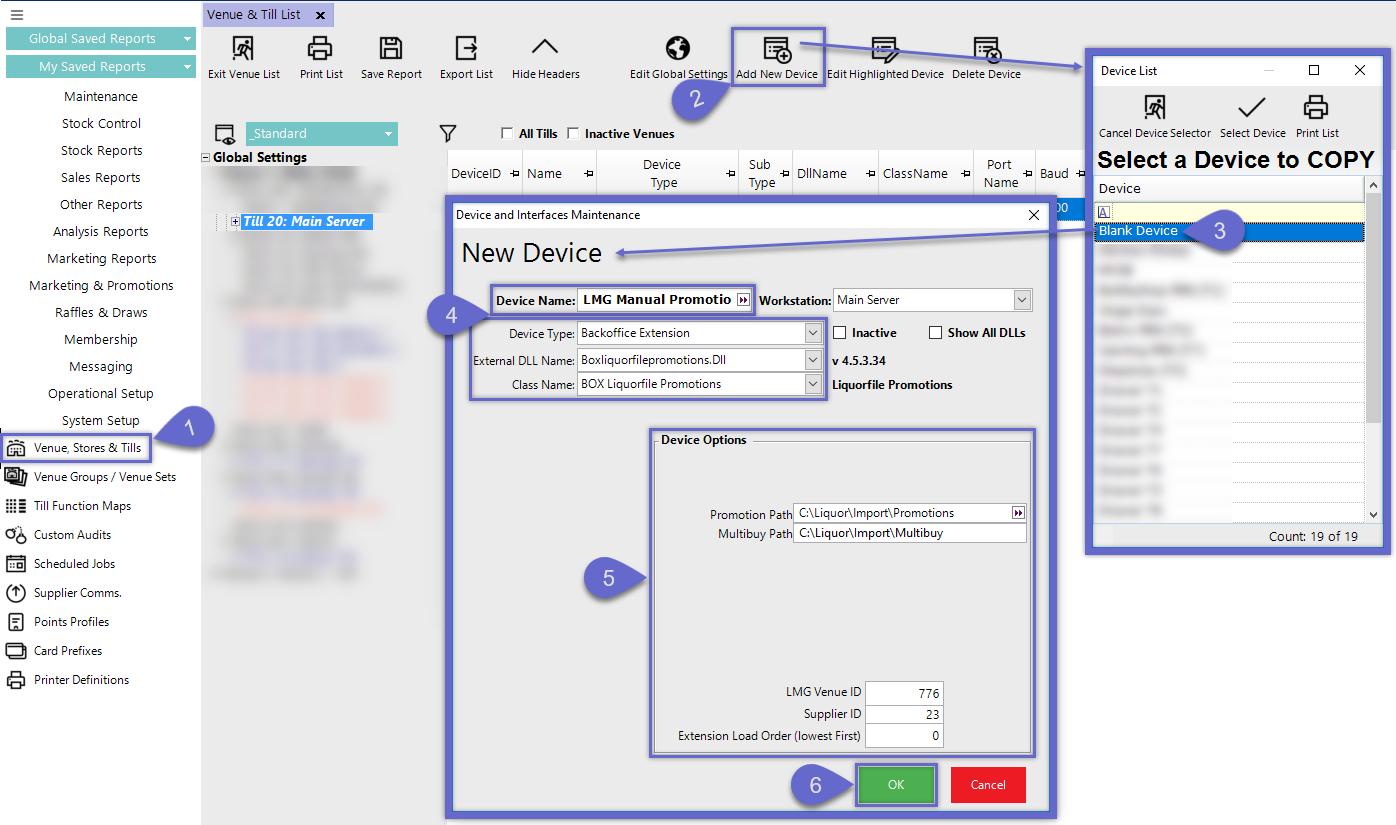
- Navigate to System Setup in the side menu and select Venue, Stores & Tills to open the Venue & Till List
- From the list, highlight the Server workstation and select the Add New Device Button from the header
- When prompted to copy a device, select Blank Device which will then open a New Device and Interfaces Maintenance window
- Enter a relevant Device Name, set the Device Type as 'BackOffice Extension', the External DLL Name as 'Boxliquorfilepromotions.Dll', and the Class Name should be 'BOX Liquorfle Promotions'
- Within the Device Options:
- Promotion Path - Enter the directory to the Price Promotions File
- Multibuy Path - enter the directory to the Multibuy Promotions Files
- LMG Venue ID - this will be supplied by LMG
- Supplier ID - enter the Supplier ID from the database belonging to the Supplier whose Pricebook will be used to match Products with
- Extension Load Order (Lowest First) - this determines the order in which all Extensions will be loaded with the lowest number loading first
- Select OK to save the Device
Setting up a Scheduled Job
- Scheduled Jobs will retrieve Promotion information and import it directly into BackOffice based on the configured schedule
- To set up the BackOffice Scheduled Job, log in to BackOffice and complete the following steps:
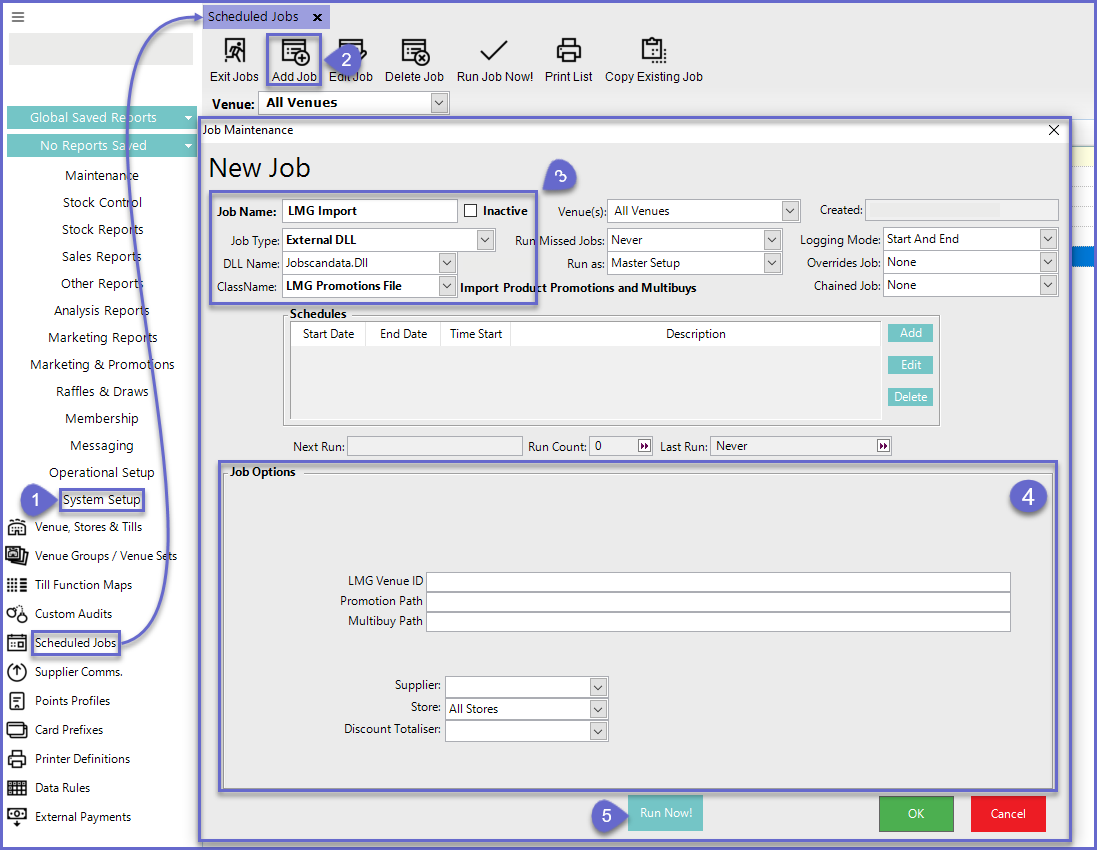
- Navigate to System Setup and select Scheduled Jobs
- Select Add Job button and the Job Maintenance window will open
- There are a number of credentials that need to input and they include:
- Job Name: Give the Job a relevant name
- Job Type: External DLL
- DLL Name: Jobscandata.Dll
- ClassName: LMG Promotions File
- Job Options will also require a number of configurations as well:
- LMG Venue ID: Supplied by LMG
- Promotion Path: The local file directory where the Promotion file is located
- Multibuy Path: The local file directory where the Multibuy file is located
- Supplier: Supplier for Imports
- Store: Enter a Store ID if the Promotions need to be filtered to a specific Store
- Discount Totaliser: Enter the Discount Totaliser that any Discounts attributed to the created Promotions will be added to
- Select Run Now! to run the Job immediately (as opposed to running based on the Schedule) and click OK to save the Scheduled Job
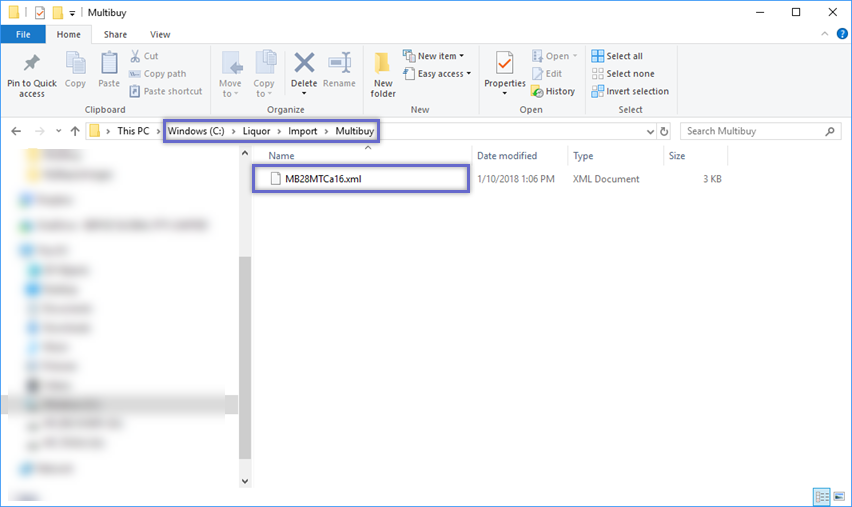
File Location
- File types will need to be saved to the File Path Directories that were defied in the Device Options and Job Options
- The File Paths used in this article are for demonstration and are merely a suggestion; place the Files wherever is best suited so long as the File Path is correctly defined in the Device Setup
- Promotions files should be in a .txt file format
- Multibuy files should be in a .xml file format

Receiving Promotions
- To Receive the Promotions Manually, first, ensure that BackOffice has been restarted after the BackOffice Extension has been created & saved; this will enable the Extension
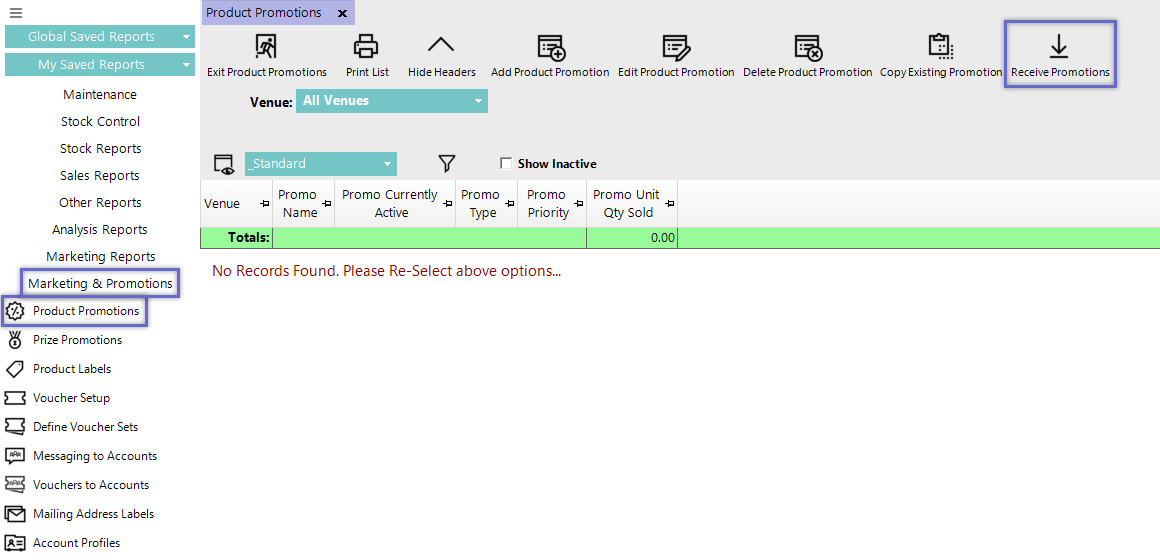
- After logging back into BackOffice, navigate to Marketing & Promotions in the side menu, expand it and select Product Promotions
- If the BackOffice Extension has been correctly applied, there will be a Receive Promotions button on the far right of the header; click this button to begin the Manual Import
- After clicking the Receive Promotions button, the Import process will begin with the opening of the Import Promotions window which will list all of the Products from the Price Promotions file
- If the Price Promotions file cannot be located or does not exist, the Import Multibuys window will open which will list all of the Products from the Multibuys Promotion file
- If neither the Price Promotions or Multibuys Promotion files can be located or they don't exist, nothing will happen
Import Product Price Promotions
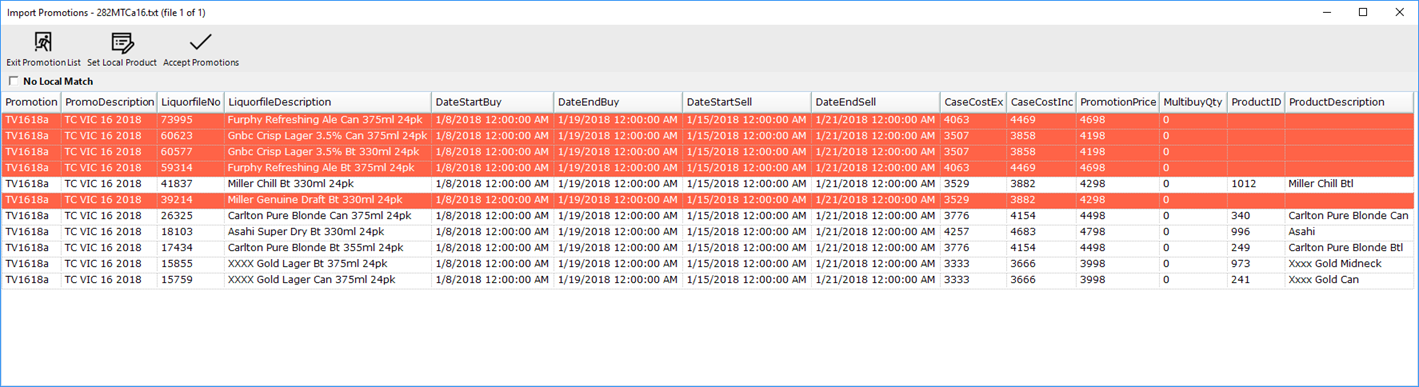
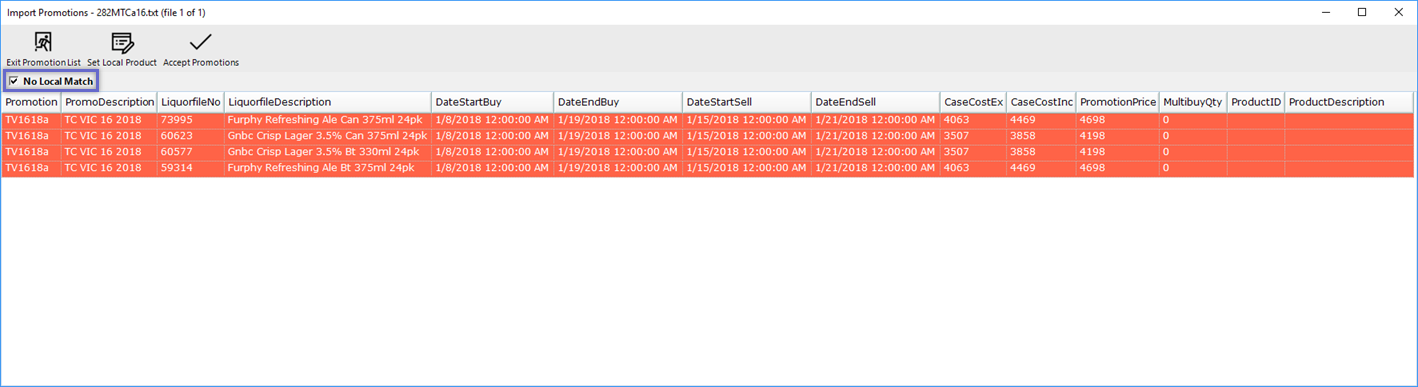
- Any Products from the file that are matched with the Supplier Pricebook and the Database's Product List will be displayed with no highlight - black text and a white background
- Products from the file that are not matched with the Supplier Pricebook and the Product List will be highlighted and will appear with white text and a red-orange background
Option 1 - Accept Price Promotions
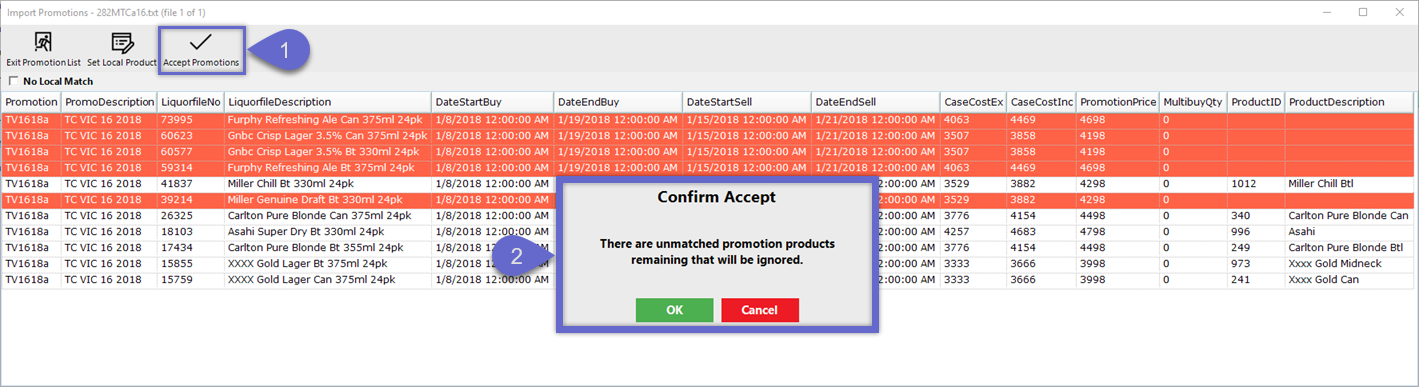
- To continue with the Promotions list as is, click the Accept Promotions button
- This will proceed with creating a Product Price Promotion/s to include only the non-highlighted Products with which a link can be made between the Products listed in the Price Promotions file and the local Database
- A Confirm Accept prompt will display to notify the Operator that there are unmatched Products; this will allow an opportunity to return to the window and Set Local Products (Option 2) or click OK to continue
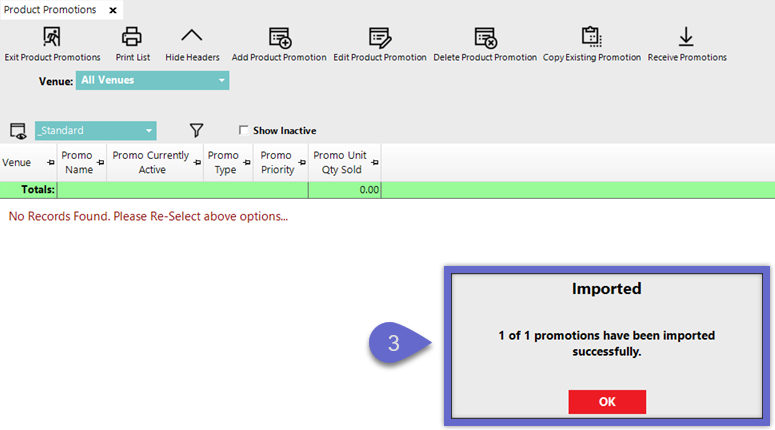
- Next, an Imported prompt will display which shows how many Price Promotions have successfully been Imported; click OK
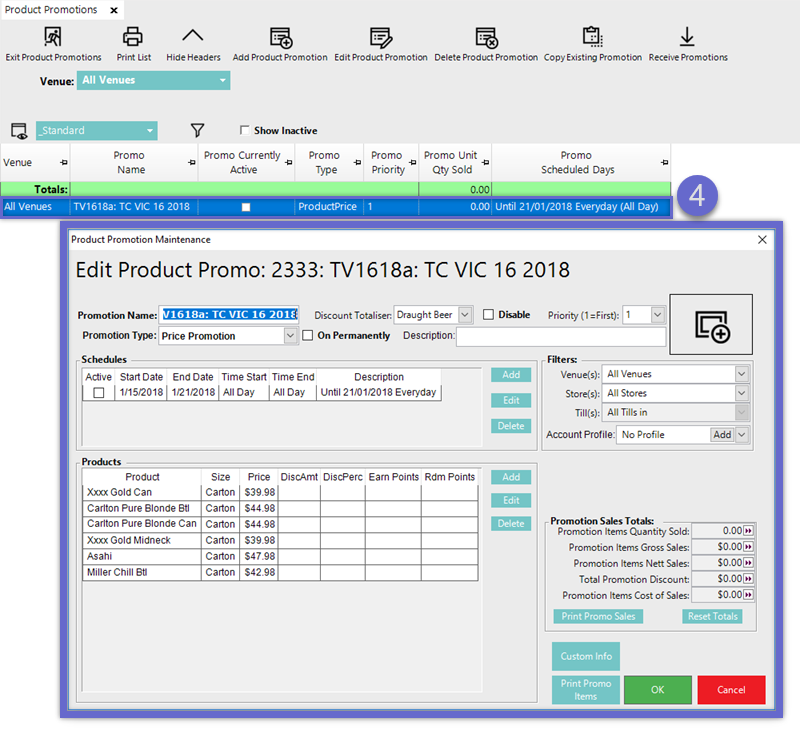
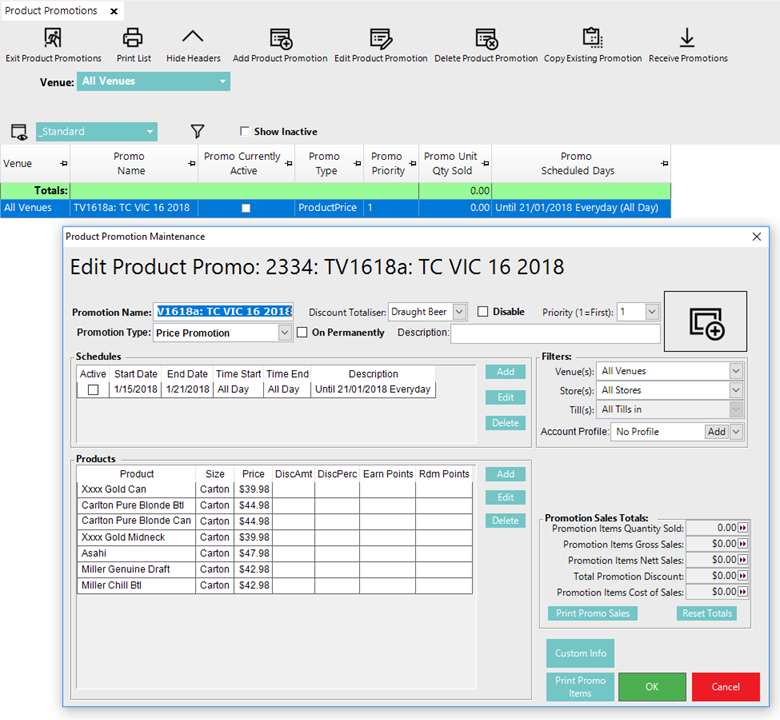
- The Product Promotions Tab will then refresh and the successfully Imported Price Promotion/s will have been created in the Database and will be listed; opening a Price Promotion will confirm the Promotion Dates and the Products included from the Imported Promotion file
Option 2 - Set Local (Unmatched) Products
- Enabling the No Local Match flag will filter the list, hiding all of the Products that match to the Local Database and only showing Products that don't have a Local Database match
- This can be used to avoid manually searching through for Unmatched Products if the Imported Price Promotion file contains dozens or hundreds of Product Lines
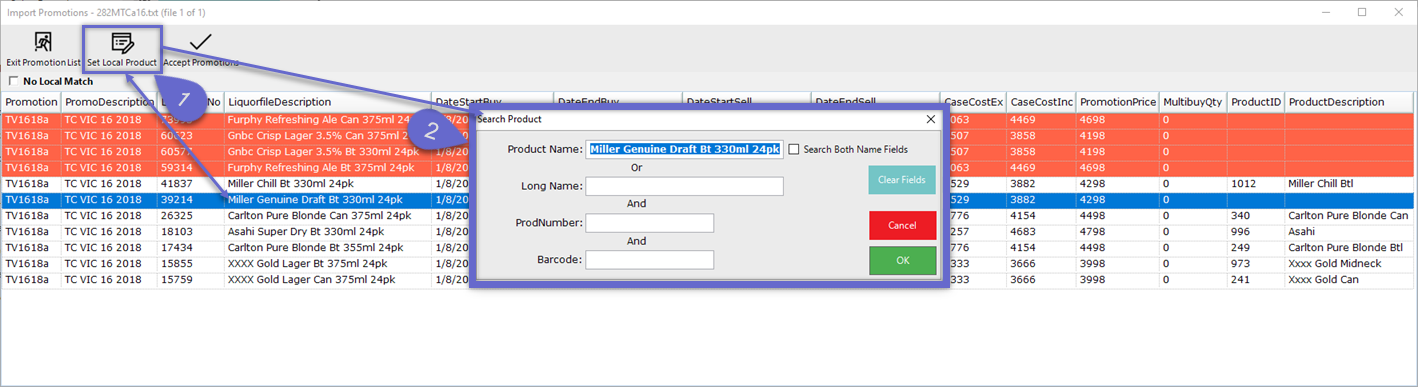
- If there are Products listed in the Price Promotion file that haven't been matched but can be set to a Local Product in the Database, highlight the desired Product line and click the Set Local Product button
- A Search Product window will open which can be used to search for a Product in the Database by Product Name and/or Long Name and ProdNumber and/or Barcode; by default, the Liquorfile Description will be entered into the Product Name field
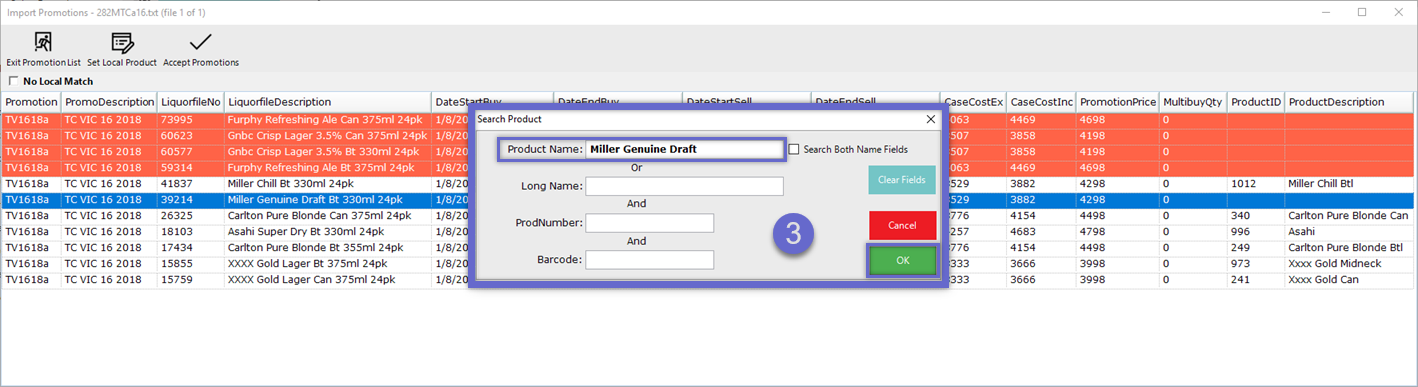
- Alter the Product Name field and/or enter text into the other fields to search the Database and then click OK
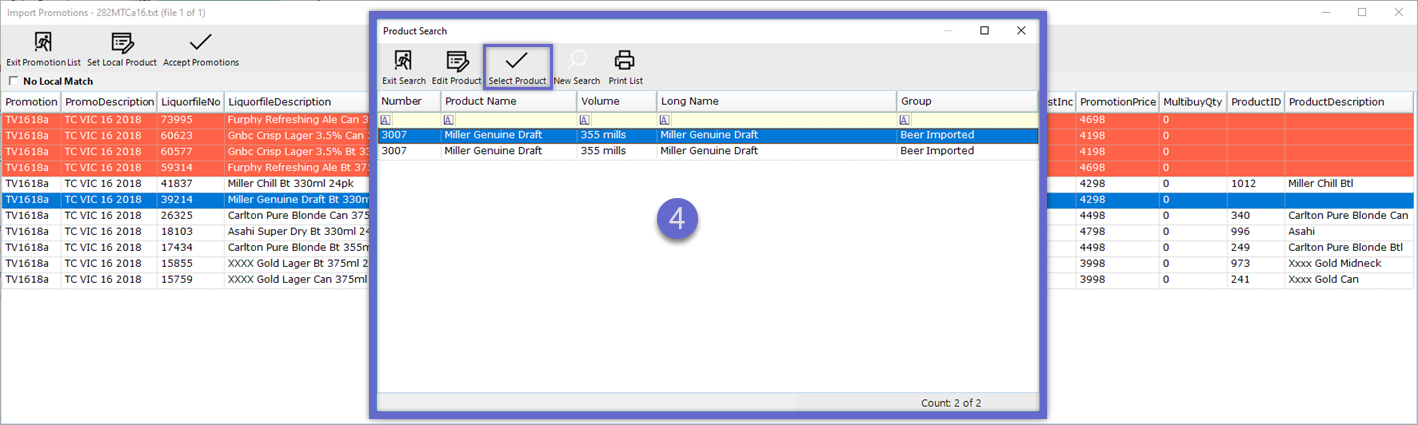
- If Product/s in the Database match the Search, they will be displayed in a Product Search window; select the desired Product to match to the Promotion file by highlighting and clicking the Select Product button or by simply double-clicking on the line
- NB: inactive Products in the Database will also match, however, they will be displayed in the standard "inactive" text color - salmon text with white background
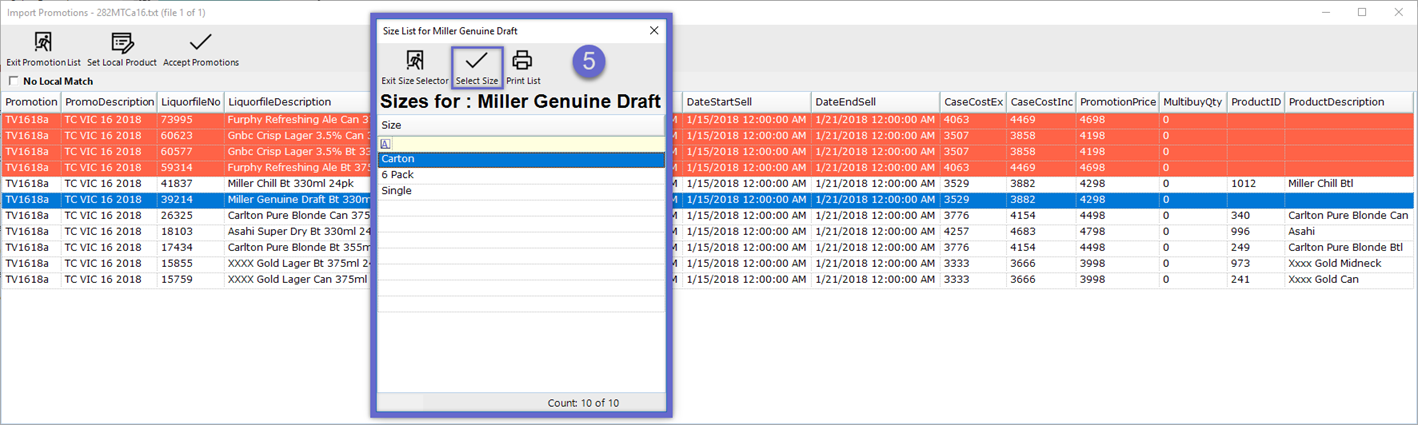
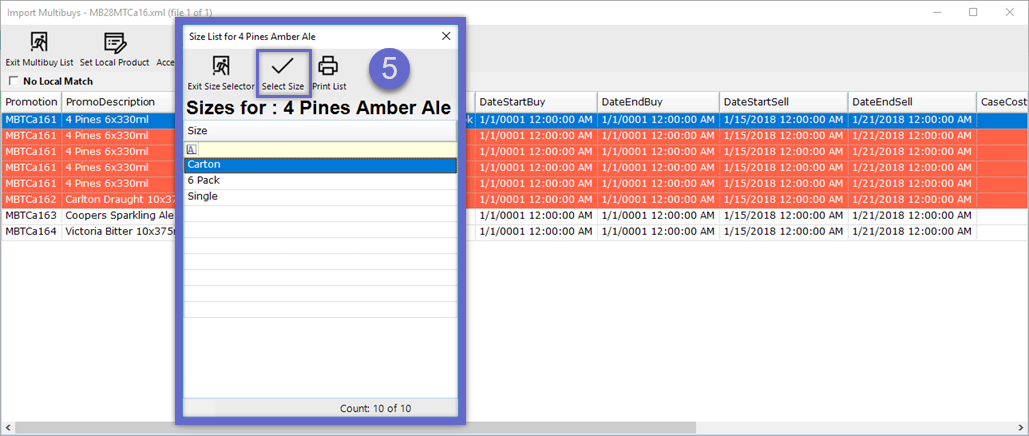
- Next, a window will appear which will prompt to select an available Size for the chosen Product; select the desired Size by highlighting and clicking the Select Size button or by simply double-clicking on the line
- After selecting the desired Size, the Product Line in the Import Promotions window will no longer be highlighted as it's now matched with a Product in the Local Database
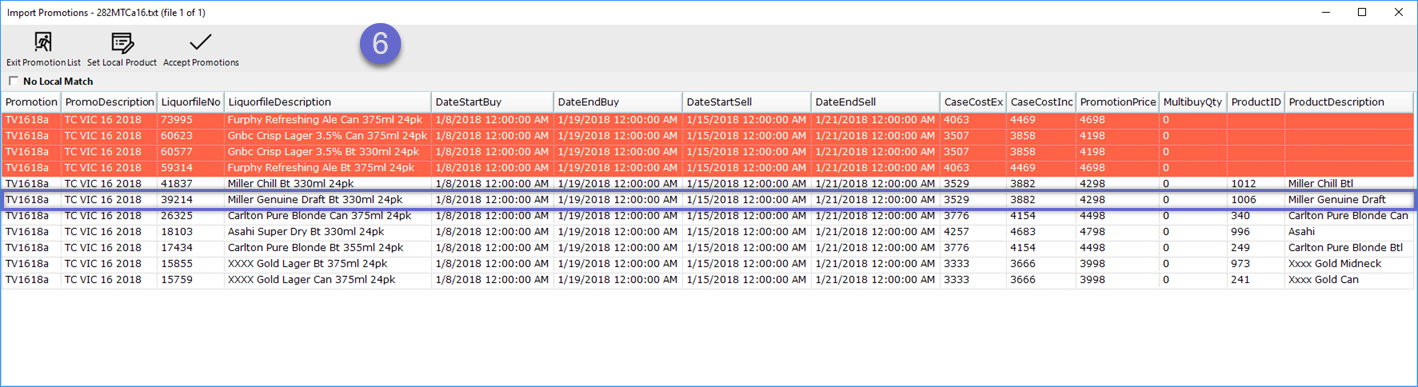
- Repeat the previous steps to Set any additional Local Products
- To continue with the Import process, complete the steps from Option 1 above
- The Promotion Name in Bepoz after the initial Import will be derived from raw data in the Import file; this can be changed to a more suitable Promotion Name if desired
- After successful Import, the Price Promotion file will be deleted from its Directory Folder
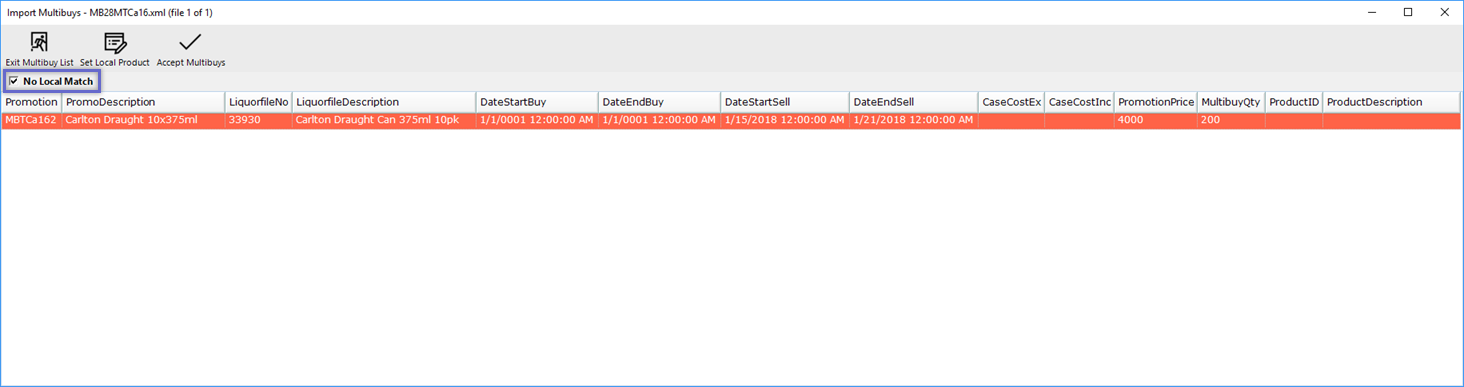
Import Multibuys Promotions
- After completing the Price Promotions Import (or if no Price Promotions file is located/doesn't exist), the Import Multibuys window will open given that the Multibuys Promotion file exists in the proper File Directory
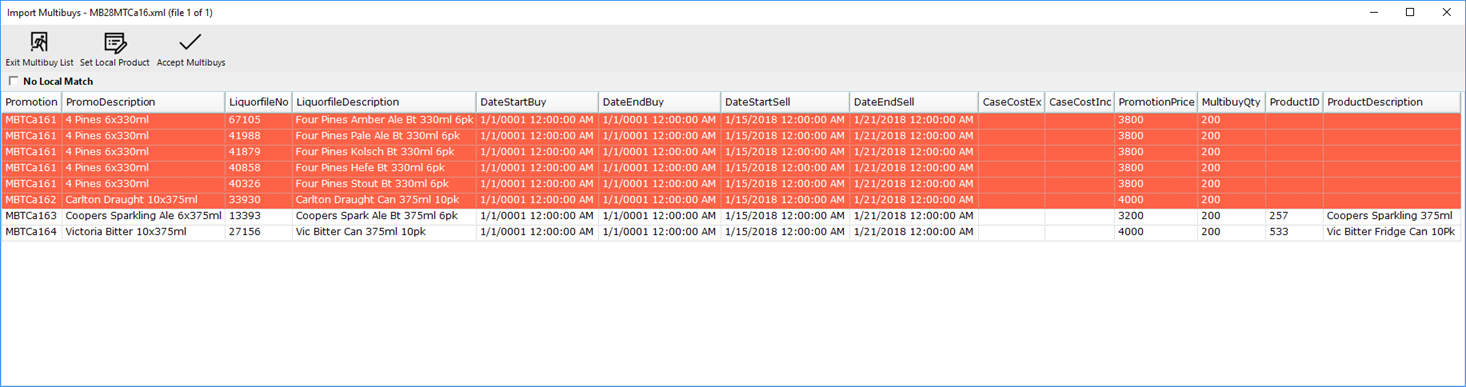
- Any Products from the file that are matched with the Supplier Pricebook and the Database's Product List will be displayed with no highlight - black text and a white background
- Products from the file that are not matched with the Supplier Pricebook and the Product List will be highlighted and will appear with white text and a red-orange background
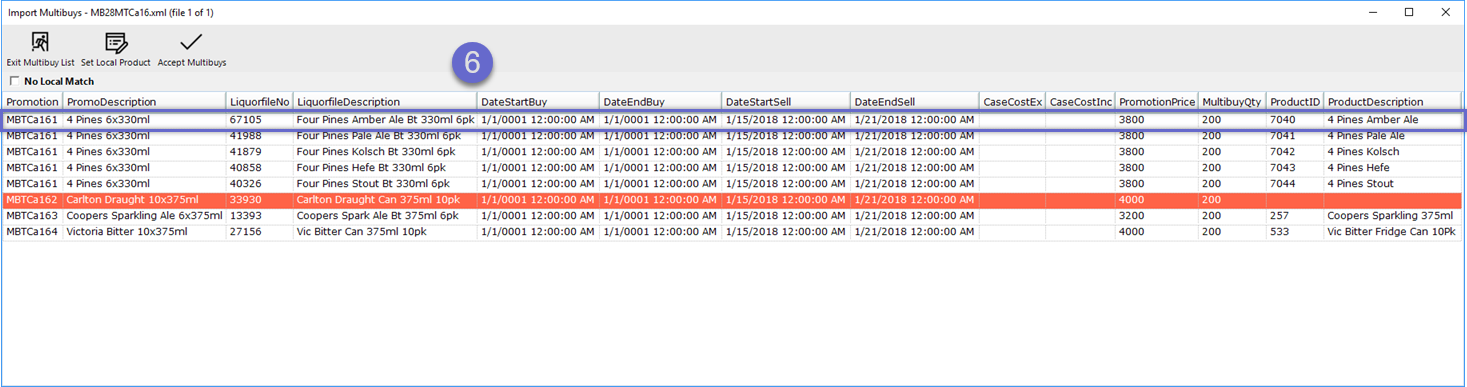
- If multiple Multibuy Promotions are imported from the same Multibuy Promotions file, they will be separated into different Multibuy Promotions in Bepoz based on raw data in the file defining which Products belong to which Multibuy Promotion
- E.g., in this example, the Multibuy Promotion file contains three (3) different Multibuy Promotions which can be seen firstly in the above image as noted by the differing text in the 'Promotion' column fields
Option 1 - Accept Multibuys
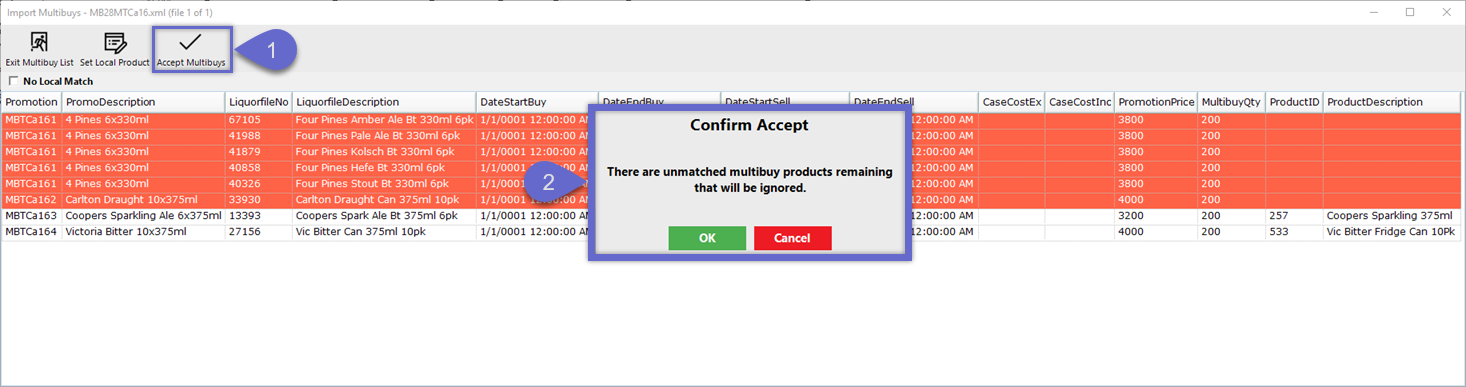
- To continue with the Multibuys list as is, click the Accept Multibuys button
- This will proceed with creating a Multibuy Promotion/s to include only the non-highlighted Products with which a link can be made between the Products listed in the Multibuys Promotion file and the local Database
- A Confirm Accept prompt will display to notify the Operator that there are unmatched Products; this will allow an opportunity to return to the window and Set Local Products (Option 2) or click OK to continue
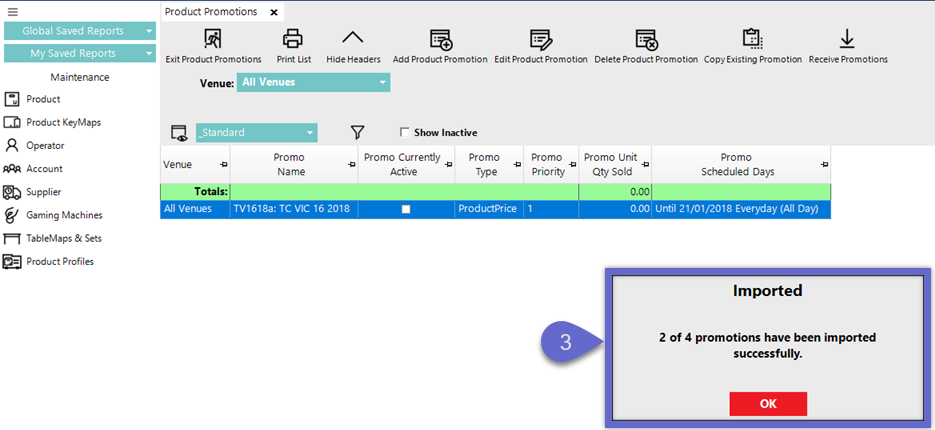
- Next, an Imported prompt will display which shows how many Multibuys Promotions have successfully been Imported; click OK
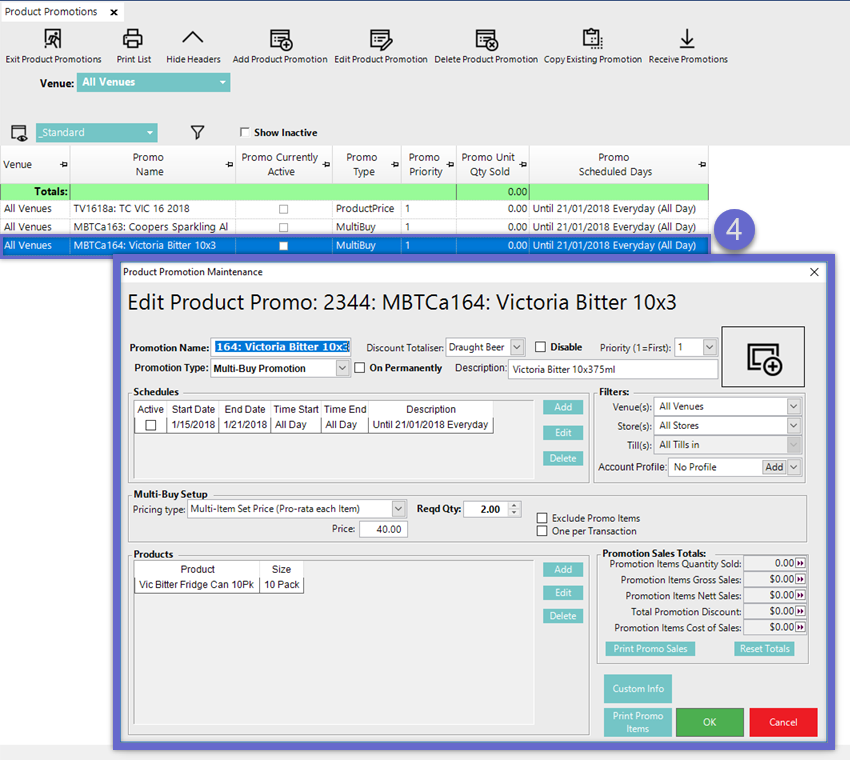
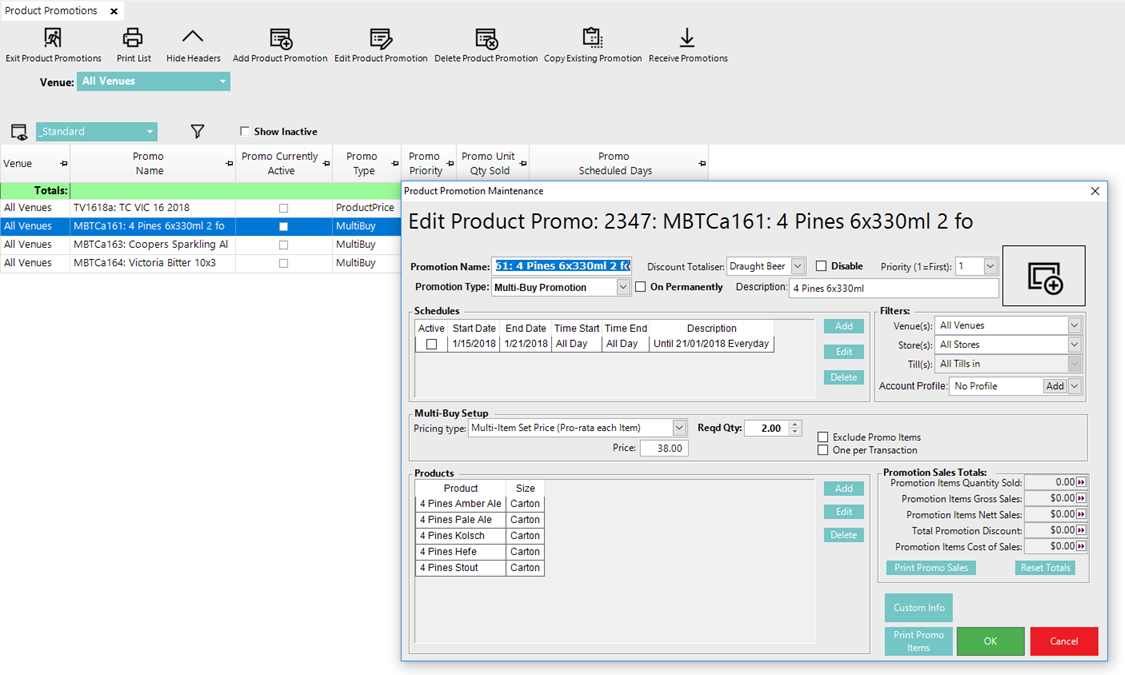
- The Product Promotions Tab will then refresh and the successfully Imported Multibuys Promotion/s will have been created in the Database and will be listed; opening a Multibuy Promotion will confirm the Promotion Dates and the Products included from the Imported Multibuys file
Option 2 - Set Local (Unmatched) Products
- Enabling the No Local Match flag will filter the list, hiding all of the Products that match to the Local Database and only showing Products that don't have a Local Database match
- This can be used to avoid manually searching through for Unmatched Products if the Imported Multibuys Promotion file contains dozens or hundreds of Product Lines
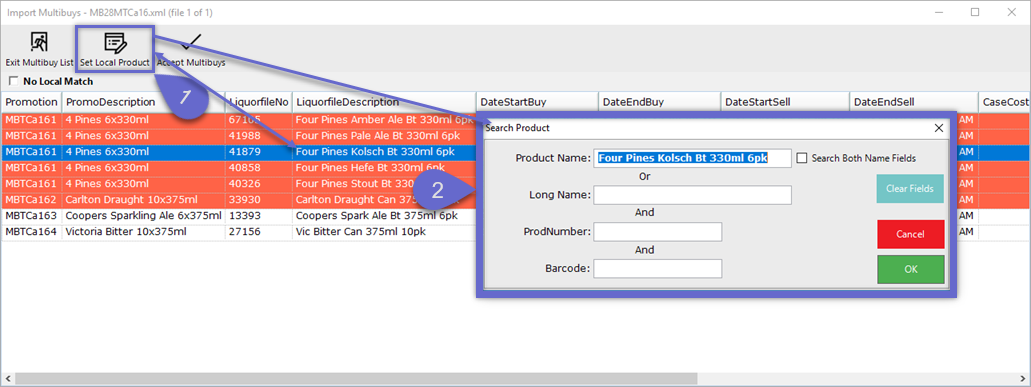
- If there are Products listed in the Multibuys Promotion file that haven't been matched but can be set to a Local Product in the Database, highlight the desired Product line and click the Set Local Product button
- A Search Product window will open which can be used to search for a Product in the Database by Product Name and/or Long Name and ProdNumber and/or Barcode; by default, the Liquorfile Description will be entered into the Product Name field
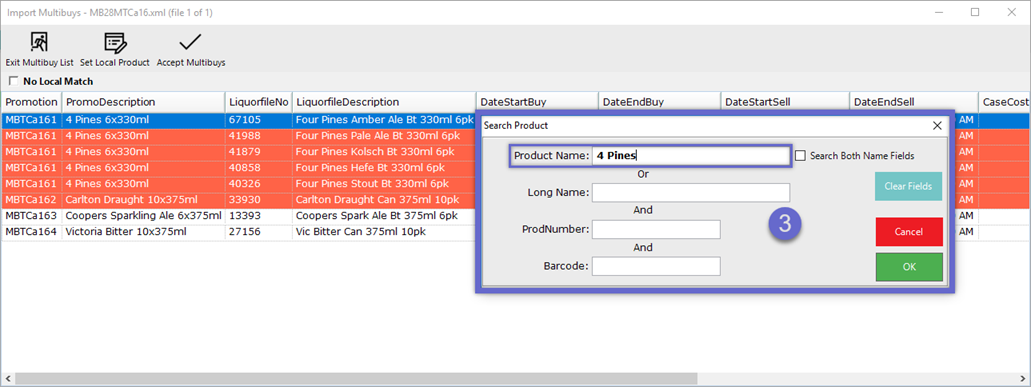
- Alter the Product Name field and/or enter text into the other fields to search the Database and then click OK
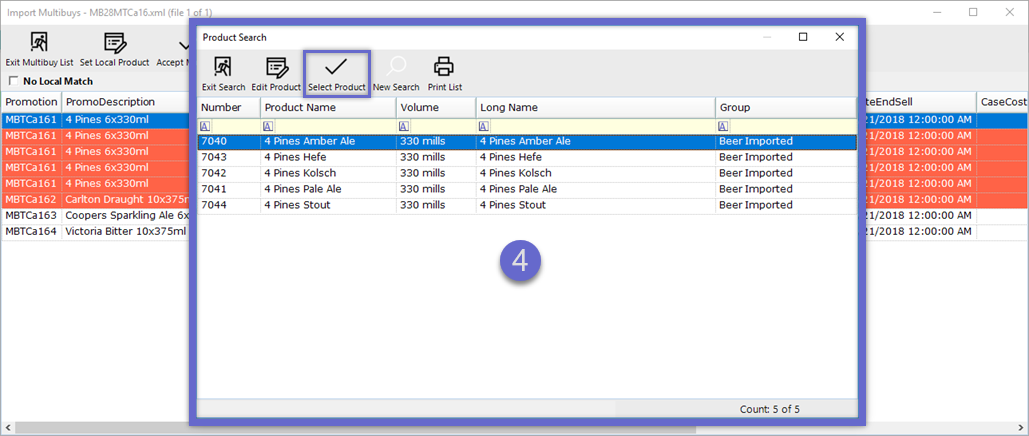
- If Product/s in the Database match the Search, they will be displayed in a Product Search window; select the desired Product to match to the Multibuys Promotion file by highlighting and clicking the Select Product button or by simply double-clicking on the line
- NB: inactive Products in the Database will also match, however, they will be displayed in the standard "inactive" text color - salmon text with white background
- Next, a window will appear which will prompt to select an available Size for the chosen Product; select the desired Size by highlighting and clicking the Select Size button or by simply double-clicking on the line
- After selecting the desired Size, the Product Line in the Import Multibuys window will no longer be highlighted as it's now matched with a Product in the Local Database
- Repeat the previous steps to Set any additional Local Products
- To continue with the Import process, complete the steps from Option 1 above
- The Promotion Name in Bepoz after the initial Import will be derived from raw data in the Import file; this can be changed to a more suitable Promotion Name if desired
- After successful Import, the Price Promotion file will be deleted from its Directory Folder
Canceling an Import
- There are two (2) different ways to Cancel an Import after the process had been started:
- By clicking on the Exit Promotion List or Exit Multibuy List buttons
- By clicking on the 'X' in the upper right corner to close the window in the traditional sense
- Both methods will have similar effects, however, clicking the Exit List button will have an added step (#2 as noted below)
- The following example shows canceling a Multibuy Promotions Import, however, the workflow remains the same for canceling a Price Promotions Import
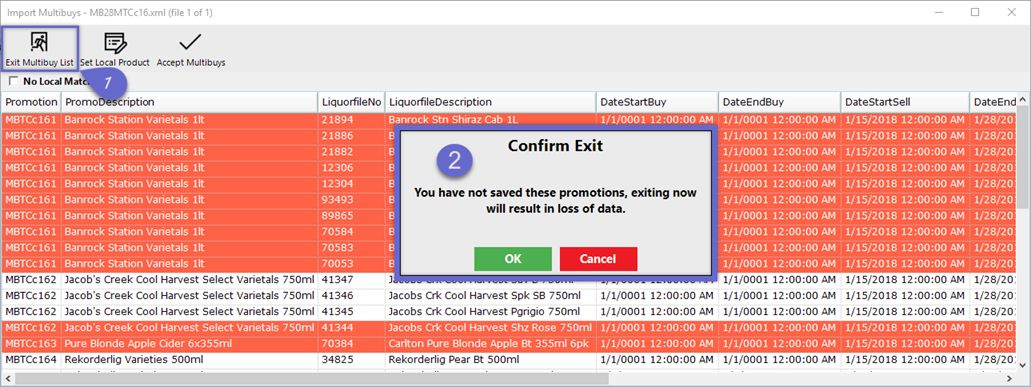
- Click on the Exit List button
- A Confirm Exit prompt will appear notifying the Operator that the Promotions have not been Saved and that exiting will result in loss of data; selecting Cancel will close the prompt and return to the Import window
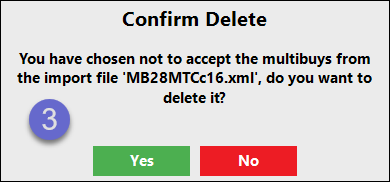
- After selecting OK, the Import window will close and a Confirm Delete prompt will appear notifying the Operator that the Import File has not been accepted
- This prompt offers an option to Delete the file from its Directory Folder, however, if No is selected the file will remain and will still be available for Import at a later time
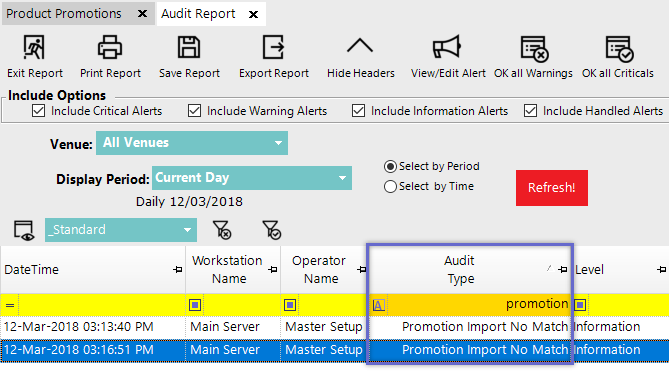
Audit Log for Unmatched Products
- When Products on the Import file aren't matched to the Local Database during the Promotions Import, an Audit Log entry will be created with the Audit Type called Promotion Import No Match