-
End-User | Products & SmartPOS
-
End-User | Stock Control
-
End-User | Table Service and Kitchen Operations
-
End-User | Pricing, Marketing, Promotions & Accounts
- Prize Promotions
- Points, Points Profiles and Loyalty
- Product Promotions
- Repricing & Discounts in SmartPOS
- Vouchers
- Account Till Functions
- Pricing, Price Numbers and Price Modes
- Raffles & Draws
- Marketing Reports
- Accounts and Account Profiles
- Rewards
- SmartPOS Account Functions
- Troubleshooting
- Product Labels
- Packing Slips
-
End-User | System Setup & Admin
-
End-User | Reporting, Data Analysis & Security
-
End-User | Membership & Scheduled Billing
-
End-User | Operators, Operator Permissions & Clocking
-
Interfaces | Data Send Interfaces
-
Interfaces | EFTPOS & Payments
- NZ EFTPOS Interfaces
- Linkly (Formerly PC-EFTPOS)
- Adyen
- Tyro
- ANZ BladePay
- Stripe
- Windcave (Formerly Payment Express)
- Albert EFTPOS
- Westpac Presto (Formerly Assembly Payments)
- Unicard
- Manager Cards External Payment
- Pocket Voucher
- OneTab
- Clipp
- eConnect-eConduit
- Verifone
- AXEPT
- DPS
- Liven
- Singapore eWallet
- Mercury Payments TRANSENTRY
- Ingenico
- Quest
- Oolio - wPay
-
Interfaces | SMS & Messaging
-
Interfaces | Product, Pricing, Marketing & Promotions
- Metcash Loyalty
- Range Servant
- ILG Pricebook & Promotions
- Oolio Order Manager Integration
- Ubiquiti
- Product Level Blocking
- BidFood Integration
- LMG
- Metcash/IBA E-Commerce Marketplace
- McWilliams
- Thirsty Camel Hump Club
- LMG Loyalty (Zen Global)
- Doshii Integration
- Impact Data
- Marsello
- IBA Data Import
- Materials Control
- Last Yard
- Bepoz Standard Transaction Import
-
Interfaces | Printing & KDS
-
Interfaces | Reservation & Bookings
-
Interfaces | Database, Reporting, ERP & BI
-
Interfaces | CALink, Accounts & Gaming
- EBET Interface
- Clubs Online Interface
- Konami Interface
- WIN Gaming Interface
- Aristocrat Interface
- Bally Interface
- WorldSmart's SmartRetail Loyalty
- Flexinet & Flexinet SP Interfaces
- Aura Interface
- MiClub Interface
- Max Gaming Interface
- Utopia Gaming Interface
- Compass Interface
- IGT & IGT Casino Interface
- MGT Gaming Interface
- System Express
- Aristocrat nConnect Interface
- GCS Interface
- Maxetag Interface
- Dacom 5000E Interface
- InnTouch Interface
- Generic & Misc. CALink
-
Interfaces | Miscellaneous Interfaces/Integrations
-
Interfaces | Property & Room Management
-
Interfaces | Online Ordering & Delivery
-
Interfaces | Purchasing, Accounting & Supplier Comms
-
SmartPOS | Mobile App
-
SmartPDE | SmartPDE 32
-
SmartPDE | Denso PDE
-
SmartPDE | SmartPDE Mobile App
-
MyPlace
-
MyPlace | myPLACE Lite
-
MyPlace | Backpanel User Guides
- Bepoz Price Promotions
- What's on, Events and tickets
- Staff
- System Settings | Operational Settings
- Vouchers & Gift Certificates
- Member Onboarding
- Members and memberships
- System Settings | System Setup
- Reports and Reporting
- Actions
- Offers | Promotions
- Messaging & Notifications
- System Settings | App Config
- Surveys
- Games
- User Feedback
- Stamp Cards
-
MyPlace | Integrations
-
MyPlace | FAQ's & How-2's
-
MyPlace | Release Notes
-
YourOrder
-
YourOrders | Backpanel User Guides
-
YourOrders | YourOrder Kiosk User Guide
-
YourOrders | Merchant App User Guide
-
WebAddons
-
Installation / System Setup Guides
- SmartPOS Mobile App | Setup
- SmartPOS Mobile App | SmartAPI Host Setup
- SmartPOS Mobile App | BackOffice Setup
- SmartPOS Mobile App | Pay@Table setup
- SmartKDS Setup 4.7.2.7 +
- SmartKDS Setup 4.6.x
- SQL Installations
- Server / BackOffice Installation
- New Database Creation
- Multivenue Setup & Config.
- SmartPOS
- SmartPDE
- Player Elite Interface | Rest API
- Interface Setups
- Import
- KDSLink
- Snapshots
- Custom Interface Setups
-
HOW-2
- Product Maintenance
- Sales and Transaction Reporting
- SmartPOS General
- Printing and Printing Profiles
- SQL
- Repricing & Discounts
- Stock Control
- Membership
- Accounts and Account Profiles
- Miscellaneous
- Scheduled Jobs Setups
- Backoffice General
- Purchasing and Receiving
- Database.exe
- EFTPOS
- System Setup
- Custom Support Tools
-
Troubleshooting
-
Hardware
10 | LMG Bottlemart - Schedule Job Setup for Promotions Import
This article outlines the steps to setup a Schedule Job for importing LMG Bottlemart Promotions.
This article outlines the steps to setup a Schedule Job for importing LMG Bottlemart Promotions.
There are two (2) ways of importing LMG Bottlemart Promotions:
- Using a BackOffice Extension to import the Promotions manually
- Using a Scheduled Job to import the Promotions automatically based on a Schedule
Importing Promotions via the Schedule Job will retrieve Product Promotion information from the files and match it with the Supplier's Pricebook and with the Database Product List. Retrieving Product information can be accessed locally or through an external server.
Other information retrieved includes Promotional Pricing, Required Quantities where applicable and Promotion Start and End Dates.
NB: Options available within the Schedule Job for LMG Bottlemart may vary depending upon the Bepoz Version installed.
Prerequisites
- To access Promotion import features, the applicable Operator Privileges will need to be enabled
-
Operator Maintenance 'General' Tab - System Setup: "Access Venue, Stores & Tills" flag
- System Setup: "Maintain Scheduled Job" flag
Setting up a Scheduled Job
- Scheduled Jobs will retrieve Product information and import it directly into BackOffice
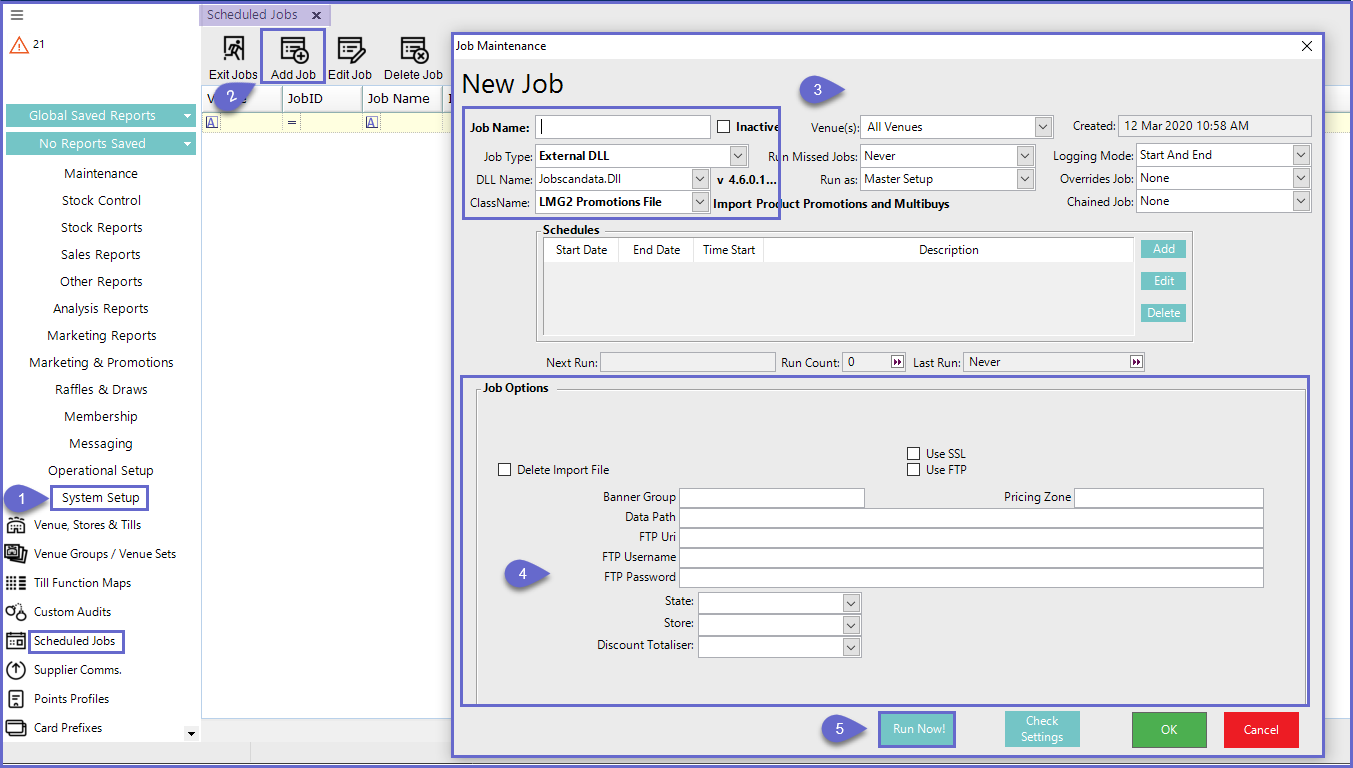
- To set up the BackOffice Scheduled Job, log in to BackOffice and complete the following steps:
- Navigate to System Setup and select Scheduled Jobs
- Select Add Job button and the Job Maintenance window will open
- There are a number of credentials that need to input and they include:
- Job Name: Give the Job a relevant name
- Job Type: External DLL
- DLL Name: Jobscandata.Dll
- ClassName: LMG2 Promotions File
- Job Options will also require a number of configurations as well:
- Use FTP: If this flag is enabled, the Promotions File will be downloaded from a remote server; the Data Path will be used if this flag is disabled
- Delete Import File: If this flag is enabled (i.e.; the Promotions are being imported from .csv file in the local directory), this will delete the Promotions file from the local directory after the import process is completed
- Banner Group: The Banner Group Identifier that will match any promotions from the promotions import file
- Pricing Zone: Provided by LMG (ranges from 1-6)
- Data Path: This is the local file directory that will be used to retrieve the Promotions file
- Will only be used if the Use FTP flag is disabled
- FTP Url: Provided by LMG
- FTP Username: Provided by LMG
- FTP Password: Provided by LMG
- State: Select the State where the Promotions are being imported; this will match the Promotions in the file so that only Promotions for the selected State are imported
- Store: Enter a Store ID if the Promotions need to be filtered to a specific Store
- Discount Totaliser: Enter the Discount Totaliser that any Discounts attributed to the created Promotions will be added to
- Select Run Now! to run the Job immediately (as opposed to running based on the Schedule) and click OK to save the Scheduled Job

File Location
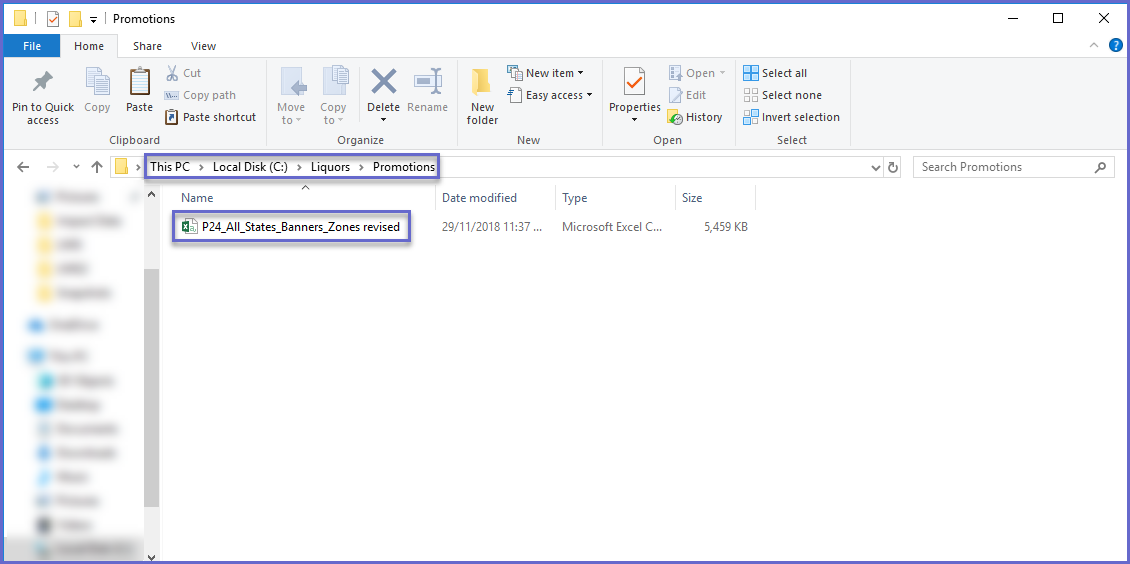
- File types will need to be saved to the File Path Directories that were defined in the Device Options & Job Options
- The File Paths used in this article are for demonstration and are merely a suggestion; place the Files wherever is best suited so long as the File Path is correctly defined in the Setup
- Promotions files should be in a .CSV format

Related Reading
-
LMG (Bottlemart) Promotions Export -
LMG Bottlemart - BackOffice Extension Device Setup for Promotions Import -
LMG Bottlemart - Receiving Promotions in BackOffice -
LMG Bottlemart - Import Product Price Promotions -
LMG Bottlemart - Import Multi-Buy Promotions -
LMG Bottlemart - Price File Export -
LMG Bottlemart - Cancelling Manual Promotions Import
