
- INTERNAL - Bepoz Help Guides
- MyPlace | Backpanel User Guides
- System Settings | System Setup
-
End-User | Products & SmartPOS
-
End-User | Stock Control
-
End-User | Table Service and Kitchen Operations
-
End-User | Pricing, Marketing, Promotions & Accounts
- Prize Promotions
- Points, Points Profiles and Loyalty
- Product Promotions
- Repricing & Discounts in SmartPOS
- Vouchers
- Account Till Functions
- Pricing, Price Numbers and Price Modes
- Raffles & Draws
- Marketing Reports
- Accounts and Account Profiles
- Rewards
- SmartPOS Account Functions
- Troubleshooting
- Product Labels
- Packing Slips
-
End-User | System Setup & Admin
-
End-User | Reporting, Data Analysis & Security
-
End-User | Membership & Scheduled Billing
-
End-User | Operators, Operator Permissions & Clocking
-
Interfaces | Data Send Interfaces
-
Interfaces | EFTPOS & Payments
- NZ EFTPOS Interfaces
- Linkly (Formerly PC-EFTPOS)
- Adyen
- Tyro
- ANZ BladePay
- Stripe
- Windcave (Formerly Payment Express)
- Albert EFTPOS
- Westpac Presto (Formerly Assembly Payments)
- Unicard
- Manager Cards External Payment
- Pocket Voucher
- OneTab
- Clipp
- eConnect-eConduit
- Verifone
- AXEPT
- DPS
- Liven
- Singapore eWallet
- Mercury Payments TRANSENTRY
- Ingenico
- Quest
- Oolio - wPay
-
Interfaces | SMS & Messaging
-
Interfaces | Product, Pricing, Marketing & Promotions
- Metcash Loyalty
- Range Servant
- ILG Pricebook & Promotions
- Oolio Order Manager Integration
- Ubiquiti
- Product Level Blocking
- BidFood Integration
- LMG
- Metcash/IBA E-Commerce Marketplace
- McWilliams
- Thirsty Camel Hump Club
- LMG Loyalty (Zen Global)
- Doshii Integration
- Impact Data
- Marsello
- IBA Data Import
- Materials Control
- Last Yard
- Bepoz Standard Transaction Import
-
Interfaces | Printing & KDS
-
Interfaces | Reservation & Bookings
-
Interfaces | Database, Reporting, ERP & BI
-
Interfaces | CALink, Accounts & Gaming
- EBET Interface
- Clubs Online Interface
- Konami Interface
- WIN Gaming Interface
- Aristocrat Interface
- Bally Interface
- WorldSmart's SmartRetail Loyalty
- Flexinet & Flexinet SP Interfaces
- Aura Interface
- MiClub Interface
- Max Gaming Interface
- Utopia Gaming Interface
- Compass Interface
- IGT & IGT Casino Interface
- MGT Gaming Interface
- System Express
- Aristocrat nConnect Interface
- GCS Interface
- Maxetag Interface
- Dacom 5000E Interface
- InnTouch Interface
- Generic & Misc. CALink
-
Interfaces | Miscellaneous Interfaces/Integrations
-
Interfaces | Property & Room Management
-
Interfaces | Online Ordering & Delivery
-
Interfaces | Purchasing, Accounting & Supplier Comms
-
SmartPOS | Mobile App
-
SmartPDE | SmartPDE 32
-
SmartPDE | Denso PDE
-
SmartPDE | SmartPDE Mobile App
-
MyPlace
-
MyPlace | myPLACE Lite
-
MyPlace | Backpanel User Guides
- Bepoz Price Promotions
- What's on, Events and tickets
- Staff
- System Settings | Operational Settings
- Vouchers & Gift Certificates
- Member Onboarding
- Members and memberships
- System Settings | System Setup
- Reports and Reporting
- Actions
- Offers | Promotions
- Messaging & Notifications
- System Settings | App Config
- Surveys
- Games
- User Feedback
- Stamp Cards
-
MyPlace | Integrations
-
MyPlace | FAQ's & How-2's
-
MyPlace | Release Notes
-
YourOrder
-
YourOrders | Backpanel User Guides
-
YourOrders | YourOrder Kiosk User Guide
-
YourOrders | Merchant App User Guide
-
WebAddons
-
Installation / System Setup Guides
- SmartPOS Mobile App | Setup
- SmartPOS Mobile App | SmartAPI Host Setup
- SmartPOS Mobile App | BackOffice Setup
- SmartPOS Mobile App | Pay@Table setup
- SmartKDS Setup 4.7.2.7 +
- SmartKDS Setup 4.6.x
- SQL Installations
- Server / BackOffice Installation
- New Database Creation
- Multivenue Setup & Config.
- SmartPOS
- SmartPDE
- Player Elite Interface | Rest API
- Interface Setups
- Import
- KDSLink
- Snapshots
- Custom Interface Setups
-
HOW-2
- Product Maintenance
- Sales and Transaction Reporting
- SmartPOS General
- Printing and Printing Profiles
- SQL
- Repricing & Discounts
- Stock Control
- Membership
- Accounts and Account Profiles
- Miscellaneous
- Scheduled Jobs Setups
- Backoffice General
- Purchasing and Receiving
- Database.exe
- EFTPOS
- System Setup
- Custom Support Tools
-
Troubleshooting
-
Hardware
4 | Location Setup | External Links
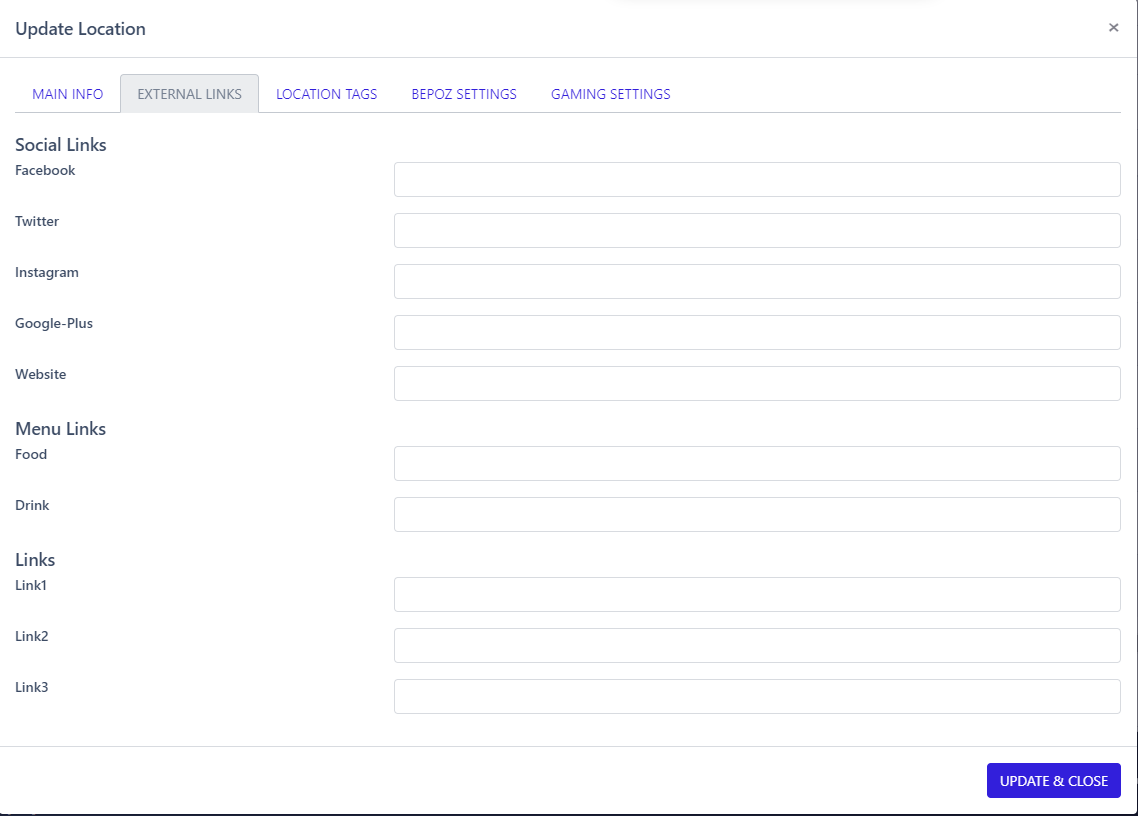
This article covers the External Links Tab of the Update Location panel. This tab contains several settings in the form of input fields.
This article covers the External Links Tab of the Update Location panel.
This tab contains several settings in the form of input fields. Each field is an opportunity to connect outside websites to the app
Prerequisites
- To access and edit 'External Links' settings, the following Roles Privileges will need to be enabled
- Roles "Roles Maintenance" panel
- Privilege Flags: "System Setup"
- The venue toggle on the "Main" section will need to be set to Multi Venue
External Links
- External Links can connect customers to various websites such as social media outlets and business websites through the Myplace app
- This tab is split into three sections:
- Social Links
- Menu Links
- Links
- Each field in this tab is optional, Although the more fields used the more marketing potential the app can provide
- Each link will be location specific. Based on the user's preferred venue/store, the links that are assigned to this location will open
- The following procedure guide users through the External Links tab.
Procedure
Step 1 - Accessing External Links
- This step will show how to access the External Links tab, after logging in to the Myplace Backpanel
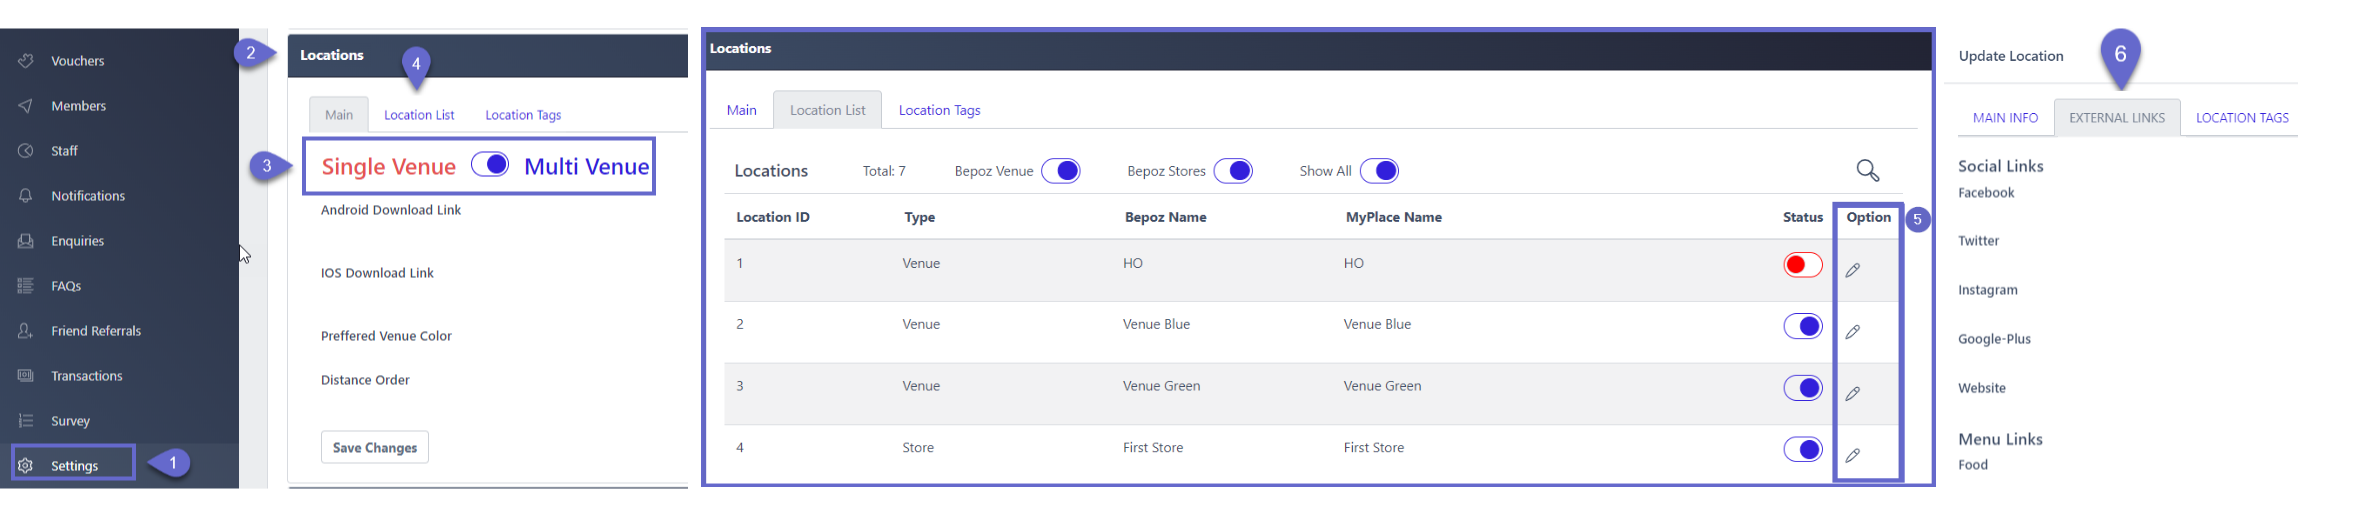
- Click Settings on the menu sidebar
- Press the Location title
- Ensure Multi-Venue is enabled on the Main tab. The toggle should be blue
- Click the Location List tab
- Choose a venue, follow the row to the Option column and click the icon
- The 'Location Update' panel will open. Click External Links tab
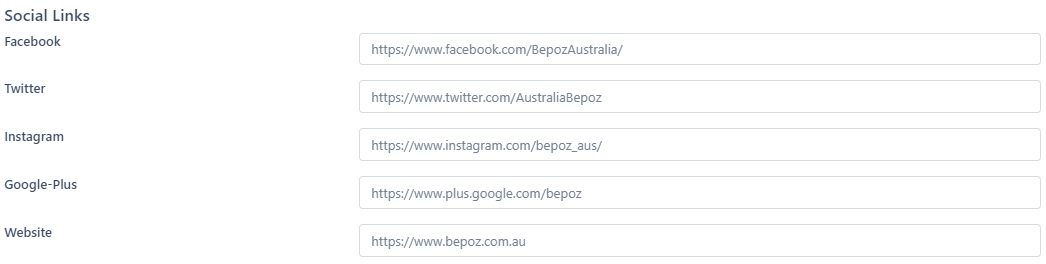
Step 2- Social Links
- This section outlines the links that connect customers to the venue or businesses' social media pages. Providing these links may increase marketing potential as customers can go to these pages and follow the organisation
- There are 4 supported social media platforms in this area:
- Google-Plus
- For each link to a social media platform, the input format should look similar to, www.socialmedia.com/businessname
Replace socialmedia with the desired platform (e.g. Facebook, twitter, Instagram, Google Plus) and businessname with the company page name.
Alternatively, users can go to the company page on the social media platform, E.g. https://www.facebook.com/BepozAustralia/ and copy/paste the link into the correct field
- There is also a field called website where users can add their business website
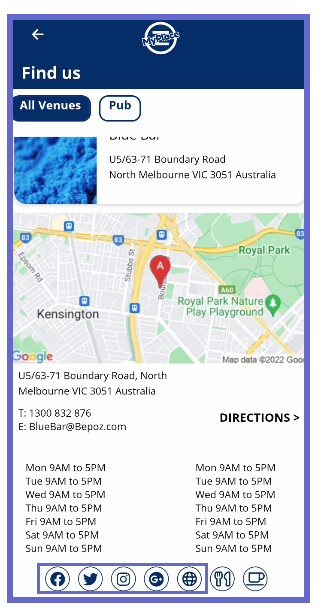
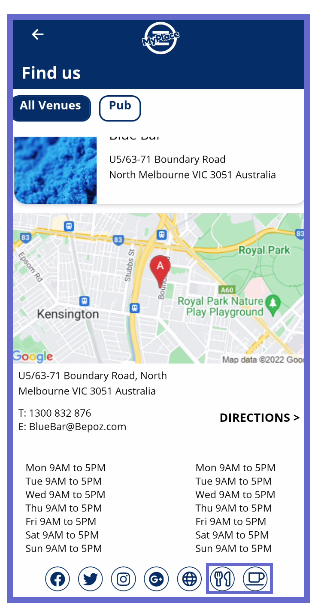
- These appear on the locations screen of the app. When a venue/store is tapped on the location screen, the panel will expand and the links will display as icons on the bottom of the panel
Step 3- Menu Links
- Menu Links provide an opportunity for businesses to attach a URL link to a menu within the venue. Menu Links allow users to see products at the site before attending the venue

- These links will appear on the location screen of the Myplace app. While on the location screen, when a venue/store is clicked, it will expand and the links will appear as icons. A knife and fork for the food link and a cup for the drink link.
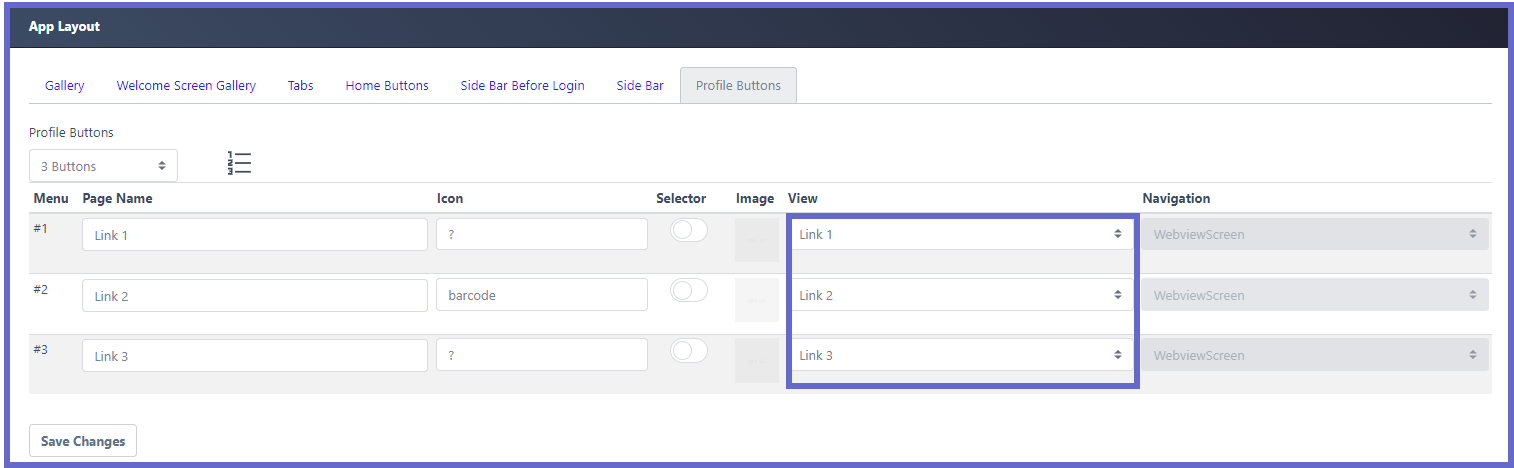
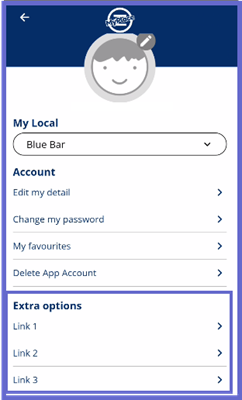
Step 4 - Links
- This section has three fields for any extra links that users would like to add to the Myplace app. Simply copy/paste the URL into the fields.
- These links could be a specific page from the business website such as a products page or an about page
- These links are used within the Home button, Profile button and Sidebar tabs in App Layout settings. In either of these tabs, they will need to be set in the View column and an icon and page name will need to be added. Once changes are saved they will appear on the app in the respective screens.
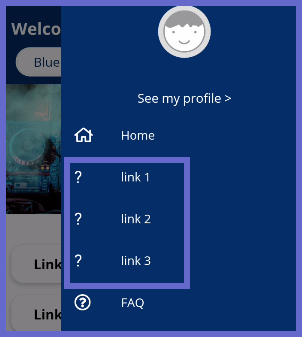
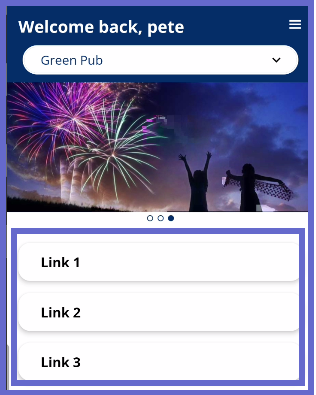
- These can appear on several screens of the app. They will appear on:
- Sidebar - if links are setup in the SideBar tab under App Layout setting
- Homepage - If the links are setup in the Home Button tab under App Layout setting
- Profile Page - If the links are setup in the Profile Button tab under App Layout setting
Step 5 - Save
- any configurations made during this procedure will need to be saved. Click Update and Close at the bottom of the tab and a prompt will appear in the top-left corner, displaying that the changes were successful. If this button is not pressed all modified configurations will be cancelled.