- INTERNAL - Bepoz Help Guides
- Interfaces | CALink, Accounts & Gaming
- Maxetag Interface
-
End-User | Products & SmartPOS
-
End-User | Stock Control
-
End-User | Table Service and Kitchen Operations
-
End-User | Pricing, Marketing, Promotions & Accounts
- Prize Promotions
- Points, Points Profiles and Loyalty
- Product Promotions
- Repricing & Discounts in SmartPOS
- Vouchers
- Account Till Functions
- Pricing, Price Numbers and Price Modes
- Raffles & Draws
- Marketing Reports
- Accounts and Account Profiles
- Rewards
- SmartPOS Account Functions
- Troubleshooting
- Product Labels
- Packing Slips
-
End-User | System Setup & Admin
-
End-User | Reporting, Data Analysis & Security
-
End-User | Membership & Scheduled Billing
-
End-User | Operators, Operator Permissions & Clocking
-
Interfaces | Data Send Interfaces
-
Interfaces | EFTPOS & Payments
- NZ EFTPOS Interfaces
- Linkly (Formerly PC-EFTPOS)
- Adyen
- Tyro
- ANZ BladePay
- Stripe
- Windcave (Formerly Payment Express)
- Albert EFTPOS
- Westpac Presto (Formerly Assembly Payments)
- Unicard
- Manager Cards External Payment
- Pocket Voucher
- OneTab
- Clipp
- eConnect-eConduit
- Verifone
- AXEPT
- DPS
- Liven
- Singapore eWallet
- Mercury Payments TRANSENTRY
- Ingenico
- Quest
- Oolio - wPay
-
Interfaces | SMS & Messaging
-
Interfaces | Product, Pricing, Marketing & Promotions
- Metcash Loyalty
- Range Servant
- ILG Pricebook & Promotions
- Oolio Order Manager Integration
- Ubiquiti
- Product Level Blocking
- BidFood Integration
- LMG
- Metcash/IBA E-Commerce Marketplace
- McWilliams
- Thirsty Camel Hump Club
- LMG Loyalty (Zen Global)
- Doshii Integration
- Impact Data
- Marsello
- IBA Data Import
- Materials Control
- Last Yard
- Bepoz Standard Transaction Import
-
Interfaces | Printing & KDS
-
Interfaces | Reservation & Bookings
-
Interfaces | Database, Reporting, ERP & BI
-
Interfaces | CALink, Accounts & Gaming
- EBET Interface
- Clubs Online Interface
- Konami Interface
- WIN Gaming Interface
- Aristocrat Interface
- Bally Interface
- WorldSmart's SmartRetail Loyalty
- Flexinet & Flexinet SP Interfaces
- Aura Interface
- MiClub Interface
- Max Gaming Interface
- Utopia Gaming Interface
- Compass Interface
- IGT & IGT Casino Interface
- MGT Gaming Interface
- System Express
- Aristocrat nConnect Interface
- GCS Interface
- Maxetag Interface
- Dacom 5000E Interface
- InnTouch Interface
- Generic & Misc. CALink
-
Interfaces | Miscellaneous Interfaces/Integrations
-
Interfaces | Property & Room Management
-
Interfaces | Online Ordering & Delivery
-
Interfaces | Purchasing, Accounting & Supplier Comms
-
SmartPOS | Mobile App
-
SmartPDE | SmartPDE 32
-
SmartPDE | Denso PDE
-
SmartPDE | SmartPDE Mobile App
-
MyPlace
-
MyPlace | myPLACE Lite
-
MyPlace | Backpanel User Guides
- Bepoz Price Promotions
- What's on, Events and tickets
- Staff
- System Settings | Operational Settings
- Vouchers & Gift Certificates
- Member Onboarding
- Members and memberships
- System Settings | System Setup
- Reports and Reporting
- Actions
- Offers | Promotions
- Messaging & Notifications
- System Settings | App Config
- Surveys
- Games
- User Feedback
- Stamp Cards
-
MyPlace | Integrations
-
MyPlace | FAQ's & How-2's
-
MyPlace | Release Notes
-
YourOrder
-
YourOrders | Backpanel User Guides
-
YourOrders | YourOrder Kiosk User Guide
-
YourOrders | Merchant App User Guide
-
WebAddons
-
Installation / System Setup Guides
- SmartPOS Mobile App | Setup
- SmartPOS Mobile App | SmartAPI Host Setup
- SmartPOS Mobile App | BackOffice Setup
- SmartPOS Mobile App | Pay@Table setup
- SmartKDS Setup 4.7.2.7 +
- SmartKDS Setup 4.6.x
- SQL Installations
- Server / BackOffice Installation
- New Database Creation
- Multivenue Setup & Config.
- SmartPOS
- SmartPDE
- Player Elite Interface | Rest API
- Interface Setups
- Import
- KDSLink
- Snapshots
- Custom Interface Setups
-
HOW-2
- Product Maintenance
- Sales and Transaction Reporting
- SmartPOS General
- Printing and Printing Profiles
- SQL
- Repricing & Discounts
- Stock Control
- Membership
- Accounts and Account Profiles
- Miscellaneous
- Scheduled Jobs Setups
- Backoffice General
- Purchasing and Receiving
- Database.exe
- EFTPOS
- System Setup
- Custom Support Tools
-
Troubleshooting
-
Hardware
4 | Maxetag Mifare Reader Device Setup
This article covers the installation process of Maxetag Mifare Reader Device in Bepoz for the purpose of scanning Account/Member Maxetags. Prior to using the Mifare reader to scan any Account/Member Maxetags, a Serial Data Input Device will need to be setup in BackOffice. This will also require configuring a Card Prefix to be used for Account Cards (in this case, Maxetags).
This article covers the installation process of Maxetag Mifare Reader Device in Bepoz for the purpose of scanning Account/Member Maxetags.
Prior to using the Mifare reader to scan any Account/Member Maxetags, a Serial Data Input Device will need to be setup in BackOffice. This will also require configuring a Card Prefix to be used for Account Cards (in this case, Maxetags).
Prerequisites
N/A
Add New Device in BackOffice
- To get started, log in to BackOffice
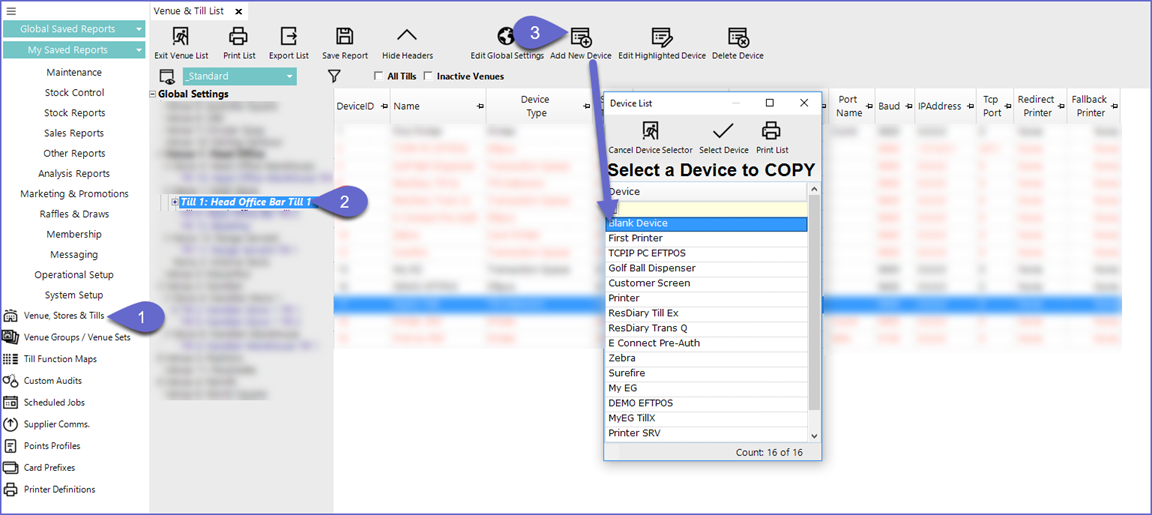
- Select the Venue, Stores & Tills option from the side menu within System Setup
- From the Venue list, select the desired Till that you would like to add the interface & Device to
- Select the Add New Device button from the Header Section and select Blank Device when prompted to Select a Device to Copy
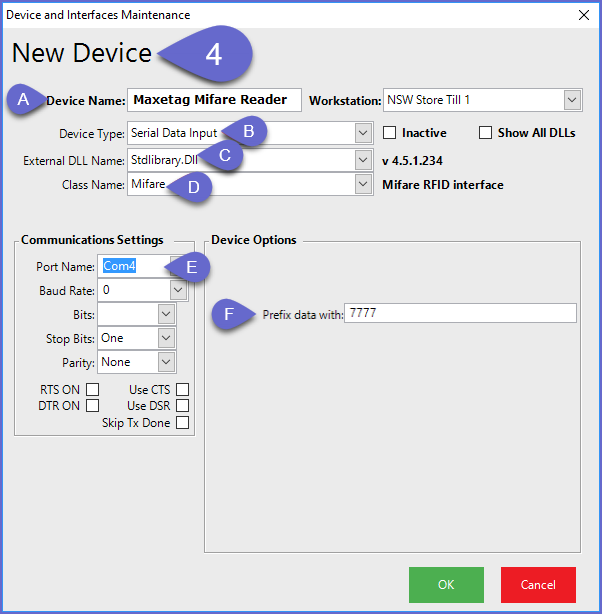
- This will open a Device and Interfaces Maintenance window for a New Device
- Give the device a relevant name
- Select Serial Data Input as the Device Type
- The External DLL Name should be Stdlibrary.Dll
- Select Mifare as the Class Name
- Set the Com Port Name of the USB Port that the Mifare Reader will be connected to
- Enter a CardPrefix that has been configured to use for Maxetag to be identified as an Account; this can be done in Card Prefixes in BackOffice (for more on this, see below)


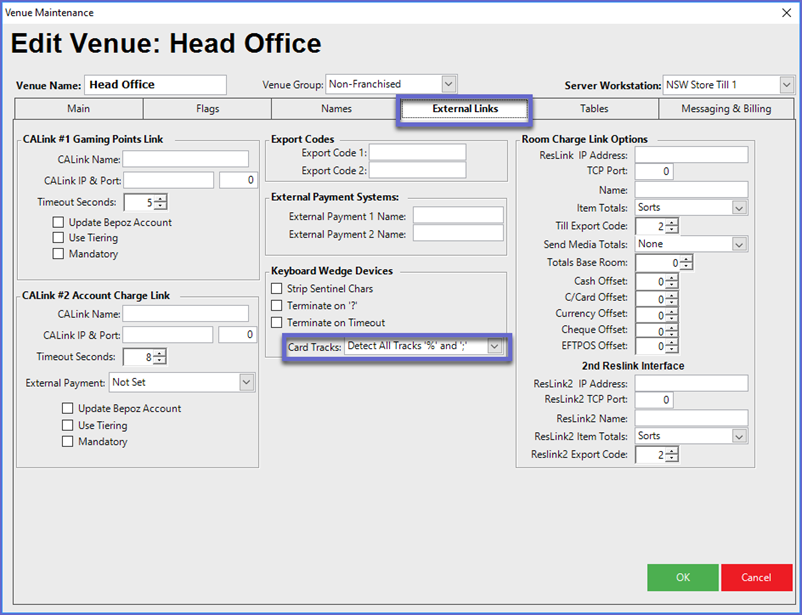
- Within Venue Maintenance, ensure that the Card Tracks setting is configured to "Detect All Tracks '%' and ';'"
- This will allow the Maxetag to be scanned and picked up by the Mifare Reader attached to the Workstation

Add & Configure a Card Prefix
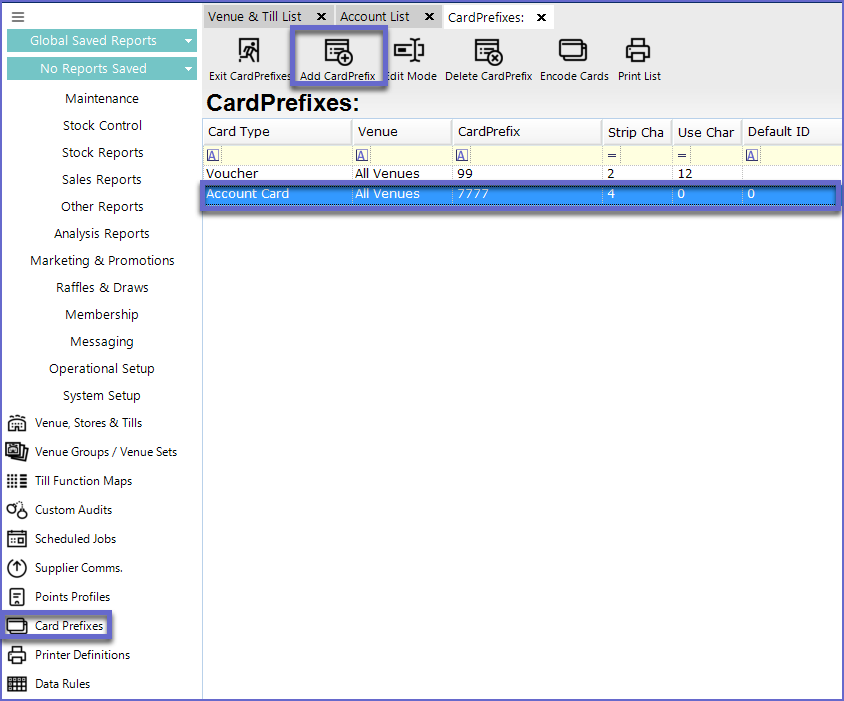
- To set up the Card Prefix to be entered into the Mifare Reader Device Settings, navigate to Card Prefixes within the System Setup menu
- Once the Card Prefixes tab is opened, select the Add Card Prefix button; when prompted, enter the desired Card Prefix
- When prompted to enter the New Card Prefix Venue, enter the desired Venue ID or enter 0 for all Venues
- Card Type will need to be configured to "Account Card"
- Strip Characters should most likely be configured to the # of characters of the Card Prefix itself
- Configure Use Characters to use the desired # of characters after the previous characters are stripped ("0" entered will use all characters remaining)
- In the below example, the "7777" will be added to the scanned tag number
- So, tag # "ABC0123" will be picked up when scanned as "7777ABC0123"
- Then due to the Strip & Use Character settings, will immediately be changed back to "ABC0123"
- Then due to the Strip & Use Character settings, will immediately be changed back to "ABC0123"

