- INTERNAL - Bepoz Help Guides
- End-User | System Setup & Admin
- Global, Venue, Store, Till & Device Setups
-
End-User | Products & SmartPOS
-
End-User | Stock Control
-
End-User | Table Service and Kitchen Operations
-
End-User | Pricing, Marketing, Promotions & Accounts
- Prize Promotions
- Points, Points Profiles and Loyalty
- Product Promotions
- Repricing & Discounts in SmartPOS
- Vouchers
- Account Till Functions
- Pricing, Price Numbers and Price Modes
- Raffles & Draws
- Marketing Reports
- Accounts and Account Profiles
- Rewards
- SmartPOS Account Functions
- Troubleshooting
- Product Labels
- Packing Slips
-
End-User | System Setup & Admin
-
End-User | Reporting, Data Analysis & Security
-
End-User | Membership & Scheduled Billing
-
End-User | Operators, Operator Permissions & Clocking
-
Interfaces | Data Send Interfaces
-
Interfaces | EFTPOS & Payments
- NZ EFTPOS Interfaces
- Linkly (Formerly PC-EFTPOS)
- Adyen
- Tyro
- ANZ BladePay
- Stripe
- Windcave (Formerly Payment Express)
- Albert EFTPOS
- Westpac Presto (Formerly Assembly Payments)
- Unicard
- Manager Cards External Payment
- Pocket Voucher
- OneTab
- Clipp
- eConnect-eConduit
- Verifone
- AXEPT
- DPS
- Liven
- Singapore eWallet
- Mercury Payments TRANSENTRY
- Ingenico
- Quest
- Oolio - wPay
-
Interfaces | SMS & Messaging
-
Interfaces | Product, Pricing, Marketing & Promotions
- Metcash Loyalty
- Range Servant
- ILG Pricebook & Promotions
- Oolio Order Manager Integration
- Ubiquiti
- Product Level Blocking
- BidFood Integration
- LMG
- Metcash/IBA E-Commerce Marketplace
- McWilliams
- Thirsty Camel Hump Club
- LMG Loyalty (Zen Global)
- Doshii Integration
- Impact Data
- Marsello
- IBA Data Import
- Materials Control
- Last Yard
- Bepoz Standard Transaction Import
-
Interfaces | Printing & KDS
-
Interfaces | Reservation & Bookings
-
Interfaces | Database, Reporting, ERP & BI
-
Interfaces | CALink, Accounts & Gaming
- EBET Interface
- Clubs Online Interface
- Konami Interface
- WIN Gaming Interface
- Aristocrat Interface
- Bally Interface
- WorldSmart's SmartRetail Loyalty
- Flexinet & Flexinet SP Interfaces
- Aura Interface
- MiClub Interface
- Max Gaming Interface
- Utopia Gaming Interface
- Compass Interface
- IGT & IGT Casino Interface
- MGT Gaming Interface
- System Express
- Aristocrat nConnect Interface
- GCS Interface
- Maxetag Interface
- Dacom 5000E Interface
- InnTouch Interface
- Generic & Misc. CALink
-
Interfaces | Miscellaneous Interfaces/Integrations
-
Interfaces | Property & Room Management
-
Interfaces | Online Ordering & Delivery
-
Interfaces | Purchasing, Accounting & Supplier Comms
-
SmartPOS | Mobile App
-
SmartPDE | SmartPDE 32
-
SmartPDE | Denso PDE
-
SmartPDE | SmartPDE Mobile App
-
MyPlace
-
MyPlace | myPLACE Lite
-
MyPlace | Backpanel User Guides
- Bepoz Price Promotions
- What's on, Events and tickets
- Staff
- System Settings | Operational Settings
- Vouchers & Gift Certificates
- Member Onboarding
- Members and memberships
- System Settings | System Setup
- Reports and Reporting
- Actions
- Offers | Promotions
- Messaging & Notifications
- System Settings | App Config
- Surveys
- Games
- User Feedback
- Stamp Cards
-
MyPlace | Integrations
-
MyPlace | FAQ's & How-2's
-
MyPlace | Release Notes
-
YourOrder
-
YourOrders | Backpanel User Guides
-
YourOrders | YourOrder Kiosk User Guide
-
YourOrders | Merchant App User Guide
-
WebAddons
-
Installation / System Setup Guides
- SmartPOS Mobile App | Setup
- SmartPOS Mobile App | SmartAPI Host Setup
- SmartPOS Mobile App | BackOffice Setup
- SmartPOS Mobile App | Pay@Table setup
- SmartKDS Setup 4.7.2.7 +
- SmartKDS Setup 4.6.x
- SQL Installations
- Server / BackOffice Installation
- New Database Creation
- Multivenue Setup & Config.
- SmartPOS
- SmartPDE
- Player Elite Interface | Rest API
- Interface Setups
- Import
- KDSLink
- Snapshots
- Custom Interface Setups
-
HOW-2
- Product Maintenance
- Sales and Transaction Reporting
- SmartPOS General
- Printing and Printing Profiles
- SQL
- Repricing & Discounts
- Stock Control
- Membership
- Accounts and Account Profiles
- Miscellaneous
- Scheduled Jobs Setups
- Backoffice General
- Purchasing and Receiving
- Database.exe
- EFTPOS
- System Setup
- Custom Support Tools
-
Troubleshooting
-
Hardware
33 | Micros Printer & Drawer Support
This article explains the setups required for Micros IDN Printer support.
This article explains the setups required for Micros IDN Printer support.Miscros WS5A Support
Micros IDN Printer Support
- Micros IDN Printers are a Proprietary Printer Interface developed by Micros and used in certain Epson Printers
- The Interface is RS422 which is a balanced dropline network and is not compatible with other standard hardware - e.g., it can only run on Micros Tills
- This interface has no Handshaking lines - hence a status request must be sent periodically to test if the Printer is there and ready
- A Status Request is sent every 10 seconds if the Printer is OK and every 4 seconds when the Printer is in error
- Sending Print Lines is interrupted to continually check if the printer is still OK - not the paper out, printer cover open, etc.
- This slows printing down - by default, the status request is sent at the start of printing and every 10 lines that are printed; this can be configured
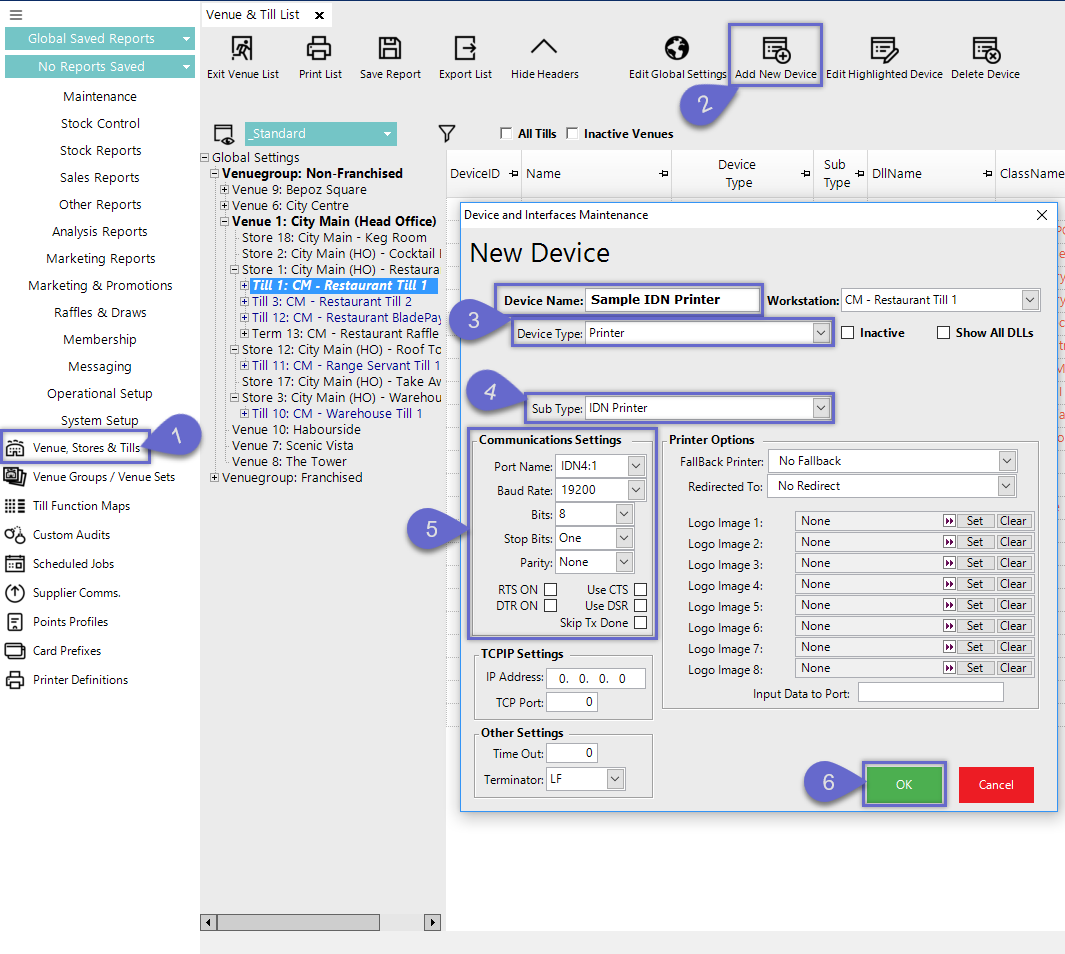
- Complete the following steps to add an IDN Printer:
- Login to BackOffice, navigate to and select Venue, Stores & Tills from the side menu
- From the list of Venues, Stores & Tills highlight the desired Till to add the Printer to and click the
Add New Device button in the header section - When prompted, select a desirable Device to Copy or select Blank Device; when the New Device window (Device and Interfaces Maintenance) opens, give the Device a relevant Name and select Printer as the Device Type
- For the Device's SubType, select IDN Printer (this is a new Printer Definition)
- In the Communications Settings section, set the Port Name as IDN4:1, set the Baud Rate to 19200 (suggested), set Bits to 8, Stop Bits to One, and Parity to None; handshaking flags are ignored
- Set any additional configurations as required or desired and click OK

- The default number of Printed Lines between Status Requests is 10
- To change the number of Printed Lines between Status Requests complete the following steps:
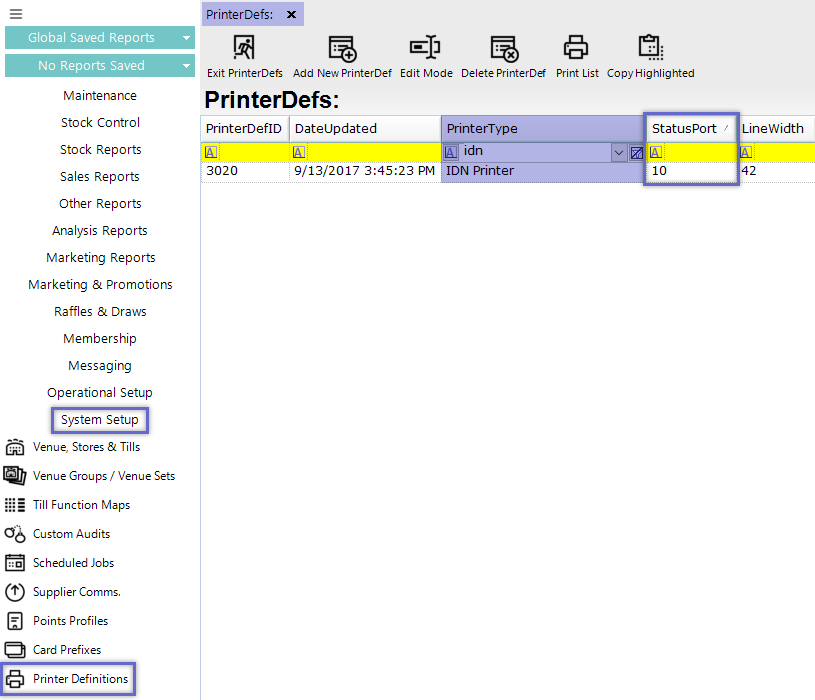
- Navigate to and open
Printer Definitions within the System Setup menu on the sidebar - Locate PrinterType 'IDN Printer' (PrinterDefID '3020') in the list
- Scroll right to locate the column called 'Status Port' (in the image below, the column has been dragged over for demonstration purposes)
- Change the number in the field to the desired number of Printed Lines between Status Requests

- Setting to 3 or below will slow down the process drastically
- Conversely, setting much higher than 10 is not recommended, as when the paper runs out, the Status Requests will keep sending without knowing that the Printer is not ready
Micros WS5A Internal Drawer Support
- The Micros WS5A terminal has internal support for 2 Cash Drawers
- PortIO commands are used to "fire" the Drawers which Bepoz already supported through the Device Type 'Drawer' and Sub Type 'PortIO - Custom Data', however, this did not support the Micros Drawer Open Sensing which required changes to be made
- A flag has been added which controls the Drawer Sense Mask Bit - Bit Mask On When Open:
- Previously, and by default, the specified Mask Bit is off for a Closed Drawer
- Micros Terminal works in reverse - the Mask Bit is off for an Open Drawer - hence the new flag was added for compatibility
- To set up a Micros Drawer connected directly to a Micros WS5A terminal complete the following steps:
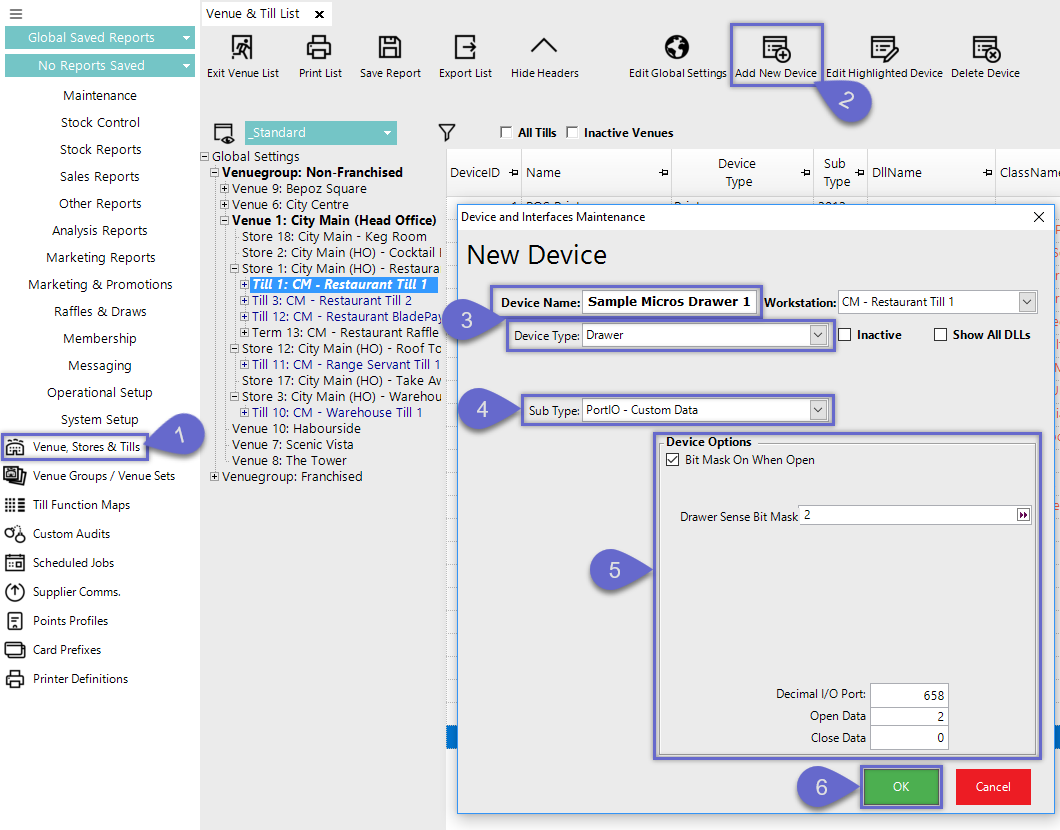
- Drawer 1:
- Login to BackOffice, navigate to and select Venue, Stores & Tills from the side menu
- From the list of Venues, Stores & Tills highlight the desired Till to add the Drawer to and click the Add New Device button in the header section
- When prompted, select a desirable Device to Copy or select Blank Device; when the New Device window (Device and Interfaces Maintenance) opens, give the Device a relevant Name and select Drawer as the Device Type
- For the Device's SubType, select PortIO - Custom Data
- Within the Device Options section:
- Enable the Bit Mask On When Open flag
- Set the Drawer Sense Bit Mask as "2"
- Enter "658" into the Decimal I/O Port field
- Enter "2" into the Open Data field
- Enter "0" into the Close Data field
- Click OK to save the Device

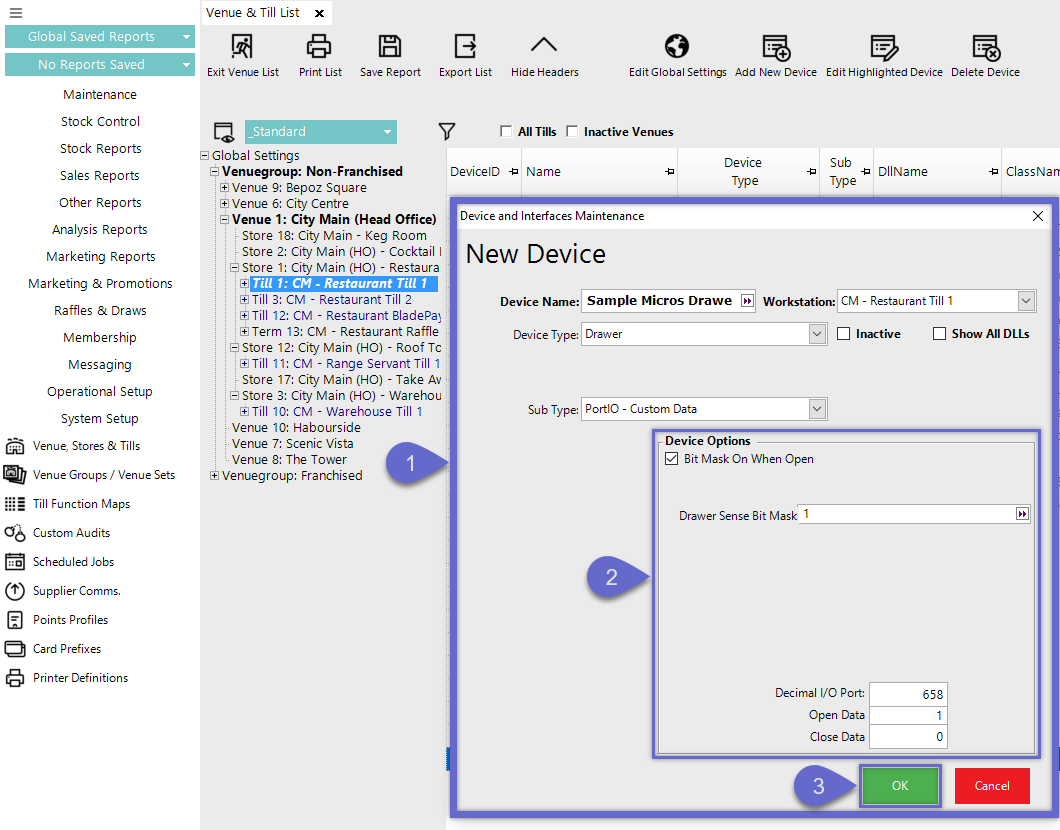
- Drawer 2:
- Repeat Steps 1 through 4 as above for Drawer 1
- Within the Device Options section:
- Enable the Bit Mask On When Open flag
- Set the Drawer Sense Bit Mask as "1"
- Enter "658" into the Decimal I/O Port field
- Enter "1" into the Open Data field
- Enter "0" into the Close Data field
- Click OK to save the Device

- The DrawInst.exe utility must be installed - this loads and registers the DLPORTIO.DLL and DLPORTIO.SYS drivers
