- INTERNAL - Bepoz Help Guides
- Installation / System Setup Guides
- Multivenue Setup & Config.
-
End-User | Products & SmartPOS
-
End-User | Stock Control
-
End-User | Table Service and Kitchen Operations
-
End-User | Pricing, Marketing, Promotions & Accounts
- Prize Promotions
- Points, Points Profiles and Loyalty
- Product Promotions
- Repricing & Discounts in SmartPOS
- Vouchers
- Account Till Functions
- Pricing, Price Numbers and Price Modes
- Raffles & Draws
- Marketing Reports
- Accounts and Account Profiles
- Rewards
- SmartPOS Account Functions
- Troubleshooting
- Product Labels
- Packing Slips
-
End-User | System Setup & Admin
-
End-User | Reporting, Data Analysis & Security
-
End-User | Membership & Scheduled Billing
-
End-User | Operators, Operator Permissions & Clocking
-
Interfaces | Data Send Interfaces
-
Interfaces | EFTPOS & Payments
- NZ EFTPOS Interfaces
- Linkly (Formerly PC-EFTPOS)
- Adyen
- Tyro
- ANZ BladePay
- Stripe
- Windcave (Formerly Payment Express)
- Albert EFTPOS
- Westpac Presto (Formerly Assembly Payments)
- Unicard
- Manager Cards External Payment
- Pocket Voucher
- OneTab
- Clipp
- eConnect-eConduit
- Verifone
- AXEPT
- DPS
- Liven
- Singapore eWallet
- Mercury Payments TRANSENTRY
- Ingenico
- Quest
- Oolio - wPay
-
Interfaces | SMS & Messaging
-
Interfaces | Product, Pricing, Marketing & Promotions
- Metcash Loyalty
- Range Servant
- ILG Pricebook & Promotions
- Oolio Order Manager Integration
- Ubiquiti
- Product Level Blocking
- BidFood Integration
- LMG
- Metcash/IBA E-Commerce Marketplace
- McWilliams
- Thirsty Camel Hump Club
- LMG Loyalty (Zen Global)
- Doshii Integration
- Impact Data
- Marsello
- IBA Data Import
- Materials Control
- Last Yard
- Bepoz Standard Transaction Import
-
Interfaces | Printing & KDS
-
Interfaces | Reservation & Bookings
-
Interfaces | Database, Reporting, ERP & BI
-
Interfaces | CALink, Accounts & Gaming
- EBET Interface
- Clubs Online Interface
- Konami Interface
- WIN Gaming Interface
- Aristocrat Interface
- Bally Interface
- WorldSmart's SmartRetail Loyalty
- Flexinet & Flexinet SP Interfaces
- Aura Interface
- MiClub Interface
- Max Gaming Interface
- Utopia Gaming Interface
- Compass Interface
- IGT & IGT Casino Interface
- MGT Gaming Interface
- System Express
- Aristocrat nConnect Interface
- GCS Interface
- Maxetag Interface
- Dacom 5000E Interface
- InnTouch Interface
- Generic & Misc. CALink
-
Interfaces | Miscellaneous Interfaces/Integrations
-
Interfaces | Property & Room Management
-
Interfaces | Online Ordering & Delivery
-
Interfaces | Purchasing, Accounting & Supplier Comms
-
SmartPOS | Mobile App
-
SmartPDE | SmartPDE 32
-
SmartPDE | Denso PDE
-
SmartPDE | SmartPDE Mobile App
-
MyPlace
-
MyPlace | myPLACE Lite
-
MyPlace | Backpanel User Guides
- Bepoz Price Promotions
- What's on, Events and tickets
- Staff
- System Settings | Operational Settings
- Vouchers & Gift Certificates
- Member Onboarding
- Members and memberships
- System Settings | System Setup
- Reports and Reporting
- Actions
- Offers | Promotions
- Messaging & Notifications
- System Settings | App Config
- Surveys
- Games
- User Feedback
- Stamp Cards
-
MyPlace | Integrations
-
MyPlace | FAQ's & How-2's
-
MyPlace | Release Notes
-
YourOrder
-
YourOrders | Backpanel User Guides
-
YourOrders | YourOrder Kiosk User Guide
-
YourOrders | Merchant App User Guide
-
WebAddons
-
Installation / System Setup Guides
- SmartPOS Mobile App | Setup
- SmartPOS Mobile App | SmartAPI Host Setup
- SmartPOS Mobile App | BackOffice Setup
- SmartPOS Mobile App | Pay@Table setup
- SmartKDS Setup 4.7.2.7 +
- SmartKDS Setup 4.6.x
- SQL Installations
- Server / BackOffice Installation
- New Database Creation
- Multivenue Setup & Config.
- SmartPOS
- SmartPDE
- Player Elite Interface | Rest API
- Interface Setups
- Import
- KDSLink
- Snapshots
- Custom Interface Setups
-
HOW-2
- Product Maintenance
- Sales and Transaction Reporting
- SmartPOS General
- Printing and Printing Profiles
- SQL
- Repricing & Discounts
- Stock Control
- Membership
- Accounts and Account Profiles
- Miscellaneous
- Scheduled Jobs Setups
- Backoffice General
- Purchasing and Receiving
- Database.exe
- EFTPOS
- System Setup
- Custom Support Tools
-
Troubleshooting
-
Hardware
Mikrotik - PPTP VPN Setup
Overview
Prerequisites
-
(Needs to be Bridged or Dialling PPPOE if it is the Main VPN Server and have a static IP address)
Mikrotik VPN
-
Download Winbox.exe
-
http://download2.mikrotik.com/routeros/winbox/3.4/winbox.exe
-
Demo Video of how to setup a VPN
-
https://wispcasts.com/videos/vpn-on-mikrotik/first-vpn-with-pptp
Default IP address is 192.168.88.1
User: admin
Pass: Blank
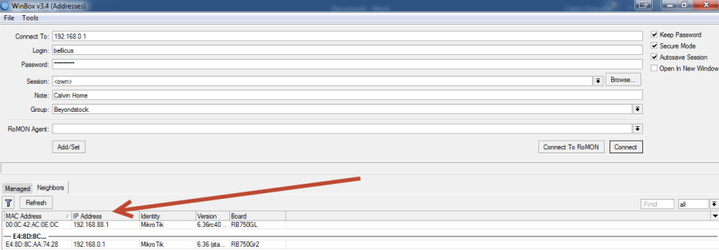
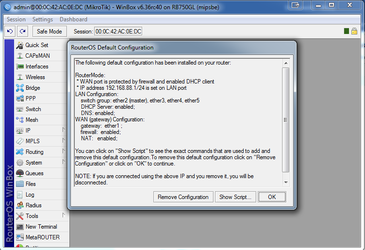
When you log in for the first time you will see this default screen – Click OK
Step 1.
DHCP range and Mikrotik IP address
Click on Quick Set
HO Venue will start on 192.168.1.0/24 range and the Mikrotik will have a IP address of 192.168.1.1. – Click Apply

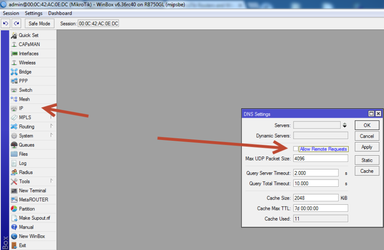
Step 2.
The you will need to make a tweak on the DNS under IP: remove allow remote requests.
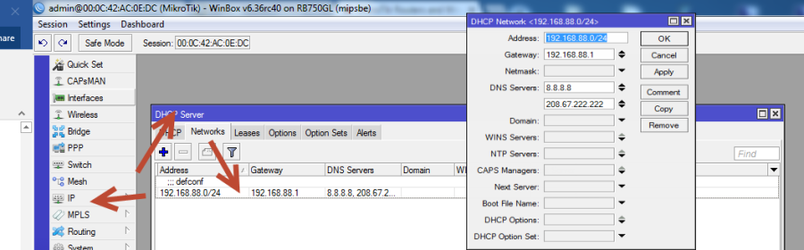
Step 3.Also a good idea is to use Google DNS and Open DNS as a backup this can be set on IP – DHCP Server – Networks.
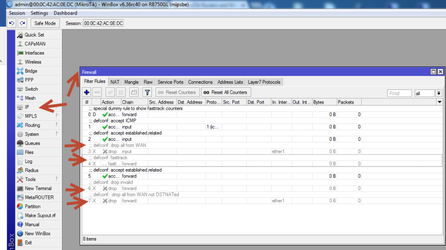
Step 4.Need to make some tweaks to the firewall.Filter RulesAnything with the word drop or fast, disable
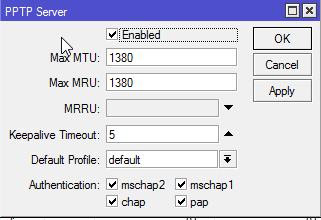
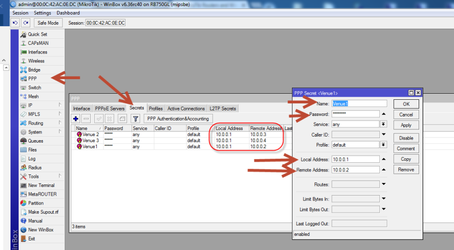
Step 5:VPNEnable the VPN PPTP SERVER

Then Create a secret for every client you want to connect to this VPN Server:
Keep in mind that the Server IP address is for the VPN always stays the same 10.0.0.1 – for every new client they will need to be +1 10.0.0.2, 10.0.0.3 etc.
Step 6:
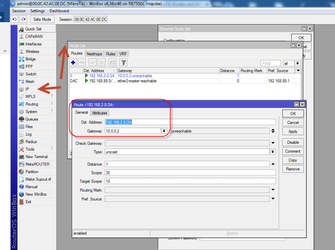
Static Routes
Server Side:
VPN on 10.0.0.1 need to talk to device on 10.0.0.2, 10.0.0.3 etc. only way to do this is to make a static route to the subnet ie 192.168.2.0/24 on its VPN gateway 10.0.0.2
NOTE: I have an instance where the whole Range 192.168.2.0/24 fails to work, as the Mikrotik or the current network setup cannot route whole ranges.
So i would suggest we specify the correct IP address for the routes.
Example: HO = 192.168.1.1
Venue 1 = 192.168.2.1
Venue 2 = 192.168.3.1
Route: Instead of 192.168.1.0/24 or 192.168.2.0/24 or 192.168.3.0/24 we specify 192.168.1.1 or 192.168.2.1 or 192.168.3.1 to the correct gateway.
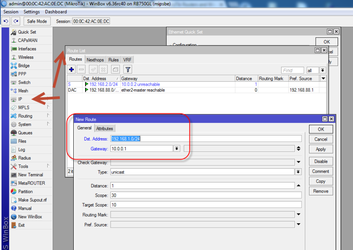
Client Side:Likewise, the client site need to talk back to the devices through 10.0.0.1 so you have to set a static route on the client Mikrotik to the subnet that the Server is running on.
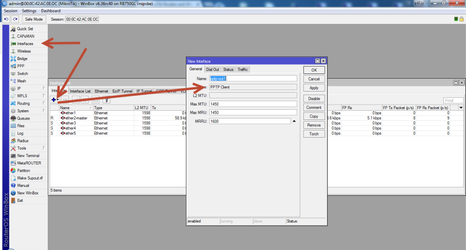
Final Step:
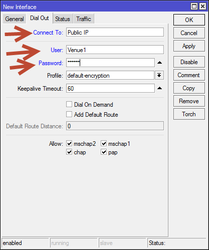
Setting a VPN Client on a Mikrotik (Client Side) to Dial into the SERVER VPN
Click on Interfaces – add new Interface and choose PPTP Client
Fill in the details of the client's secretsName: VPN Server (HO)User: Venue1Pass: vpn123
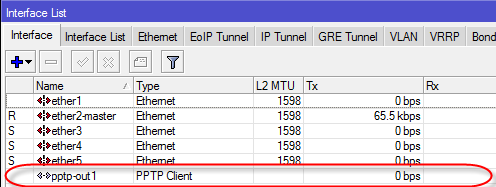
On the list you should see the VPN connection – it needs to have and 'R' next to it – (if not it's not connecting).
Once readyYou should be able to ping from one subnet to another. IE. 192.168.1-0/24 to 192.168.2.0/24
-
it's actually 172.16.0.0/12, 192.168.0.0/16 and 10.0.0.0/8 (Private IP block)
-
Private IPv4 address spaces
The Internet Engineering Task Force (IETF) has directed the Internet Assigned Numbers Authority (IANA) to reserve the following IPv4 address ranges for private networks, as published in RFC 1918:[1]
|
RFC1918 name |
IP address range |
number of addresses |
largest CIDR block (subnet mask) |
host id size |
mask bits |
classful description |
|
24-bit block |
10.0.0.0 - 10.255.255.255 |
16,777,216 |
10.0.0.0/8 (255.0.0.0) |
24 bits |
8 bits |
single class A network |
|
20-bit block |
172.16.0.0 - 172.31.255.255 |
1,048,576 |
172.16.0.0/12 (255.240.0.0) |
20 bits |
12 bits |
16 contiguous class B networks |
|
16-bit block |
192.168.0.0 - 192.168.255.255 |
65,536 |
192.168.0.0/16 (255.255.0.0) |
16 bits |
16 bits |
256 contiguous class C networks |
Additional Steps for added Security:
Click on System and then Users
Disable The Default Admin account
Create a new users with a password.
I.e MikAdmin - Pass: 12345678

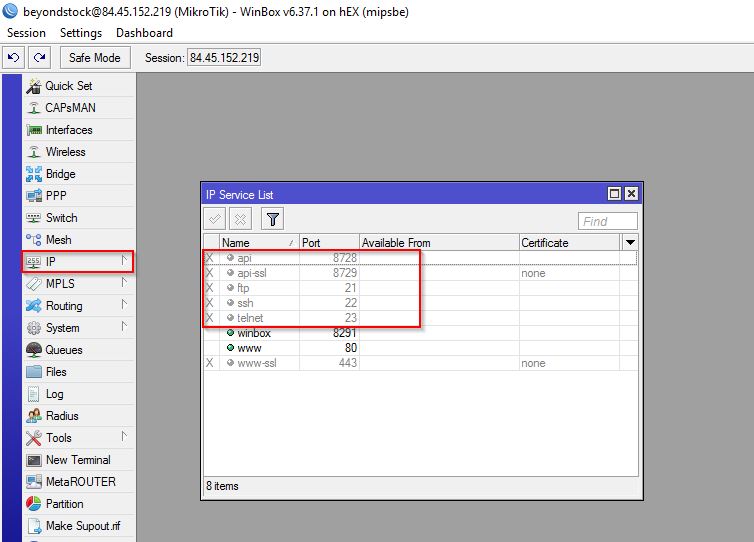
Also we only need access to the router via Winbox:
Click on IP and the Services.
Disable all the below services in red
-
Api
-
api-ssl
-
ftp
-
ssh
-
telnet
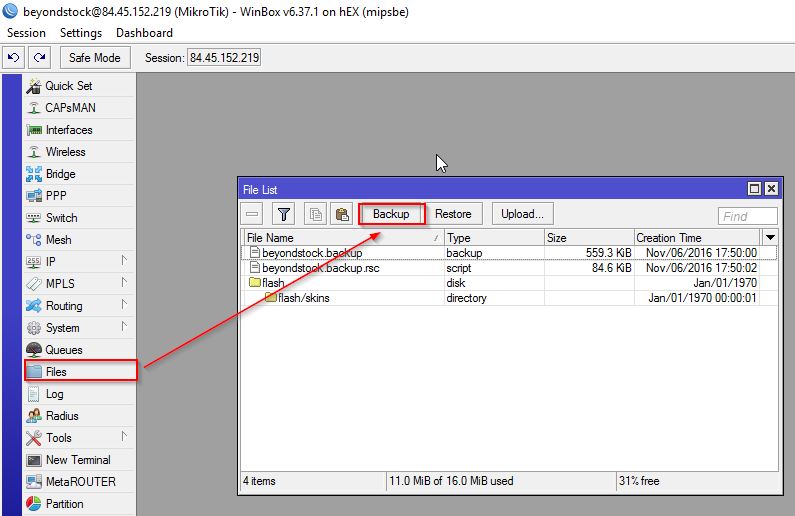
Lastly if you want to create a backup:
Click on Files and then Backup
Give it a name and click backup, it will then create a file in the list below, highlight this file and drag it to your desktop.