
Overview
Multi-venue Overview
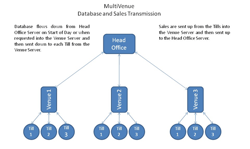
In BEpoz Multi-venue, there is one Master database. This one database exists in Head Office (HO) only. Remote sites connect to the Head Office by an Internet connection with a VPN.
The remote site/s will also have a Smart Controller running as well. The Remote
Smart Controllers connect to the Head Office Smart Controller to send transactions to Head Office in real time. Head Office also sends databases down to the remote Venue.
The ports 19800 – 19820 must be open through all firewalls and connections for all Multi-venue communications to work successfully.
When sending a database to a remote site, it creates a VenueDataQueued.zip that sends to the remote site. This will send all the changes made at the Head Office database to the “cut down” site database. This means changes are not in real time but can be sent whenever the operator chooses to. A job can also be set up to run on a regular basis, i.e. daily, weekly.
Below is a diagram of the Multi-venue Database and Sales Transmission.
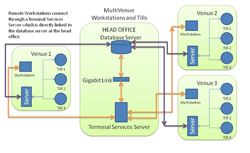
Access to BackOffice workstations in Multi-venue is set up differently to a single
Venue site. BEpoz uses Microsoft Windows Terminal Server with Remote Apps to Access BackOffice from a remote Venue. Visually, the application “looks” like it is running locally however it is running at the Head Office. This is available in Microsoft Windows 2008.
The security works on three levels. As the registry settings for BEpoz is in the current
User, each terminal services user can be assigned a Workstation. The Venue
Workstation is set up in the actual Remote Venue in Venue, Stores and Tills. The
BEpoz operator logon then determines if the operator can logon to that Venue Workstation depending on the operator privileges. An operator with privilege to Venue X cannot access a workstation set up for Venue Y. This is how the security Works with data access in BEpoz Multi-venue.
Below is a diagram to explain the way Workstations connects.
Creating a Venue via Database.exe
Before creating a Multi-Venue environment you must create a single Venue first.
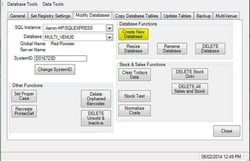
You will need to run Database.exe. Once Database.exe is running it will load on the default, General tab. You will need to click on the top tabs Modify Databases.

Click Create New Database to create database.
When you have created the database you will need to run Backoffice to complete the VS&T setup.
Close database.exe and run Backoffice and complete the VS&T setup.
Once set up is complete close Backoffice.
Convert a Single Venue to Multi-venue via Database.exe
The following explains how to move from a single venue site into Multi Venue. This is the recommended procedure to build a Multi-venue system.
You will need to run Database.exe. Once Database.exe is running it will load on the default, General tab. You will need to click on the Multi-venue tab on the far right.
Once multi-venue tab is selected you will see the following window. There is a Create Multi Venue System Button.
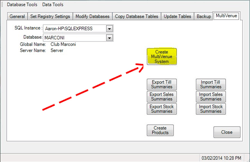
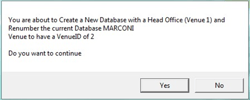
You must click Create Multi venue system as shown above.
You will see the following window appear. Click yes to continue.
As soon as you click yes you are prompt to update global data.
Global Data Must be updated you will receive the following message.
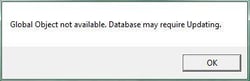
Click ok to update Global data.
Once you hit ok the ENTER THE HEAD OFFICE IP ADDRESS window will appear.
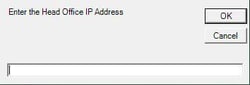
Enter The Correct Head Office IP Address. This is the IP address of the server that will run headoffice database.
Now you can restore data base on Head Office Machine.
Note: Failure to set the database size to max SQL limit can cause database corruption.
When accessing Backoffice go to VS&T and check your Venue Tree it should look similar to the following sample.
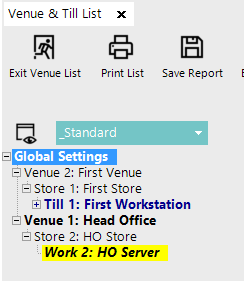
You can see that when I created the first Venue as a single Venue it was numbered to Venue 2 and head office is venue one database.exe is designed to handle this procedure.
Note: You won’t be able to define a server workstation just as yet as there is no server set yet for this venue.
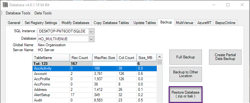
Creating a database For Multi Venue’s Remote Site via Database.exe
This method is the only method to be used when restoring a Remote venue database.
Run Database.exe on the HO Smartcontroller workstation.
Select the MultiVenue Tab

Select the option ‘Create Venue Data Recovery'

You will now get a prompt to specify the VenueID for the Remote venue you want to restore.
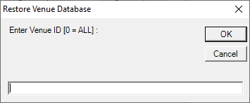
In our example we will be using VenueID = 2 (First Venue)
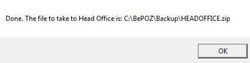
The Remote Venue database will now be generated for VenueID specified and once completed it will save the Archive to the Backup Location
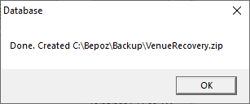
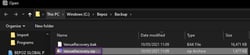
The VenueRecovery.zip can now be copied to the Remove Venue Server for Restoration.
Restoring a database For Multi Venue’s Remote Site via Database.exe
Run Database.exe from the Remote Venue Smartcontroller Workstation.
Navigate to the Backup tab

Select the option for ‘Restore Database (zip or back)’
Select the VenueRecovery.zip that was copied from the HO Smartcontroller workstation
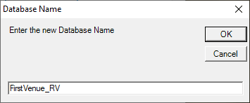
You will now be prompted to enter the Remove Venues Database Name.
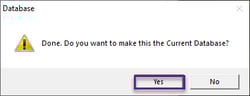
Next prompt will be to set the Database to be the current one.
Lastly you need to ensure that the correct Remote venue Smartcontroller workstation is set
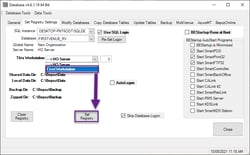
Navigate to the Set Registry Tab

Select the This Workstation Dropdown list, ensure the correct Remote Venue Smartcontroller workstation has been selected and then set registry.
This complete the installation guide of how to convert a Single Venue Database into a Multivenue Database.
Related Articles
SQL Standard / Multi-Venue Peek Performance Setup
SQL Server - Locked Pages (Recommended for Virtual machines)
SQL Performance Troubleshooting Tools
ZeroTier – Global Area Networking - Setup
Remote Desktop (RDP) - Workstation Setup
SmartController Default Ports
Smartcontroller CmdLine Options