-
End-User | Products & SmartPOS
-
End-User | Stock Control
-
End-User | Table Service and Kitchen Operations
-
End-User | Pricing, Marketing, Promotions & Accounts
- Prize Promotions
- Points, Points Profiles and Loyalty
- Product Promotions
- Repricing & Discounts in SmartPOS
- Vouchers
- Account Till Functions
- Pricing, Price Numbers and Price Modes
- Raffles & Draws
- Marketing Reports
- Accounts and Account Profiles
- Rewards
- SmartPOS Account Functions
- Troubleshooting
- Product Labels
- Packing Slips
-
End-User | System Setup & Admin
-
End-User | Reporting, Data Analysis & Security
-
End-User | Membership & Scheduled Billing
-
End-User | Operators, Operator Permissions & Clocking
-
Interfaces | Data Send Interfaces
-
Interfaces | EFTPOS & Payments
- NZ EFTPOS Interfaces
- Linkly (Formerly PC-EFTPOS)
- Adyen
- Tyro
- ANZ BladePay
- Stripe
- Windcave (Formerly Payment Express)
- Albert EFTPOS
- Westpac Presto (Formerly Assembly Payments)
- Unicard
- Manager Cards External Payment
- Pocket Voucher
- OneTab
- Clipp
- eConnect-eConduit
- Verifone
- AXEPT
- DPS
- Liven
- Singapore eWallet
- Mercury Payments TRANSENTRY
- Ingenico
- Quest
- Oolio - wPay
-
Interfaces | SMS & Messaging
-
Interfaces | Product, Pricing, Marketing & Promotions
- Metcash Loyalty
- Range Servant
- ILG Pricebook & Promotions
- Oolio Order Manager Integration
- Ubiquiti
- Product Level Blocking
- BidFood Integration
- LMG
- Metcash/IBA E-Commerce Marketplace
- McWilliams
- Thirsty Camel Hump Club
- LMG Loyalty (Zen Global)
- Doshii Integration
- Impact Data
- Marsello
- IBA Data Import
- Materials Control
- Last Yard
- Bepoz Standard Transaction Import
-
Interfaces | Printing & KDS
-
Interfaces | Reservation & Bookings
-
Interfaces | Database, Reporting, ERP & BI
-
Interfaces | CALink, Accounts & Gaming
- EBET Interface
- Clubs Online Interface
- Konami Interface
- WIN Gaming Interface
- Aristocrat Interface
- Bally Interface
- WorldSmart's SmartRetail Loyalty
- Flexinet & Flexinet SP Interfaces
- Aura Interface
- MiClub Interface
- Max Gaming Interface
- Utopia Gaming Interface
- Compass Interface
- IGT & IGT Casino Interface
- MGT Gaming Interface
- System Express
- Aristocrat nConnect Interface
- GCS Interface
- Maxetag Interface
- Dacom 5000E Interface
- InnTouch Interface
- Generic & Misc. CALink
-
Interfaces | Miscellaneous Interfaces/Integrations
-
Interfaces | Property & Room Management
-
Interfaces | Online Ordering & Delivery
-
Interfaces | Purchasing, Accounting & Supplier Comms
-
SmartPOS | Mobile App
-
SmartPDE | SmartPDE 32
-
SmartPDE | Denso PDE
-
SmartPDE | SmartPDE Mobile App
-
MyPlace
-
MyPlace | myPLACE Lite
-
MyPlace | Backpanel User Guides
- Bepoz Price Promotions
- What's on, Events and tickets
- Staff
- System Settings | Operational Settings
- Vouchers & Gift Certificates
- Member Onboarding
- Members and memberships
- System Settings | System Setup
- Reports and Reporting
- Actions
- Offers | Promotions
- Messaging & Notifications
- System Settings | App Config
- Surveys
- Games
- User Feedback
- Stamp Cards
-
MyPlace | Integrations
-
MyPlace | FAQ's & How-2's
-
MyPlace | Release Notes
-
YourOrder
-
YourOrders | Backpanel User Guides
-
YourOrders | YourOrder Kiosk User Guide
-
YourOrders | Merchant App User Guide
-
WebAddons
-
Installation / System Setup Guides
- SmartPOS Mobile App | Setup
- SmartPOS Mobile App | SmartAPI Host Setup
- SmartPOS Mobile App | BackOffice Setup
- SmartPOS Mobile App | Pay@Table setup
- SmartKDS Setup 4.7.2.7 +
- SmartKDS Setup 4.6.x
- SQL Installations
- Server / BackOffice Installation
- New Database Creation
- Multivenue Setup & Config.
- SmartPOS
- SmartPDE
- Player Elite Interface | Rest API
- Interface Setups
- Import
- KDSLink
- Snapshots
- Custom Interface Setups
-
HOW-2
- Product Maintenance
- Sales and Transaction Reporting
- SmartPOS General
- Printing and Printing Profiles
- SQL
- Repricing & Discounts
- Stock Control
- Membership
- Accounts and Account Profiles
- Miscellaneous
- Scheduled Jobs Setups
- Backoffice General
- Purchasing and Receiving
- Database.exe
- EFTPOS
- System Setup
- Custom Support Tools
-
Troubleshooting
-
Hardware
5 | NowBookIt Interface - Graphical Map Till Function
This article covers one of the Till Functions that can be configured along with the NowBookIt interface.
This article covers one of the Till Functions that can be configured along with the NowBookIt interface.
There are two (2) different Till Functions that can be setup in BackOffice to access NowBookIt Bookings on SmartPOS:
- Table Open Booking List will display a list of NowBookIt bookings including Booking reference number, Date & Time, Guest Count, and Name
- Graphical Table Booking (this article) will allow to open bookings on Graphical Table map in SmartPOS
Prerequisites
- To access the Till Function Map, following Operator privileges must be enabled
-
Operator Maintenance 'General' Tab - System Setup: 'Maintain Till Function Maps' flag
"Graphical Table Booking" Sub-Function

Till Function Configuration
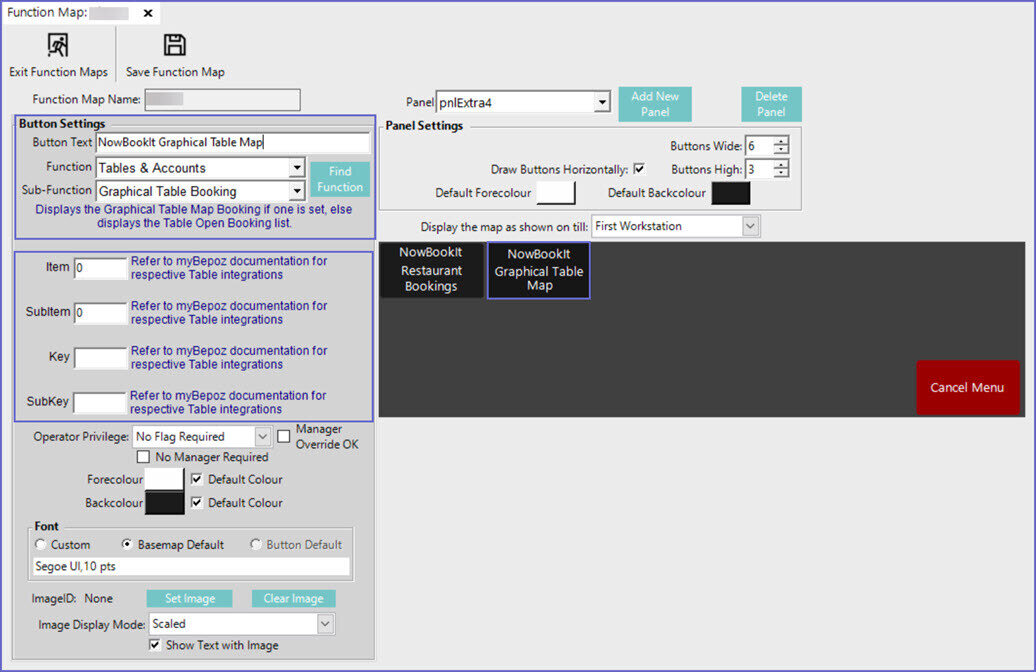
- After selecting the desired Till Function Map and Panel, click on the desired button space and then complete the following steps to configure the Booking List Till Function:
- In the Button Text field enter the text that will display on the Till Function Button in SmartPOS
- Set the Function drop-down to 'Tables & Accounts'
- Set the Sub-Function to 'Graphical Table Booking'
- Enter a TableGroup number into the Item field
- Note: The TableGroup number should be the TableGroup # that will be used for NowBookIt reservations
- Enter the value for SubItem. Note: Default value is current week
- When SubItem=1, it opens all the bookings for the current day
- When SubItem=2, it opens all the bookings for the current week
- When SubItem=3, it opens all the bookings for the last week
- When SubItem=4, it opens all the bookings for the next week
- When SubItem=5, it opens all the bookings for the current month
- When SubItem=6, it allows custom date range inputs
- Enter the value of Key. Note: Key value is the Service Name at NowBookIt. Ex: Breakfast, Dinner etc.
- Key value match is case insensitive
- Enter the value of SubKey
- Please enter a SubKey value so as to filter the bookings by their seated status
- When SubKey = 1, this displays bookings which have either 'Seated' or 'Partially Seated' status
- When SubKey = 2, this displays bookings which have either 'UnSeated' or 'Confirmed' status
- The above steps must be repeated for each table group configured in the Till Extension device for NowBookIt
Graphical Table Booking SmartPOS Workflows
- Depending on how your system is configured, there may be one (1) or multiple Till Function Buttons that can be used to retrieve NowBookIt reservations
- There are many different workflows that can occur when using this Till Function depending on the situation; e.g., Booked Tables, seating a Walk-in via SmartPOS, seating a Walk-in via NowBookIt etc.
- Due to this, not all possible workflows can be covered in this article, however, all Table Open Booking List option will be covered and basic workflows will be demonstrated
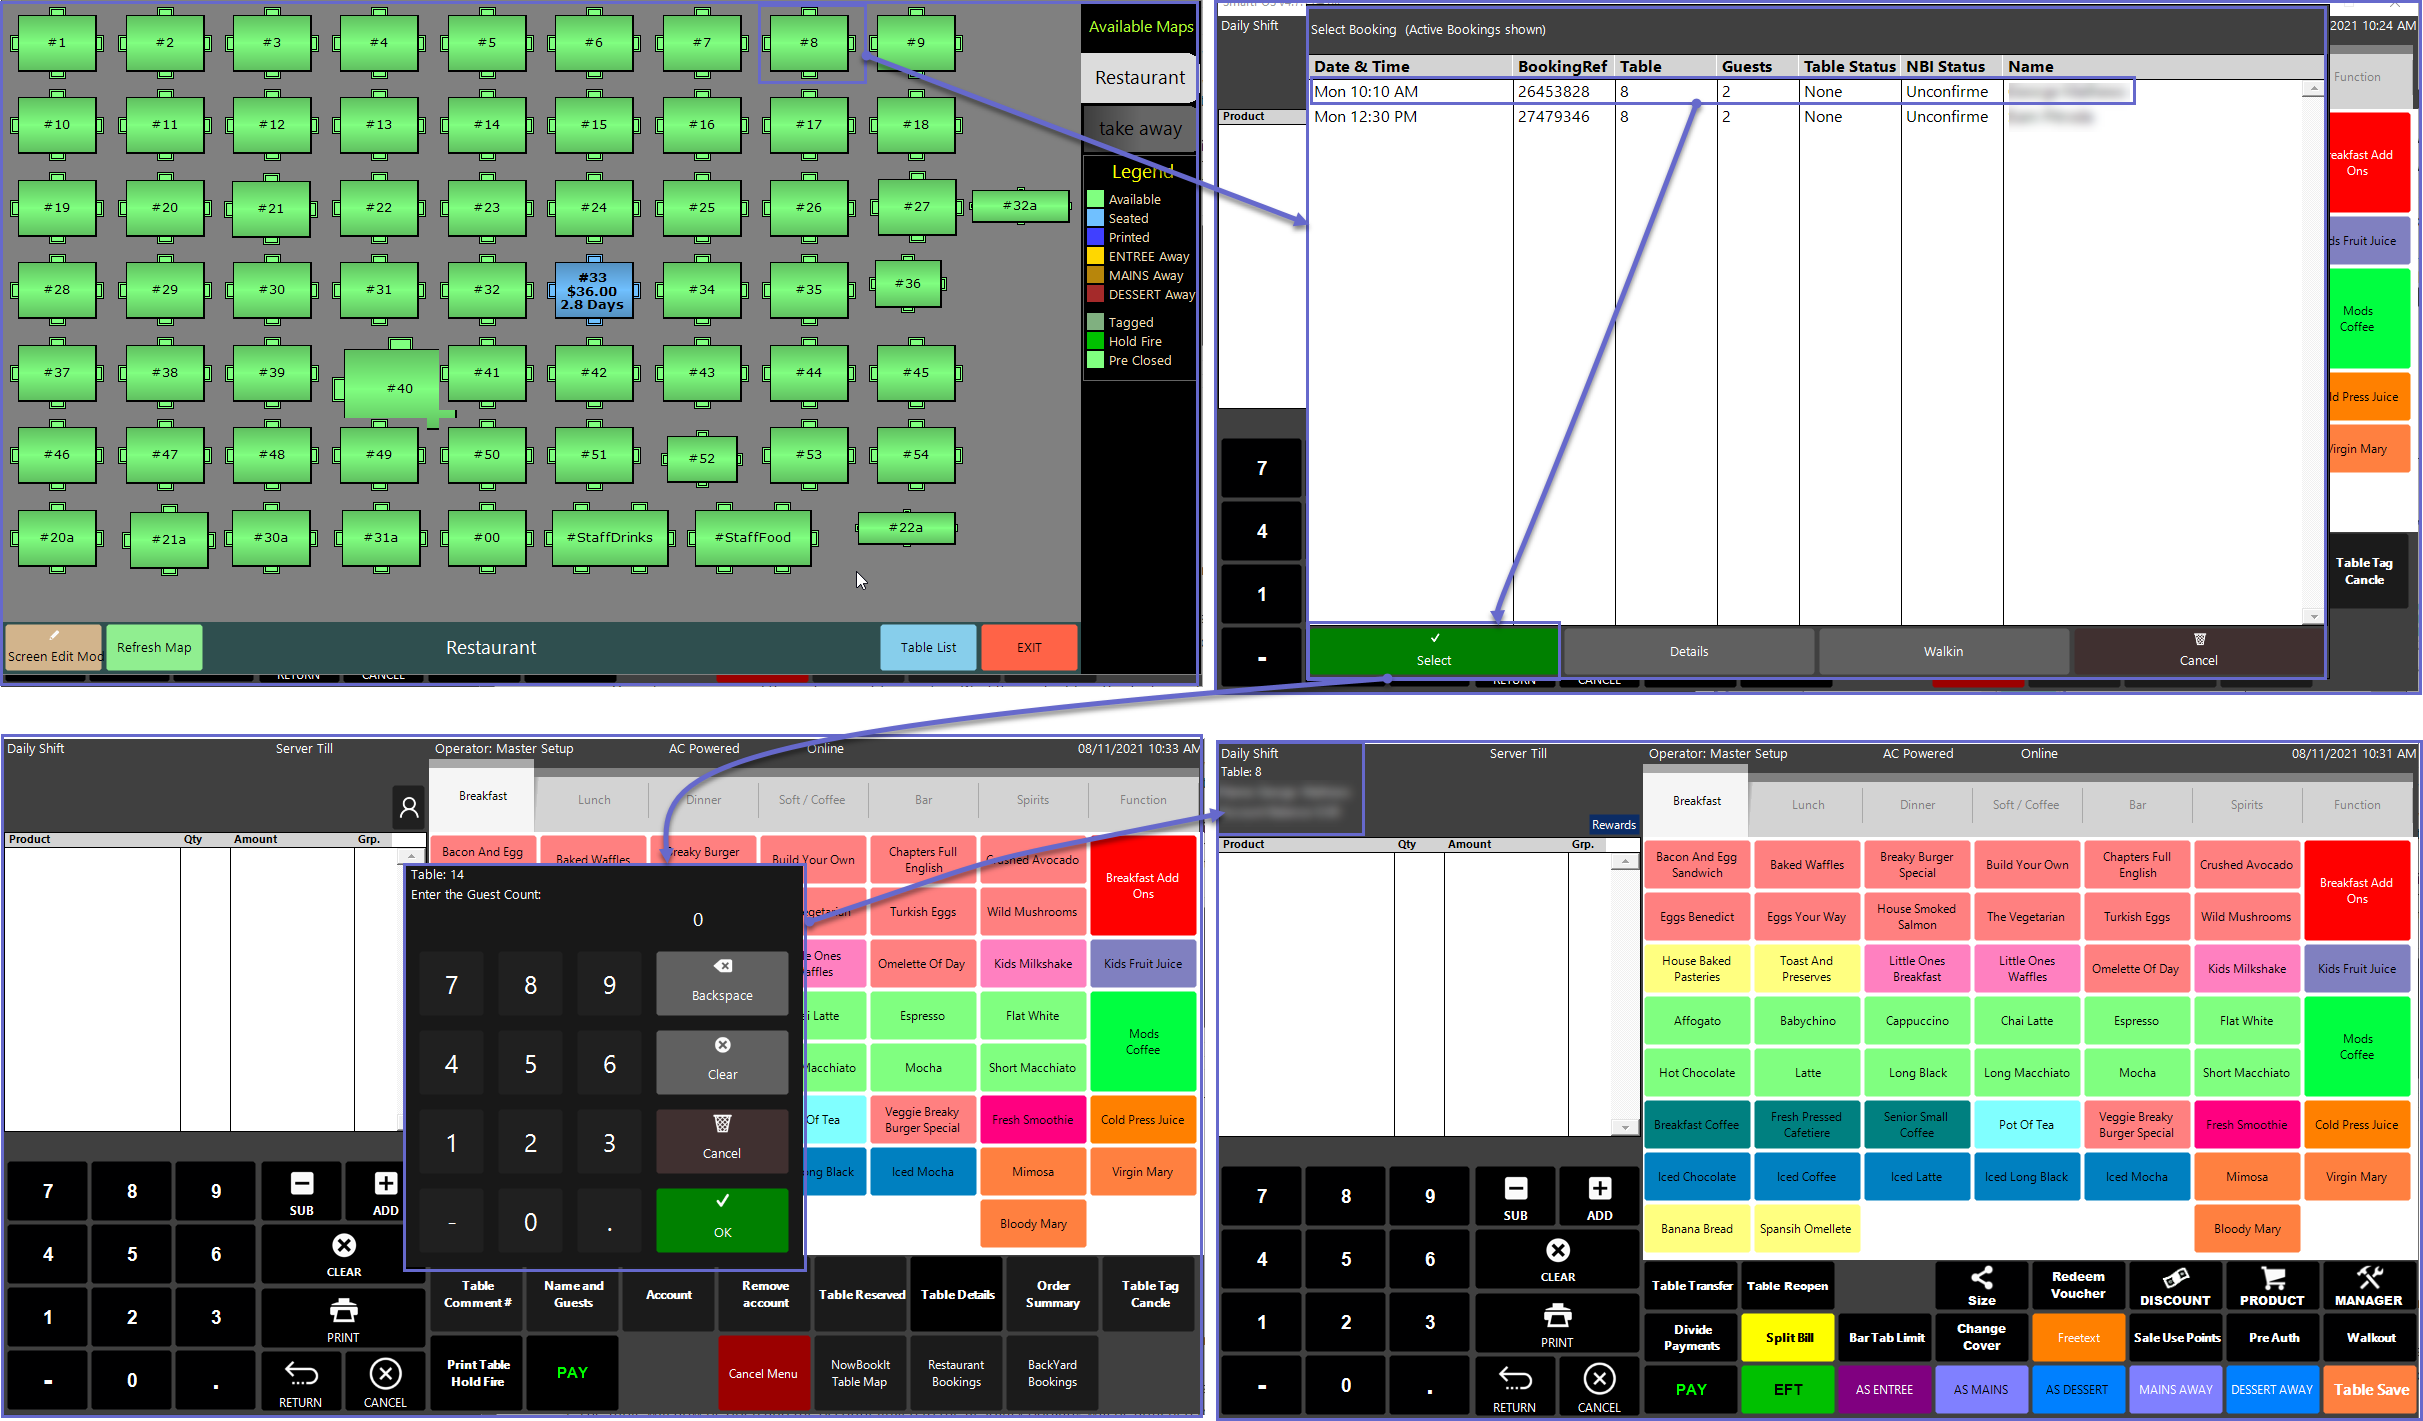
- Begin by logging into SmartPOS and navigating to the panel where the Till Function button is located then click on the Graphical Table Booking function button
- The configured Table Map will open and there are a number of workflows that can being from the Graphical Table Map including clicking on a Booked Table in the Map of using one of the following button options on the bottom of the screen:
- Refresh Map which will manually refresh the Table Map with updated data from NowBookIt
- Table List will be the same as using the Table Open Booking List function and will display a List of NowBookIt Bookings
- Exit - Clicking on Exit will pop-up a message on SmartPOS allowing the users to create a Walkin, if desired

Opening a Booking
- To open a Booking from the Booking Table Map, complete the following steps:
- Tap on the desired Table from the Table Map
- If the Table has a booking(s) available, a window will open to allow Operators to select from the available bookings; highlight the desired Booking and click the Select button or simply double-tap the booking
- A prompt will appear on the screen to enter the number of guest(s); enter the number of guest(s) and click on Ok
- The Table will now be open and the Account linked to the NowBookIt Booking will be attached to the Transaction
- Operators can proceed through normal Transaction worflows of adding Products, applying Discounts, performing other Functions, etc.

View Booking Details
- To view Booking Details from the Graphical Table map, complete the following steps
- Complete Steps 1 through 3 from the Opening a Booking workflow, however, when prompted with the option to Open the NowBooking Table
- o view Booking Details from the Booking Table Map, complete the following steps (this can be done before or after a Booking has Arrived and been Seated):
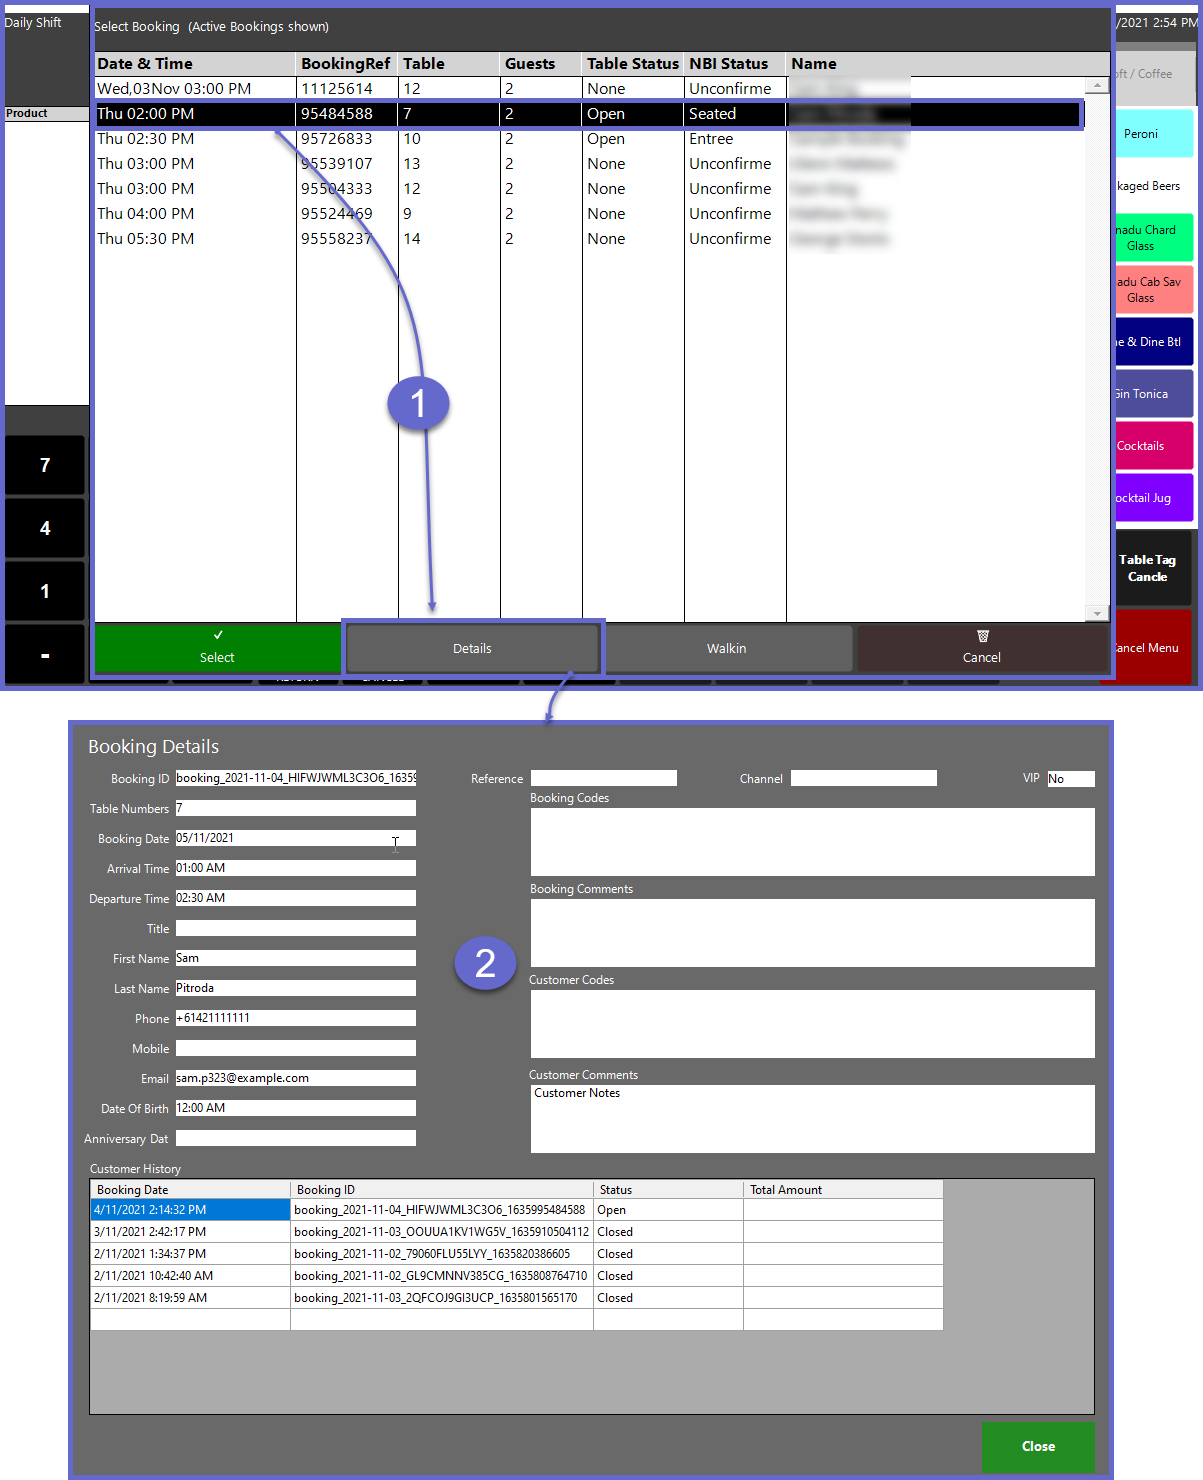
- Complete Steps 1 & Step 2 from the Opening a Booking Workflow, however, in step 2 highlight the desired booking from the List and tap on the Booking Details button on the bottom of the screen
- The booking details will be retrieved from NowBookIt
- Booking ID
- Table Number
- Booking Date & Times
- Customer Name and Contact Details
- Customer Date of Birth
- Customer Anniversary Date
- Reference ID
- Channel Information
- VIP Status
- Booking Codes
- Booking Comments
- Customer Comments
- Customer History

Seating a Walk-in
- To seat a Walk-in to NowBookIt through SmartPOS from Graphical Table Map, complete the following steps:
- Navigate to the panel where the Till Function button is located then click on the Graphical Table Booking function button
- Click on the table to create a walkin.
- If a booking is already associated with the selected table, the booking will open on SmartPOS
- If there is no booking available for the selected table, a prompt is displayed on SmartPOS to create a walkin
- When clicked 'OK' to create a walkin, a keypad is then displayed prompting to enter the name of the customer, enter the customer's name, guest count and click on 'Ok'
- The Table will be Opened immediately, and Transaction Functions may commence; continue as usual and Save, Save & Send, process Payment for the Table when finished

