
This article covers the WebSocket Schedule Job setup guide for the Oolio Order M
This article covers the WebSocket Schedule Job setup guide for the Oolio Order Manager Integration with Bepoz.Prerequisites
- Minimum Bepoz version of v4.7.2.8 and onwards
- For an Operator to be able to setup Oolio Order Manager Integration, the following Operator privileges must be enabled:
-
Venue Maintenance "Main" Tab (General Settings) - All “System Setup” Flags
-
Operator Maintenance 'General' Tab - System Setup: “Maintain Schedule Job” Flag
- System Setup: “Access Venue, Stores, Tills” Flag
Oolio Order Manager WebSocket Schedule Job
- This WebSocket scheduled job, once configured, communicates with Oolio Order Manager and receive orders to the SmartPOS
Job Setup Instructions
- To set up the BackOffice schedule job, log into BackOffice and complete the following steps:
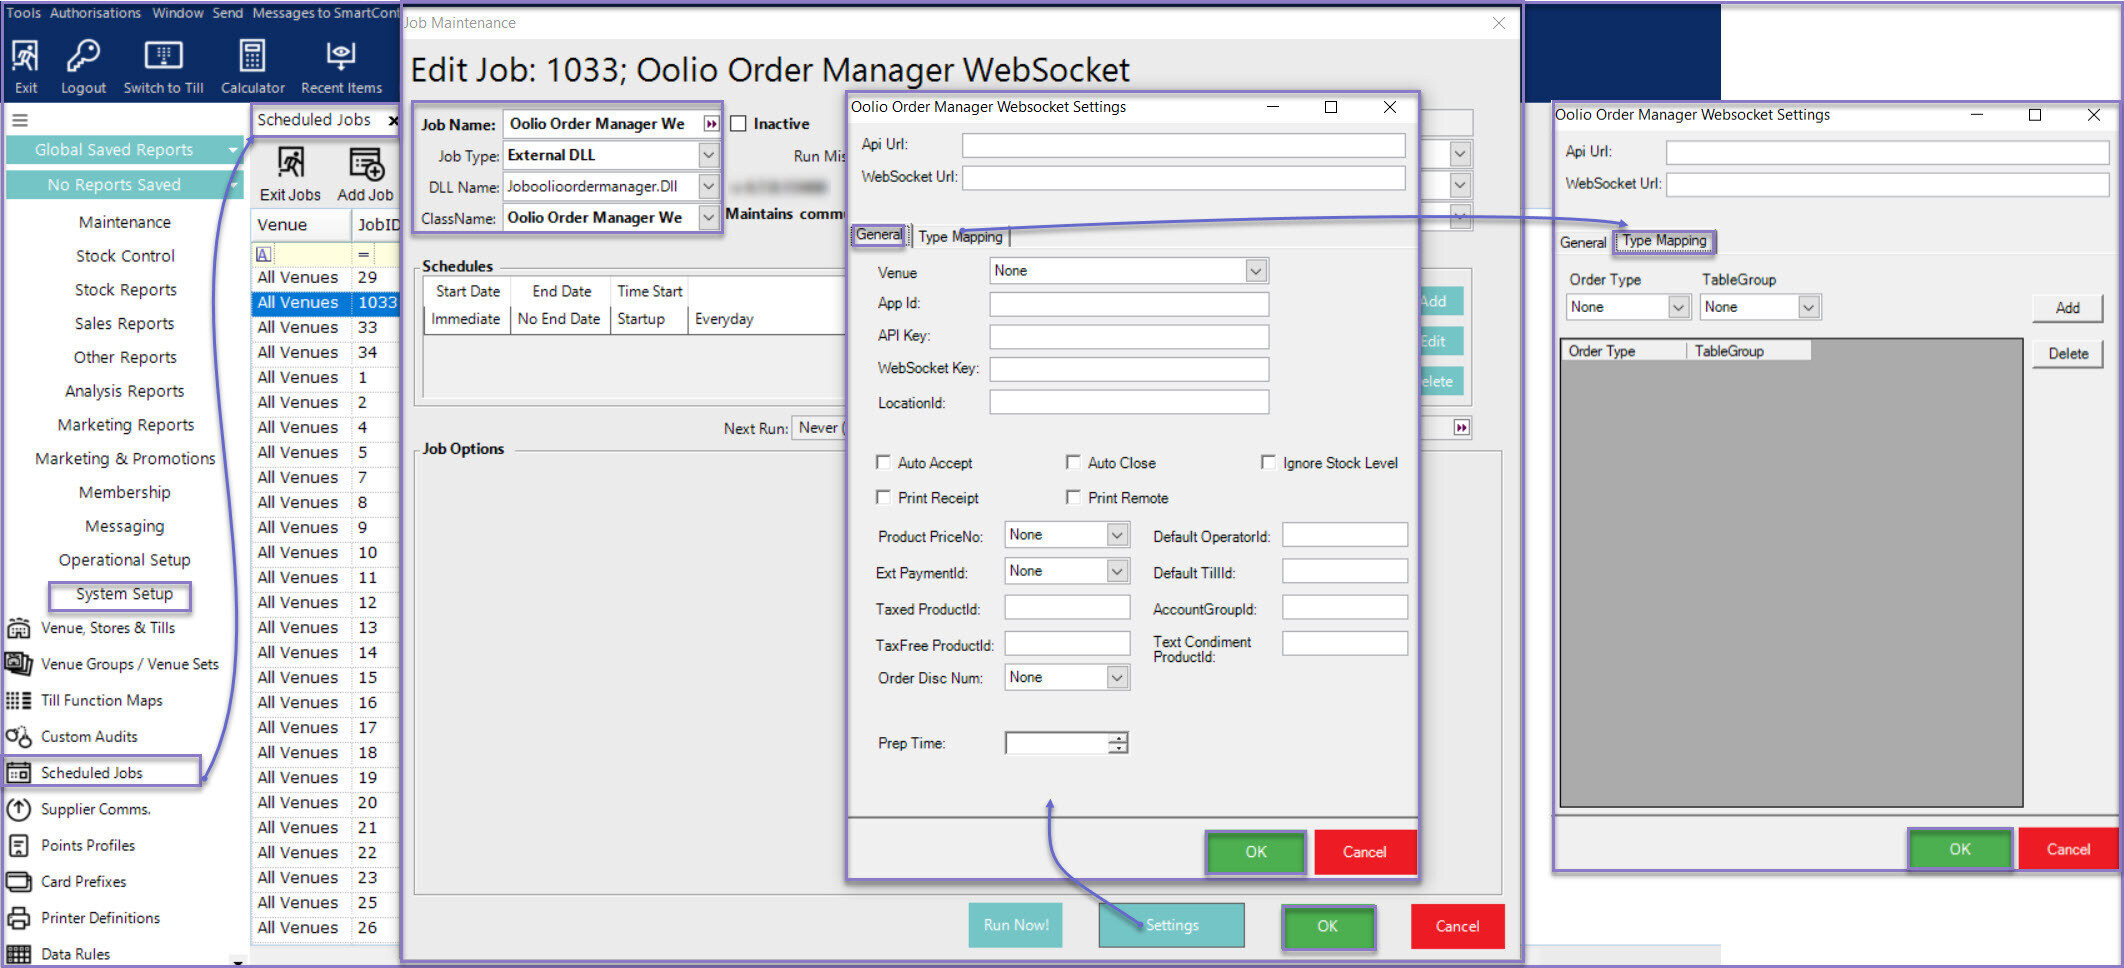
- Navigate to System Setup and select Scheduled Jobs
- Select Add Job button and the Job Maintenance window will open
- There are a number of details that need to be input and they include
- Job Name: Give the job a relevant name
- Job Type: External DLL
- DLL Name: Joboolioordermanager.Dll
- Class Name: Oolio Order Manager Web Socket Job
- Set any other required configurations such as "Run Missed Jobs", "Run as", etc.
- Configure any required schedule(s) (recommended to run at least once daily)
N.B. When setting up in a Multi Venue environment, ensure the Websocket job runs at the Remote venue
Oolio Order Manager WebSocket Job Settings
- Within the Settings
- API Url: This is the URL provided by Oolio Order Manager
- WebSocket Url: This is the URL provided by Oolio Order Manager
- General:
- Venue: Select the venue from the dropdown list
- App Id: This is the App Id provided by Oolio Order Manager
- API Key: This is the API Key provided by Oolio Order Manager
- WebSocket Key: This is the WebSocket Key provided by Oolio Order Manager
- LocationId: This is the Location Id provided by Oolio Order Manager
- Auto Accept Flag: This will auto-accept all the pending orders from Oolio Order Manager
- ON: When the flag is on, the orders received from Oolio Order Manager are accepted automatically
- OFF: When the flag is off, the orders are not auto accepted, the operator has to manually accept the orders at SmartPOS
- Auto Close Flag: This will auto-close all the accepted orders from Oolio Order Manager
- ON: When the flag is on, the orders received from Oolio Order Manager are closed automatically
- OFF: When the flag is off, the orders are not auto closed, the operator has to manually close the orders at SmartPOS
- Ignore Stock Level Flag: This is the custom flag for stock of the products; stock of the products is considered all the times unless the flag is ON
- Print Receipt Flag: When enabled, a receipt is printed for every transaction made
- Print Remote Flag: This controls whether the print job is queued to the remote printers (Kitchen printers) for the products
- Product PriceNo: Select the Price Number from the drop-down list; the selected Price Number will be used when a menu is sent to Oolio Order Manager
- Default OperatorId: Enter the default Operator ID to be used
- Ext PaymentId:
Create an external payment for Oolio Order Manager and select the External Payment ID from the drop-down list - Default TillId: Enter the default Till ID to be used
- AccountGroupId: This is the default Account Group which will be used to create new Accounts from Oolio Order Manager
- Taxed ProductId: If any item sold at OOM will be available / mapped into POS as Product item specify with this ProductID; note: this should be the Product ID of a Product in the System's database that was created to be used specifically for this purpose and setup as GST, Non-Stock, Zero Cost and Price
- TaxFree ProductId: If any non-tax item sold at OOM will be available / mapped into POS as Product item specify with this ProductID; note: this should be the Product ID of a Product in the System's database that was created to be used specifically for this purpose and setup as GSTFree, Non-Stock, Zero Cost and Price
- Text Condiment ProductId: This is the default text condiment product Id used when a Doshii order has an open/unknown condiment
- Order Disc Num: This is the default Order discount totaliser
- Prep Time: This is the time to prepare the order
- Type Mapping:
- Map the TableGroup to each Order Type
- Select the Order Type and Table Group respectively from the drop down and click on the ‘Add’ button to add the selection
- Note: The TableGroup for DeliverIt Delivery and Pickup order types must be created within the
Venue Maintenance "Tables" Tab - Click ‘OK’ to save the settings and this will exit from the Oolio Order Manager WebSocket Job Settings window
- Click on 'Ok' again on the Job Maintenance window to save the Oolio Order Manager Schedule Job settings
Quick Links & Additional Resources
-
Venue Maintenance "Main" Tab (General Settings) -
Operator Maintenance 'General' Tab -
Venue Maintenance "Tables" Tab -
External Payments Configurations