
Ordering Options This section allows the Admin Backpanel user to configure Dine
Ordering OptionsThis section allows the Admin Backpanel user to configure Dine In, Pickup, Drive Through and Delivery labelling and route orders to the correct places in BEPOZ. However it is recommended that the order routing component is configured by a Bepoz technical support team member. An extra ‘Dine-In Tables’ tab displays in this section if the Dine In ON switch is active. Otherwise the following order option fields are available:
|
ON/OFF
|
If enabled the order option is displayed on the YourOrder Home page
|
| Name |
Configure the name displayed to customers for the order option. E.g, Pickup may be labelled ‘Take Away’. Leave blank to use the default value
|
|
Till ID
|
Numeric identifier for API Till/revenue centre in BEPOZ for reporting for selected ordering option.
Caution: Please consult Bepoz support staff to configure.
|
|
Bepoz API
|
If value is populated (not empty) then in conjunction with the Mac key (field below) member pricing is being taken from the store settings rather than the global settings in BEPOZ
Caution: Please consult Bepoz support staff to configure.
|
| Mac |
If value is populated (not empty) then in conjunction with the Bepoz API key (field above) member pricing is being taken from the store settings rather than the global settings in BEPOZ
Caution: Please consult Bepoz support staff to configure.
|
|
Table Group
|
Numeric identifier for table group in BEPOZ which displays transactions for selected ordering option in BackOffice, at the Till or on the order docket.
Caution: Please consult Bepoz support staff to configure.
|
|
Instruction
|
Configure the subtext displayed to customers under the order option. E.g, ‘Scan a QR code on table to place order’. The Instruction text is displayed under the relevant order option on the YourOrder Home page. |
| Display instruction as a pop-up to require acknowledgement |
If enabled then after the order option on the Home page is clicked the Instruction text is displayed as a popup.
If disabled the Instruction text does not appear as a popup.
|
|
Close Order in Bepoz
|
ON = Table (Dine In)/Phone Number (Pickup/Delivery) order is closed in till/BEPOZ when balance is zero. E.g, if full payment received
OFF = Table /Phone Number order remains open in till/BEPOZ if balance is zero.
|
Dine-In Tables
This tab is used to set up the table numbers and their associated areas and table groups for Dine In orders. If Dine In is required the user should click on the ‘Dine-In Tables’ tab item that appears when the Dine In ON/OFF switch is enabled.
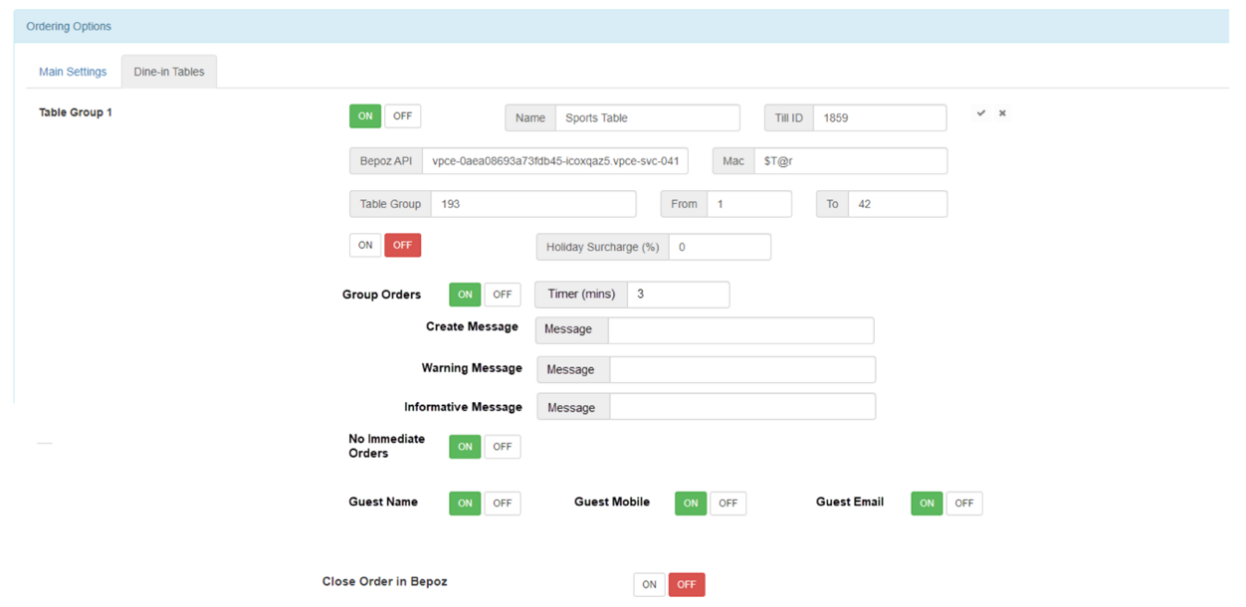
These are the required fields:
|
Table Group 1-3
ON/OFF
|
If switched ON – Dine In orders can be made to any table numbers within the associated table group/area (1 to 3)
If switched OFF – table numbers within the associated table group/area (1 to 3) are disabled for Dine In orders
|
|
Table Group 1-3
Name
|
Table area name that displays in front of each table number. If QR Codes are used on tables then the table group (1-3) name displays next to the table number above the QR Code. Otherwise this is the name of the tab on the table number selection window that displays when customer elects to Dine In |
|
Table Group 1-3 ID |
So that orders flow through to the correct API Till for printing and reporting this field should be set to the Numeric identifier for API Till/revenue centre in BEPOZ for the Dine-In ordering option.
Caution: Please consult Bepoz staff to configure.
|
|
Table Group 1-3 Table Group |
So that orders flow through to the correct table group for reporting and pulling up at the till this field should be set to the table group ID for associated table group in BEPOZ BackOffice.
Refer to BackOffice Table Group IDs in next screenshot
|
|
Table Group 1-3
From
|
This field is used to set the first number in the group’s range for relevant table group. Example, If ‘Table Group 1 From’ is set to 2 and ‘Table Group 1 To’ is set to 5 then users can select/scan QR code to order for ‘Table Group 1’ table numbers: 1, 2, 3, 4 & 5 |
|
Table Group 1-3
To
|
This field is used to set the last number in the group’s range for relevant table group. Example, If ‘Table Group 3 From’ is set to 5 and ‘Table Group 3 To’ is set to 8 then users can select/scan QR code to order for ‘Table Group 3’ table numbers: 3, 4, 5, 6, 7 & 8 |
|
Group Orders
|
Group Order switch enables customers to place orders collectively as a group.
ON = After having attempted to order customer will have the option to wait for other diners on the table to place their orders so they can be brought out at once
OFF = All orders for customers are placed separately
Note: Tables will remain open in BEPOZ/till until operator closes them manually and Pay at Counter payments will be disabled.
|
| Timer (mins) |
Field specifies the length of time in minutes all members of the table must place their order within for the order to be sent off collectively as a group order |
| Create Message |
If field text is entered, this text will display to the first customer after they have placed their order. This to check if they would like to order straight away, or wait for other people on the table and order collectively (and start the timer).
If not specified, default message displays “Would you like to wait X minutes for other people on your table to order?” Where X is the Timer value specified (field above)
Note: Please do not remove the value in the brackets , as this is used to indicate the time remaining in minutes to order as a group
|
| Warning Message |
If field text is entered, this text will display to the second customer forward in the group after they have placed their order if they don’t wish to place a separate order. This to tell them how many minutes are remaining on the timer to place their order with the rest of the group.
If not specified, default message displays “This table is currently set to group orders. There are Y minutes remaining to order with the group”. Where Y is the Timer value specified minus any minutes that elapsed for previous members of the group to nominate their preferences
Note: Please do not remove the value in the brackets , as this is used to indicate the time remaining in minutes to the customer
|
|
Informative Message
|
If field text is entered, this text will display to the first customer who initiates the group order and therefore sets the timer countdown.
If not specified, default message displays “A group table order has been created. Please advise other people on the table to complete their order within X minutes!”. Where X is the original Timer value specified
Note: Please do not remove the value in the brackets , as this is used to indicate the time remaining in minutes to the customer
|
| No Immediate Orders |
ON = ‘Create Message’ (as referenced above) will not display to the first member of the table who elects to create a group order. (Timer begins the moment their preferences are locked in for the group order)
OFF = ‘Create Message’ does not display to the member of the table who elects to create the group order
|
|
Guest Name
|
ON = if customer is not logged in then they are asked for their name the first time they proceed to the checkout page.
OFF = if customer has not logged in then they are not asked for their name when they attempt to proceed to the checkout page
Note: If either Guest Name, Mobile or Email is enabled then Guest Window will display when customer attempts to proceed to the checkout page
|
| Guest Mobile |
ON = If customer is not logged in then they are asked for their mobile the first time they proceed to the checkout page
OFF = if customer has not logged in then they are not asked for their mobile when they attempt to proceed to the checkout page
|
| Guest Email |
ON = If customer is not logged in then they are asked for their email the first time they proceed to the checkout page
OFF = if customer has not logged in then they are not asked for their email when they attempt to proceed to the checkout page
Note: If no email address is requested then customer is more likely to request a paper receipt as they were unable to have the electronic receipt sent to them
|
=======
PLEASE NOTE: Specific table numbers within the above table group ranges can only be disabled if table QR Codes are used. For example, if QR codes are not used and Tables 3 and 4 are combined into one table, Table 3, then staff should consider that orders made for Table 4 are also for the same table.
Instructions for disabling associated tables using QR Codes are covered in the next section, ‘QR Codes’.
BACKOFFICE TABLE GROUP IDs

Circled in Red are the Table Group IDs for the venue in BackOffice