
Overview
The guide will explain the difference between a 'Fall-back' Printer setup vs a 'Redirected' Printer setup, although the functionality is very similar in design their triggers are where the difference is, Fall-back is generally predefined or you could say a hard rule when setting up a new sites printer configurations. where a redirect is more so set on the fly to ensure, for example a faulty Printer is redirect to another printer where the staff can pickup the remote printed dockets and continue the service.
Below will provide example between Fall-back and Redirected
Prerequisites:
Fall-Back Printer Setup
The Nature of Fall-Back is to ensure if one printer is failing to print, for any reason like, no paper, printer is physically faulty etc.
If the Print job cannot reach for Example POS1 Receipt Printer which is the default allocation of where the Customer Receipt is supposed to print, it will Fall-Back to the predefined Fall-Back printer.
In this example, you might have a setup where you have two POS units close to one another for example a Bar, both POS units have their own Receipt printers, but in the case where POS1 has an error and cannot print, it will automatically then Fall-Back to POS2's Receipt Printer and print the customer receipt.
If Fall-back is not defined, the POS will just display an error message saying failed to print to POS1 Receipt Printer and no Print job will print at all.
Fall-Back Setup Example:
As mentioned above you might have two POS Terminals sharing the same workspace,
POS1 and POS2 might be a few meters apart and each has their own Receipt Printers to Print Customer Receipts.
In the event that either POS1 or POS2 has a printer error that will result in a failed print, you can prevent this interruption to service by ensuring there is a Fall-Back printer predefined/hard rule.
In this example:
POS 1 Receipt Printer will Fall-Back to POS 2 Receipt Printer
As shown on the Right, if for any reason POS1 RP Printer is in Error it will Fall-Back to POS2 RP Printer
POS 2 Receipt Printer will Fall-Back to POS 1 Receipt Printer
As shown on the Right, if for any reason POS2 RP Printer is in Error it will Fall-Back to POS1 RP Printer

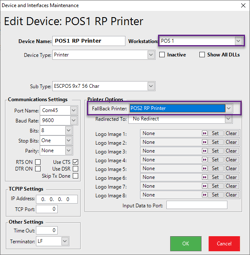
To configure Fall-Back Setting in Backoffice
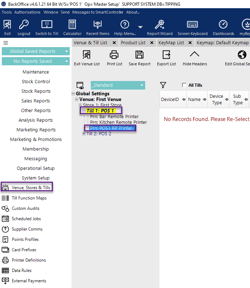
Navigate to System Setup -> Venue Stores and Tills
Select the Workstation/POS and then expand the devices
Select the Printer you want to configure, I.e. POS1 RP Printer
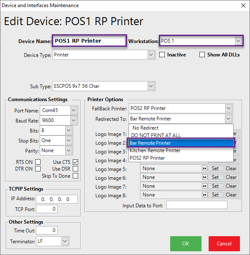
Navigate to Printer Options
Dropdown the Fallback Printer
Specify the FallBack Printer, I.e. POS2 RP Printer
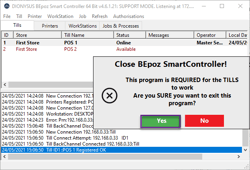
Once Changes have been made you will need to Restart SmartController and the SmartPOS and SmartPrint for the setting to take effect.

Redirection Printer Setup
The nature of this functionality is more geared to having the ability to change any printer on the fly to print somewhere else. I will continue with my two POS terminal setup sharing the same workspace. Now we know both POS units have Fall-Back setups, but what happens in the event that both Receipt printer go faulty at the same time?
This is where Redirect Printing comes into action. If both printers are faulty, site might have a Front of House Printer or Kitchen Printer, where we can redirect the current printing configuration to a new configuration on the fly, without having to change POS/Workstation Printer setting.
In this example
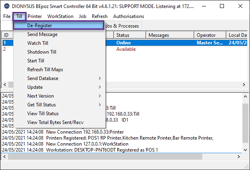
Redirect Setup Method 1: SmartController - (Recommended)
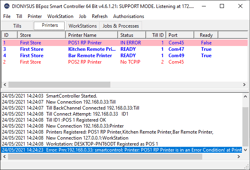
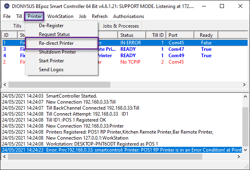
From SmartController - Printers Tab
We can see that POS1 RP Printer is in Error and POS2 RP Printer is Offline / No TCPIP
But the system still has a Bar Remote Printer and a Kitchen Remote Printer.
So, you can on the fly change POS1 and POS2 to Print to any one of these Printers
Within the Printer Tab on Smartcontroller
Highlight the Printer you want to Redirect, this will show the highlighted Printer in Blue
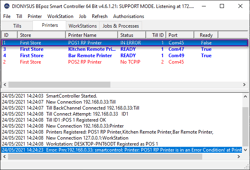
Then select the Printer option on the top ribbon of Smartcontroller
Then select Re-direct Printer
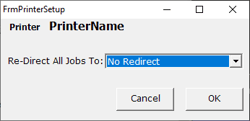
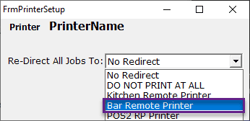
You should now have a pop-up window appear where you can specify the redirected printer
Since the Bar Printer is the closest printer to my location and most particle, I'm going to redirect POS1 RP Printer to the Bar Remote Printer.
Click OK
You will now get a warning message to De-Register All Tills.
This must be done otherwise the new redirection rules will not take effect.

Navigate to the Tills Tab on Smartcontroller
Highlight POS 1 since this is the workstation where the redirection has been changed.
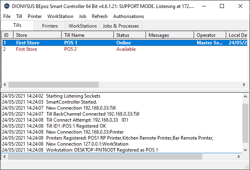
Select the Till option within the ribbon of Smartcontroller
Then select De-Register
The Till will go offline for a moment and then back online making sure the new settings are in effect.
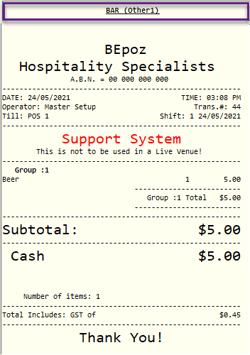
Perform a Test from POS1 and ensure that the Customer Reciept is now printed at Bar Remote Printer.
Redirect Setup Method 2: Backoffice
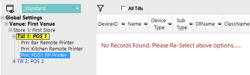
Navigate to System Setup -> Venue Stores and Tills
Expand the POS/Workstation
Select the Printer you want to Redirect and double click
Within the Printer Options select the dropdown list for Redirected To:
Then select the printer you want to print to.
In this example Bar Remote Printer
Click OK
You will need to then Restart Smartcontroller
You will have to then also Restart SmartPOS
You will have to Restart SmartPrint
For the setting to take effect at SmartPOS.
Perform a Test at POS1 and confirm that the Redirection has taken affect and the Print job is now printing on the Bar Remote Printer.