Configuration Option
|
Description
|
Visual/s (if applicable)
|
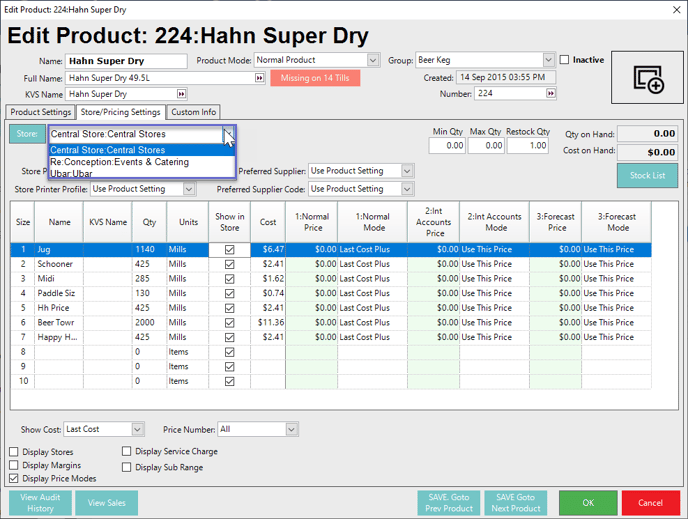
| Store Drop-Down & Button |
- The selected Store controls the location for the values shown in the Store/Pricing Settings Tab
- Selecting the drop-down will display all of the Stores which have already been added to the Product and whose settings can be configured below
- When a Store is selected from the drop-down, it will become the active Product Store on the tab and the configuration options will correspond to that Store
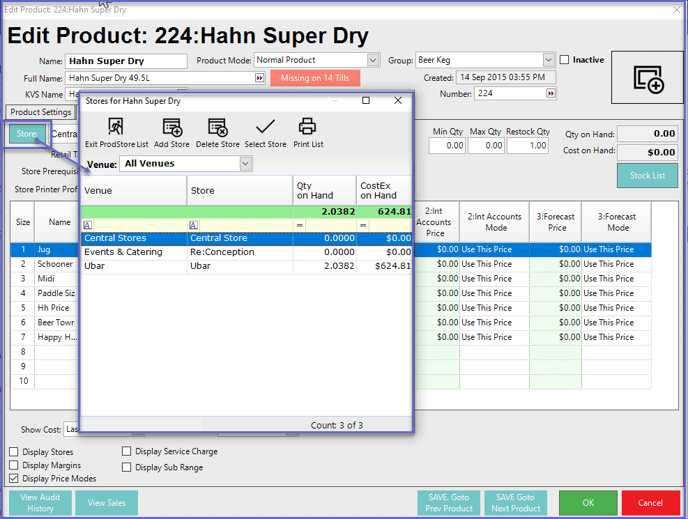
- Alternatively, clicking on the Store button will open another window which will also display all of the Product's current Stores
- Additionally, this window will also offer the ability to maintain the Product's Stores using the Add Store and Delete Store buttons
- Double-clicking on the desired Store will close the window, and the selected Store will become the active Product Store on the tab
|
|
| Retail Tax |
- This setting specifies whether the Retail Price of this product in the selected Store includes GST/Tax or not
- The options are GST and GST Free but could be taxable or non-taxable according to the country/region of the Venue
|
|
| Store Prerequisite |
- In conjunction with the Prerequisite setting on the Product Settings Tab, if a Prerequisite is selected, it must be fulfilled prior to selling this Product in the selected Store
- This will be in addition to a Prerequisite setting on the Product Settings Tab, however, it is checked after the Prerequisite setting on the Product Settings Tab
- If Prerequisites are selected, BOTH Prerequisites must be fulfilled for the Product to be allowed to be sold
|
|
| Store Printer Profile |
- Each Product has a Printer Profile that can be set for it on the Product Settings Tab
- The Store Printer Profile setting allows a different Printer Profile to be set for each individual Store that the Product is sold in
- This setting will override the Printer Profile on the Product Settings Tab when this Product is sold at a SmartPOS Workstation in the selected Store
- If it is desired to keep the Printer Profile settings from the Product Settings Tab, select the 'Use Product Setting' option from the drop-down
|
|
| Preferred Supplier |
- The Preferred Supplier for the selected Store can be set using this drop-down which includes options of all of the Suppliers in the System's database along with an option called 'Use Product Setting'
- If "Use Product Setting" is selected, the Preferred Supplier as set in the Product Settings will be used
- The Supplier selected here will be used when utilizing Auto PO and Requisitions for the Store
- This allows for each Store to have a different Preferred Supplier if required when using Auto PO processes or Requisitions
- This may be needed in situations where Venues and therefore Stores in different locations receive (or prefer to) a Product from Suppliers that are specific to the Stores' location
- For example, if an Organisation has a Venue/Store in Melbourne and a Venue/Store in Sydney and they also have two suppliers for Coca-Cola, one for each state
- The customer can configure the Melbourne Store to have the Preferred Supplier as the Coca-Cola Supplier in Victoria for their Coca-Cola Products, while the Sydney Store can configure the Coca-Cola NSW Supplier as their Preferred Supplier
- Even if the customer has a Preferred Supplier set for the Product overall
- When using Auto POs or Requisitions, when these processes define a Supplier for a Purchase Order, the Supplier will be determined by the "Preferred Supplier" as configured via this drop-down and will use that Supplier for the PO
|
|
| Preferred Supplier Code |
- The Preferred Supplier Code for the selected Store can be set using this drop-down which includes options of all of the Suppliers in the System's database along with an option called 'Use Product Setting'
- If "Use Product Setting" is selected, the Preferred Supplier Code as set in the Product Settings will be used
- This will allow the operator to manually set a Preferred Supplier Code for a product per Store
|
|
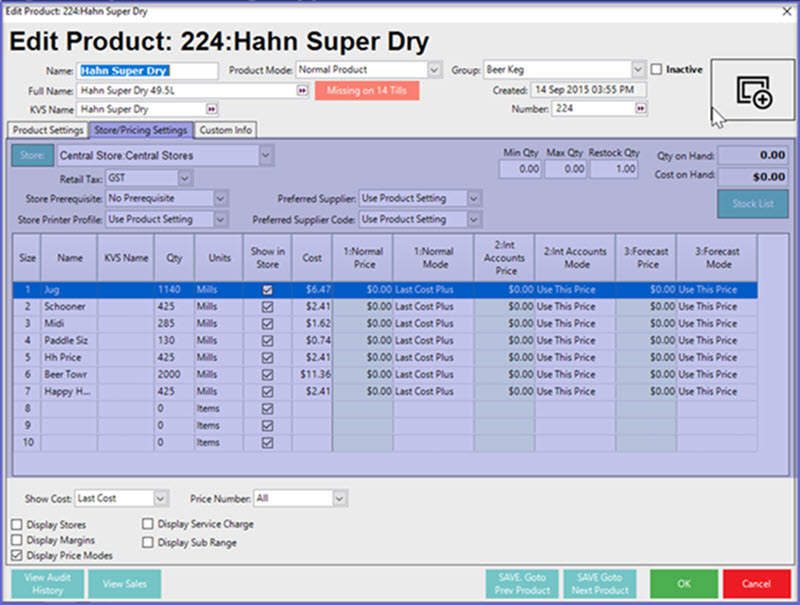
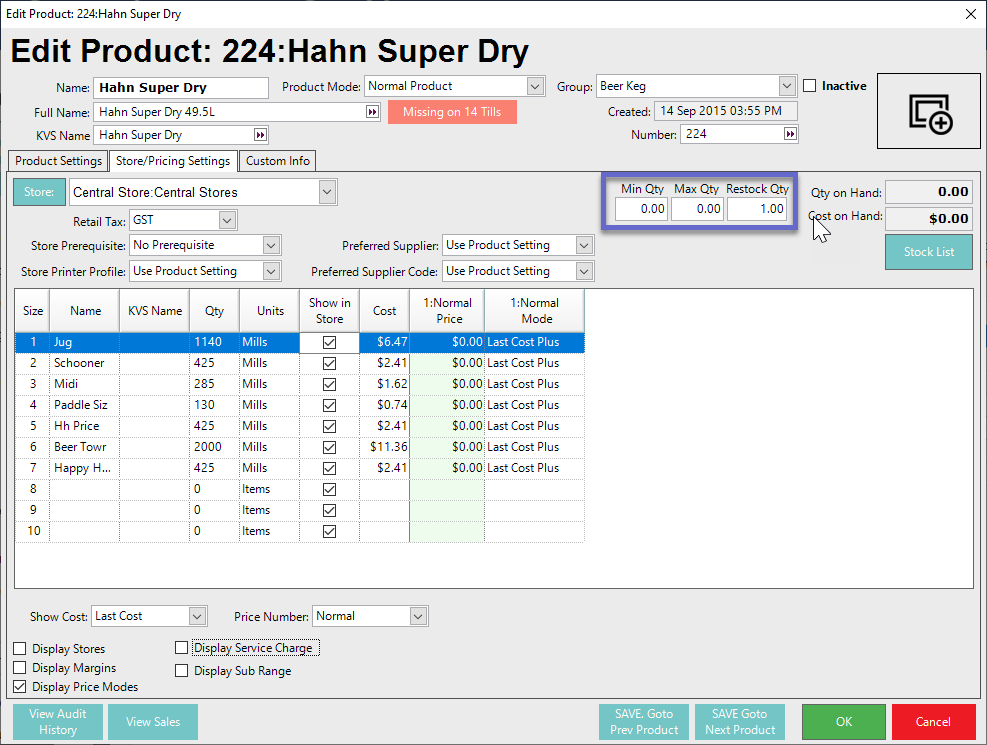
| Size Settings |
- Use this section to define the Sizes in which the Product can be sold, including Name, Quantity, Units, Cost, and Pricing for each Size individually
- A product can be sold in up to 10 different Sizes
- Sizes can be defined as a number of Items or by using a measurement such as Mills or Grams
- The quantity of Units can then be set for each Size
- One Item is the equivalent of the Base Size defined for the product - for example, if the Base Size is 700mills, then 1 Item is equal to 700mills
- For each size, the number entered into the Quantity field combined with the Unit selected will define in the System how much Stock to deduct when the Size is sold
- Size Names, Quantities, and Units will be the same for all of the Product's Stores
- To enter a Name for a Size, click in the Name field corresponding to the Size
- When a product is sold in only one Size, a Size name doesn't need to be entered
- However, when selling more than one Size, the Size names must be entered
- Edit the Qty and Units as are relevant to how the Product will be sold for each Size
- The remaining columns beginning with the Show in Store flag are Store-specific to the selected Store
- The Show in Store flag ONLY controls whether or not this size will be displayed on KeyMaps; this flag does not prevent the Product from being sold via either a Barcode or Product search
- The Cost shown is the Cost Price of each Size which is calculated from the Size's Qty and Units as a portion of the Base Size
- Costs are extended for each Size and are calculated from the Size's Quantity as it relates to the Reordering Unit's Cost
- The Show Cost selector at the bottom of the tab determines which Cost will be displayed
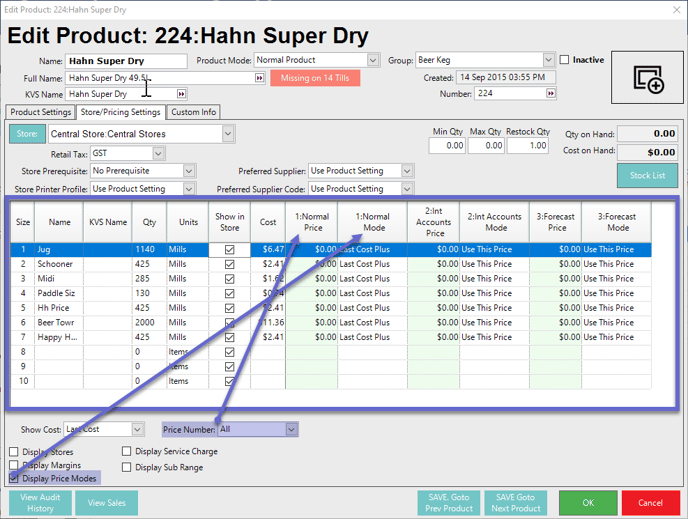
- Price Numbers and Price Mode's columns will appear depending on what's been chosen to display using the Price Number drop-down and the Display Price Modes flag
- These are discussed further below
It is important to be as consistent as possible when setting up the Sizes of Products. All products of the same type should be set up with the Sizes in the same order. This may mean that some Products may be set up with a Size that isn't used.
|
|
| Price Column/s |
- Each Price column displays and allows for editing the Prices of the Product per Price Name
- This is usually the Selling Price for each Size and Price Name, however, is affected by the Price Mode
|
|
| Price Mode Column/s |
- When the Display Price Modes flag is enabled, Price Mode column/s will be shown for each corresponding Price Name
- The Price Mode selected for each Price Name determines how the Selling Price for the Price Name and Size is calculated
- The Price Mode drop-down will offer several options as explained below:
- Use This Price
- This is the default setting; it means the System will simply use the Price as set in the Price column as the Selling Price
- Use Base Price
- If this is a Redirected Price (as set in the Store setup) then use the Price as set in the original Price Number and the original Store as the Selling Price
- Percent Disc
- If this a Redirected Price (as set in the Store setup) then use the Price field as a Discount Percentage to be applied to the original Price Number and the original Store Selling Price
- Discount
- If this is a Redirected Price (as set in the Store setup) then use the Price field as a Discount Amount to be applied to the original Price Number and the original Store Selling Price
- Zero Price
- This disregards any Price setup and simply sells the Product at a Zero Price
- This option will NOT ask for a Price; if the price is simply SET as zero ($0.00), the SmartPOS Workstation will ask for a Price
- Ask Price Auto Cost
- This disregards any Price setup and asks for a Selling Price at the SmartPOS Workstation; then the Price field is used as the percentage of the Selling Price to use as the Cost of the Product
- Last Cost Plus
- The Price field is used as the Percentage to add to the LAST COST to use as the Selling Price of the Product
- Use Price No Tax
- This is the same as the Use This Price selection, however, the Tax is set to No Tax
- Pro Rata Size Price
- The Price field is actually set as the Size number of the Price and Units to pro-rata to obtain the Selling Price
- This enables setting decimal placed Prices, i.g.:
- Size 2 is 100 Items at $5.49
- Size 1 is 1 item at $0.02
- Price Mode for Size 1 is set to Pro Rata Size Price (at $0.02 = Size 2),
- The selling price for Size 1 will be $0.0549
- Price Redirects as set up in the Stores have no impact on the above – meaning that a Redirected Price acts just like it was set up in the "non-redirected" price and store
- For setting things such as $0.10 extra for a range of products you can use Price Modes.
- Example: Setting up a Surcharge
- Turn on Price Modes
- Add Price Number
- Use Price Copy
- Set all Sizes from Price Number (Normal) to Price Number (Premium)
- Use Price Mode Discount
- This will set all the Products and Sizes to use the Discount Price Mode, which means it will add whichever Discount is set to the Normal of 1st Price Number
- In the case of a surcharge, the discount needs to be a NEGATIVE discount i.e. -.10c
|
|
|
| Show Cost |
- This drop-down allows for selecting which Cost to display for each Product Size in the above Cost column
- Options are Last Cost, Average Cost, and Last Inwards
- Selecting "Last Cost" will display the most recent cost of the Product
- Average Cost will display the average cost of the Product based on its entire recorded Cost history
- Selecting Last Inwards will display the h1_
|
|
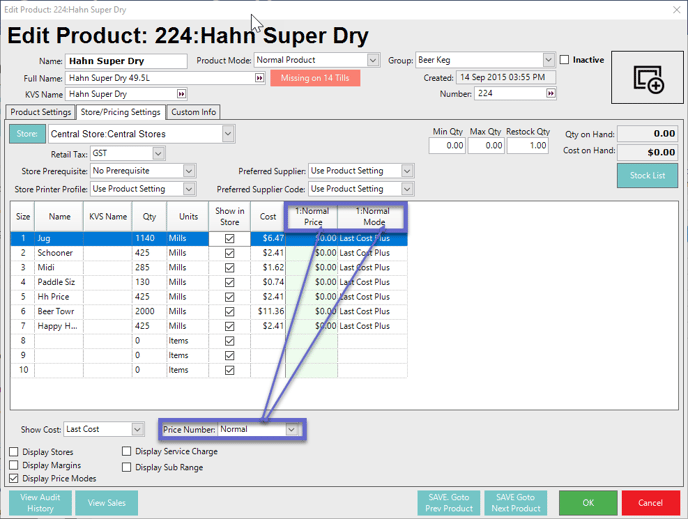
| Price Number |
- This setting allows for defining the Price Name/s and the corresponding Price/s that will be displayed in the above Price column/s
- The drop-down will display all of the available Price Names as set up within the 'Names' Tab of Venue Maintenance and will also have an 'All' option which will display information for each Price Name
- When a Price Name is selected, the Price and optional Mode columns in the Size settings will change accordingly
|
|
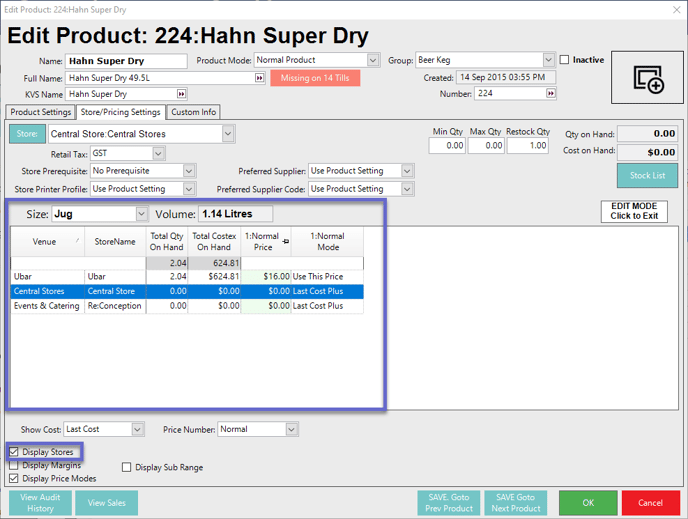
| Display Stores |
- The Display Stores flag controls how and what Product information is displayed above
- When the flag is disabled (as it has been for the duration of this documentation), the Prices for all the Sizes for the selected Store will be displayed
- However, when this flag is enabled, Prices will be shown for all of the Product's Stores but for the selected Size only
- The following information can be seen for the selected Size:
- Venue & Store Names for each of the Product's Stores
- Total Quantity on Hand of the selected Size in each Store
- Total CostEx on Hand of the selected Size in each Store
- Cost & Price information of the selected Size in each Store
|
|
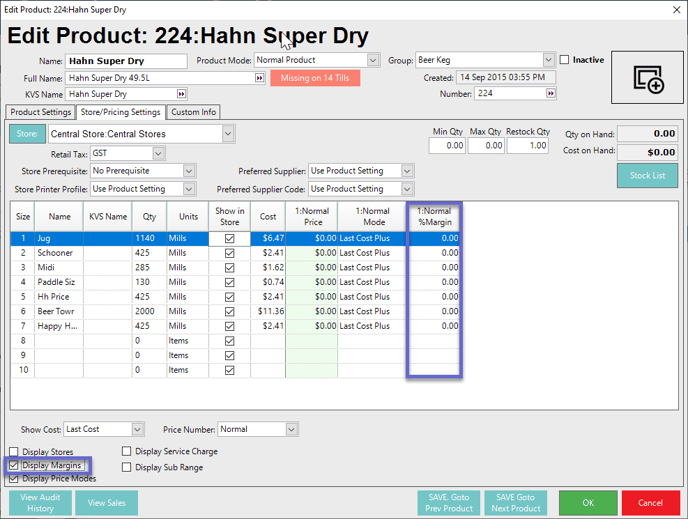
| Display Margins |
- When the Display Margins flag is selected, a Percent Profit Margin column will display for the Price Number/s selected
|
|
| Price Mode |
- If this flag is enabled, then a column/s will display for the Price Name/s of the Product
- See above for detailed information regarding Price Modes
|
|
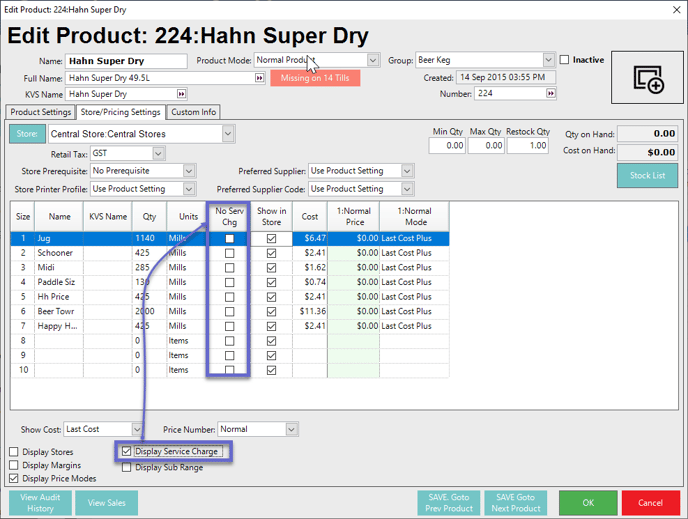
| Display Service Charge |
- If this flag is enabled, then a 'No Service Charge' column will display
- Ticking the flags in this column means that the respective product size do not have service charge added onto them
- If this flag is ticked off, then service charge is already added in the price of products
|
|
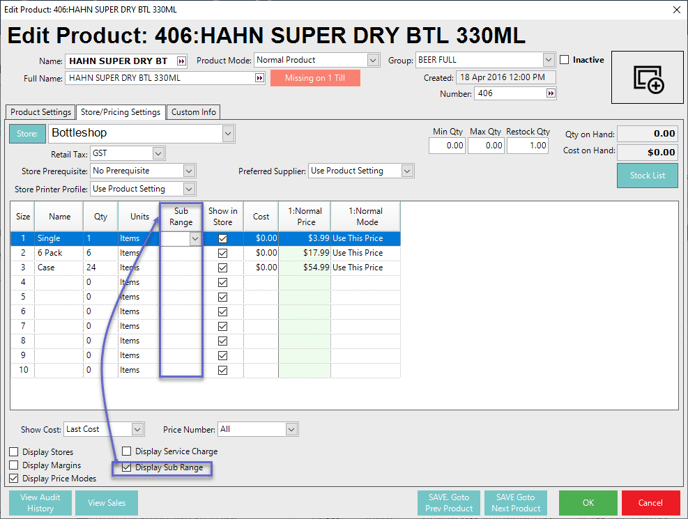
| Display Sub Range |
- If this flag is enabled, then a 'Sub Range' column will display
- Sub Range allows the operator to update a group of products once, based off their sub range. The product will be updated with the same settings and prices for the entire sub range.
- Ticking the flags in this column means that it allows the operator to select from the drop down list of Sub Range.
|
 |