
QR Codes The purpose of this section is to create QR Codes printouts for attaching to a physical sign or table talker on a table.

|
QR Codes OFF/ON
|
If switched ON – venue has set tables and in order to place Dine In orders customers must scan a QR code on the table
If switched OFF – venue has set tables and in order to place Dine orders
customer must enter/click/press a table number (and/or area if applicable) before putting through order
|
|
Generate QR Codes
|
This button opens the ‘QR Code Generator’ window permitting Admin staff to create new QR Codes for existing table numbers if the old QR Codes should no longer be used. Refer to ‘QR Code Generator’ rows |
|
View QR Codes
|
This button opens the ‘View QR Codes’ window enabling Admin staff to
print a QR Code for each table. Refer to ‘View QR Codes’ rows
|
| QR Code Generator (window) |
|
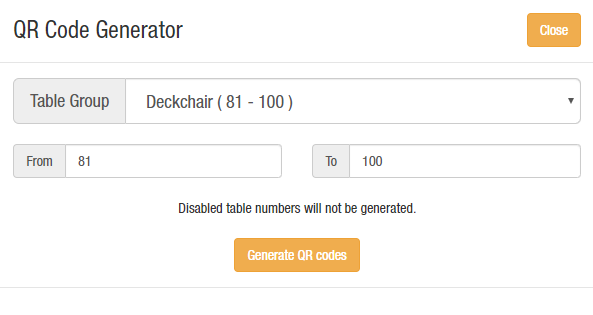
Table Group
|
Area name corresponding to any of the three table groups may be clicked to select all table QR Codes within the relevant group for replacement.
Maximum table range for the table group is also displayed in brackets.
|
| From | This field is used in conjunction with the ‘To’ field to reduce the table number range of QR Codes selected for replacement. The ‘From’ field sets the first number in the group’s table number range to replace. If the ‘From’ field is not updated after selecting the Table Group then all QR Codes in the Table Group from the first table number up until the table number in the ‘To’ field will be marked for replacement |
| To | This field is used to set the last number in the group’s range to replace QR Codes for relevant table group. When a table group is selected the ‘To’ value is automatically set to the last available table number in the table group’s range |
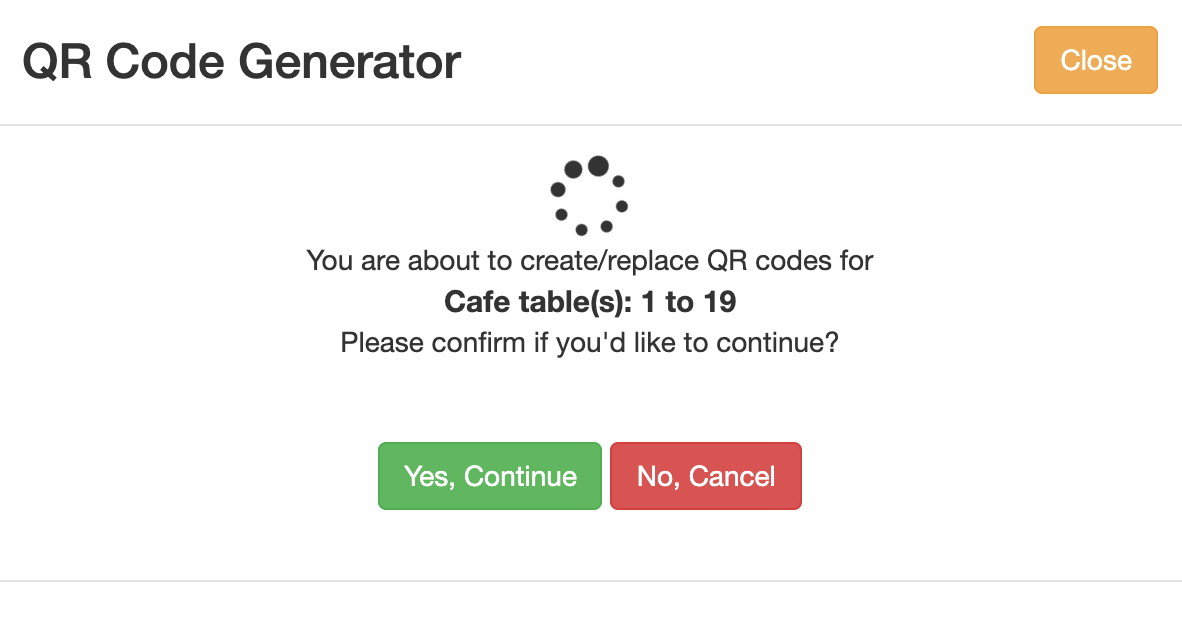
| Generate QR codes | As accident prevention, a new window appears after pressing this button to confirm or reject request to replace the selected QR Codes. For example, if previous set of QR Codes were engraved into each table then the venue may not want them to be replaced |
|
Yes, Continue
|
This button replaces all QR Codes relevant to the specified range of numbers and group in the request. For example, if ‘From’ is set to 91 for ‘Table Group 2’ table area and ‘To’ is set to 95 for ‘Table Group 2’ s table area then QR Codes used to order for ‘Table Group 2’ will be replaced for table numbers: 91, 92, 93, 94 & 95. The previous QR Codes for tables 91 to 95 will no longer work and existing QR Codes outside the range,for example 81 to 90 and 96 to 100 will continue to work. Depending on how extensive table layout changes are it might be quickest to replace QR Codes periodically after table layouts change to prevent customers ordering to invalid tables |
|
No, Cancel
|
This button returns the user to the ‘QR Code Generator’ window section to update the table range to create new QR Codes when the old QR Codes should no longer be used |
| View QR Codes (window) |
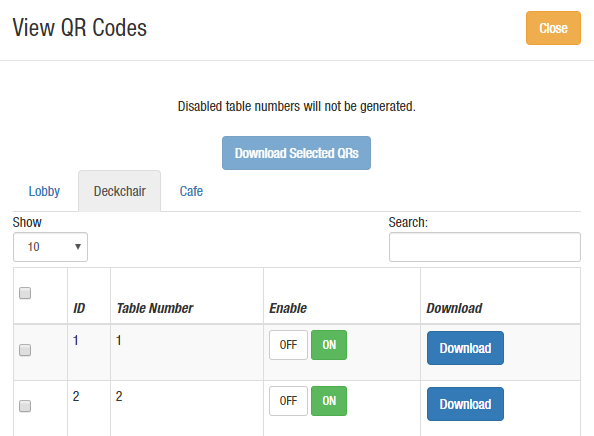
| Download Selected QRs |
If checkbox for any/all table records is switched ON – click this button to generate an Adobe PDF of all selected QR Codes in the current table area tab (e.g, Deckchair) for printing.
If checkboxes for all table records are switched OFF – this button is disabled
|
| Table Group Tab |
All enabled Table Group names from the ‘Dine In Tables’ section will display as tabs across the top of window. Clicking on a tab will display available tables (‘Enable’ switch is ON/green) and unavailable tables (switch is OFF/red). Note that maximum one Adobe PDF file for one Table Group can be generated at a time and clicking on another tab puts that table group in focus and unselects any checkboxes in the previously selected tab |
| ‘Show’ paginator |
Paginator dropdown specifies the number of table records to display in each page with each page being selected by clicking relevant button (number 1 to last page number) at the bottom of page. Note that the higher the paginator value selected the longer it will take for each page to load but the fewer page numbers user will need to navigate through at the base of page |
| ‘Search’ tables | Search field can be used to quickly pull up tables that partially match the search criteria. For example, entering number ‘1’ into the search field will display all table numbers that include a 1 |
|
Select All
|
Clicking checkbox immediately under the paginator selects all available table checkboxes in the current table area and activates the ‘Download Selected QRs’ button so that the user can generate Adobe PDF/print those QR Codes. Note that the paginator is automatically updated to display the maximum number of records (e.g, 500) when the ‘Select All’ checkbox is ticked |
| Select Table(s) |
Click on checkboxes associated with individual tables before clicking the ‘Download Selected QRs’ button to generate/print an Adobe PDF of just those QR Code(s) for printing. Note that checkbox will not display next to unavailable tables (‘Enable’ switch set to OFF) |
| QR Code ID | System-generated identifier for each QR code record. Does not affect user |
| Table Number | Each record displays a table number from Table Number 1 to the maximum for the selected page. Note that only tables with ‘Enable’ set to ON can have a QR Code printed. By default all tables outside range set in ‘Dine In Tables’ section are unavailable (‘Enable’ set to OFF) |
|
Enable table OFF/ON |
If switched OFF – Table’s QR Code cannot be printed or scanned to start a Dine In order. Use this feature to deactivate specific tables within table area
If switched ON:
– QR Code for table within the set table range can be printed and scanned by a customer to start a Dine In order to that table
– QR Code for table outside the set table range can be printed but cannot be scanned by a customer to start a Dine In order
Note that table area range in the Dine In Tables section must be expanded to include the table number for its printed QR Code to receive orders
|
| Download | Button generates for the associated table an Adobe PDF of the QR Code for printing. Button is disabled if its table is unavailable (‘Enable’ set to OFF) |