-
End-User | Products & SmartPOS
-
End-User | Stock Control
-
End-User | Table Service and Kitchen Operations
-
End-User | Pricing, Marketing, Promotions & Accounts
- Prize Promotions
- Points, Points Profiles and Loyalty
- Product Promotions
- Repricing & Discounts in SmartPOS
- Vouchers
- Account Till Functions
- Pricing, Price Numbers and Price Modes
- Raffles & Draws
- Marketing Reports
- Accounts and Account Profiles
- Rewards
- SmartPOS Account Functions
- Troubleshooting
- Product Labels
- Packing Slips
-
End-User | System Setup & Admin
-
End-User | Reporting, Data Analysis & Security
-
End-User | Membership & Scheduled Billing
-
End-User | Operators, Operator Permissions & Clocking
-
Interfaces | Data Send Interfaces
-
Interfaces | EFTPOS & Payments
- NZ EFTPOS Interfaces
- Linkly (Formerly PC-EFTPOS)
- Adyen
- Tyro
- ANZ BladePay
- Stripe
- Windcave (Formerly Payment Express)
- Albert EFTPOS
- Westpac Presto (Formerly Assembly Payments)
- Unicard
- Manager Cards External Payment
- Pocket Voucher
- OneTab
- Clipp
- eConnect-eConduit
- Verifone
- AXEPT
- DPS
- Liven
- Singapore eWallet
- Mercury Payments TRANSENTRY
- Ingenico
- Quest
- Oolio - wPay
-
Interfaces | SMS & Messaging
-
Interfaces | Product, Pricing, Marketing & Promotions
- Metcash Loyalty
- Range Servant
- ILG Pricebook & Promotions
- Oolio Order Manager Integration
- Ubiquiti
- Product Level Blocking
- BidFood Integration
- LMG
- Metcash/IBA E-Commerce Marketplace
- McWilliams
- Thirsty Camel Hump Club
- LMG Loyalty (Zen Global)
- Doshii Integration
- Impact Data
- Marsello
- IBA Data Import
- Materials Control
- Last Yard
- Bepoz Standard Transaction Import
-
Interfaces | Printing & KDS
-
Interfaces | Reservation & Bookings
-
Interfaces | Database, Reporting, ERP & BI
-
Interfaces | CALink, Accounts & Gaming
- EBET Interface
- Clubs Online Interface
- Konami Interface
- WIN Gaming Interface
- Aristocrat Interface
- Bally Interface
- WorldSmart's SmartRetail Loyalty
- Flexinet & Flexinet SP Interfaces
- Aura Interface
- MiClub Interface
- Max Gaming Interface
- Utopia Gaming Interface
- Compass Interface
- IGT & IGT Casino Interface
- MGT Gaming Interface
- System Express
- Aristocrat nConnect Interface
- GCS Interface
- Maxetag Interface
- Dacom 5000E Interface
- InnTouch Interface
- Generic & Misc. CALink
-
Interfaces | Miscellaneous Interfaces/Integrations
-
Interfaces | Property & Room Management
-
Interfaces | Online Ordering & Delivery
-
Interfaces | Purchasing, Accounting & Supplier Comms
-
SmartPOS | Mobile App
-
SmartPDE | SmartPDE 32
-
SmartPDE | Denso PDE
-
SmartPDE | SmartPDE Mobile App
-
MyPlace
-
MyPlace | myPLACE Lite
-
MyPlace | Backpanel User Guides
- Bepoz Price Promotions
- What's on, Events and tickets
- Staff
- System Settings | Operational Settings
- Vouchers & Gift Certificates
- Member Onboarding
- Members and memberships
- System Settings | System Setup
- Reports and Reporting
- Actions
- Offers | Promotions
- Messaging & Notifications
- System Settings | App Config
- Surveys
- Games
- User Feedback
- Stamp Cards
-
MyPlace | Integrations
-
MyPlace | FAQ's & How-2's
-
MyPlace | Release Notes
-
YourOrder
-
YourOrders | Backpanel User Guides
-
YourOrders | YourOrder Kiosk User Guide
-
YourOrders | Merchant App User Guide
-
WebAddons
-
Installation / System Setup Guides
- SmartPOS Mobile App | Setup
- SmartPOS Mobile App | SmartAPI Host Setup
- SmartPOS Mobile App | BackOffice Setup
- SmartPOS Mobile App | Pay@Table setup
- SmartKDS Setup 4.7.2.7 +
- SmartKDS Setup 4.6.x
- SQL Installations
- Server / BackOffice Installation
- New Database Creation
- Multivenue Setup & Config.
- SmartPOS
- SmartPDE
- Player Elite Interface | Rest API
- Interface Setups
- Import
- KDSLink
- Snapshots
- Custom Interface Setups
-
HOW-2
- Product Maintenance
- Sales and Transaction Reporting
- SmartPOS General
- Printing and Printing Profiles
- SQL
- Repricing & Discounts
- Stock Control
- Membership
- Accounts and Account Profiles
- Miscellaneous
- Scheduled Jobs Setups
- Backoffice General
- Purchasing and Receiving
- Database.exe
- EFTPOS
- System Setup
- Custom Support Tools
-
Troubleshooting
-
Hardware
3 | QSR BackOffice Setup
This article covers a how-to guide to configuring the QSR interface within BackOffice. The Bepoz setups required for the QSR KDS Integration may seem daunting, however, they are actually straightforward and fairly simple. The order with which these setups are completed isn't necessarily important as long as they are all achieved.
This article covers a how-to guide to configuring the QSR interface within BackOffice.
The Bepoz setups required for the QSR KDS Integration may seem daunting, however, they are actually straightforward and fairly simple.
The order with which these setups are completed isn't necessarily important as long as they are all achieved.
Prerequisites
- To access KDS features in BackOffice, the following Operator Privileges will need to be enabled
-
Operator Maintenance 'General' Tab - System Setup: "Access Venue, Stores & Tills" Flag
- System Setup: "Maintain Venue, Stores & Tills" Flag
- System Setup: "Maintain Till Function Maps" Flag
-
Operator Maintenance 'Maintenance' Tab - Products: "View Products" Flag
- Products: "Edit Products" Flag
KDSLink
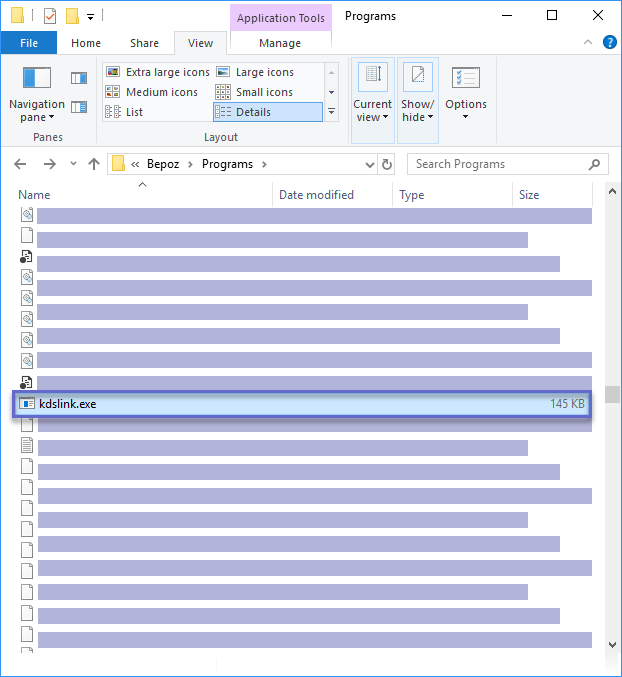
- The KDSLink is a separate Bepoz application and should be found in the Bepoz Programs directory (C:\Bepoz\Programs)
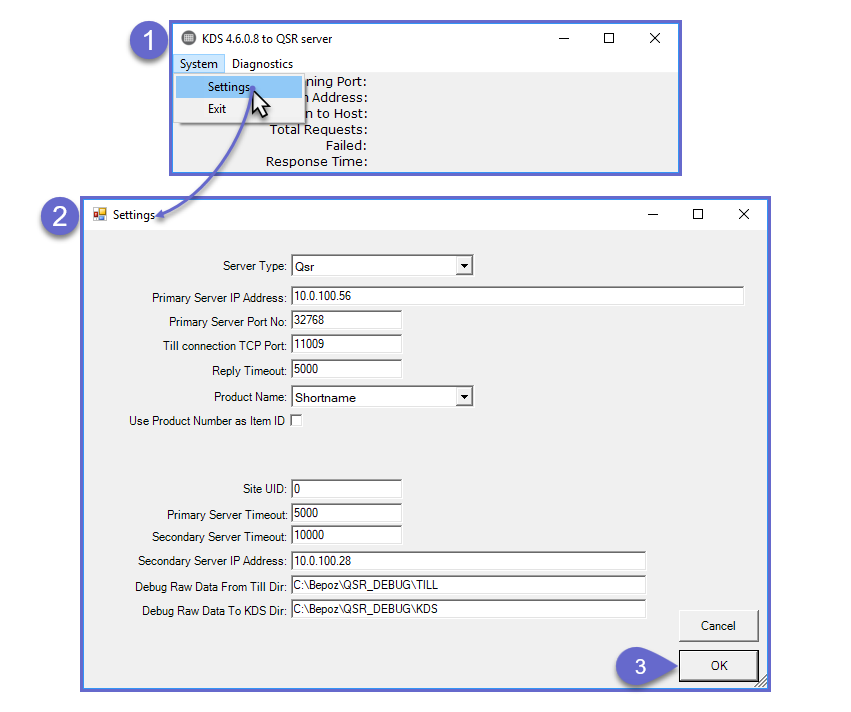
- After opening the application, navigate to System > Settings to configure KDSLink
- Within the KDSLink Settings, configure as required:
- Server Type - select QSR from the drop-down
- Primary Server IP Address - enter the IP Address of the QSR ConnectSmart KitchenServer
- Primary Server Port No - enter the Primary Server Port No as provided by QSR
- Till connection TCP Port - enter an open TCP Port to be used
- Reply Timeout - enter the desired reply timeout amount in milliseconds
- Product Name - select the desired Product Name to appear on KDS screens
- Choose either Shortname, Longname, or Secondname; these refer to the Product Names as configured in Product Maintenance (Name, Full Name, Second Language Name, respectively)
- Use Product Number as Item ID - enable this flag if using the Product Number as the Item ID on KDS screens
- Site UID - the Site UID as provided by QSR
- Primary Server Timeout - enter the desired primary server timeout amount in milliseconds
- Secondary Server Timeout - enter the desired secondary server timeout amount in milliseconds
- Secondary Server IP Address - enter the IP Address of a backup QSR ConnectSmart KitchenServer
- Debug Raw Data From Till Dir - enter the directory where debug XML file will be stored such as C:\Bepoz\QSR_DEBUG\TILL
- Debug Raw Data To KDS Dir - enter the directory where debug XML file will be stored such as C:\Bepoz\QSR_DEBUG\KDS
- Click OK to save the KDSLink settings
- If all configurations are correct and both SmartController and the QSR KitchenServer are running, KDSLink should connect and the integration is active

Database
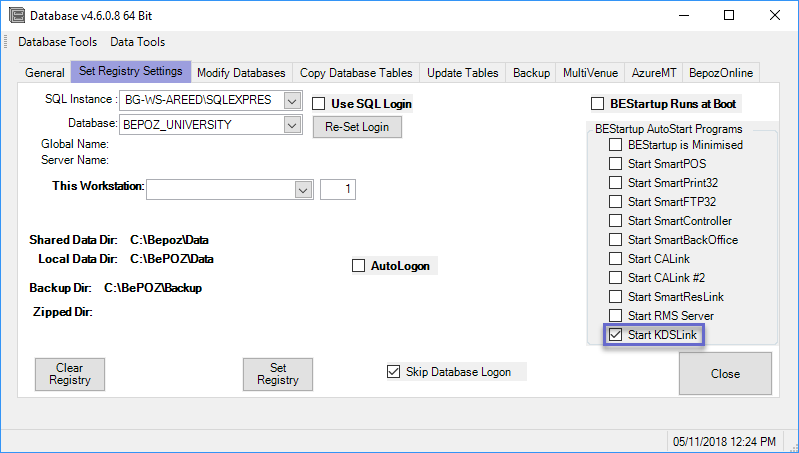
- There is a flag in the Bepoz Database application which controls whether or not KDSLink will autostart
- This flag can be found on the "Set Registry Settings" tab in the "BEStartup Auto Start Programs" section
- If enabled and Bepoz is set to run at boot, KDSLink will autostart along with any other Programs set to autostart
BackOffice
- Within BackOffice, there is an abundance of configuration options related to KDSLinks and to to the QRS integration that must be considered during setup
Venue Maintenance
- Once KDSLink is active, a section of configuration options will appear on the "External Links" tab of Venue Maintenance called "KDSLink - Kitchen Display"
- Most of these settings will be copied from the KDSLink Settings
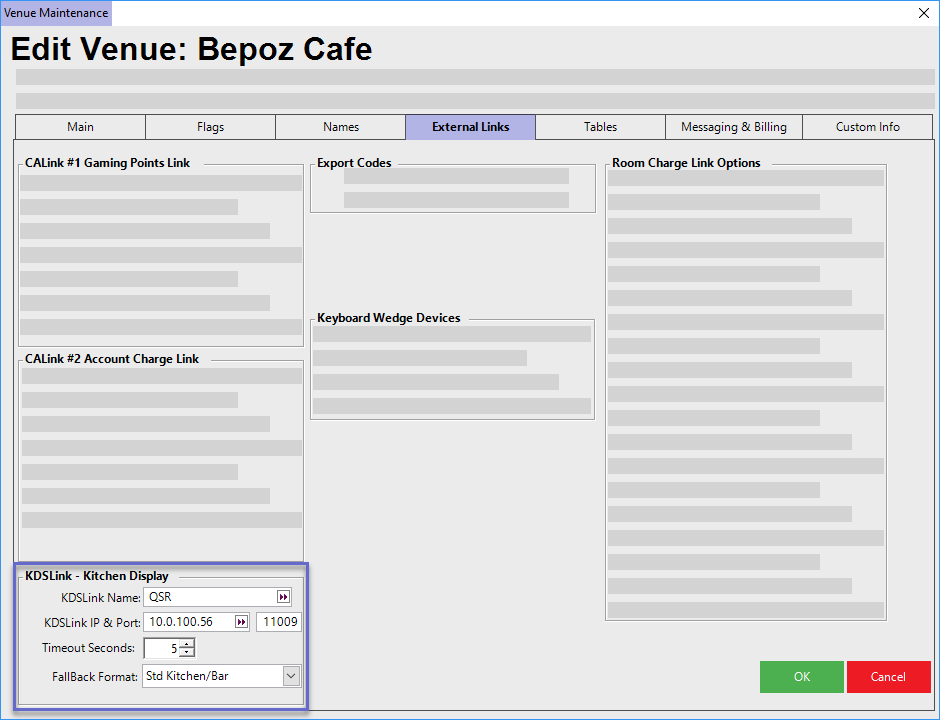
- KDSLink Name - enter the name of the KDS; this should match the Server Type from KDSLink (QSR in this case)
- KDSLink IP & Port - enter the Primary Server IP Address and the Primary Server Port Number from KDSLink into the respective fields
- Timeout Seconds - this should be the same as the Reply Timeout from KDSLink
- FallBack Format - use the drop-down to select one of the System's Printer Formats; when redirected to a Receipt Printer, this is the Print Format that will be used
Workstation Maintenance
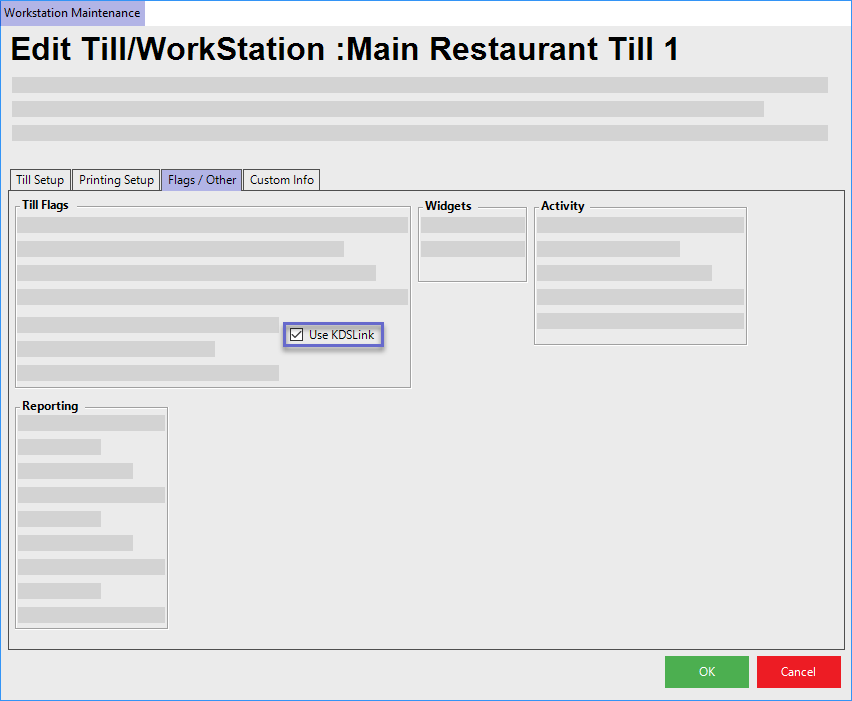
- A flag in Workstation Maintenance on the "Flags/Other" tab called "Use KDSLink" controls whether or not the Till will be able to send orders to a KDS integration
- If enabled and a KDS integration is set up, orders from the Workstation will be sent to the KDS
- Disable this flag if orders from the Till should not go to the KDS
Product Preparation Times
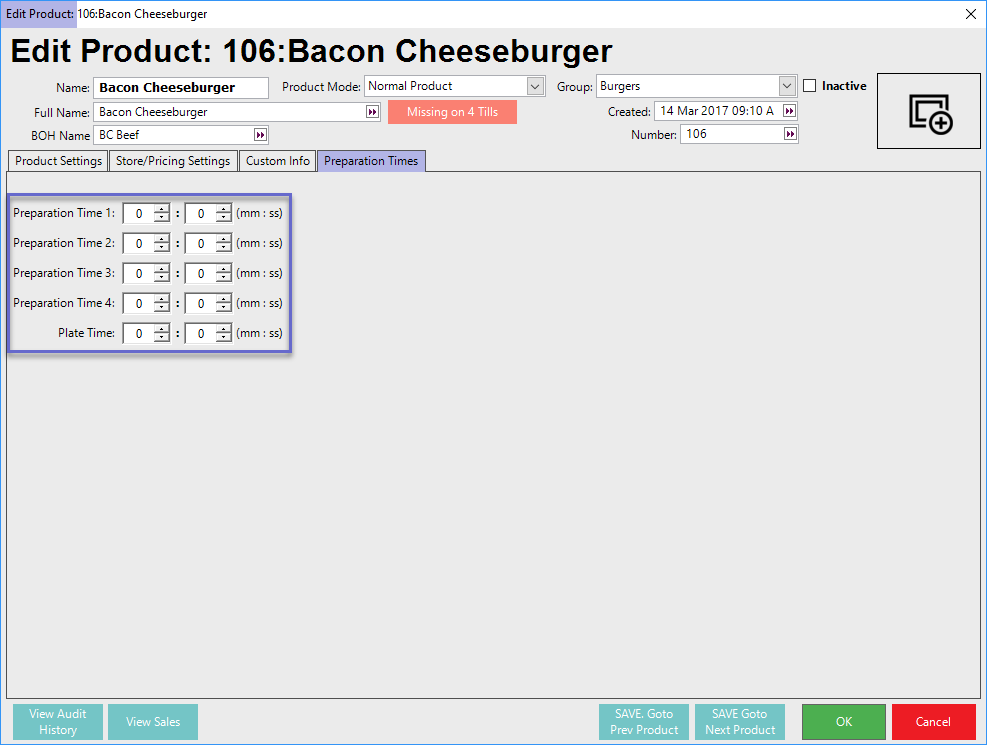
- QSR can support up to four (4) Preparation/Cook Times and one (1) Plate Time & Bepoz supports all of these times
- After KDSLink has been configured, a new tab will appear on the Product Maintenance window called "Preparation Times" where these times can be input for all Products
- These different times can be configured in QSR to change the behavior of when the items appear on the KDS
- If a Time entered is greater than zero (0), the respective time will be sent through KDSLink to QSR
- These times will determine when Products will be Printed/Displayed on the KDS
- Enter the desired Preparation & Plate Time(s) for each Product as needed, including Condiment Products
Till Functions
- Two (2) Till Functions relating to the QSR KDS integration and other integrated KDS can aid in operating more effectively
Rush Item
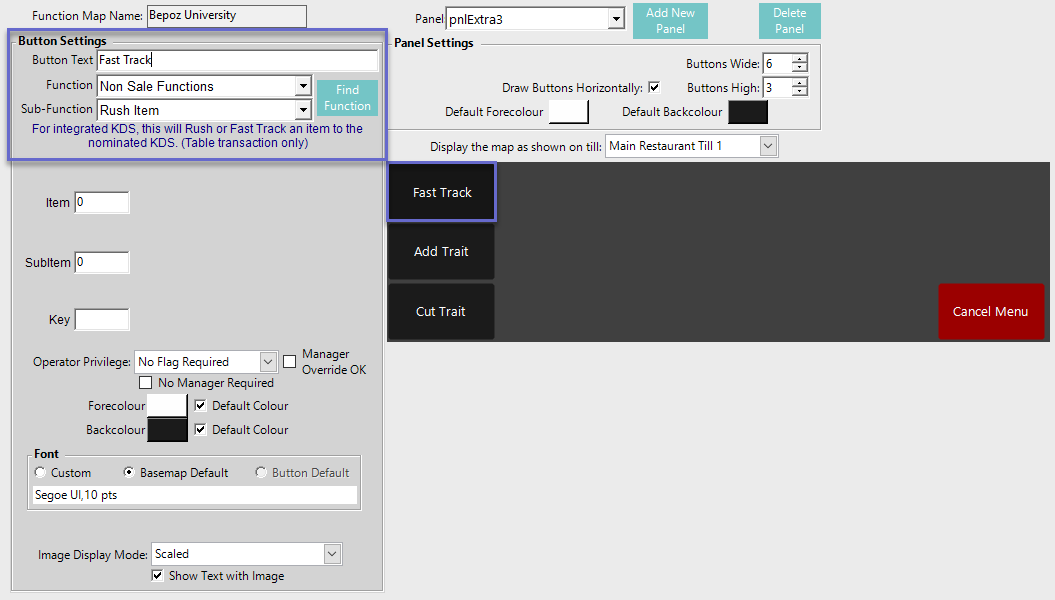
- When used with integrated KDS such as QSR, using this Till Function will Rush/Fast Track a Product to the nominated KDS screen
- This only applies to Table Transactions
- To set up this Till Function:
- Select the desired Till Function Panel, click on the desired Button space and then configure the Button Settings:
- In the Button Text field enter the text that will display on the Till Function Button on SmartPOS Workstation screens
- Set the Function drop-down to 'Non Sale Functions'
- Set the Sub-Function to 'Rush Item'
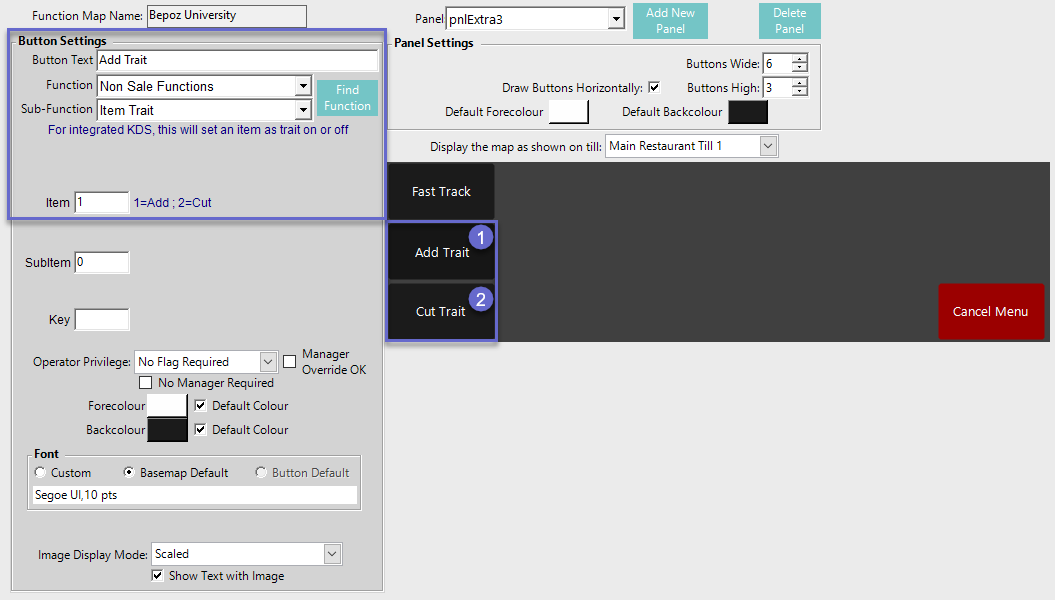
Item Trait
- Depending on the Till Function configuration option as set up in the Item field, this Till Function, when used with an integrated KDS, will set a Product as "trait" on or off
- It's recommended to configure two (2) of these Till Functions - one used to set Traits on and the other to set Traits off
- To set up this Till Function:
- Select the desired Till Function Panel, click on the desired Button space and then configure the Button Settings:
- In the Button Text field enter the text that will display on the Till Function Button on SmartPOS Workstation screens
- Set the Function drop-down to 'Non Sale Functions'
- Set the Sub-Function to 'Item Trait'
- Enter a corresponding number the Item field where:
- "1" will set a trait as on/add
- "2" will set a trait as off/cut
