-
End-User | Products & SmartPOS
-
End-User | Stock Control
-
End-User | Table Service and Kitchen Operations
-
End-User | Pricing, Marketing, Promotions & Accounts
- Prize Promotions
- Points, Points Profiles and Loyalty
- Product Promotions
- Repricing & Discounts in SmartPOS
- Vouchers
- Account Till Functions
- Pricing, Price Numbers and Price Modes
- Raffles & Draws
- Marketing Reports
- Accounts and Account Profiles
- Rewards
- SmartPOS Account Functions
- Troubleshooting
- Product Labels
- Packing Slips
-
End-User | System Setup & Admin
-
End-User | Reporting, Data Analysis & Security
-
End-User | Membership & Scheduled Billing
-
End-User | Operators, Operator Permissions & Clocking
-
Interfaces | Data Send Interfaces
-
Interfaces | EFTPOS & Payments
- NZ EFTPOS Interfaces
- Linkly (Formerly PC-EFTPOS)
- Adyen
- Tyro
- ANZ BladePay
- Stripe
- Windcave (Formerly Payment Express)
- Albert EFTPOS
- Westpac Presto (Formerly Assembly Payments)
- Unicard
- Manager Cards External Payment
- Pocket Voucher
- OneTab
- Clipp
- eConnect-eConduit
- Verifone
- AXEPT
- DPS
- Liven
- Singapore eWallet
- Mercury Payments TRANSENTRY
- Ingenico
- Quest
- Oolio - wPay
-
Interfaces | SMS & Messaging
-
Interfaces | Product, Pricing, Marketing & Promotions
- Metcash Loyalty
- Range Servant
- ILG Pricebook & Promotions
- Oolio Order Manager Integration
- Ubiquiti
- Product Level Blocking
- BidFood Integration
- LMG
- Metcash/IBA E-Commerce Marketplace
- McWilliams
- Thirsty Camel Hump Club
- LMG Loyalty (Zen Global)
- Doshii Integration
- Impact Data
- Marsello
- IBA Data Import
- Materials Control
- Last Yard
- Bepoz Standard Transaction Import
-
Interfaces | Printing & KDS
-
Interfaces | Reservation & Bookings
-
Interfaces | Database, Reporting, ERP & BI
-
Interfaces | CALink, Accounts & Gaming
- EBET Interface
- Clubs Online Interface
- Konami Interface
- WIN Gaming Interface
- Aristocrat Interface
- Bally Interface
- WorldSmart's SmartRetail Loyalty
- Flexinet & Flexinet SP Interfaces
- Aura Interface
- MiClub Interface
- Max Gaming Interface
- Utopia Gaming Interface
- Compass Interface
- IGT & IGT Casino Interface
- MGT Gaming Interface
- System Express
- Aristocrat nConnect Interface
- GCS Interface
- Maxetag Interface
- Dacom 5000E Interface
- InnTouch Interface
- Generic & Misc. CALink
-
Interfaces | Miscellaneous Interfaces/Integrations
-
Interfaces | Property & Room Management
-
Interfaces | Online Ordering & Delivery
-
Interfaces | Purchasing, Accounting & Supplier Comms
-
SmartPOS | Mobile App
-
SmartPDE | SmartPDE 32
-
SmartPDE | Denso PDE
-
SmartPDE | SmartPDE Mobile App
-
MyPlace
-
MyPlace | myPLACE Lite
-
MyPlace | Backpanel User Guides
- Bepoz Price Promotions
- What's on, Events and tickets
- Staff
- System Settings | Operational Settings
- Vouchers & Gift Certificates
- Member Onboarding
- Members and memberships
- System Settings | System Setup
- Reports and Reporting
- Actions
- Offers | Promotions
- Messaging & Notifications
- System Settings | App Config
- Surveys
- Games
- User Feedback
- Stamp Cards
-
MyPlace | Integrations
-
MyPlace | FAQ's & How-2's
-
MyPlace | Release Notes
-
YourOrder
-
YourOrders | Backpanel User Guides
-
YourOrders | YourOrder Kiosk User Guide
-
YourOrders | Merchant App User Guide
-
WebAddons
-
Installation / System Setup Guides
- SmartPOS Mobile App | Setup
- SmartPOS Mobile App | SmartAPI Host Setup
- SmartPOS Mobile App | BackOffice Setup
- SmartPOS Mobile App | Pay@Table setup
- SmartKDS Setup 4.7.2.7 +
- SmartKDS Setup 4.6.x
- SQL Installations
- Server / BackOffice Installation
- New Database Creation
- Multivenue Setup & Config.
- SmartPOS
- SmartPDE
- Player Elite Interface | Rest API
- Interface Setups
- Import
- KDSLink
- Snapshots
- Custom Interface Setups
-
HOW-2
- Product Maintenance
- Sales and Transaction Reporting
- SmartPOS General
- Printing and Printing Profiles
- SQL
- Repricing & Discounts
- Stock Control
- Membership
- Accounts and Account Profiles
- Miscellaneous
- Scheduled Jobs Setups
- Backoffice General
- Purchasing and Receiving
- Database.exe
- EFTPOS
- System Setup
- Custom Support Tools
-
Troubleshooting
-
Hardware
7 | QSR Setup and Configuration
This documentation details how to setup and configure QSR.
This documentation details how to setup and configure QSR.Prerequisites
- A minimum Bepoz version of 4.6 is required for this functionality
- To access KDS features and configuration options in BackOffice, the following Operator Privileges will need to be enabled
-
Operator Maintenance 'General' Tab - System Setup: "Access Venue, Stores & Tills" Flag
- System Setup: "Maintain Venue, Stores & Tills" Flag
- System Setup: "Maintain Till Function Maps" Flag
-
Operator Maintenance 'Maintenance' Tab - Products: "View Products" Flag
- Products: "Edit Products" Flag
Setup Instructions
On the Server
- Install the following
- Builder Installer
- Control Point Installer - Both Client and Server
- Kitchen Server Setup
- Report Installer
- Server Full Installer
On the Screen
- Install the following
- Server Full Installer
- Control Point Installer - Both Client and Server
After Installation
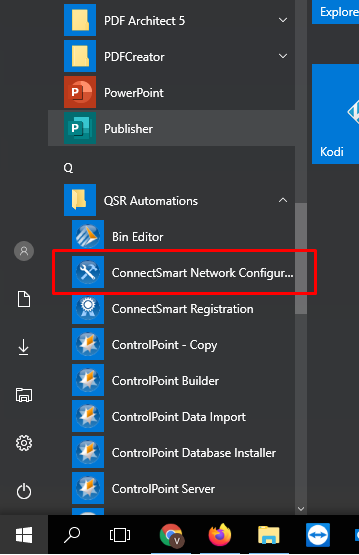
- Click run and go to QSR Automation and run Network config on the server
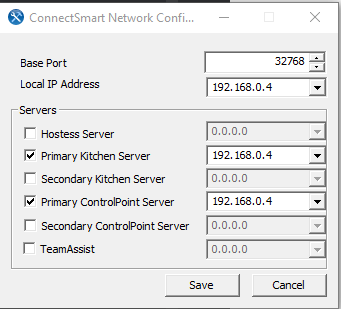
- Then set the below; the server will have the same IP all the way through:
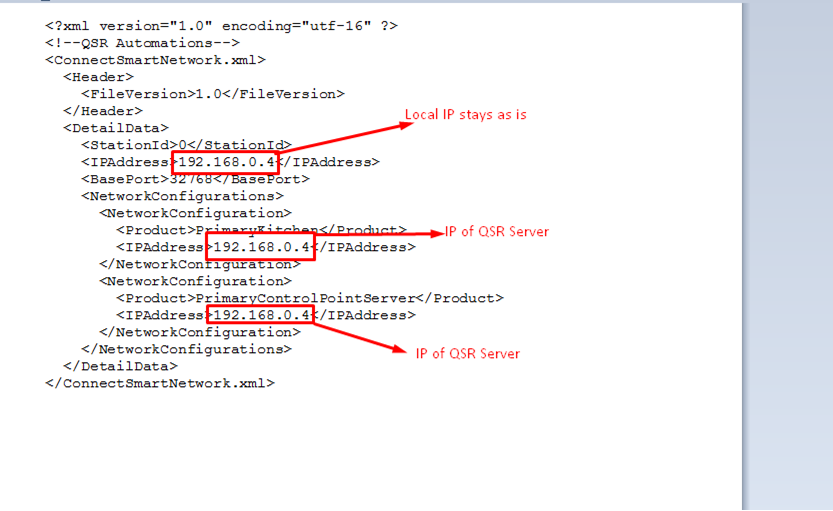
- On the tills, you will have to set the same IP but change the Primary Kitchen Server and Primary ControlPoint Server manually in the XML as below:

- ID = the same ID as in the Kitchen Builder Pro you configured
- This needs to match the same screen you need this to be as
- Save this and then copy this file to the following locations as well:
- c:\programdata\QSR Automations\ ConnectSmart\
- Kitchen \ Data - Paste it in there
- Display Client \ Data - Paste it in there
- Once you have done this part the system will connect and display as you have configured it from Kitchen Builder Pro
Control Point Setup
- Go To:
- C:\Program Files (x86)\QSR Automations\ControlPoint\ControlPointServer\DeviceAgent\Win32
- Copy this folder to
- c:\QSRAuto
- Rename to DeviceAgent
- Create a copy of QSRDeviceAgent.exe in the same folder
- Then send the copy to the desktop

- Then, from the desktop right click and add the following to Target:
- /p
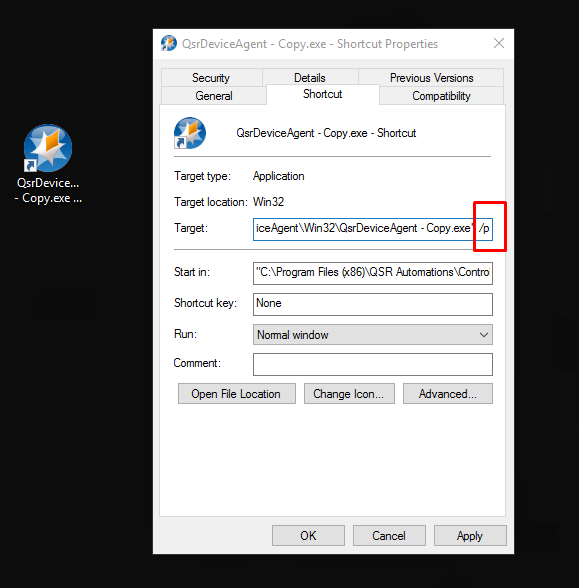
- This will allow the program to run as we don't use QSR hardware
- Do not run still
- Then copy the original edited XML file into this same location
- c:\QSRAuto\DeviceAgent
- This will then allow the software to communicate with the Control Point back at the server
- Copy this to the QSRAuto\DeviceAgent folder
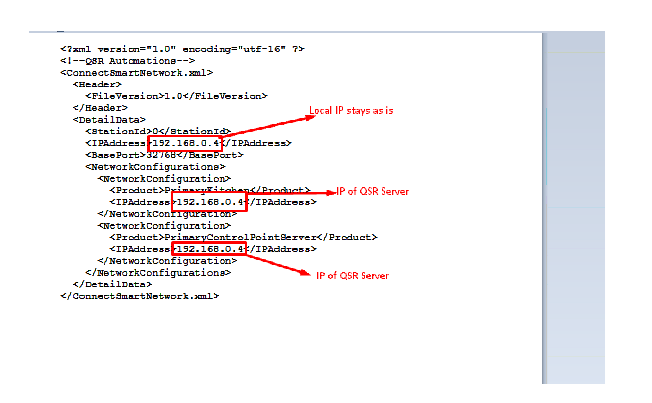
- Run the Device Agent
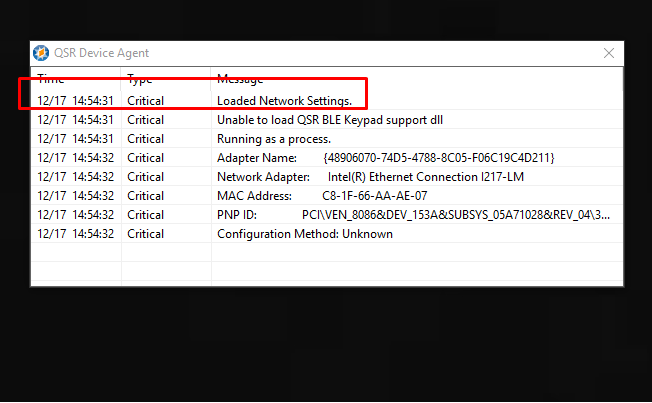
- To know you have done the above correctly the program should run and show all the details below
- Loaded Network Settings should display
Control Point on QSR Server
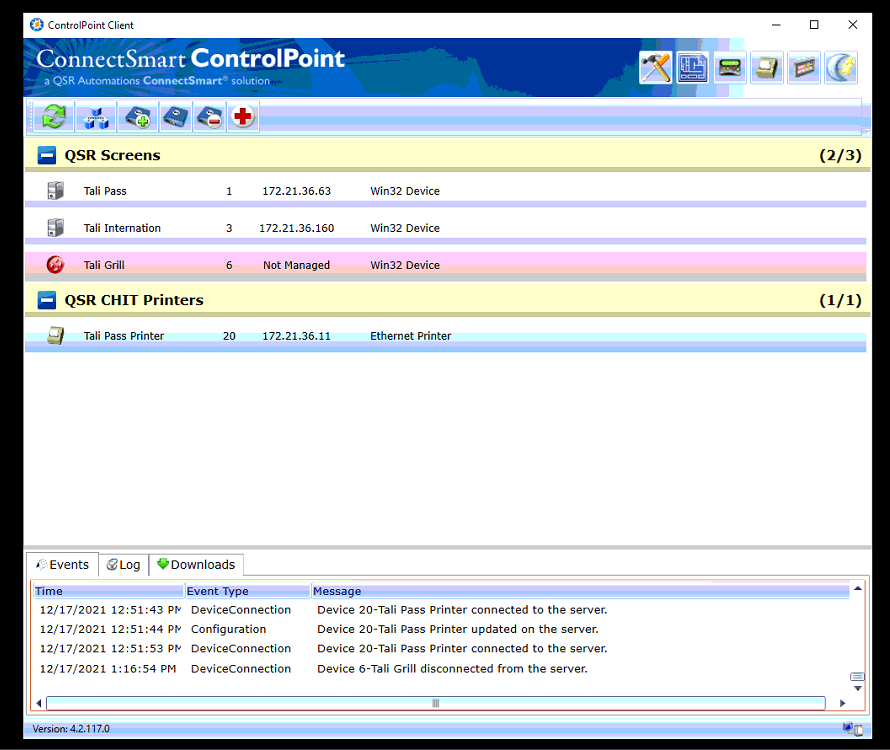
- Once you create all the devices you will see below:
