
-
End-User | Products & SmartPOS
-
End-User | Stock Control
-
End-User | Table Service and Kitchen Operations
-
End-User | Pricing, Marketing, Promotions & Accounts
- Prize Promotions
- Points, Points Profiles and Loyalty
- Product Promotions
- Repricing & Discounts in SmartPOS
- Vouchers
- Account Till Functions
- Pricing, Price Numbers and Price Modes
- Raffles & Draws
- Marketing Reports
- Accounts and Account Profiles
- Rewards
- SmartPOS Account Functions
- Troubleshooting
- Product Labels
- Packing Slips
-
End-User | System Setup & Admin
-
End-User | Reporting, Data Analysis & Security
-
End-User | Membership & Scheduled Billing
-
End-User | Operators, Operator Permissions & Clocking
-
Interfaces | Data Send Interfaces
-
Interfaces | EFTPOS & Payments
- NZ EFTPOS Interfaces
- Linkly (Formerly PC-EFTPOS)
- Adyen
- Tyro
- ANZ BladePay
- Stripe
- Windcave (Formerly Payment Express)
- Albert EFTPOS
- Westpac Presto (Formerly Assembly Payments)
- Unicard
- Manager Cards External Payment
- Pocket Voucher
- OneTab
- Clipp
- eConnect-eConduit
- Verifone
- AXEPT
- DPS
- Liven
- Singapore eWallet
- Mercury Payments TRANSENTRY
- Ingenico
- Quest
- Oolio - wPay
-
Interfaces | SMS & Messaging
-
Interfaces | Product, Pricing, Marketing & Promotions
- Metcash Loyalty
- Range Servant
- ILG Pricebook & Promotions
- Oolio Order Manager Integration
- Ubiquiti
- Product Level Blocking
- BidFood Integration
- LMG
- Metcash/IBA E-Commerce Marketplace
- McWilliams
- Thirsty Camel Hump Club
- LMG Loyalty (Zen Global)
- Doshii Integration
- Impact Data
- Marsello
- IBA Data Import
- Materials Control
- Last Yard
- Bepoz Standard Transaction Import
-
Interfaces | Printing & KDS
-
Interfaces | Reservation & Bookings
-
Interfaces | Database, Reporting, ERP & BI
-
Interfaces | CALink, Accounts & Gaming
- EBET Interface
- Clubs Online Interface
- Konami Interface
- WIN Gaming Interface
- Aristocrat Interface
- Bally Interface
- WorldSmart's SmartRetail Loyalty
- Flexinet & Flexinet SP Interfaces
- Aura Interface
- MiClub Interface
- Max Gaming Interface
- Utopia Gaming Interface
- Compass Interface
- IGT & IGT Casino Interface
- MGT Gaming Interface
- System Express
- Aristocrat nConnect Interface
- GCS Interface
- Maxetag Interface
- Dacom 5000E Interface
- InnTouch Interface
- Generic & Misc. CALink
-
Interfaces | Miscellaneous Interfaces/Integrations
-
Interfaces | Property & Room Management
-
Interfaces | Online Ordering & Delivery
-
Interfaces | Purchasing, Accounting & Supplier Comms
-
SmartPOS | Mobile App
-
SmartPDE | SmartPDE 32
-
SmartPDE | Denso PDE
-
SmartPDE | SmartPDE Mobile App
-
MyPlace
-
MyPlace | myPLACE Lite
-
MyPlace | Backpanel User Guides
- Bepoz Price Promotions
- What's on, Events and tickets
- Staff
- System Settings | Operational Settings
- Vouchers & Gift Certificates
- Member Onboarding
- Members and memberships
- System Settings | System Setup
- Reports and Reporting
- Actions
- Offers | Promotions
- Messaging & Notifications
- System Settings | App Config
- Surveys
- Games
- User Feedback
- Stamp Cards
-
MyPlace | Integrations
-
MyPlace | FAQ's & How-2's
-
MyPlace | Release Notes
-
YourOrder
-
YourOrders | Backpanel User Guides
-
YourOrders | YourOrder Kiosk User Guide
-
YourOrders | Merchant App User Guide
-
WebAddons
-
Installation / System Setup Guides
- SmartPOS Mobile App | Setup
- SmartPOS Mobile App | SmartAPI Host Setup
- SmartPOS Mobile App | BackOffice Setup
- SmartPOS Mobile App | Pay@Table setup
- SmartKDS Setup 4.7.2.7 +
- SmartKDS Setup 4.6.x
- SQL Installations
- Server / BackOffice Installation
- New Database Creation
- Multivenue Setup & Config.
- SmartPOS
- SmartPDE
- Player Elite Interface | Rest API
- Interface Setups
- Import
- KDSLink
- Snapshots
- Custom Interface Setups
-
HOW-2
- Product Maintenance
- Sales and Transaction Reporting
- SmartPOS General
- Printing and Printing Profiles
- SQL
- Repricing & Discounts
- Stock Control
- Membership
- Accounts and Account Profiles
- Miscellaneous
- Scheduled Jobs Setups
- Backoffice General
- Purchasing and Receiving
- Database.exe
- EFTPOS
- System Setup
- Custom Support Tools
-
Troubleshooting
-
Hardware
1 | QuickBooks Interface Setup
This article explains the interface between QuickBooks and Bepoz. Bepoz supports exporting Stock Purchases data, Sales Summary Data and Accounts receivable data to QuickBooks Accounting Package. This is an authorisation option that must be enabled first. The interface utilizes the external program Transaction Pro.
This article explains the interface between QuickBooks and Bepoz. Bepoz supports exporting Stock Purchases data, Sales Summary Data and Accounts receivable data to QuickBooks Accounting Package. This is an authorisation option that must be enabled first. The interface utilizes the external program Transaction Pro. This is a 3rd party program that must be purchased and authorized for use on the computer.
Because Bepoz sends data to QuickBooks via Transaction Pro, QuickBooks must be running on the same computer as Bepoz and the Company must be open in QuickBooks. The first time connecting to QuickBooks, you will be asked to authorize the Bepoz application to connect to the QuickBooks company.
Currently, the interface will automatically trigger Transaction Pro to import the data and this is done “in the foreground”, meaning the screens will display as it processes the data. Also, prior to each “Import Event”, Bepoz will prompt you to confirm to continue. This is to ensure that QuickBooks and Transaction Pro are “ready” for the data to be sent. This may change in the future.
Prerequisites
N/A
Step-by-step guide
To setup the QuickBooks interface in Bepoz, you must firstly add a Device to the workstation that will be performing the data transfer. QuickBooks should be loaded on that computer.
Here is a screen shot of the device:
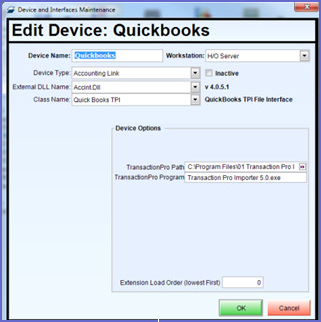
All that is needed is the Transaction Pro path and program name set.
- Once this is setup, you must close BackOffice and restart it to get the QuickBooks Link menu option
Once you restart BackOffice, you will get a QuickBooks Link menu on the left side of the screen. Within this menu you have two main option.
Setup Interface: This is where you setup options within the interface such as what type of data is to be sent to QuickBooks and how it is broken up.
Export to QuickBooks: This is where you actually initiate the transfer of data.
Setup Interface
Here is a screen print of the QuickBooks setup. Your screen may vary depending on options selected.
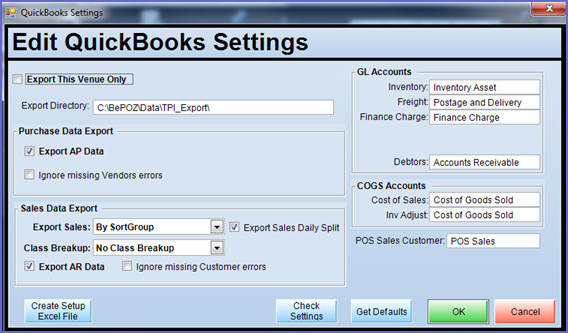
On the left, you can select what to export and how, and on the right are some configurable Accounts that must exist in QuickBooks.
Exporting Purchases
This allows for the Header information (only) from a Purchase Order/Receipt to be exported to the Accounting Package. These are sent in as Bills and Vendor Credit Memos.
BEpoz Purchase Receipt Header Fields
Invoice Total: This is the Total payable to the Supplier.
Freight: This the Freight Amount component of the Invoice Total
Finance Charge: This is the optionally Finance charge added by the Supplier
Note: The minimum that must be entered is the Invoice Total.
The actual products, their costs and quantities are ignored for the purpose of exporting. This allows slight rounding variations not to affect your true Account Payable amounts.
This is also useful if you have items on an Invoice from a supplier that you must obviously pay for, but do not need to enter them into the BEpoz Purchase Order. This includes packaging etc.
Exporting Sales
This allows for Sales Summary data to be exported to the Accounting Package. This is sent in as a Sales Receipt (or a Credit Memo for negatives). All details on these Sales Receipts are sent in as Items. This allows the flexibility of sales data totals flowing in via an Item that can then be set to any Account within QuickBooks you setup.
The data sent is very similar to the Till Balance/Summary information as reported within BEpoz. Basically, Nett Sales (either as a total or broken up by SortGroup or Typegroup), Tax, Cash Payouts, Payins and all other balance information.
There are a few options when exporting Sales Data. Firstly, you can export the Venue Sales as a whole, or break-up the sales data by store. Additionally, you can also breakup the sales total by Product SortGroups or by Product TypeGroups.
Exporting Accounts Receivables
This allows for Account charge sales and payments to be exported to the Accounting Package.
This allows for the Accounting Package to maintain the Accounts Receivables for the BEpoz accounts.
Data Validation
To ensure that the data that is exported is valid for the Accounting Package, BEpoz will validate things like the GL Account Codes, Items, Supplier Codes and Customer Codes prior to Exporting.
To check that all required is in the QuickBooks company, click the Check Settings Button on the Setup screen. This will get all the relevant lists from QuickBooks immediately and then check if all the required Items, Accounts, Payment Methods, Classes, Vendors and Customers are there.
This test will be done prior to every export to QuickBooks. The slight difference is that from the setup screen it will check for ALL Vendors and ALL Charge Type Customers. When checking prior to an Export to QuickBooks, it will only check for the Vendors and Customers included in the Export data.
Data Synchronization
To assist you in setting up all the required Items, Accounts, Vendors and Customers in QuickBooks, BEpoz can create an Excel Spreadsheet that can be imported in QuickBooks to create these for you.
On the Setup Interface screen, click the Create Setup Files.
This will create an Excel Spreadsheet with the all the required Accounts, Vendors and Customers and with as many of the Items that can be imported into Quickbooks. Quickbooks does not allow importing Items that are of Types: Payment or Subtotal – these will have to be created manually in Quickbooks. Also Payment Types and Classes must also be created manually.
To test your progress of setting up your QuickBooks Company, you can click the Check Settings to continually test whether all setups are complete.
Transfer Data to QuickBooks.
When you are ready to send data to QuickBooks select the Export to QuickBooks menu option. You will be presented with a screen similar to below. Your screen may vary depending on your settings selected in the settings screen.
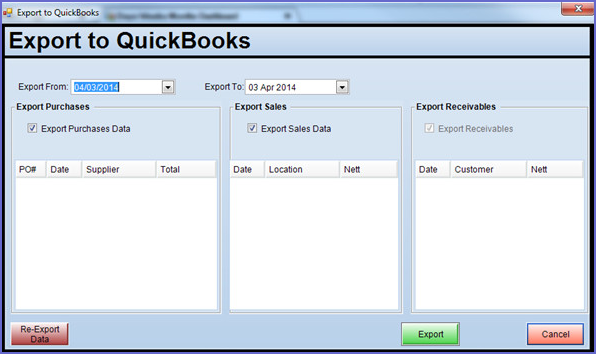
The Re-Export Data button is only available when an operator with System Setup privileges is logged in. This is useful for testing and demonstrations, but should not be used in a live site without the proper precautions.
At the top of the screen the LAST EXPORT DATE will be prompted in the From date box. You can select a different date if you wish.
When any data is sent to QuickBooks, it is flagged as sent. IT WILL NOT BE RE-SENT unless the Re-Export Data is selected.
When you click the EXPORT button, the unsent data will be packaged up and sent to QuickBooks via the Transaction Pro software.