- INTERNAL - Bepoz Help Guides
- End-User | Stock Control
- Internal Stock Movements
-
End-User | Products & SmartPOS
-
End-User | Stock Control
-
End-User | Table Service and Kitchen Operations
-
End-User | Pricing, Marketing, Promotions & Accounts
- Prize Promotions
- Points, Points Profiles and Loyalty
- Product Promotions
- Repricing & Discounts in SmartPOS
- Vouchers
- Account Till Functions
- Pricing, Price Numbers and Price Modes
- Raffles & Draws
- Marketing Reports
- Accounts and Account Profiles
- Rewards
- SmartPOS Account Functions
- Troubleshooting
- Product Labels
- Packing Slips
-
End-User | System Setup & Admin
-
End-User | Reporting, Data Analysis & Security
-
End-User | Membership & Scheduled Billing
-
End-User | Operators, Operator Permissions & Clocking
-
Interfaces | Data Send Interfaces
-
Interfaces | EFTPOS & Payments
- NZ EFTPOS Interfaces
- Linkly (Formerly PC-EFTPOS)
- Adyen
- Tyro
- ANZ BladePay
- Stripe
- Windcave (Formerly Payment Express)
- Albert EFTPOS
- Westpac Presto (Formerly Assembly Payments)
- Unicard
- Manager Cards External Payment
- Pocket Voucher
- OneTab
- Clipp
- eConnect-eConduit
- Verifone
- AXEPT
- DPS
- Liven
- Singapore eWallet
- Mercury Payments TRANSENTRY
- Ingenico
- Quest
- Oolio - wPay
-
Interfaces | SMS & Messaging
-
Interfaces | Product, Pricing, Marketing & Promotions
- Metcash Loyalty
- Range Servant
- ILG Pricebook & Promotions
- Oolio Order Manager Integration
- Ubiquiti
- Product Level Blocking
- BidFood Integration
- LMG
- Metcash/IBA E-Commerce Marketplace
- McWilliams
- Thirsty Camel Hump Club
- LMG Loyalty (Zen Global)
- Doshii Integration
- Impact Data
- Marsello
- IBA Data Import
- Materials Control
- Last Yard
- Bepoz Standard Transaction Import
-
Interfaces | Printing & KDS
-
Interfaces | Reservation & Bookings
-
Interfaces | Database, Reporting, ERP & BI
-
Interfaces | CALink, Accounts & Gaming
- EBET Interface
- Clubs Online Interface
- Konami Interface
- WIN Gaming Interface
- Aristocrat Interface
- Bally Interface
- WorldSmart's SmartRetail Loyalty
- Flexinet & Flexinet SP Interfaces
- Aura Interface
- MiClub Interface
- Max Gaming Interface
- Utopia Gaming Interface
- Compass Interface
- IGT & IGT Casino Interface
- MGT Gaming Interface
- System Express
- Aristocrat nConnect Interface
- GCS Interface
- Maxetag Interface
- Dacom 5000E Interface
- InnTouch Interface
- Generic & Misc. CALink
-
Interfaces | Miscellaneous Interfaces/Integrations
-
Interfaces | Property & Room Management
-
Interfaces | Online Ordering & Delivery
-
Interfaces | Purchasing, Accounting & Supplier Comms
-
SmartPOS | Mobile App
-
SmartPDE | SmartPDE 32
-
SmartPDE | Denso PDE
-
SmartPDE | SmartPDE Mobile App
-
MyPlace
-
MyPlace | myPLACE Lite
-
MyPlace | Backpanel User Guides
- Bepoz Price Promotions
- What's on, Events and tickets
- Staff
- System Settings | Operational Settings
- Vouchers & Gift Certificates
- Member Onboarding
- Members and memberships
- System Settings | System Setup
- Reports and Reporting
- Actions
- Offers | Promotions
- Messaging & Notifications
- System Settings | App Config
- Surveys
- Games
- User Feedback
- Stamp Cards
-
MyPlace | Integrations
-
MyPlace | FAQ's & How-2's
-
MyPlace | Release Notes
-
YourOrder
-
YourOrders | Backpanel User Guides
-
YourOrders | YourOrder Kiosk User Guide
-
YourOrders | Merchant App User Guide
-
WebAddons
-
Installation / System Setup Guides
- SmartPOS Mobile App | Setup
- SmartPOS Mobile App | SmartAPI Host Setup
- SmartPOS Mobile App | BackOffice Setup
- SmartPOS Mobile App | Pay@Table setup
- SmartKDS Setup 4.7.2.7 +
- SmartKDS Setup 4.6.x
- SQL Installations
- Server / BackOffice Installation
- New Database Creation
- Multivenue Setup & Config.
- SmartPOS
- SmartPDE
- Player Elite Interface | Rest API
- Interface Setups
- Import
- KDSLink
- Snapshots
- Custom Interface Setups
-
HOW-2
- Product Maintenance
- Sales and Transaction Reporting
- SmartPOS General
- Printing and Printing Profiles
- SQL
- Repricing & Discounts
- Stock Control
- Membership
- Accounts and Account Profiles
- Miscellaneous
- Scheduled Jobs Setups
- Backoffice General
- Purchasing and Receiving
- Database.exe
- EFTPOS
- System Setup
- Custom Support Tools
-
Troubleshooting
-
Hardware
10 | Requisitions
This article covers how to set up, create and process Requisitions in BackOffice. Requisitions offer the capability of creating a Purchase Order for a Store and also the ability to auto-send Purchase Orders. Requisitions are used for re-ordering ingredients for Manufactured Products. Requisitions will always use the Preferred Supplier, although if the Preferred Supplier is not selected the first Supplier will be used.
This article covers how to set up, create and process Requisitions in BackOffice.
Requisitions offer the capability of creating a Purchase Order for a Store and also the ability to auto-send Purchase Orders.
Requisitions are used for re-ordering ingredients for Manufactured Products.
Requisitions will always use the Preferred Supplier, although if the Preferred Supplier is not selected the first Supplier will be used.
Prerequisites
- To access Requisitions Settings, the applicable Operator Privileges will need to be enabled:
- Operator Maintenance 'Stock Control' Tab
- All "Requisitions" Flags
Setting up Requisitions
- Bepoz can only be set up to use either the Requisitions or Replenish Stores Feature
- To access Requisition features, the "Use Requisitions" flag will need to be enabled within the Global Settings "Flags" Tab
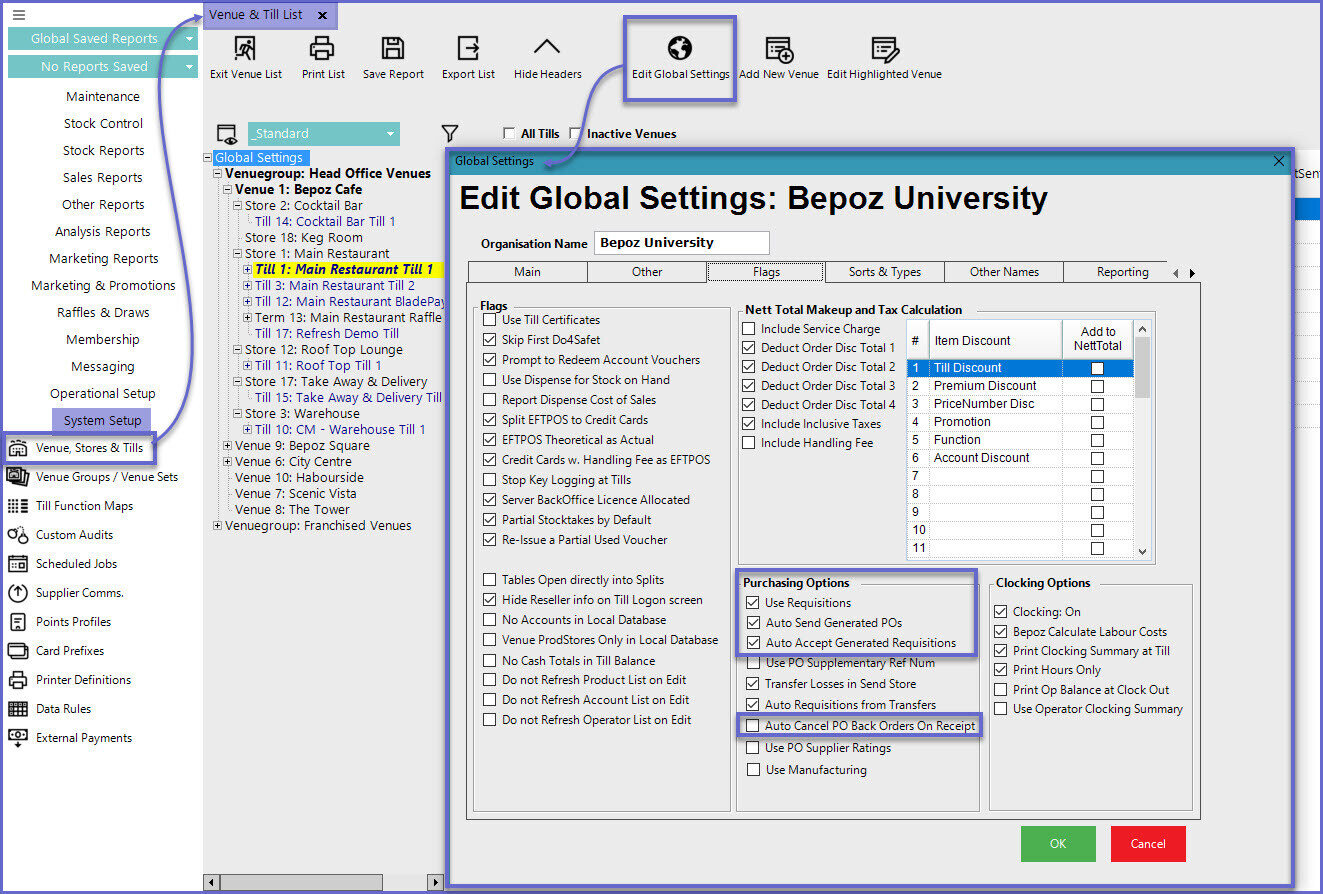
- In addition, there are a number of flags that relate to Requisitions which are detailed in the table below:
Flag |
Description/Functionality |
|
Use Requisitions
|
|
| Auto send Generated PO's |
|
| Auto Accept Generated Requisitions |
|
| Transfer Losses in Send Store |
|
| Auto Requisitions from Transfers |
|
-
Remember, after setting these flags, the Bepoz System will need to be restarted for them to take effect
Assigning Requisition Store Types
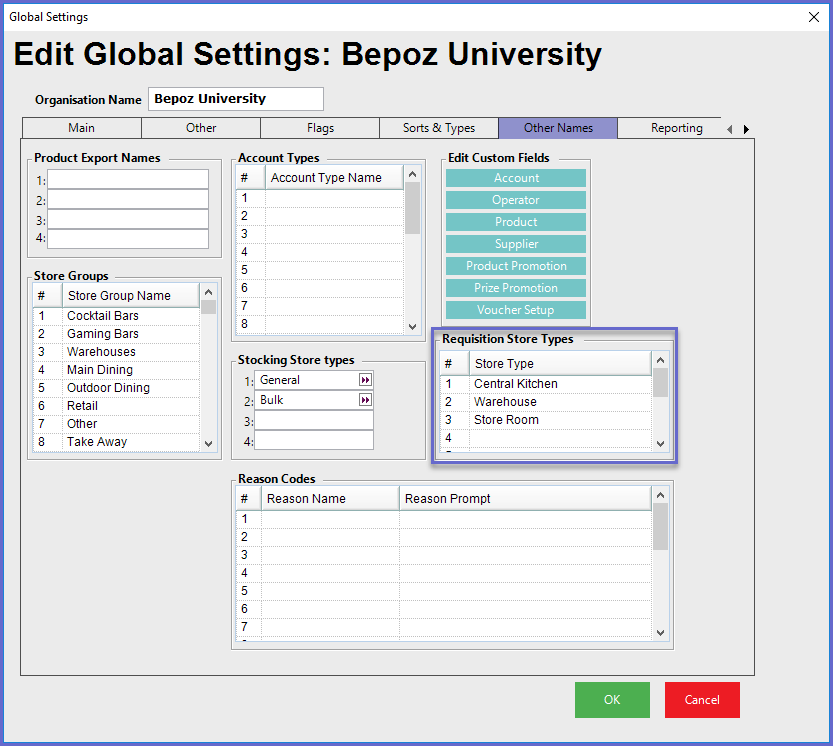
- When Requisitioning Stock from Multiple Stocking locations, individual Products can be set to be sourced from different locations
- These source locations can be set within Global Settings "Other Names" Tab
- Up to 8 Requisition Store Types can be setup
- If using Manufactured Products then assign two (2) names to the Requisition Store Types
- If only using normal Stocked Products then only one (1) Requisition Store Type is required
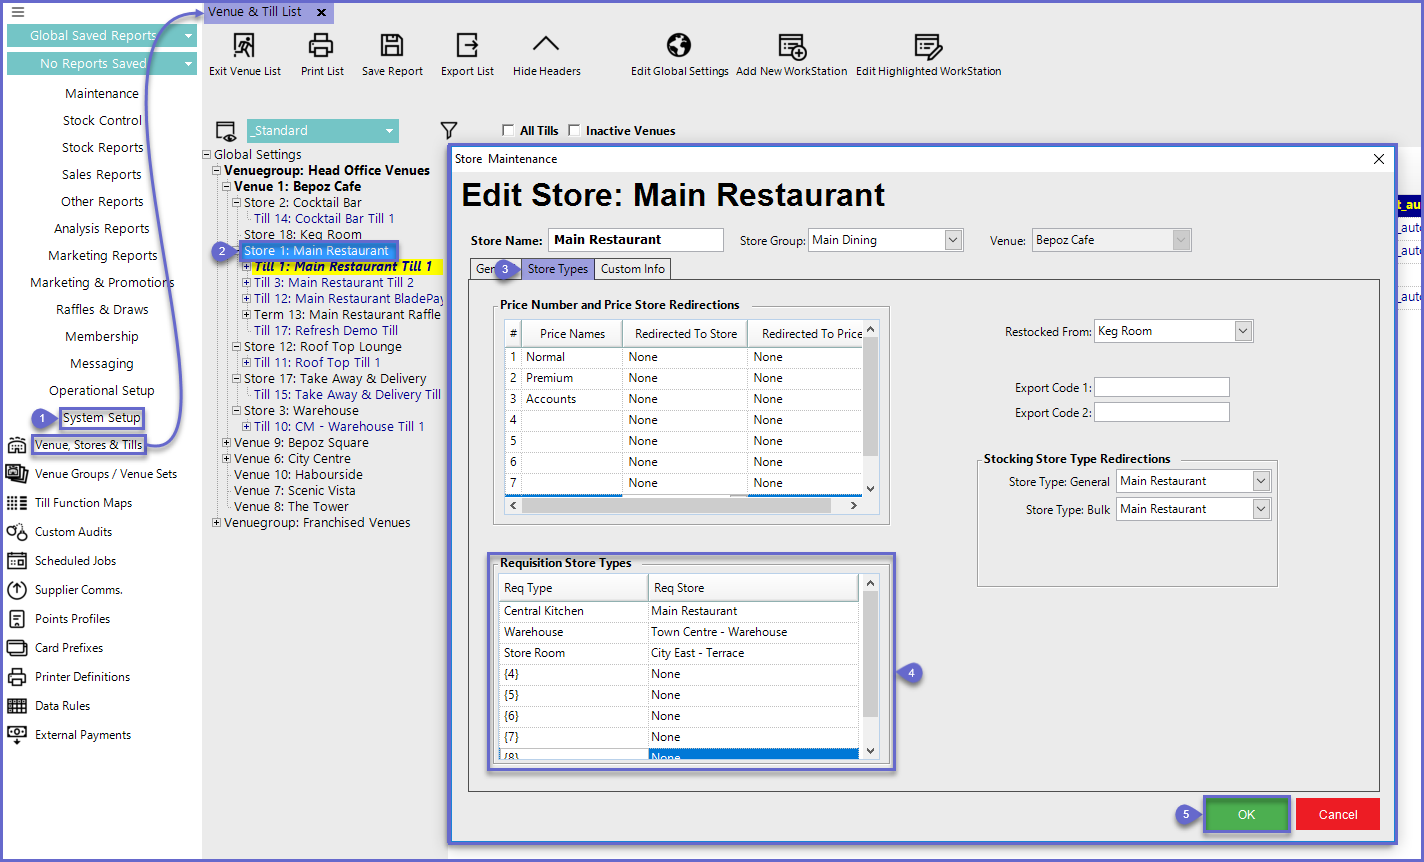
Allocating Store Types: Store Maintenance
- To assign the Requisition Store Types, follow the steps below after logging in to BackOffice:
- From the System Setup menu, select Venue, Stores & Tills
- Double-click the desired Store where Products will be restocked from
- In the Store Maintenance window, select the Store Types Tab
- Assign the Store/s that are required for the Requisition Store Types
- Select OK once completed
- Steps 2-5 will need to be repeated for the Manufacturing Store and the Selling Store
- The Manufacturing Store is where the Manufactured Products are made and will need to be Transferred out from
- If the Venue does not have Manufactured Products – the Manufacturing Store does not need to be setup
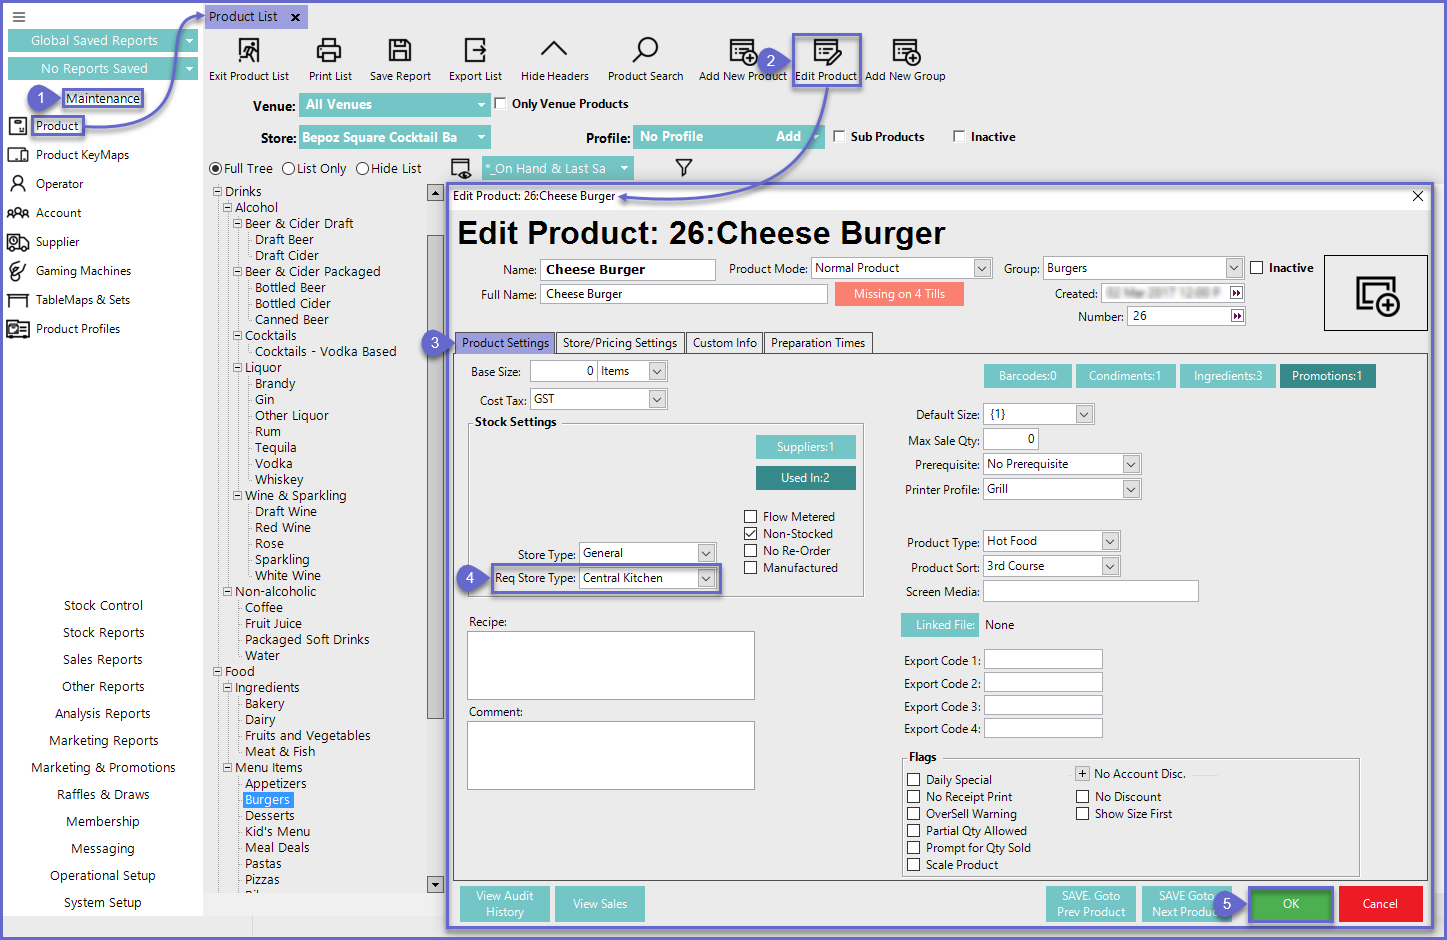
- To assign the Requisition Store Types to Products, follow the steps below after logging in to BackOffice:
- From the Maintenance menu, select Product
- Double-click (or use the Edit Product Function) the desired Product will be allocated with a Store Type
- Both Manufactured and Non-Manufactured Products can be selected
- In the Edit Product window, select the Product Settings Tab
- Using the Req Store Type drop-menu to select the desired Store Type
- Select OK once completed
- To begin a new Requisition, first select the Stock Control menu in BackOffice and then Requisitions which will open a new window

- To add a requisition, select the New Requisition button
- A prompt window will appear
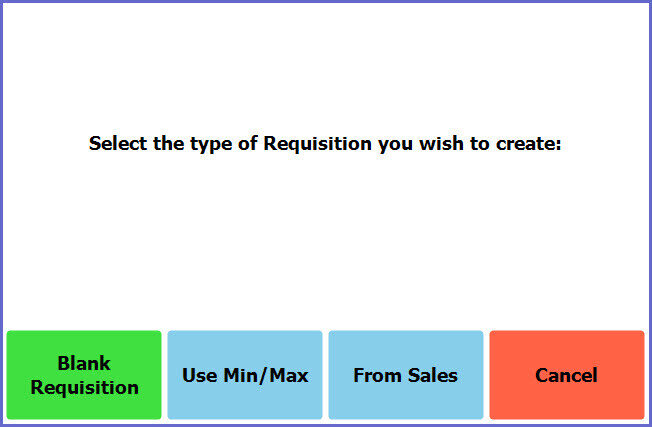
- Blank Requisition
- Will create a blank Requisition where Products will need to be manually added
- Use Min/Max
- Will create a Requisition on the Min/Max setting on the Products that have Min/Max assigned
- From Sales
- Will create a Requisition from Sales data
- To create a blank Requisition, select the Blank Requisition button
- This will open up a New Requisition Tab

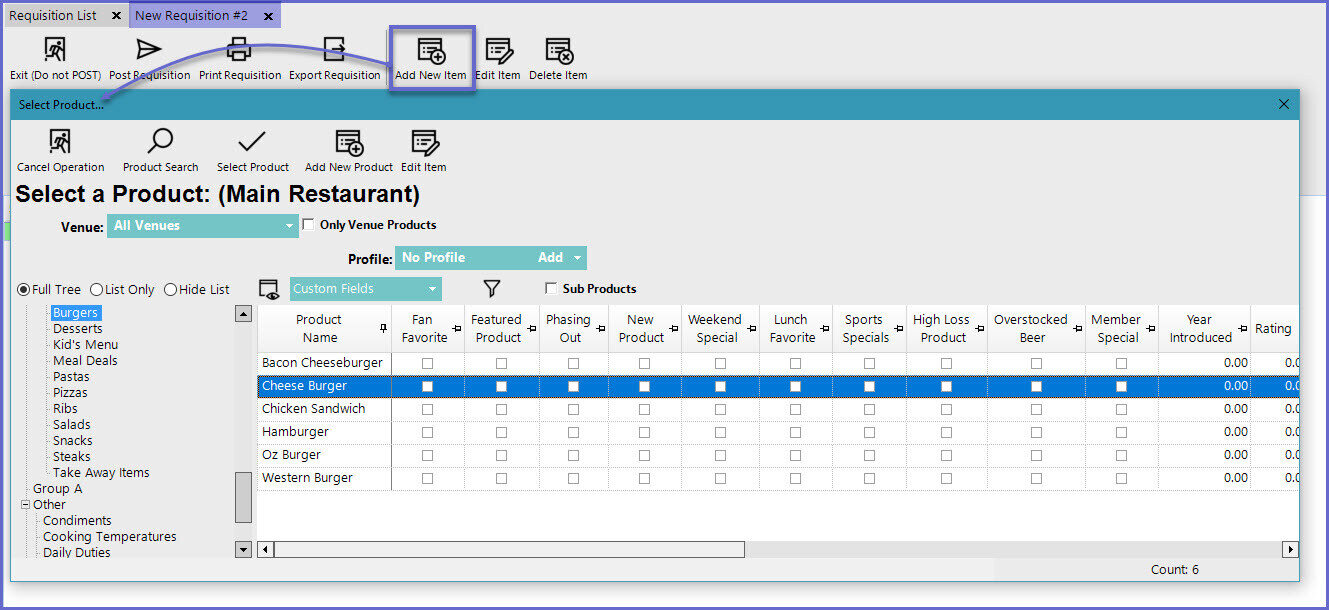
- Select the Add Item button
- A window prompt will appear with the Product List displaying
- Select a Product that has already been setup for Requisition use
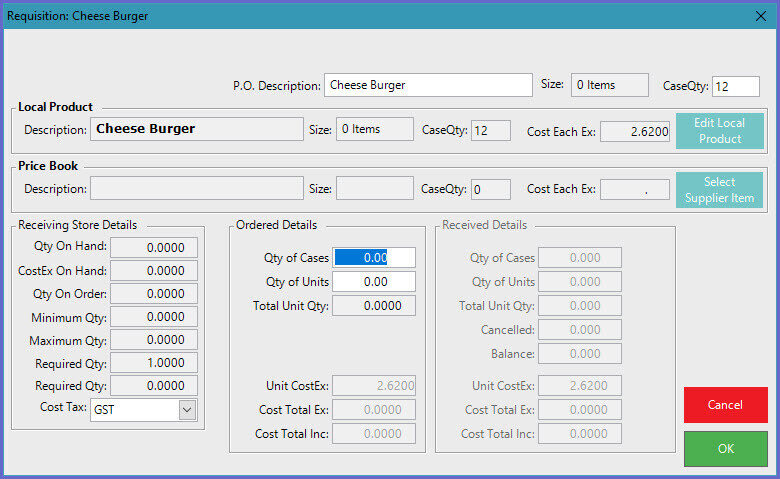
- Another window will prompt to enter the Required order amount
- Enter the Quantity Required
- Follow the previous steps to enter additional Products
- Select the Post Requisition button to finalise
- The Requisition will now be in a Posted status
- Do not Post a Requisition unless certain that the Requisition is completed as once posted the Requisition cannot be amended
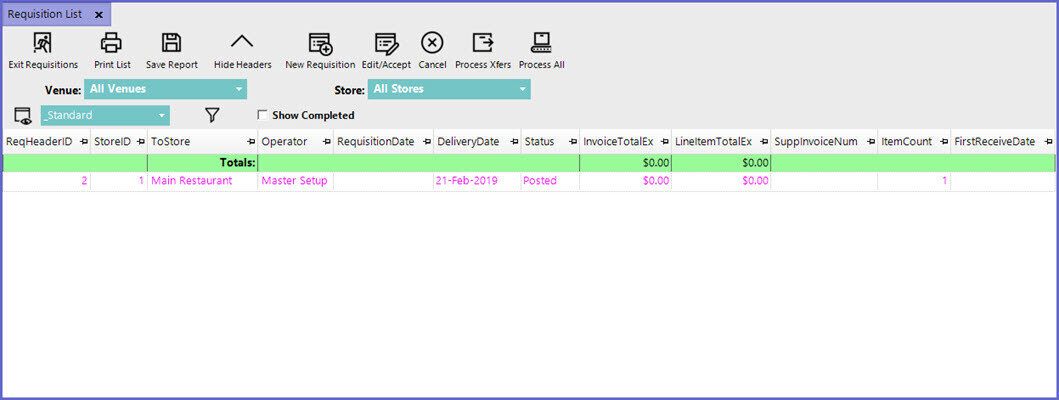
- When a Requisition is in a Posted status, the line item for the Requisition will be displayed in a magenta colour
- Select the Posted Requisition
- Select the Edit/Accept button which will open a new Edit/Accept Requisition Tab

- View the details for each Product by double-clicking on the desired line item
- To process the Requisition select the Accept button
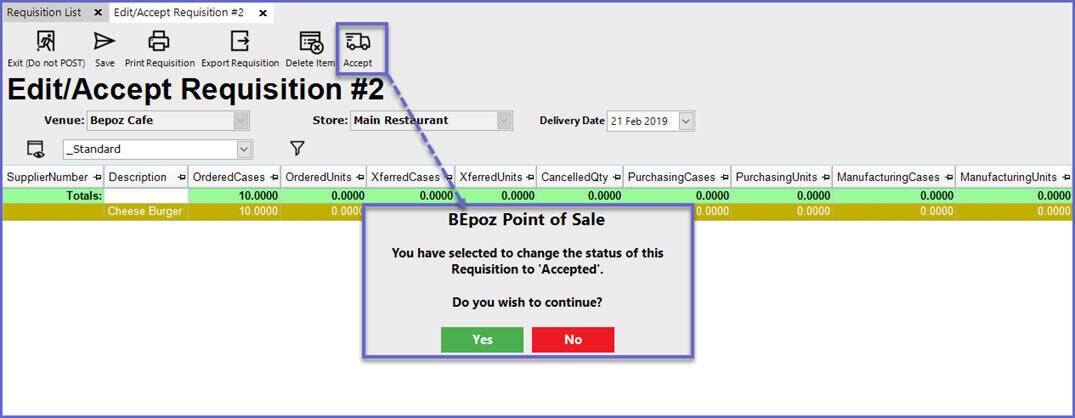
- Select Yes to continue
- The Requisition List screen will now display the Accepted Requisition in green

- Select the Process All button to Process the Requisition/s
- Select OK to proceed with Processing the Requisition which will now be successfully Posted

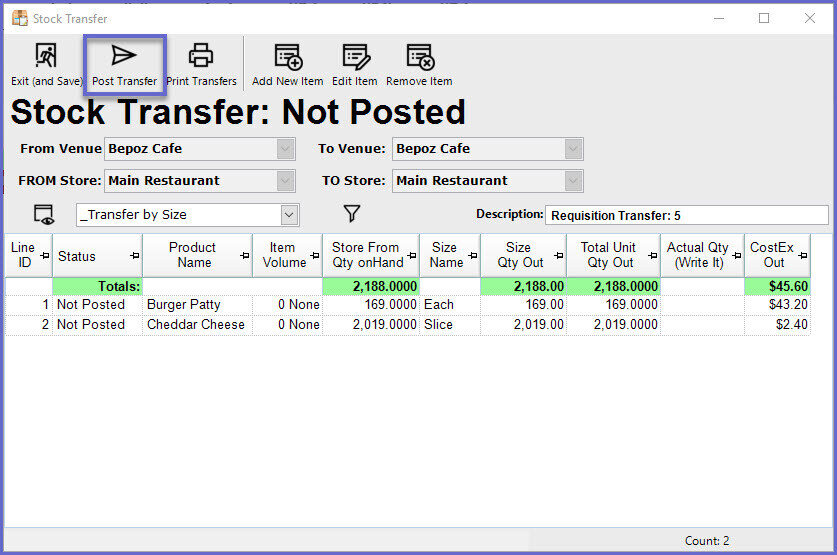
- Once Processed, the Requisition has now turned into a Transfer
- Select Stock Transfer to view the Requisition Transfer
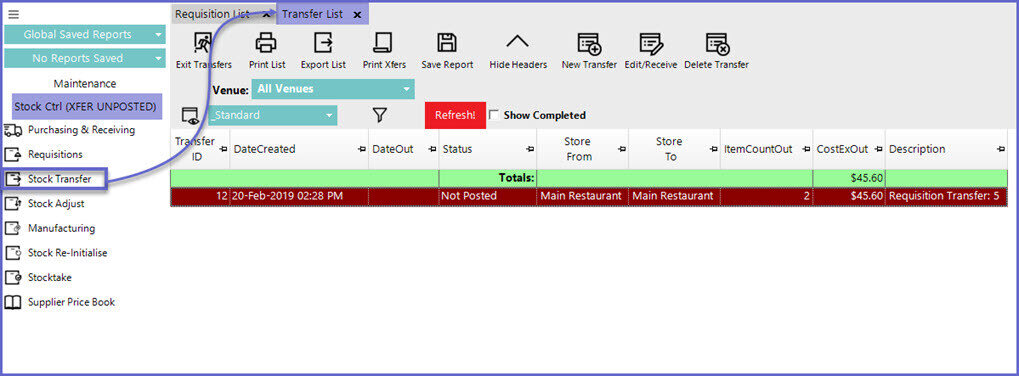
- Double-click an item from the list which will open a new window
- Post the Transfers by clicking on the Post Transfer button
