There are three (3) different Till Functions that can be setup in SmartPOS to ac
There are three (3) different Till Functions that can be setup in SmartPOS to access ResDiary Bookings:
-
Graphical Table Booking will display a Graphical Table Map (granted that one is configured) showing ResDiary Bookings; this will allow for Opening a Booked Table, Viewing Booking Details, and seating Walk-Ins -
Table Open Booking List will display a List of ResDiary Bookings including Booking Reference, Date & Time, Guest Count, and Name; this list will allow for Opening a Booked Table, Viewing Booking Details, and seating Walk-Ins -
Table Open Booking Grid will display a Grid of ResDiary Bookings and will allow for Opening a Booked Table, Viewing Booking Details, and seating Walk-Ins
This article covers the Graphical Table Booking Function and it's SmartPOS use.
Prerequisites
- To access ResDiary Till Function Settings, the applicable Operator Privileges will need to be enabled
-
Reporting Tab - Sales Reports Flags
"Graphical Table Booking" Function
- Note: The change in the UI for Till Function Buttons configuration at BackOffice as shown below is applicable from v4.7.x.x
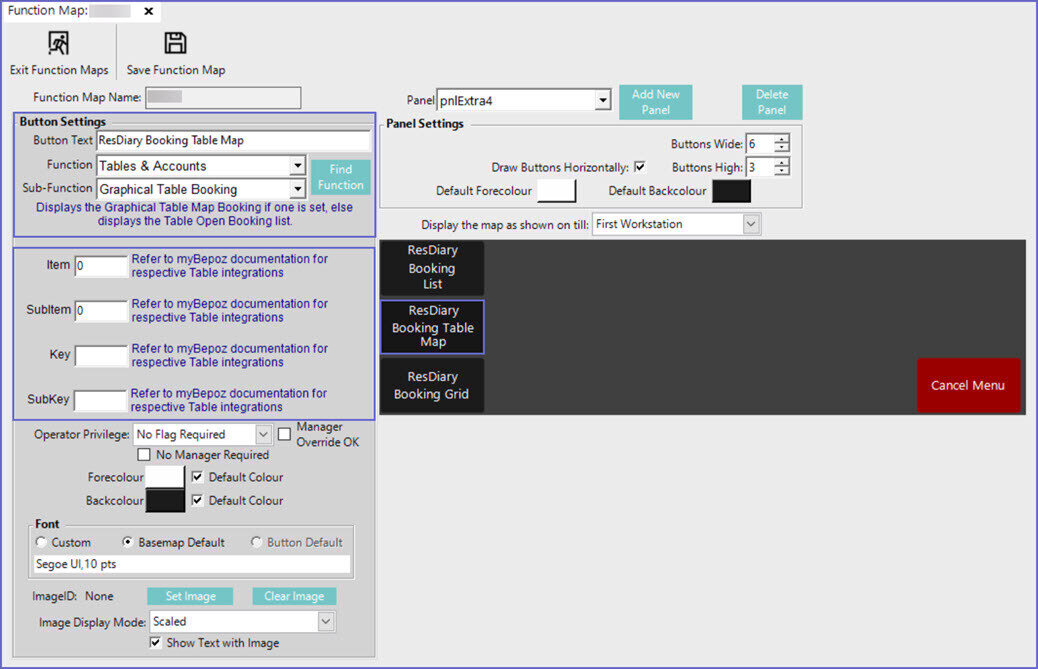
Till Function Configuration
- Click on the desired Button space and then configure the Button Settings:
- In the Button Text field enter the text that will display on the Till Function Button on SmartPOS Workstation screens
- Set the Function drop-down to 'Tables & Accounts'
- Set the Sub-Function to 'Graphical Table Booking'
- Enter a corresponding number into the Item field where:
- "0" will show all Tables Booked and Seated
- "1" will only show Seated Tables; i.e. future Bookings will not be displayed
- Enter a corresponding number into the SubItem field where:
- "0" will show future Bookings for all Service Periods
- "1" will only show future Bookings for the Service Period specified by entering the desired Service Period Name or ID into the Key field
- These configuration options allow for setting up multiple of these Till Function buttons, depending on Organizational needs, potentially where each one could display Bookings for a different Service Period and an additional button could display only Seated Tables
Graphical Booking SmartPOS Workflows
- NB: In the following workflows, the Till Function button is configured as shown in the above image - to show both Booked and Seated Tables and without a specified Service Period; also, the Ask Open Table flag in the Till Extension Device Options has been enabled
- If the Till Function button were to be configured differently, Workflows, options within SmartPOS, and message prompts may vary slightly to those seen in this article
- There are many different Workflows that can occur when using this Till Function depending on the situation; e.g., Booked Tables, seating a Walk-In via SmartPOS, seating a Walk-in via ResDiary directly, etc.
- Due to this, not all possible Workflows can be covered in this article, however, all Graphical Table options that are unique to this Till Function will be included and basic Workflows will be demonstrated
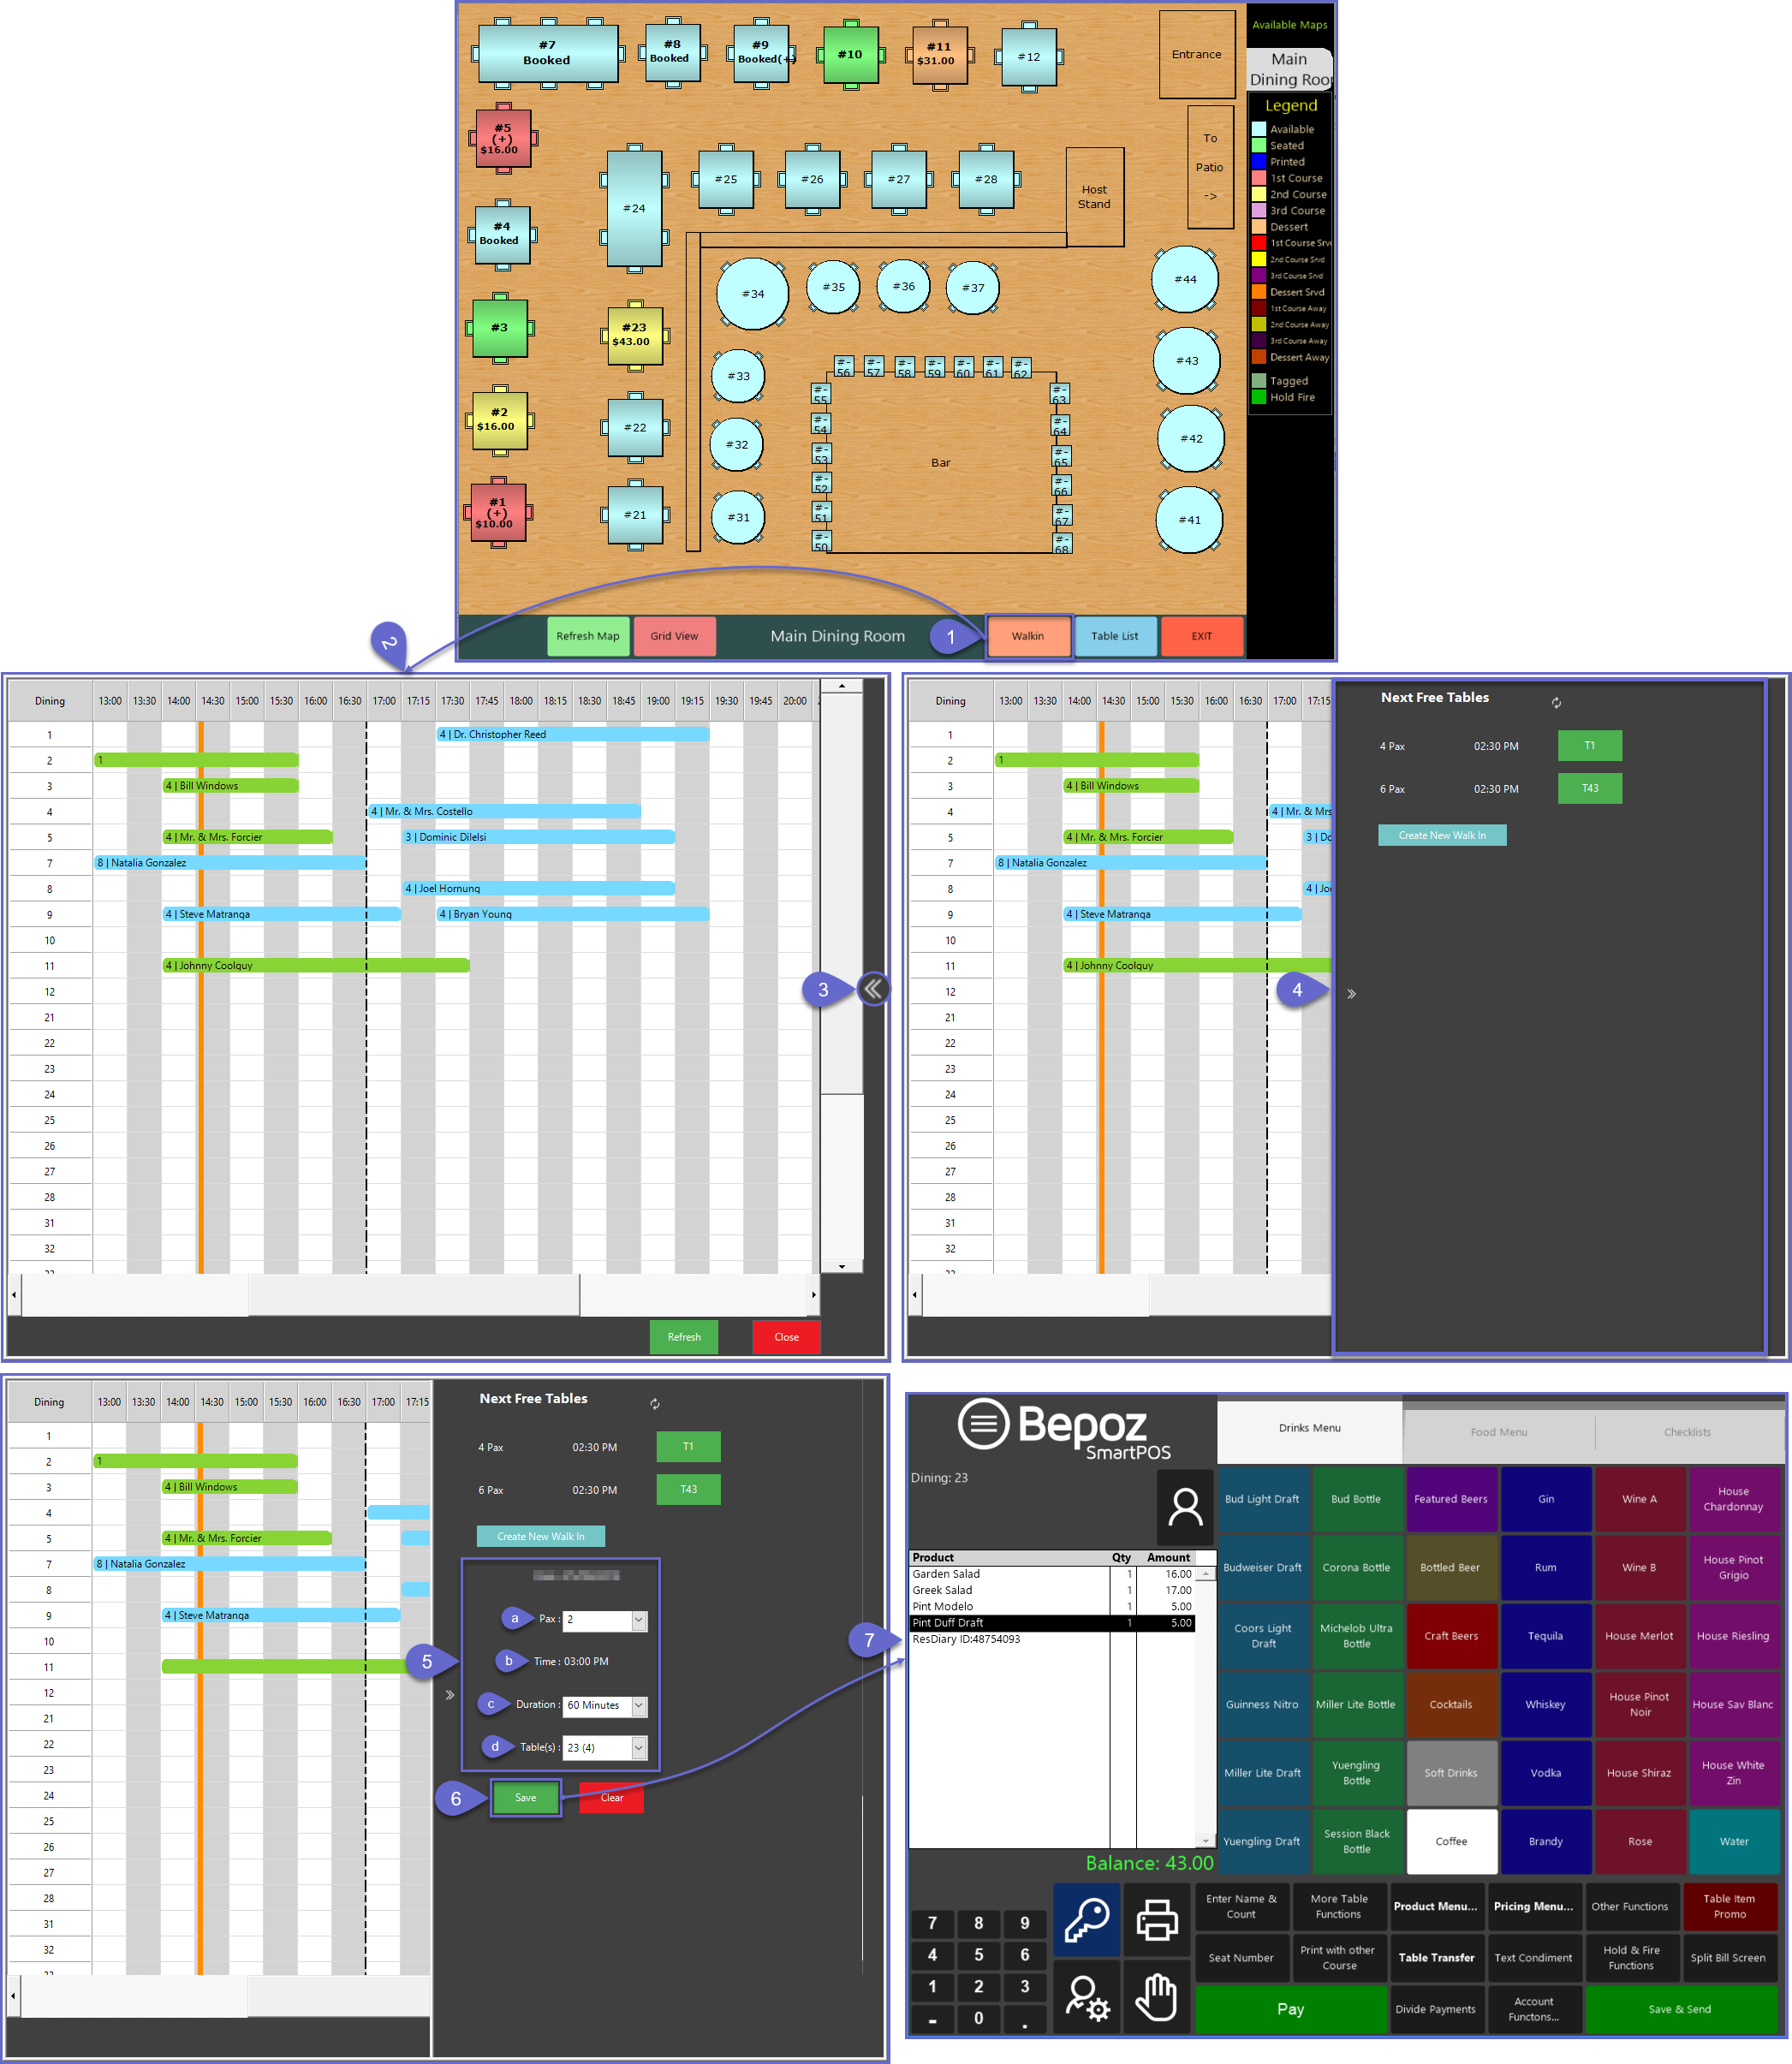
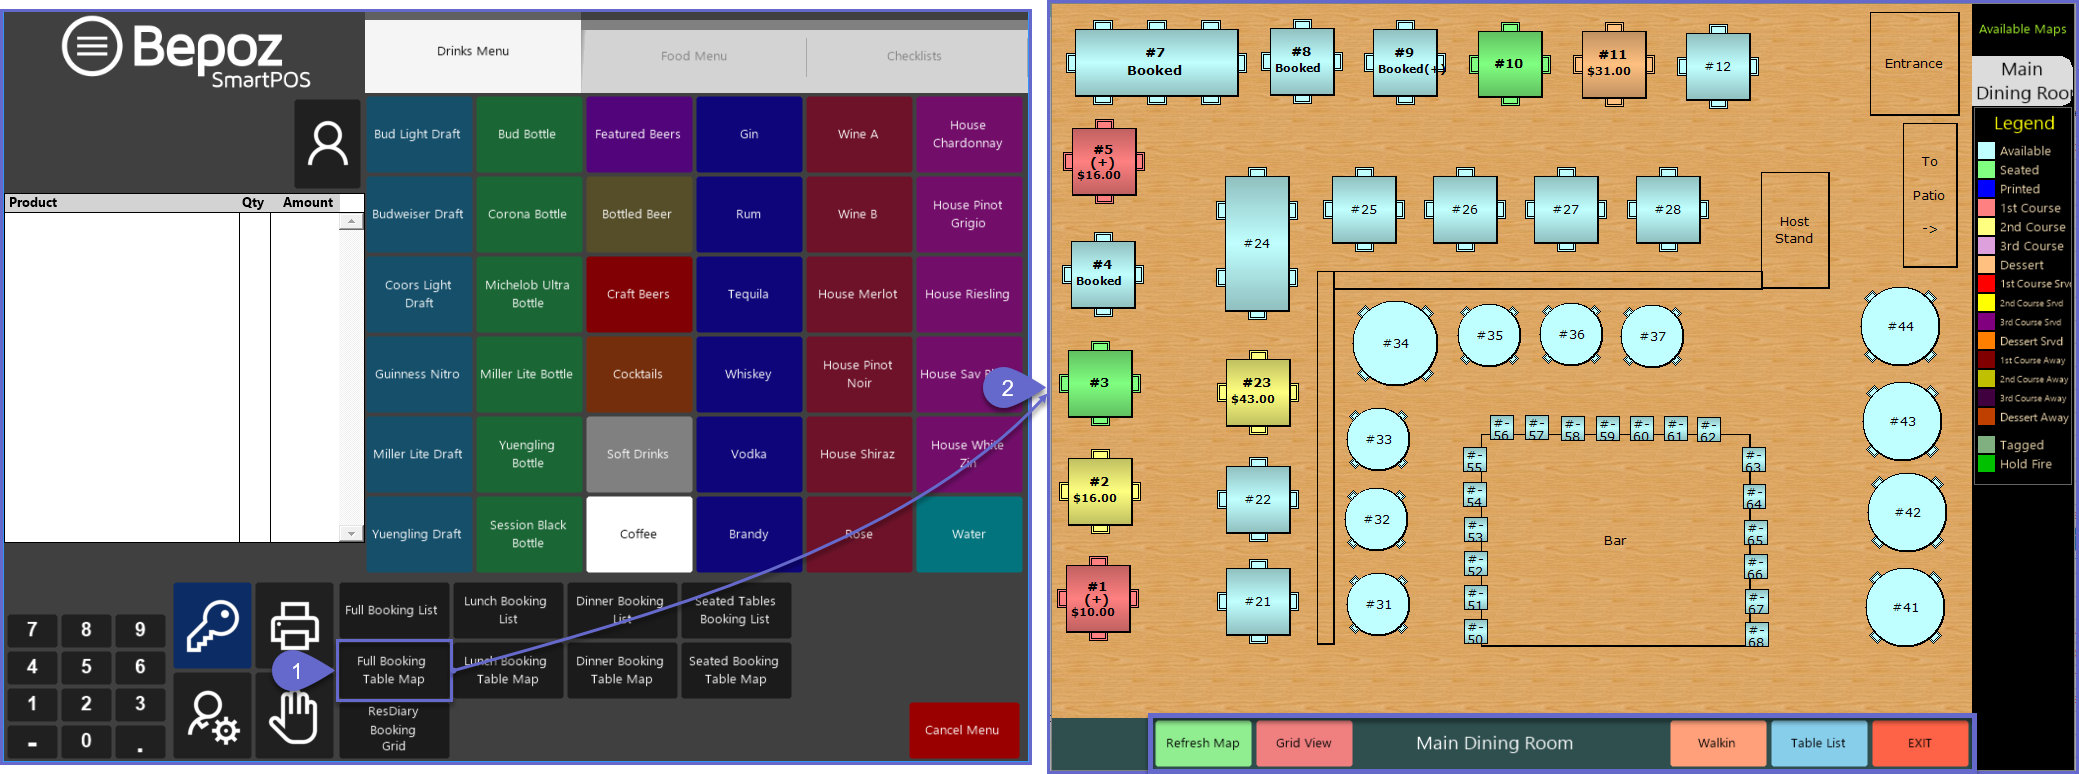
- Begin by logging into SmartPOS and navigating to the panel where the Till Function button is located then click on the Graphical Table Booking function button
- The configured Table Map will open and there are a number of workflows that can begin from the Graphical Table Map including clicking on a Booked Table in the Map or using one of the following button options on the bottom of the screen:
- Refresh Map which will manually refresh the Table Map with updated data from ResDiary
- Grid View will be the same as using the Table Open Booking Grid Till Function and will display a Grid of ResDiary Bookings which will allow for Opening a Booked Table, Viewing Booking Details, and seating Walk-Ins
- Walkin can also be used to access the Booking Grid to seat a Walk-In using the same workflow as demonstrated in the above section
- Table List will be the same as using the Table Open Booking List function and will display a List of ResDiary Bookings including Booking Reference, Date & Time, Guest Count, and Name
- Exit
Opening a Booking
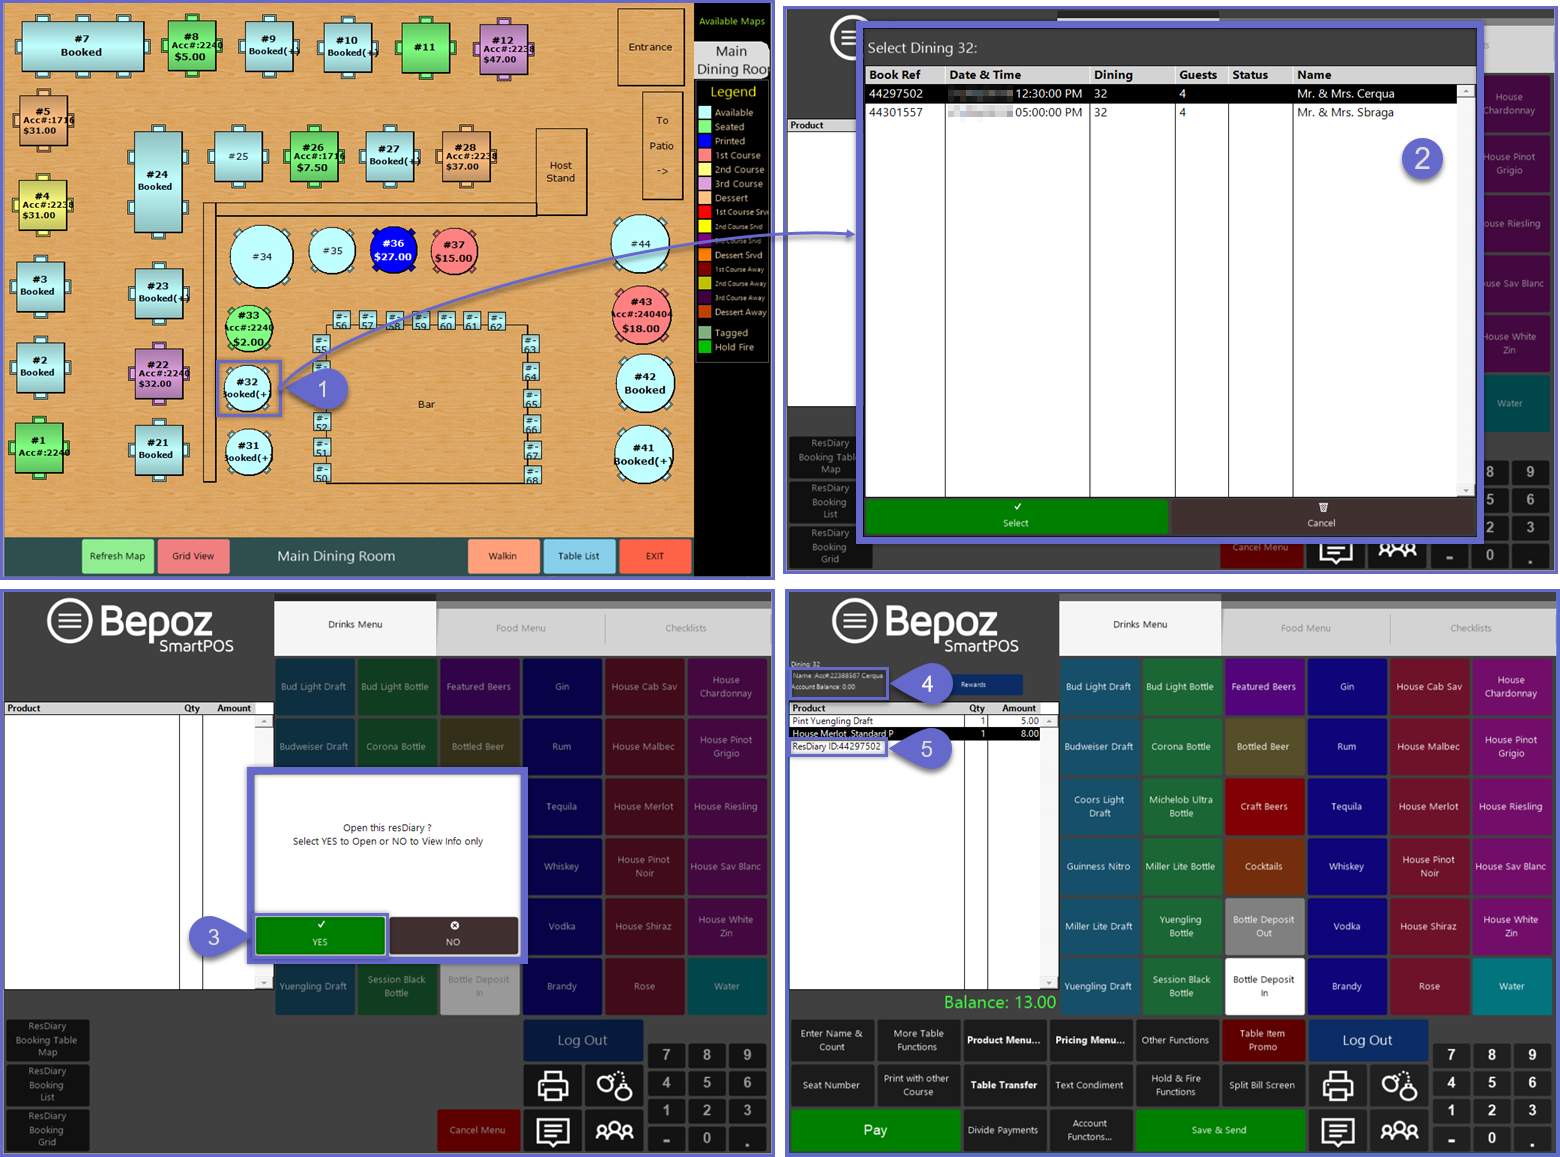
- To open a Booking from the Booking Table Map, complete the following steps:
- Tap on the desired Table from the Table Map
- Tables with Bookings that have not yet arrived will have a "Booked" label
- If the Table has multiple Bookings, the label will read "Booked (+)"
- If the Table has only one available Booking, skip to Step 3
- If the Table has multiple Bookings available, a window will open to allow Operators to select from one of the Bookings; highlight the desired Booking and click the Select button or simply double-tap the Booking
- A prompt will appear on the screen with an option to Open the ResDiary Booking Table; in this Workflow select Yes
- The Table will now be open and the Account linked to the ResDiary Booking will be attached to the Transaction as noted by the Account Information above the Transaction window
- Operators can proceed through normal Transaction Workflows of adding Products, applying Discounts, performing other Functions, etc.
- The ResDiary Booking ID Number will be displayed in the Transaction window
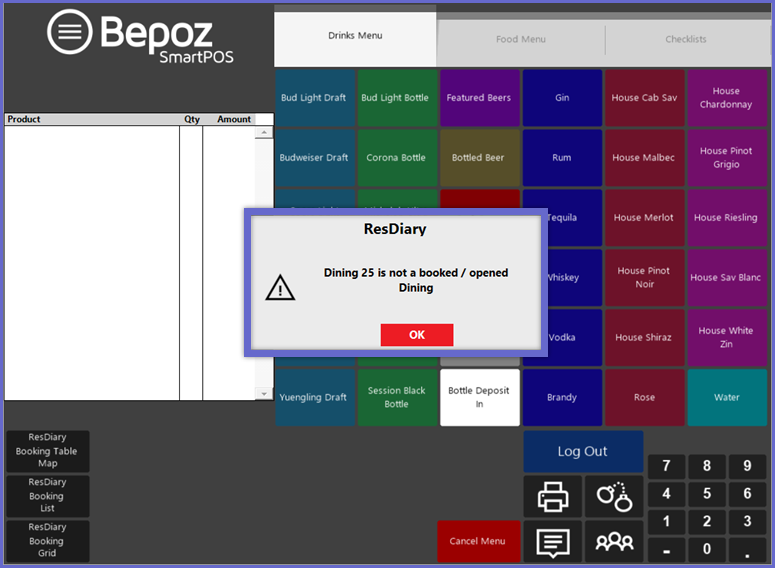
- Tapping on a Table that doesn't have a Booking will result in a message prompt displaying on screen informing that the selected Table isn't Booked or Opened; the wording of this message may vary depending on the Till Function configurations
View Booking Details
- To view Booking Details from the Booking Table Map, complete the following steps (this can be done before or after a Booking has Arrived and been Seated):
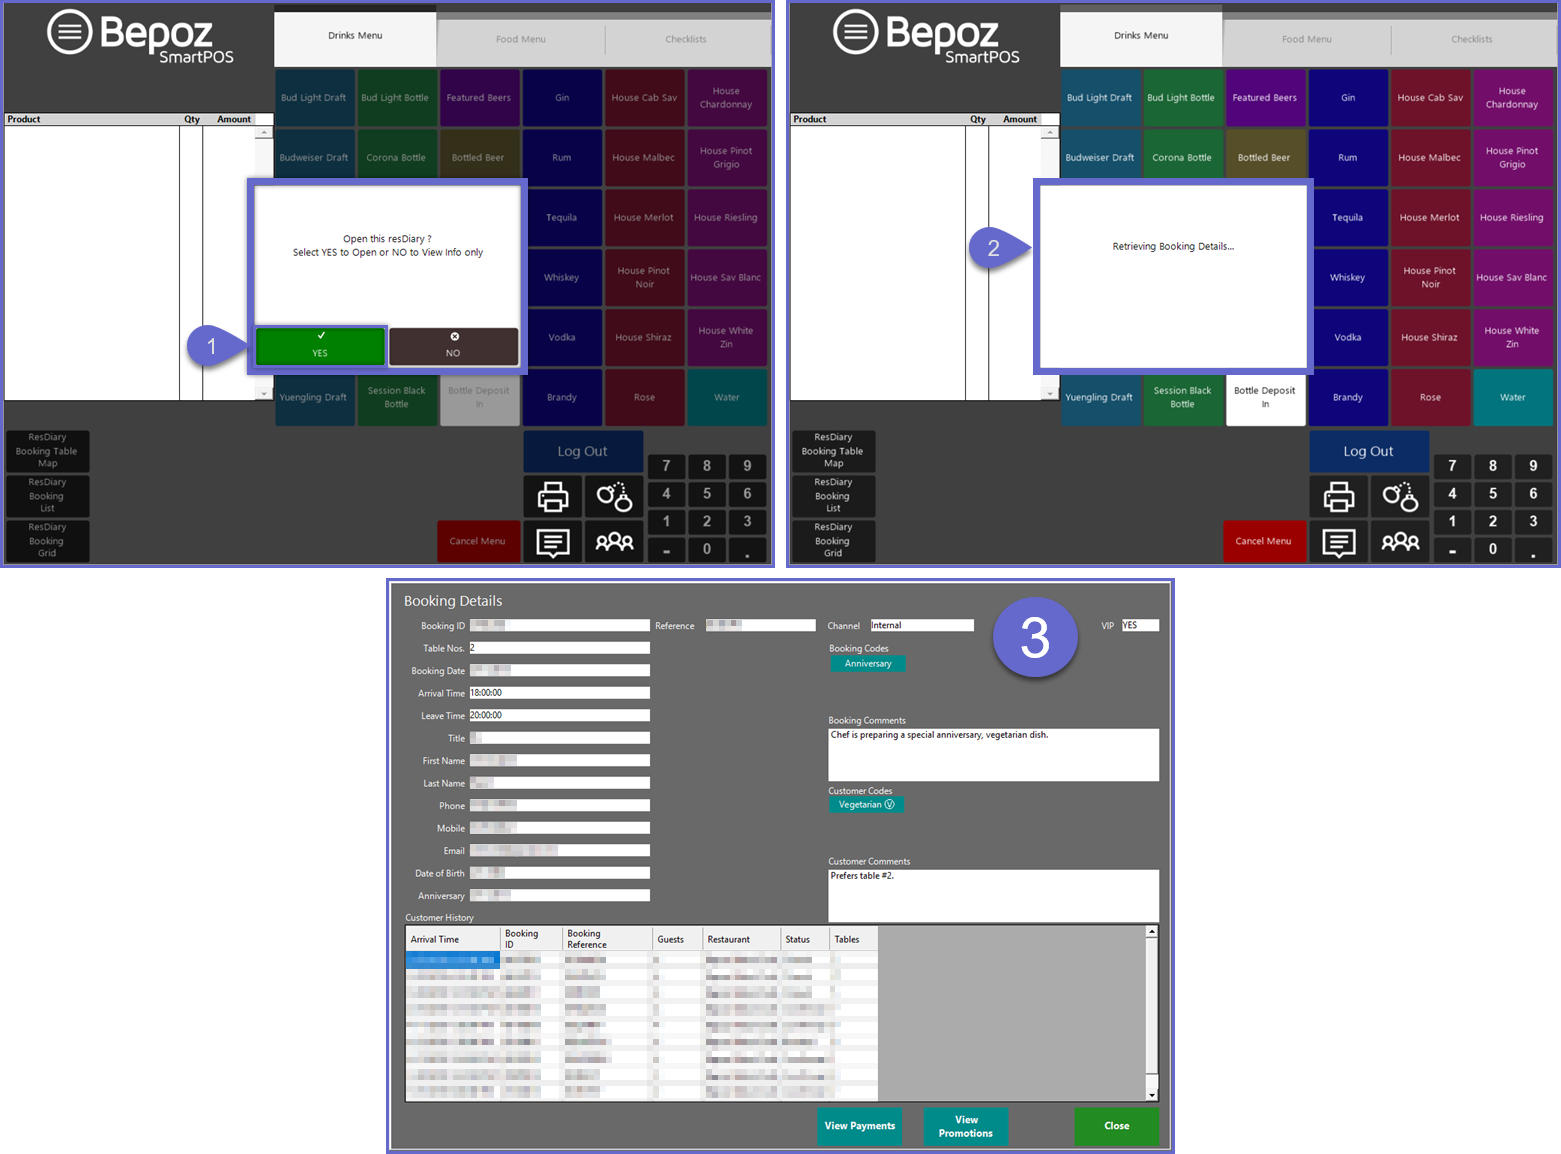
- Complete Steps 1 through 3 from the Opening a Booking Workflow, however, when prompted with the option to Open the ResDiary Booking Table select No
- The Booking Details will be retrieved from ResDiary
- After retrieval, a window will open displaying the Booking Details including:
- Booking ID
- Table Number/s
- Booking Date & Times
- Customer Name and Contact Details
- Customer Date of Birth
- Customer Anniversary Date
- Reference ID
- Channel Information
- VIP Status
- Booking Codes
- Booking Comments
- Customer Codes
- Customer Comments
- Customer History
Seating a Walk-In
- To seat a Walk-In to ResDiary through SmartPOS from a Booking Table Map, complete the following steps:
- Tap on the Walkin button on the bottom of the screen
- The Booking Grid will open
- Tap on the chevron icon/button on the right side of the screen to expand the pop-out panel
- The pop-out panel will expand from the right; from this panel, a Walk-In can be seated to one of the "Next Free Tables" or another available Table if desired by using the "Create New Walk-In" button
- The "Next Free Tables" are retrieved from the "W8LIST" in ResDiary and can be selected by tapping on the Table's green button
- Each Table shown will show the Number of Guests that the Table can Seat as "# Pax", the current seating interval time, and a button with the Table Number as "T#"
- Alternatively, tap on the "Create New Walk-In" button to seat the Walk-In to a different Table instead of one of the "Next Free Tables"
- Whether selecting one of the "Next Free Tables" or the "Create New Walk-In" option, additional seating options will display in the bottom portion of the panel:
- (a) Select the Pax, or the number of guests from the drop-down; if a "Next Free Table" was selected, this will default to the Table's maximum guest count
- (b) The closest seating interval time will be displayed; this cannot be changed from SmartPOS as the Walk-In is intended to be seated immediately
- (c) Select the Duration in minutes from the drop-down
- (d) Select the Table from the drop-down; each Table will show its maximum Pax; NB: if a "Next Free Table" was chosen, this won't be a drop-down and will instead show the Table Number selected
- Tap on the Save button to complete the Walk-In entry in SmartPOS
- The Table will be Opened immediately and Transaction Functions may commence; continue as usual and Save, Save & Send, process Payment for the Table when finished