-
End-User | Products & SmartPOS
-
End-User | Stock Control
-
End-User | Table Service and Kitchen Operations
-
End-User | Pricing, Marketing, Promotions & Accounts
- Prize Promotions
- Points, Points Profiles and Loyalty
- Product Promotions
- Repricing & Discounts in SmartPOS
- Vouchers
- Account Till Functions
- Pricing, Price Numbers and Price Modes
- Raffles & Draws
- Marketing Reports
- Accounts and Account Profiles
- Rewards
- SmartPOS Account Functions
- Troubleshooting
- Product Labels
- Packing Slips
-
End-User | System Setup & Admin
-
End-User | Reporting, Data Analysis & Security
-
End-User | Membership & Scheduled Billing
-
End-User | Operators, Operator Permissions & Clocking
-
Interfaces | Data Send Interfaces
-
Interfaces | EFTPOS & Payments
- NZ EFTPOS Interfaces
- Linkly (Formerly PC-EFTPOS)
- Adyen
- Tyro
- ANZ BladePay
- Stripe
- Windcave (Formerly Payment Express)
- Albert EFTPOS
- Westpac Presto (Formerly Assembly Payments)
- Unicard
- Manager Cards External Payment
- Pocket Voucher
- OneTab
- Clipp
- eConnect-eConduit
- Verifone
- AXEPT
- DPS
- Liven
- Singapore eWallet
- Mercury Payments TRANSENTRY
- Ingenico
- Quest
- Oolio - wPay
-
Interfaces | SMS & Messaging
-
Interfaces | Product, Pricing, Marketing & Promotions
- Metcash Loyalty
- Range Servant
- ILG Pricebook & Promotions
- Oolio Order Manager Integration
- Ubiquiti
- Product Level Blocking
- BidFood Integration
- LMG
- Metcash/IBA E-Commerce Marketplace
- McWilliams
- Thirsty Camel Hump Club
- LMG Loyalty (Zen Global)
- Doshii Integration
- Impact Data
- Marsello
- IBA Data Import
- Materials Control
- Last Yard
- Bepoz Standard Transaction Import
-
Interfaces | Printing & KDS
-
Interfaces | Reservation & Bookings
-
Interfaces | Database, Reporting, ERP & BI
-
Interfaces | CALink, Accounts & Gaming
- EBET Interface
- Clubs Online Interface
- Konami Interface
- WIN Gaming Interface
- Aristocrat Interface
- Bally Interface
- WorldSmart's SmartRetail Loyalty
- Flexinet & Flexinet SP Interfaces
- Aura Interface
- MiClub Interface
- Max Gaming Interface
- Utopia Gaming Interface
- Compass Interface
- IGT & IGT Casino Interface
- MGT Gaming Interface
- System Express
- Aristocrat nConnect Interface
- GCS Interface
- Maxetag Interface
- Dacom 5000E Interface
- InnTouch Interface
- Generic & Misc. CALink
-
Interfaces | Miscellaneous Interfaces/Integrations
-
Interfaces | Property & Room Management
-
Interfaces | Online Ordering & Delivery
-
Interfaces | Purchasing, Accounting & Supplier Comms
-
SmartPOS | Mobile App
-
SmartPDE | SmartPDE 32
-
SmartPDE | Denso PDE
-
SmartPDE | SmartPDE Mobile App
-
MyPlace
-
MyPlace | myPLACE Lite
-
MyPlace | Backpanel User Guides
- Bepoz Price Promotions
- What's on, Events and tickets
- Staff
- System Settings | Operational Settings
- Vouchers & Gift Certificates
- Member Onboarding
- Members and memberships
- System Settings | System Setup
- Reports and Reporting
- Actions
- Offers | Promotions
- Messaging & Notifications
- System Settings | App Config
- Surveys
- Games
- User Feedback
- Stamp Cards
-
MyPlace | Integrations
-
MyPlace | FAQ's & How-2's
-
MyPlace | Release Notes
-
YourOrder
-
YourOrders | Backpanel User Guides
-
YourOrders | YourOrder Kiosk User Guide
-
YourOrders | Merchant App User Guide
-
WebAddons
-
Installation / System Setup Guides
- SmartPOS Mobile App | Setup
- SmartPOS Mobile App | SmartAPI Host Setup
- SmartPOS Mobile App | BackOffice Setup
- SmartPOS Mobile App | Pay@Table setup
- SmartKDS Setup 4.7.2.7 +
- SmartKDS Setup 4.6.x
- SQL Installations
- Server / BackOffice Installation
- New Database Creation
- Multivenue Setup & Config.
- SmartPOS
- SmartPDE
- Player Elite Interface | Rest API
- Interface Setups
- Import
- KDSLink
- Snapshots
- Custom Interface Setups
-
HOW-2
- Product Maintenance
- Sales and Transaction Reporting
- SmartPOS General
- Printing and Printing Profiles
- SQL
- Repricing & Discounts
- Stock Control
- Membership
- Accounts and Account Profiles
- Miscellaneous
- Scheduled Jobs Setups
- Backoffice General
- Purchasing and Receiving
- Database.exe
- EFTPOS
- System Setup
- Custom Support Tools
-
Troubleshooting
-
Hardware
3 | ResDiary Interface Devices Setup
This article focuses on the Device configurations required to connect to ResDiary successfully. Before setting up any Till Functions, a link must first be made between Bepoz and ResDiary via two (2) BackOffice Devices: a Till Extension and a Transaction Queue. Device Settings can be made before or after the settings in Venue Maintenance have been changed.
This article focuses on the Device configurations required to connect to ResDiary successfully.
Before setting up any Till Functions, a link must first be made between Bepoz and ResDiary via two (2) BackOffice Devices: a Till Extension and a Transaction Queue. Device Settings can be made before or after the settings in
Prerequisites
- To access ResDiary Setup features, the applicable Operator Privileges will need to be enabled
-
Operator Maintenance 'General' Tab - System Setup: "Maintain Venue, Stores & Tills" Flag
- System Setup: "Access Venue, Stores & Tills" Flag
- An optional requirement is
External Payment Setup will need to be set up if you wish to add in resdiary. - Frameworks 4.6 (Windows XP/POSReady2009 does not support Frameworks 4.6)
- CA Root Certificates issued by Microsoft need to be up to date on the POS Terminal making Resdiary requests
BackOffice Devices
- To enable communication with ResDiary so that the integration functions seamlessly, both a Till Extension and a Transaction Queue will need to be created and configured accurately for each required
ResDiary Till Extension Setup
- After logging into BackOffice, complete the following steps to create & configure a ResDiary Till Extension:
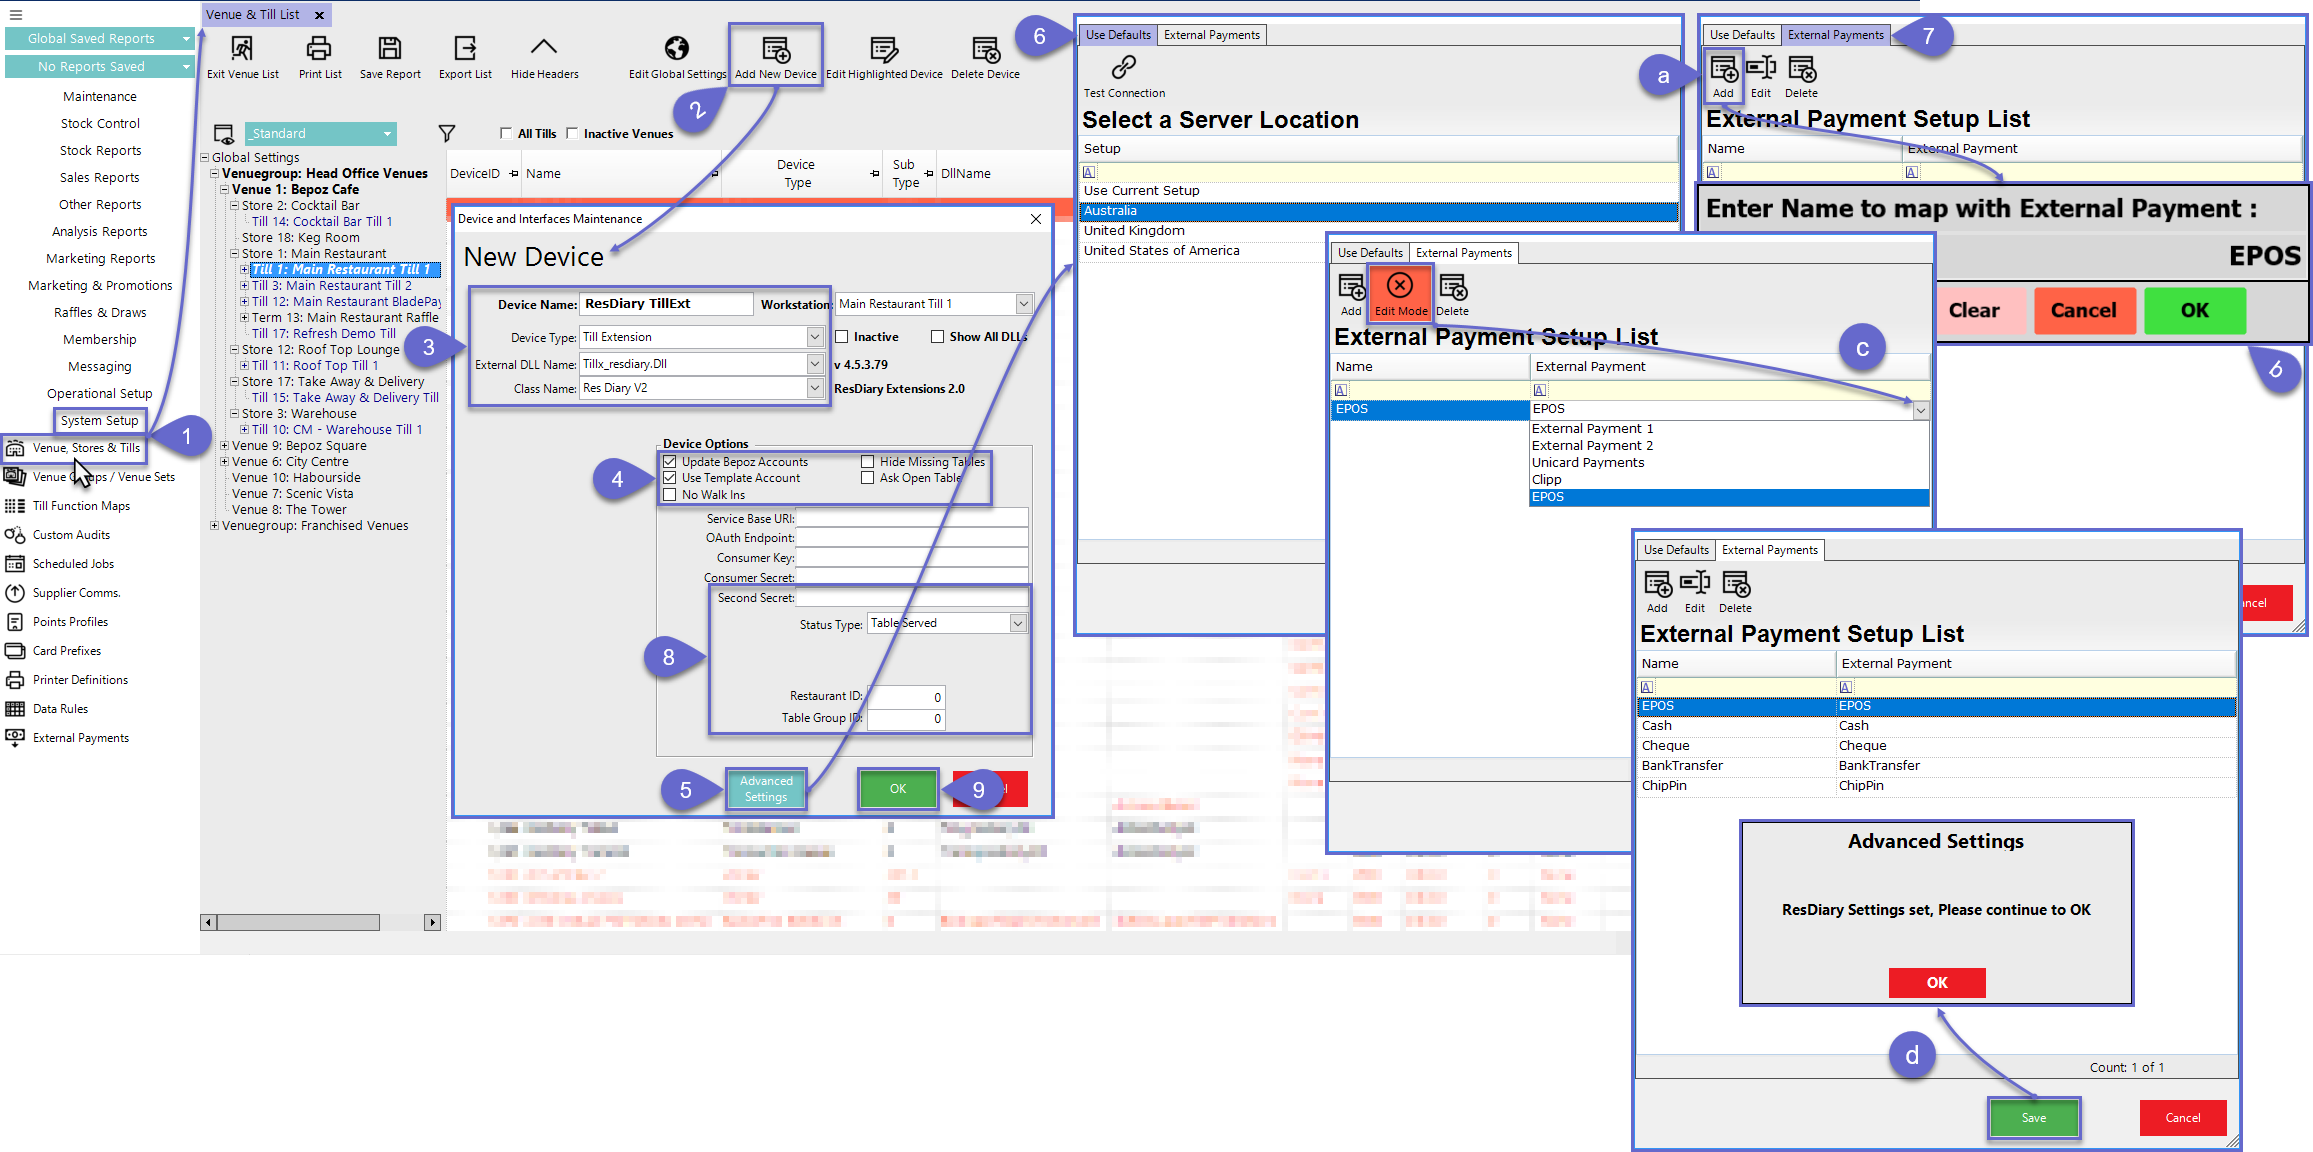
- Navigate to the System Setup component in the sidebar, expand, and select Venue, Stores & Tills to open the Venue & Till List Tab
- Highlight the desired Till and click on the Add New Device button at the top of the tab; when prompted select 'Blank Device' and a New Device and Interfaces Maintenance window will open
- Enter a relevant Device Name, set the Device Type to 'Till Extension', the External DLL Name to 'Tillx_resdiary.Dll', and the Class Name to 'Res Diary V2'
- Configure the Device Options Flags as desired:
- If the Update Bepoz Accounts flag is enabled, Accounts in Bepoz will be updated and/or associated with Accounts from ResDiary
- When the Use Template Account flag is enabled, an Account with the Account Number of "RESDIARY" will be used as the base settings for Accounts that are Imported from ResDiary
- If the No Walk Ins flag is enabled, then all "Walk-In" buttons will be hidden in SmartPOS
- This will require all Walk-Ins to be created through ResDiary directly
- When the Hide Missing Tables flag is enabled, Table Numbers that are not included in the ResDiary Table Setup will be hidden on Graphical Table Maps
- If the Ask Open Table flag is enabled, when Operators select a Booked or Seated Table from a Graphical Table Map they will be prompted with an option to Open the Table or to View Booking Detail Info
- Select the Advanced Settings button to access the Device Options Defaults by Server Location and External Payments Configurations
- On the Use Defaults tab, select the relevant Server Location to fill in the following default information in the Device Options fields:
- Service Base URL
- OAuth Endpoint
- Consumer Key
- Consumer Secret
- Optionally, leave as "Use Current Setup" if no changes are required
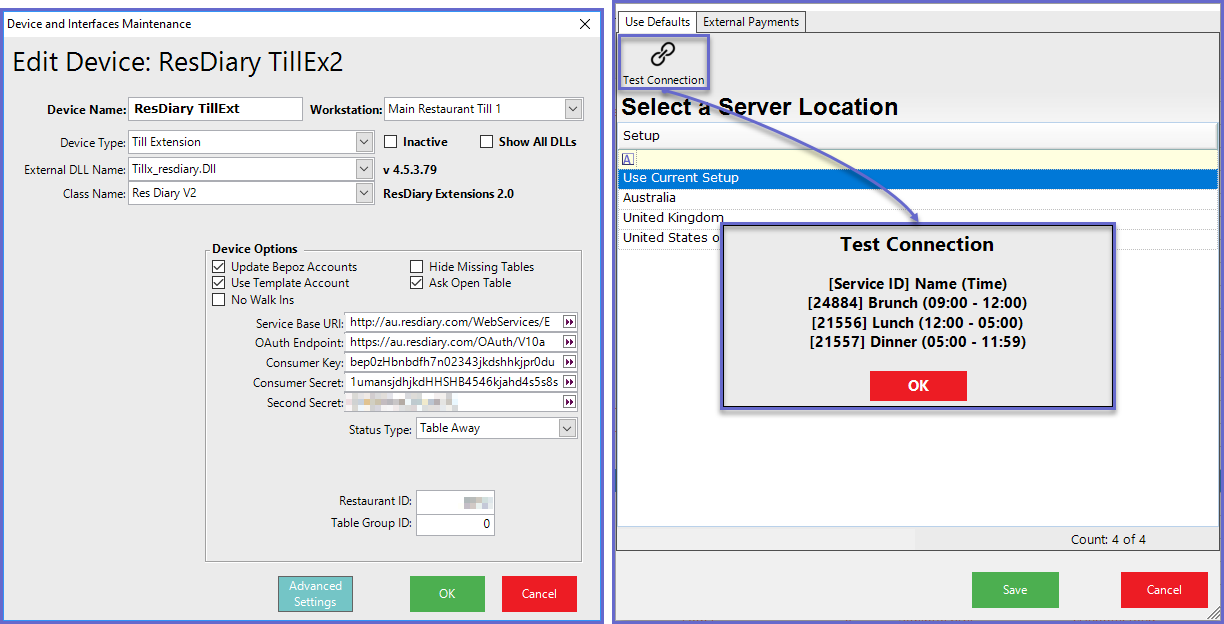
- After completing all setups including the remaining steps, return to this window to use the Test Connection button; this will confirm a connection to ResDiary and if the connection is OK it will display the Service ID, Service Name, and Service Time Frame that are retrieved from ResDiay which are referenced for Till Functions
- Use the External Payments tab to map an External Payment/s to the Device; this is to be used for adding as many
External Payments as necessary to match the ResDiary Payment Methods and will Report in BackOffice as the External Payment defined - These will be utilized for automatically applying Payments received through ResDiary at the time of Booking
- (a) Select the Add button to add a new External Payment Name for the Device
- (b) Enter the Name to map with one of the System's External Payments & click OK
- ResDiary Account Type Names to use for correct mapping:
- Cash
- Cheque
- BankTransfer
- ChipPin
- Epos
- (c) Click on the Edit button to enter Edit Mode and then in the External Payment column expand the drop-down; this will list all of the System's active External Payments
- Select the desired External Payment to map for the Device
- Repeat steps (a) through (c) as required
- (d) Exit Edit Mode and click Save; a prompt will confirm that the ResDiary Settings have been set
- Configure the additional Device Options:
- Second Secret should be obtained from ResDiary; this is unique to each Restaurant
- For the Status Type drop-down, select from the options "Table Served" or "Table Away" which will indicate when status updates should be sent to ResDiary
- Restaurant ID is the ResDiary Restaurant ID and should be obtained from ResDiary; this is unique to each Restaurant
- Table Group ID is the TableGroup ID that should be used for ResDiary; this is obtained from the Venue Maintenance Tables Tab and is the TableGroup # belonging to the desired Table Group to be used in this instance regarding ResDiary
- Click OK to save the Till Extension


ResDiary Transaction Queue Setup
Note: Only 1 Resdiary TransQueue is required per Store
- After logging into BackOffice, complete the following steps to create & configure a ResDiary Transaction Queue:
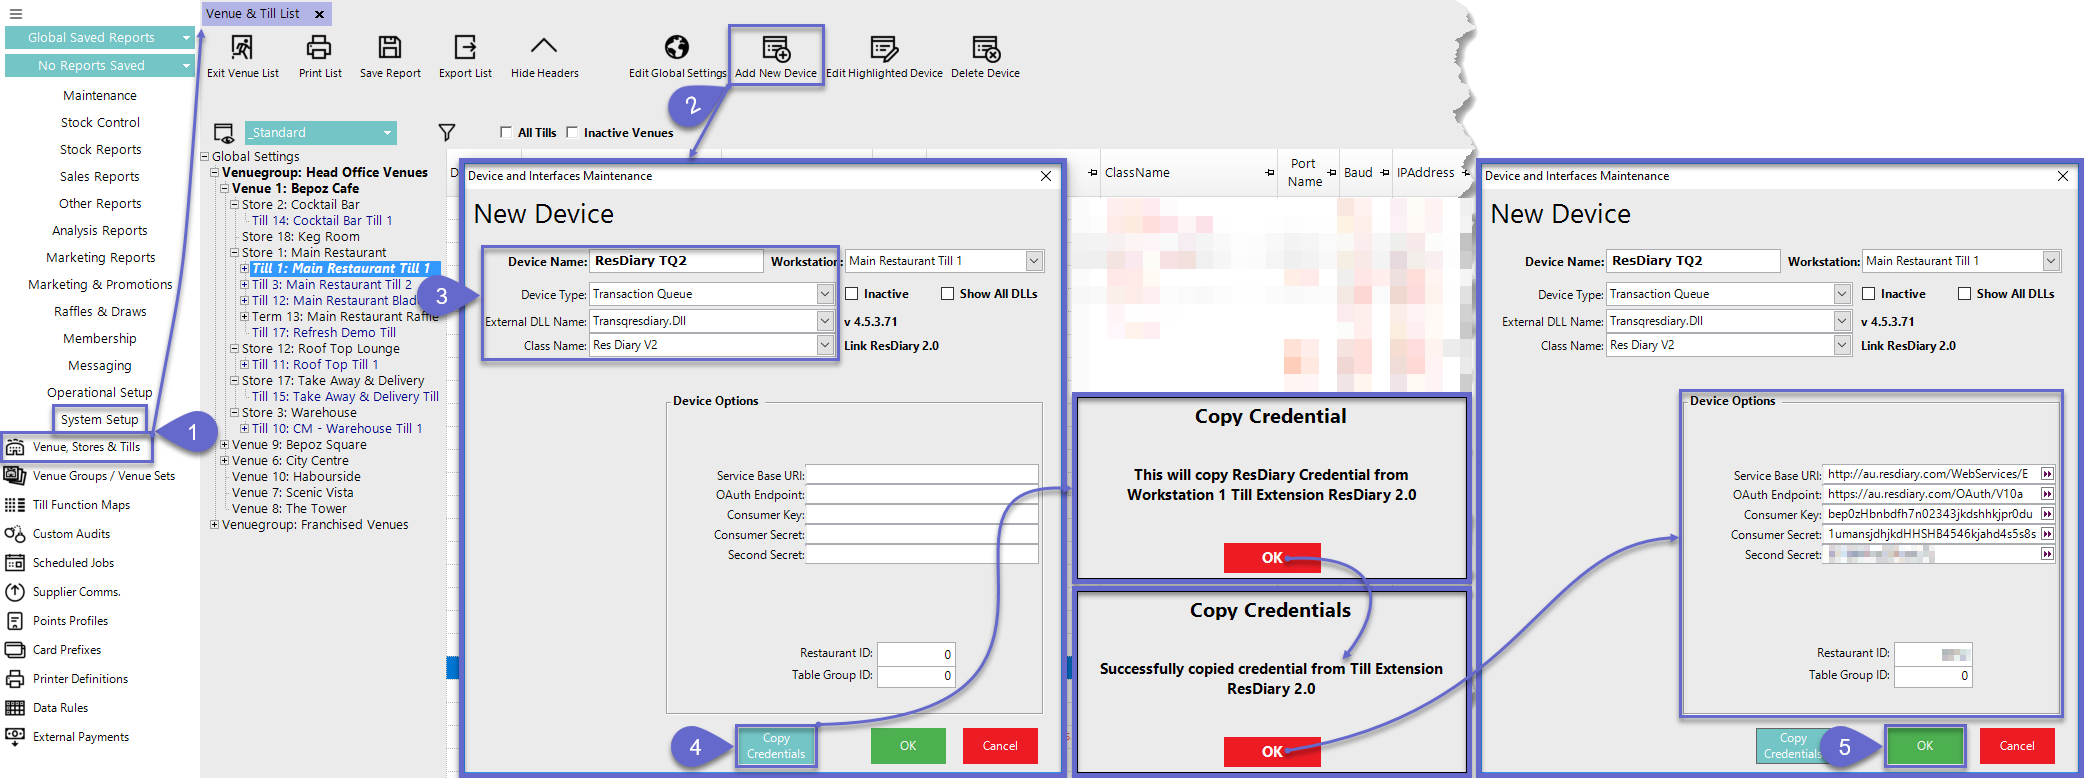
- Navigate to the System Setup component in the sidebar, expand, and select Venue, Stores & Tills to open the Venue & Till List Tab
- Highlight the desired Till and click on the Add New Device button in the header; when prompted select 'Blank Device' and a New Device and Interfaces Maintenance window will open
- Enter a relevant Device Name, set the Device Type to 'Transaction Queue', the External DLL Name to 'Transqresdiary.Dll', and the Class Name to 'Res Diary V2'
- Click the Copy Credentials button to copy the following Device Options fields from the same Workstation's ResDiary 2.0 Till Extension:
- Service Base URL
- OAuth Endpoint
- Consumer Key
- Consumer Secret
- Second Secret
- Restaurant ID
- Table Group ID
- Click OK to save the Transaction Queue

- After configuring and saving both Devices, make sure that SmartController is restarted
- Continue on to the
ResDiary Till Functions article to learn about configuration & use of ResDiary Functions in SmartPOS
