-
End-User | Products & SmartPOS
-
End-User | Stock Control
-
End-User | Table Service and Kitchen Operations
-
End-User | Pricing, Marketing, Promotions & Accounts
- Prize Promotions
- Points, Points Profiles and Loyalty
- Product Promotions
- Repricing & Discounts in SmartPOS
- Vouchers
- Account Till Functions
- Pricing, Price Numbers and Price Modes
- Raffles & Draws
- Marketing Reports
- Accounts and Account Profiles
- Rewards
- SmartPOS Account Functions
- Troubleshooting
- Product Labels
- Packing Slips
-
End-User | System Setup & Admin
-
End-User | Reporting, Data Analysis & Security
-
End-User | Membership & Scheduled Billing
-
End-User | Operators, Operator Permissions & Clocking
-
Interfaces | Data Send Interfaces
-
Interfaces | EFTPOS & Payments
- NZ EFTPOS Interfaces
- Linkly (Formerly PC-EFTPOS)
- Adyen
- Tyro
- ANZ BladePay
- Stripe
- Windcave (Formerly Payment Express)
- Albert EFTPOS
- Westpac Presto (Formerly Assembly Payments)
- Unicard
- Manager Cards External Payment
- Pocket Voucher
- OneTab
- Clipp
- eConnect-eConduit
- Verifone
- AXEPT
- DPS
- Liven
- Singapore eWallet
- Mercury Payments TRANSENTRY
- Ingenico
- Quest
- Oolio - wPay
-
Interfaces | SMS & Messaging
-
Interfaces | Product, Pricing, Marketing & Promotions
- Metcash Loyalty
- Range Servant
- ILG Pricebook & Promotions
- Oolio Order Manager Integration
- Ubiquiti
- Product Level Blocking
- BidFood Integration
- LMG
- Metcash/IBA E-Commerce Marketplace
- McWilliams
- Thirsty Camel Hump Club
- LMG Loyalty (Zen Global)
- Doshii Integration
- Impact Data
- Marsello
- IBA Data Import
- Materials Control
- Last Yard
- Bepoz Standard Transaction Import
-
Interfaces | Printing & KDS
-
Interfaces | Reservation & Bookings
-
Interfaces | Database, Reporting, ERP & BI
-
Interfaces | CALink, Accounts & Gaming
- EBET Interface
- Clubs Online Interface
- Konami Interface
- WIN Gaming Interface
- Aristocrat Interface
- Bally Interface
- WorldSmart's SmartRetail Loyalty
- Flexinet & Flexinet SP Interfaces
- Aura Interface
- MiClub Interface
- Max Gaming Interface
- Utopia Gaming Interface
- Compass Interface
- IGT & IGT Casino Interface
- MGT Gaming Interface
- System Express
- Aristocrat nConnect Interface
- GCS Interface
- Maxetag Interface
- Dacom 5000E Interface
- InnTouch Interface
- Generic & Misc. CALink
-
Interfaces | Miscellaneous Interfaces/Integrations
-
Interfaces | Property & Room Management
-
Interfaces | Online Ordering & Delivery
-
Interfaces | Purchasing, Accounting & Supplier Comms
-
SmartPOS | Mobile App
-
SmartPDE | SmartPDE 32
-
SmartPDE | Denso PDE
-
SmartPDE | SmartPDE Mobile App
-
MyPlace
-
MyPlace | myPLACE Lite
-
MyPlace | Backpanel User Guides
- Bepoz Price Promotions
- What's on, Events and tickets
- Staff
- System Settings | Operational Settings
- Vouchers & Gift Certificates
- Member Onboarding
- Members and memberships
- System Settings | System Setup
- Reports and Reporting
- Actions
- Offers | Promotions
- Messaging & Notifications
- System Settings | App Config
- Surveys
- Games
- User Feedback
- Stamp Cards
-
MyPlace | Integrations
-
MyPlace | FAQ's & How-2's
-
MyPlace | Release Notes
-
YourOrder
-
YourOrders | Backpanel User Guides
-
YourOrders | YourOrder Kiosk User Guide
-
YourOrders | Merchant App User Guide
-
WebAddons
-
Installation / System Setup Guides
- SmartPOS Mobile App | Setup
- SmartPOS Mobile App | SmartAPI Host Setup
- SmartPOS Mobile App | BackOffice Setup
- SmartPOS Mobile App | Pay@Table setup
- SmartKDS Setup 4.7.2.7 +
- SmartKDS Setup 4.6.x
- SQL Installations
- Server / BackOffice Installation
- New Database Creation
- Multivenue Setup & Config.
- SmartPOS
- SmartPDE
- Player Elite Interface | Rest API
- Interface Setups
- Import
- KDSLink
- Snapshots
- Custom Interface Setups
-
HOW-2
- Product Maintenance
- Sales and Transaction Reporting
- SmartPOS General
- Printing and Printing Profiles
- SQL
- Repricing & Discounts
- Stock Control
- Membership
- Accounts and Account Profiles
- Miscellaneous
- Scheduled Jobs Setups
- Backoffice General
- Purchasing and Receiving
- Database.exe
- EFTPOS
- System Setup
- Custom Support Tools
-
Troubleshooting
-
Hardware
5 | ResDiary 'Table Open Booking Grid' Till Function
There are three (3) different Till Functions that can be setup in SmartPOS to ac
There are three (3) different Till Functions that can be setup in SmartPOS to access ResDiary Bookings:
-
Graphical Table Booking will display a Graphical Table Map (granted that one is configured) showing ResDiary Bookings; this will allow for Opening a Booked Table, Viewing Booking Details, and seating Walk-Ins -
Table Open Booking List will display a List of ResDiary Bookings including Booking Reference, Date & Time, Guest Count, and Name; this list will allow for Opening a Booked Table, Viewing Booking Details, and seating Walk-Ins -
Table Open Booking Grid will display a Grid of ResDiary Bookings and will allow for Opening a Booked Table, Viewing Booking Details, and seating Walk-Ins
This article covers the Table Open Booking Grid Function and it's SmartPOS use.
Prerequisites
- To access ResDiary Till Function Settings, the applicable Operator Privileges will need to be enabled
-
Reporting Tab - Sales Reports Flags
"Table Open Booking Grid" Till Function
- Note: The change in the UI for Till Function Buttons configuration at BackOffice as shown below is applicable from v4.7.x.x
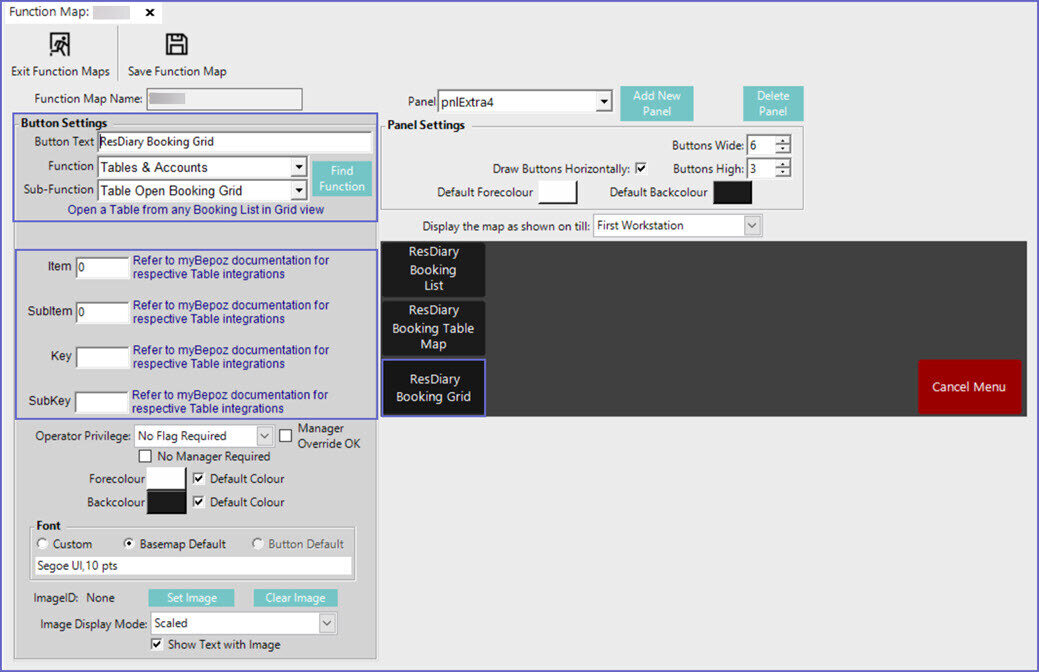
Till Function Configuration
- Click on the desired Button space and then configure the Button Settings:
- In the Button Text field enter the text that will display on the Till Function Button on SmartPOS Workstation screens
- Set the Function drop-down to 'Tables & Accounts'
- Set the Sub-Function to 'Table Open Booking Grid'
Booking Grid SmartPOS Workflows
- There are some different Workflows that can occur when using this Till Function depending on the situation; e.g., Booked Tables, seating a Walk-In via SmartPOS, seating a Walk-in via ResDiary directly, etc.
- Due to this, not all possible Workflows can be covered in this article, however, all Table Grid options will be included and basic Workflows will be demonstrated
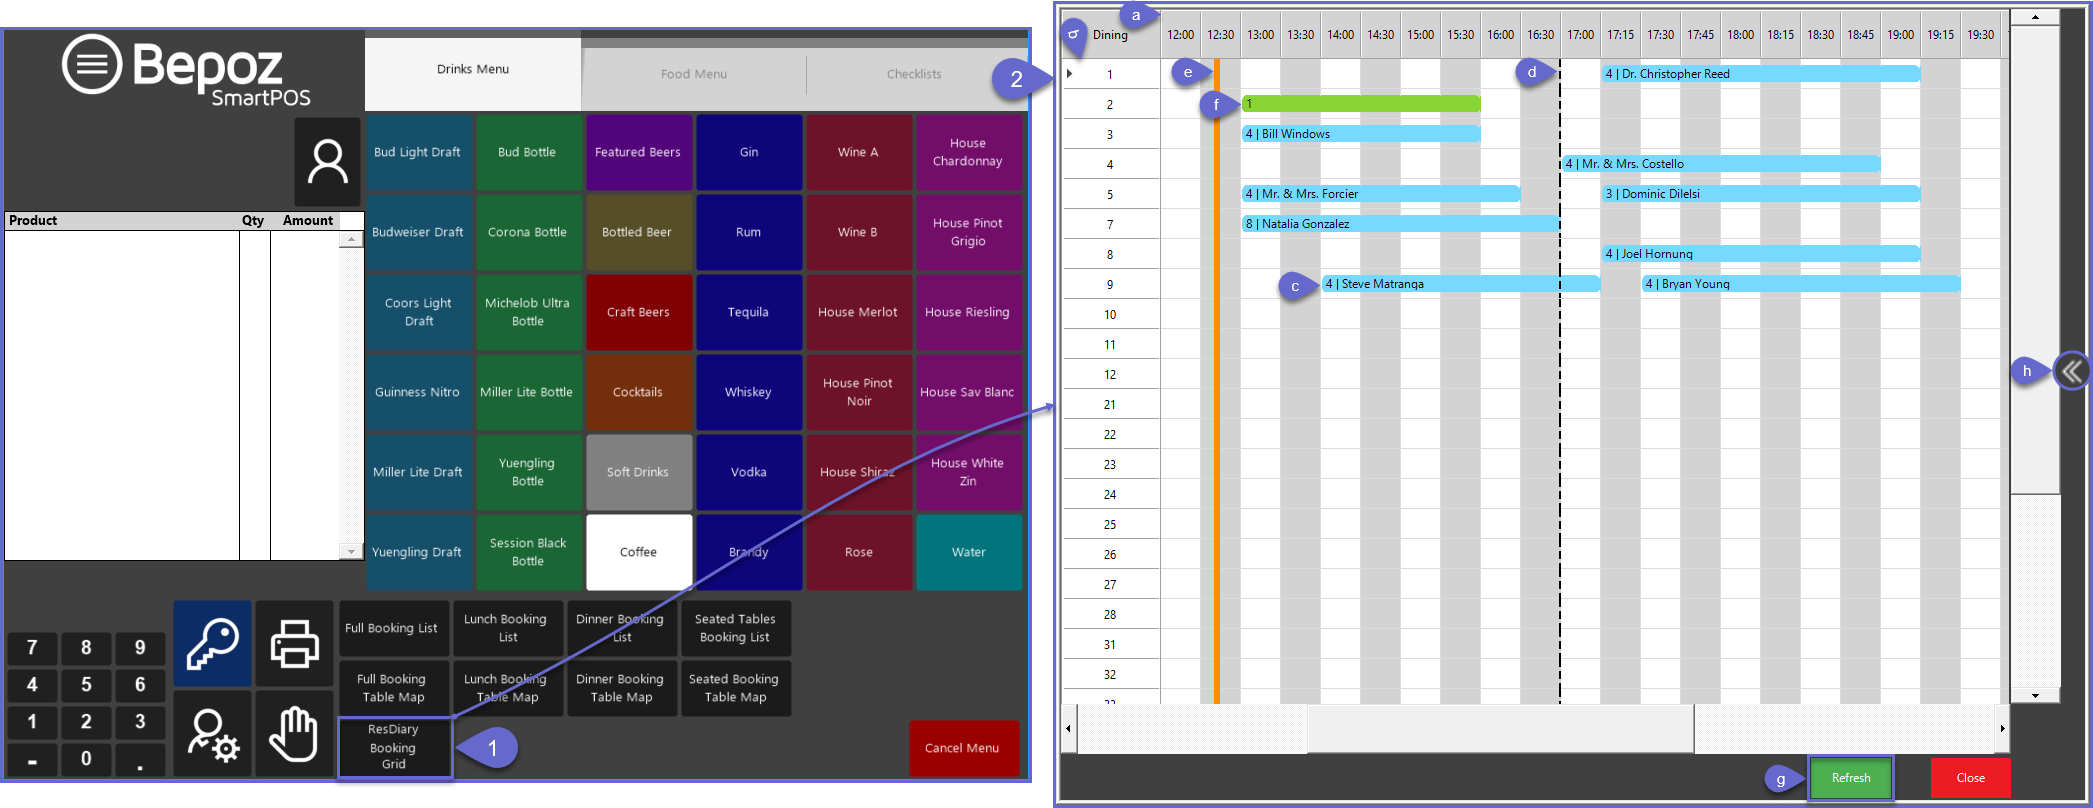
- Begin by logging into SmartPOS and navigating to the panel where the Till Function button is located then click on the Table Open Booking Grid Till Function button
- The Table Booking Grid will now open which will look very similar to the ResDiary "Diary" for the Day:
- (a) Times across the top x-axis in 15-minute increments
- (b) Table Numbers along the left, y-axis
- All of the Bookings for the day will be shown in the Grid at the point where the Bookings' Table Numbers and the Times intersect
- Scroll bars allow for navigating to different Times and Tables
- (c) Each Booking will show the Number of Guests and the Booking Name and will extend along the x-axis for each Booking's duration of Time
- (d) Vertical dashed lines will designate the separation of Service Periods
- (e) An orange vertical line will mark the current Time
- (f) Walk-Ins will not have a Name displayed
- (g) The Grid can be Refreshed at any time using the Refresh button; this will update the data retrieved from ResDiary
- (h) The chevron icon on the right side of the screen can be used to access a pop-out panel used for seating Walk-Ins
- There are a number of workflows that can begin from the Table Grid beginning with either tapping on a Booking in the Grid or by tapping the chevron icon
View Booking Info & Booking Details
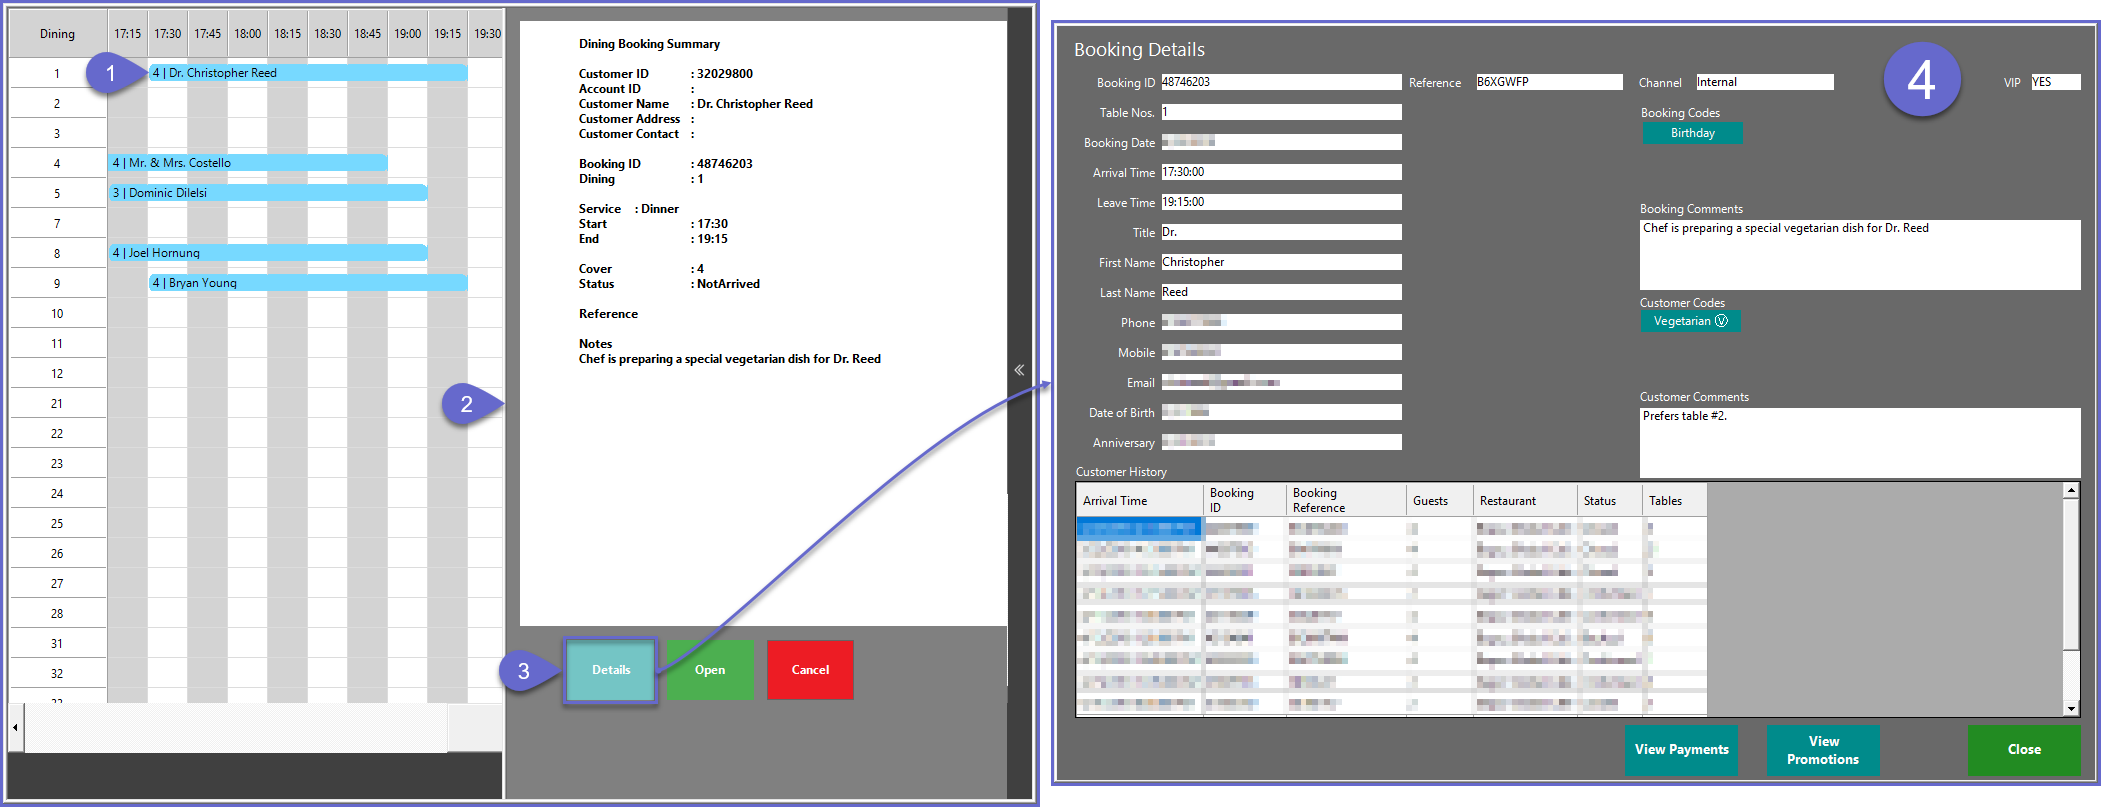
- To view basic Booking Info for a Booking using the Booking Grid, complete the following steps (this can be done before or after a Booking has Arrived and been Seated):
- Tap on the desired Booking
- A panel will expand from the right side which will show the Dining Booking Summary and will also offer additional workflows via buttons on the bottom of the panel:
- Details
- Open
- Cancel
- To view the Booking Details, tap on the Details button in the panel
- After the data is retrieved from ResDiary, a window will open displaying the Booking Details including:
- Booking ID
- Table Number/s
- Booking Date & Times
- Customer Name and Contact Details
- Customer Date of Birth
- Customer Anniversary Date
- Reference ID
- Channel Information
- VIP Status
- Booking Codes
- Booking Comments
- Customer Codes
- Customer Comments
- Customer History
Opening a Booking
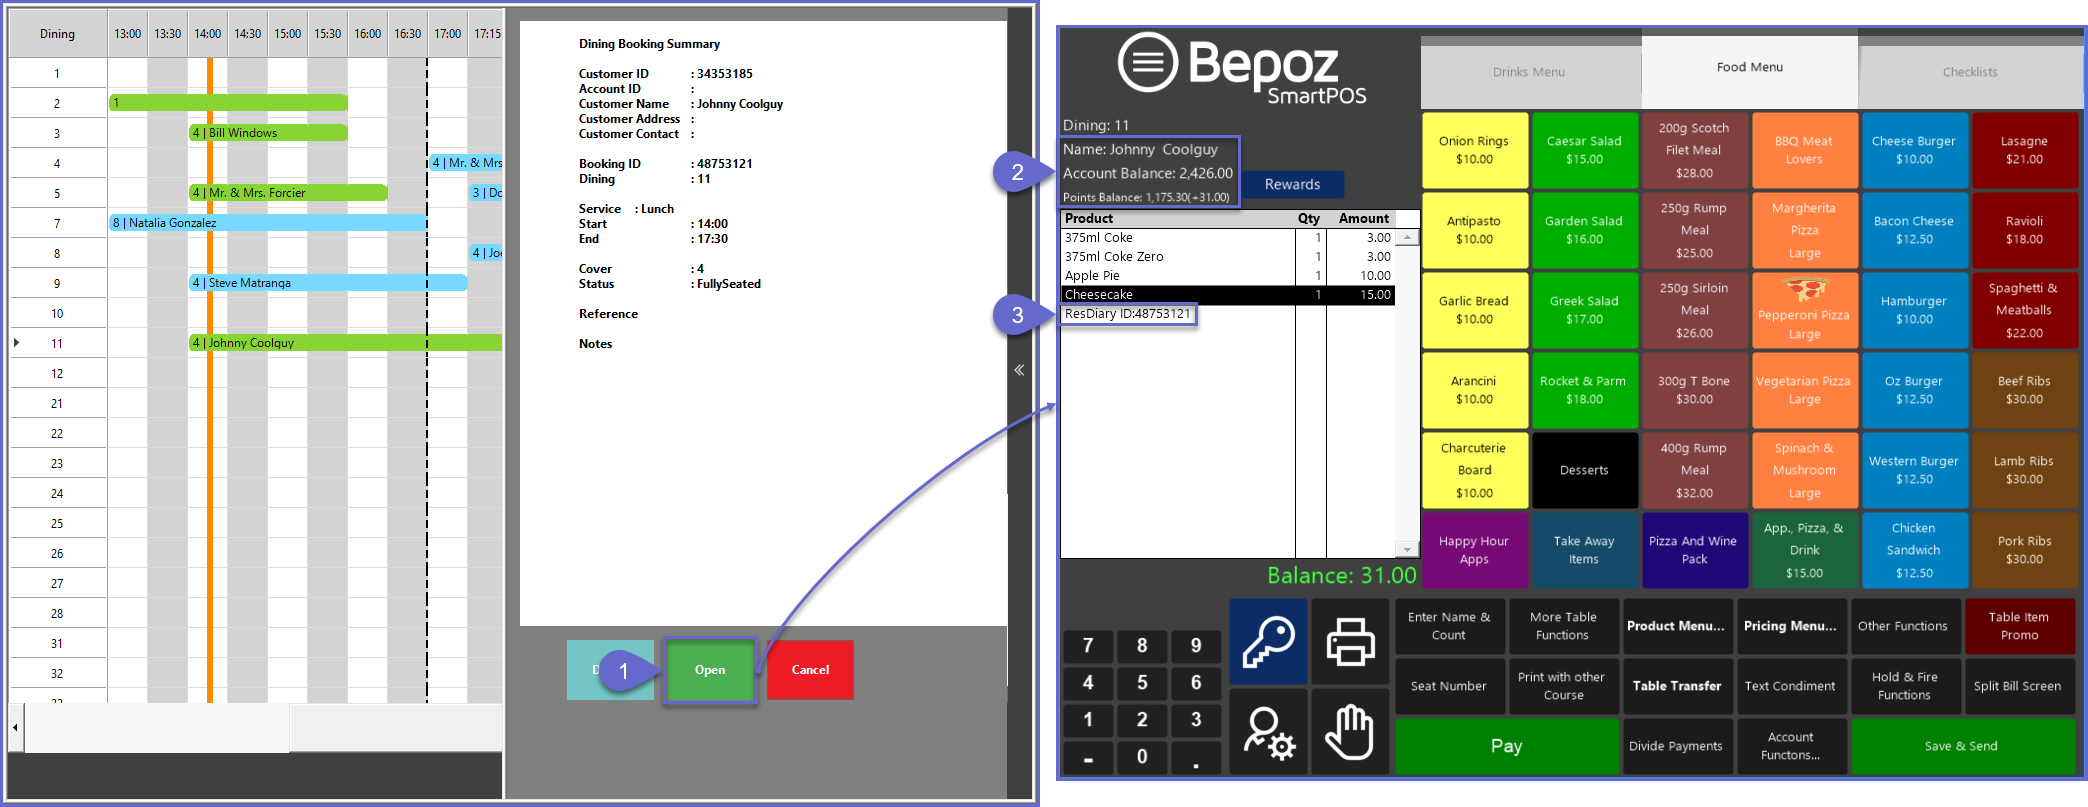
- To Open any Booking from the Booking Table Grid (whether previously Open/Sat or not), complete the steps 1 & 2 from above and then complete the following steps:
- Tap on the Open button from the panel
- The Booked Table will now be Open and the Account linked to the ResDiary Booking will be attached to the Transaction as noted by the Account Information above the Transaction window (depending on the Till Extension configurations)
- Operators can proceed through normal Transaction Workflows of adding Products, applying Discounts, performing other Functions, etc.
- The ResDiary Booking ID Number will be displayed in the Transaction window
- This Workflow is also used to open a Table for a Walk-In that has already been Seated
Seating a Walk-In
- To seat a Walk-In to ResDiary through SmartPOS from the Booking Table Grid, complete the following steps:
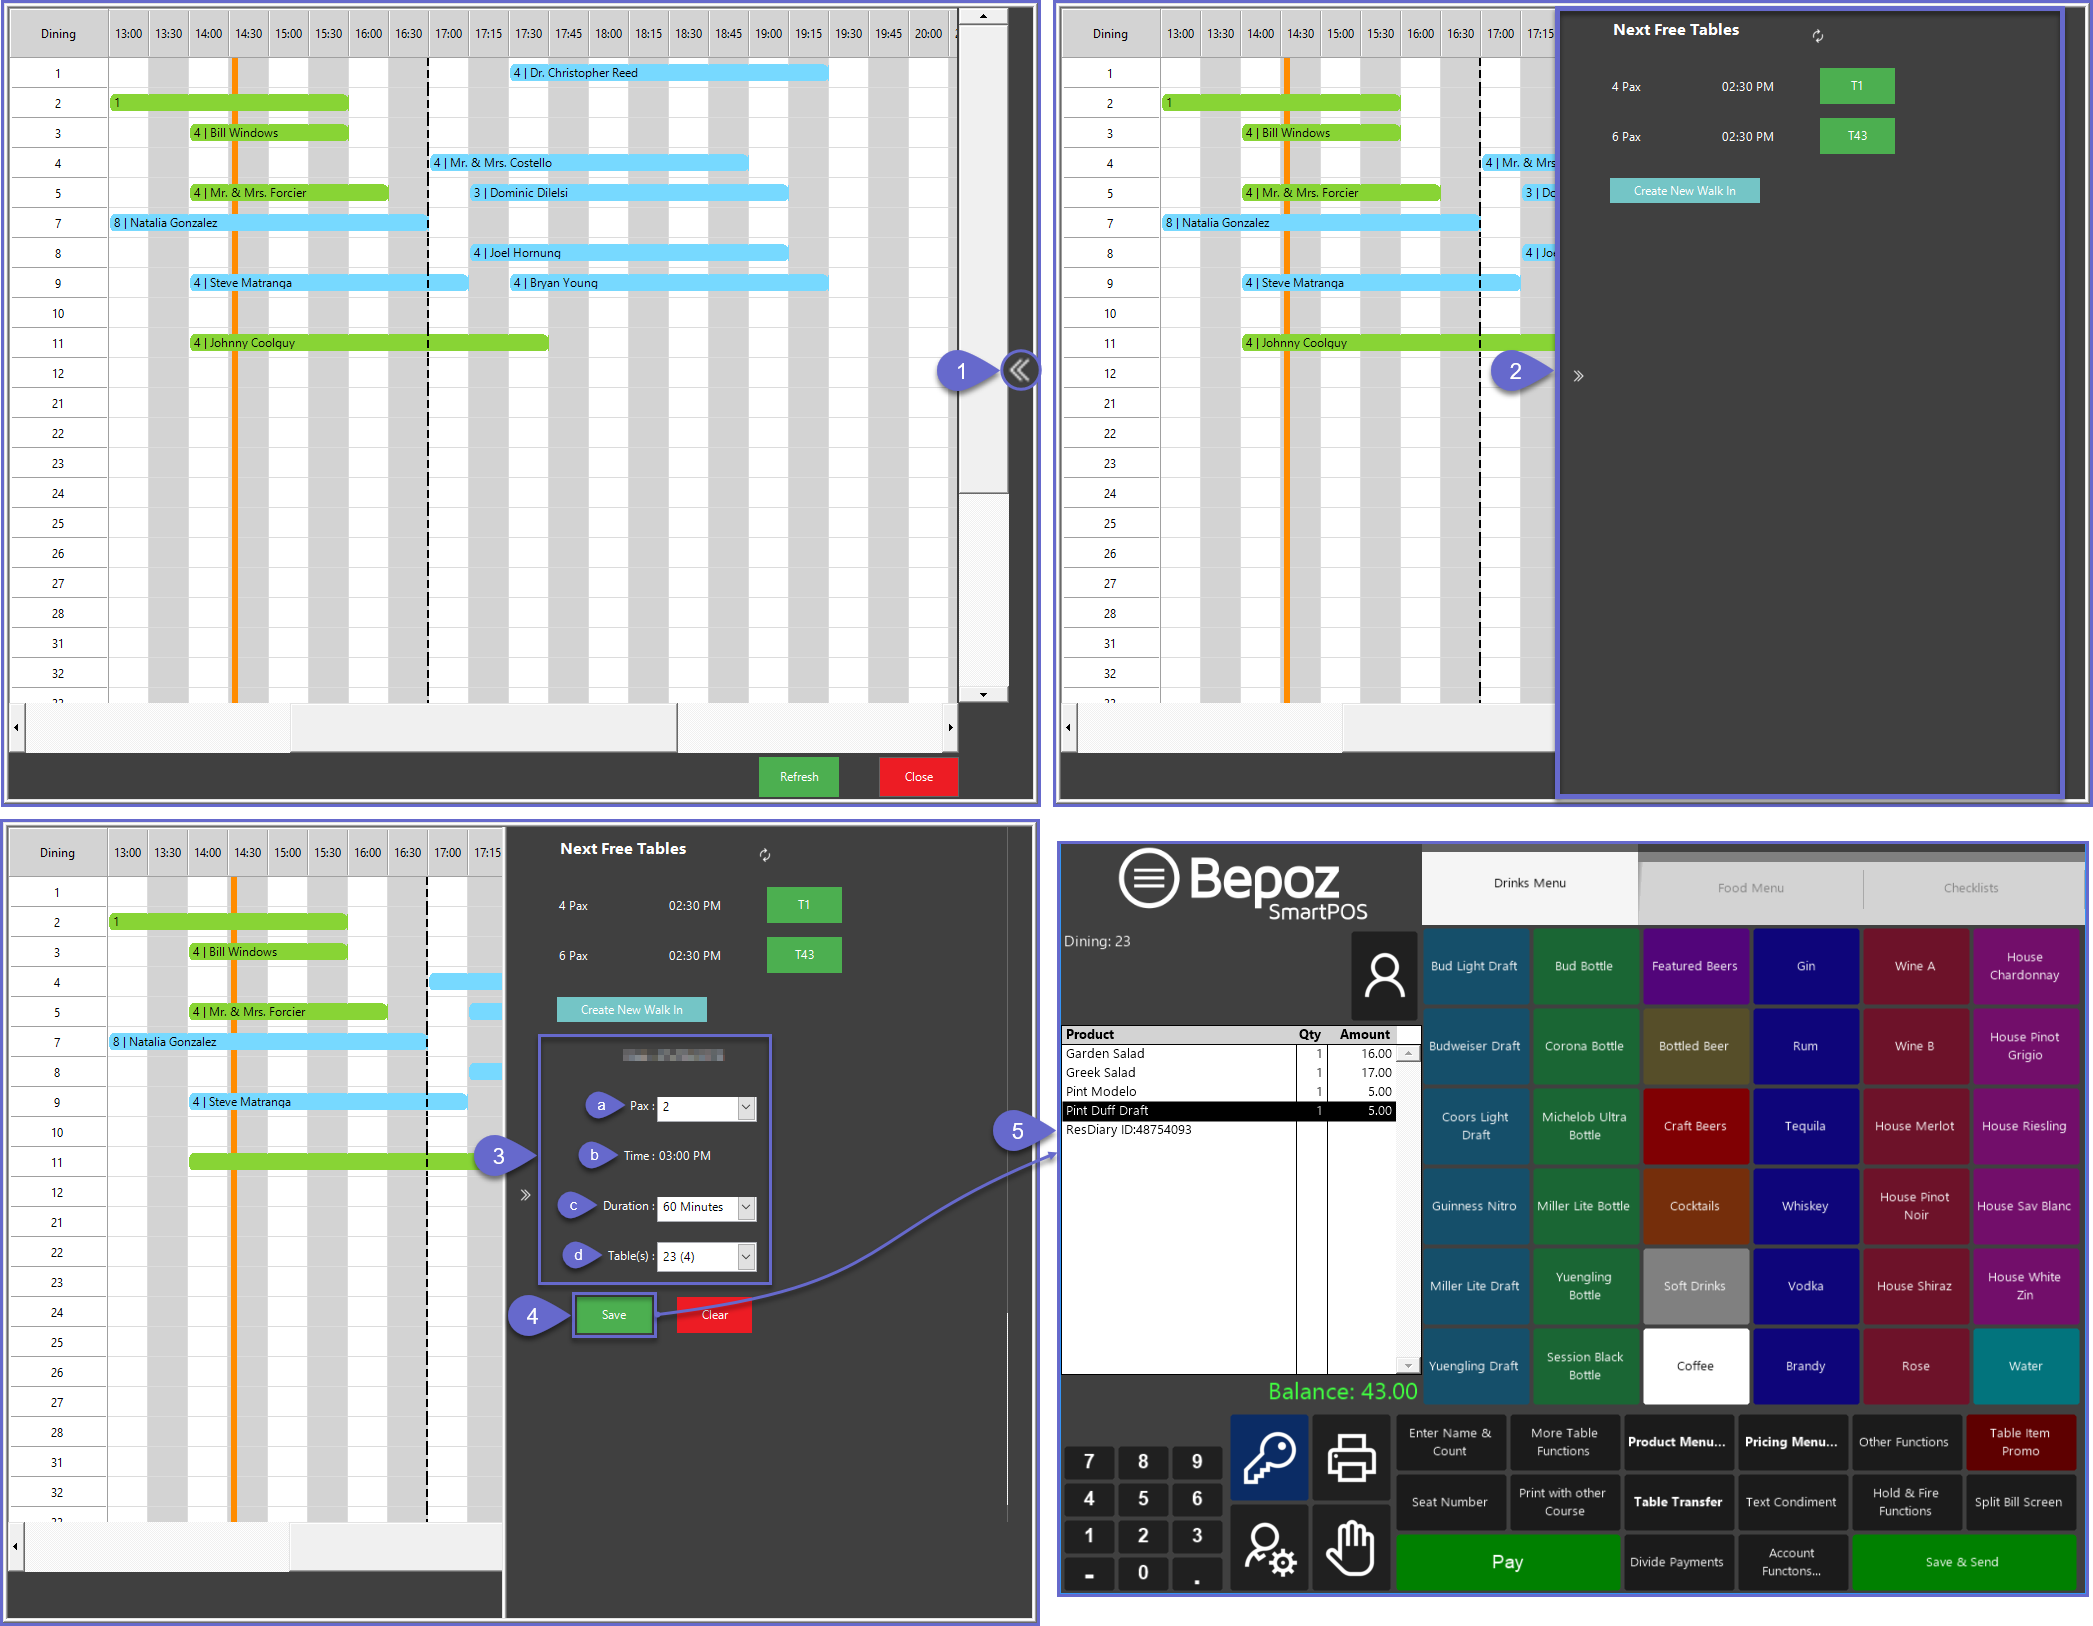
- Tap on the chevron icon/button on the right side of the screen to expand the pop-out panel
- The pop-out panel will expand from the right; from this panel, a Walk-In can be seated to one of the "Next Free Tables" or another available Table if desired by using the "Create New Walk-In" button
- The "Next Free Tables" are retrieved from the "W8LIST" in ResDiary and can be selected by tapping on the Table's green button
- Each Table shown will show the Number of Guests that the Table can Seat as "# Pax", the current seating interval time, and a button with the Table Number as "T#"
- Alternatively, tap on the "Create New Walk-In" button to seat the Walk-In to a different Table instead of one of the "Next Free Tables"
- Whether selecting one of the "Next Free Tables" or the "Create New Walk-In" option, additional seating options will display in the bottom portion of the panel:
- (a) Select the Pax, or the number of guests from the drop-down; if a "Next Free Table" was selected, this will default to the Table's maximum guest count
- (b) The closest seating interval time will be displayed; this cannot be changed from SmartPOS as the Walk-In is intended to be seated immediately
- (c) Select the Duration in minutes from the drop-down
- (d) Select the Table from the drop-down; each Table will show its maximum Pax; NB: if a "Next Free Table" was chosen, this won't be a drop-down and will instead show the Table Number selected
- Tap on the Save button to complete the Walk-In entry in SmartPOS
- The Table will be Opened immediately and Transaction Functions may commence; continue as usual and Save, Save & Send, process Payment for the Table when finished
