-
End-User | Products & SmartPOS
-
End-User | Stock Control
-
End-User | Table Service and Kitchen Operations
-
End-User | Pricing, Marketing, Promotions & Accounts
- Prize Promotions
- Points, Points Profiles and Loyalty
- Product Promotions
- Repricing & Discounts in SmartPOS
- Vouchers
- Account Till Functions
- Pricing, Price Numbers and Price Modes
- Raffles & Draws
- Marketing Reports
- Accounts and Account Profiles
- Rewards
- SmartPOS Account Functions
- Troubleshooting
- Product Labels
- Packing Slips
-
End-User | System Setup & Admin
-
End-User | Reporting, Data Analysis & Security
-
End-User | Membership & Scheduled Billing
-
End-User | Operators, Operator Permissions & Clocking
-
Interfaces | Data Send Interfaces
-
Interfaces | EFTPOS & Payments
- NZ EFTPOS Interfaces
- Linkly (Formerly PC-EFTPOS)
- Adyen
- Tyro
- ANZ BladePay
- Stripe
- Windcave (Formerly Payment Express)
- Albert EFTPOS
- Westpac Presto (Formerly Assembly Payments)
- Unicard
- Manager Cards External Payment
- Pocket Voucher
- OneTab
- Clipp
- eConnect-eConduit
- Verifone
- AXEPT
- DPS
- Liven
- Singapore eWallet
- Mercury Payments TRANSENTRY
- Ingenico
- Quest
- Oolio - wPay
-
Interfaces | SMS & Messaging
-
Interfaces | Product, Pricing, Marketing & Promotions
- Metcash Loyalty
- Range Servant
- ILG Pricebook & Promotions
- Oolio Order Manager Integration
- Ubiquiti
- Product Level Blocking
- BidFood Integration
- LMG
- Metcash/IBA E-Commerce Marketplace
- McWilliams
- Thirsty Camel Hump Club
- LMG Loyalty (Zen Global)
- Doshii Integration
- Impact Data
- Marsello
- IBA Data Import
- Materials Control
- Last Yard
- Bepoz Standard Transaction Import
-
Interfaces | Printing & KDS
-
Interfaces | Reservation & Bookings
-
Interfaces | Database, Reporting, ERP & BI
-
Interfaces | CALink, Accounts & Gaming
- EBET Interface
- Clubs Online Interface
- Konami Interface
- WIN Gaming Interface
- Aristocrat Interface
- Bally Interface
- WorldSmart's SmartRetail Loyalty
- Flexinet & Flexinet SP Interfaces
- Aura Interface
- MiClub Interface
- Max Gaming Interface
- Utopia Gaming Interface
- Compass Interface
- IGT & IGT Casino Interface
- MGT Gaming Interface
- System Express
- Aristocrat nConnect Interface
- GCS Interface
- Maxetag Interface
- Dacom 5000E Interface
- InnTouch Interface
- Generic & Misc. CALink
-
Interfaces | Miscellaneous Interfaces/Integrations
-
Interfaces | Property & Room Management
-
Interfaces | Online Ordering & Delivery
-
Interfaces | Purchasing, Accounting & Supplier Comms
-
SmartPOS | Mobile App
-
SmartPDE | SmartPDE 32
-
SmartPDE | Denso PDE
-
SmartPDE | SmartPDE Mobile App
-
MyPlace
-
MyPlace | myPLACE Lite
-
MyPlace | Backpanel User Guides
- Bepoz Price Promotions
- What's on, Events and tickets
- Staff
- System Settings | Operational Settings
- Vouchers & Gift Certificates
- Member Onboarding
- Members and memberships
- System Settings | System Setup
- Reports and Reporting
- Actions
- Offers | Promotions
- Messaging & Notifications
- System Settings | App Config
- Surveys
- Games
- User Feedback
- Stamp Cards
-
MyPlace | Integrations
-
MyPlace | FAQ's & How-2's
-
MyPlace | Release Notes
-
YourOrder
-
YourOrders | Backpanel User Guides
-
YourOrders | YourOrder Kiosk User Guide
-
YourOrders | Merchant App User Guide
-
WebAddons
-
Installation / System Setup Guides
- SmartPOS Mobile App | Setup
- SmartPOS Mobile App | SmartAPI Host Setup
- SmartPOS Mobile App | BackOffice Setup
- SmartPOS Mobile App | Pay@Table setup
- SmartKDS Setup 4.7.2.7 +
- SmartKDS Setup 4.6.x
- SQL Installations
- Server / BackOffice Installation
- New Database Creation
- Multivenue Setup & Config.
- SmartPOS
- SmartPDE
- Player Elite Interface | Rest API
- Interface Setups
- Import
- KDSLink
- Snapshots
- Custom Interface Setups
-
HOW-2
- Product Maintenance
- Sales and Transaction Reporting
- SmartPOS General
- Printing and Printing Profiles
- SQL
- Repricing & Discounts
- Stock Control
- Membership
- Accounts and Account Profiles
- Miscellaneous
- Scheduled Jobs Setups
- Backoffice General
- Purchasing and Receiving
- Database.exe
- EFTPOS
- System Setup
- Custom Support Tools
-
Troubleshooting
-
Hardware
9 | ResDiary Table Transfers via SmartPOS
This article explains the process of transferring ResDiary Tables via SmartPOS.
This article explains the process of transferring ResDiary Tables via SmartPOS.
Prerequisites
- To access ResDiary Till Function Settings, the applicable Operator Privileges will need to be enabled
-
General Tab - Sales Reports Flags
-
Reporting Tab - Sales Reports Flags
ResDiary Table Transfers via SmartPOS
- This functionality provides Operators with the ability to
Transfer ResDiary Tables without using the ResDiary website; i.e., ResDiary Tables can be transferred directly in SmartPOS
"Table Transfer" Till Function Configuration
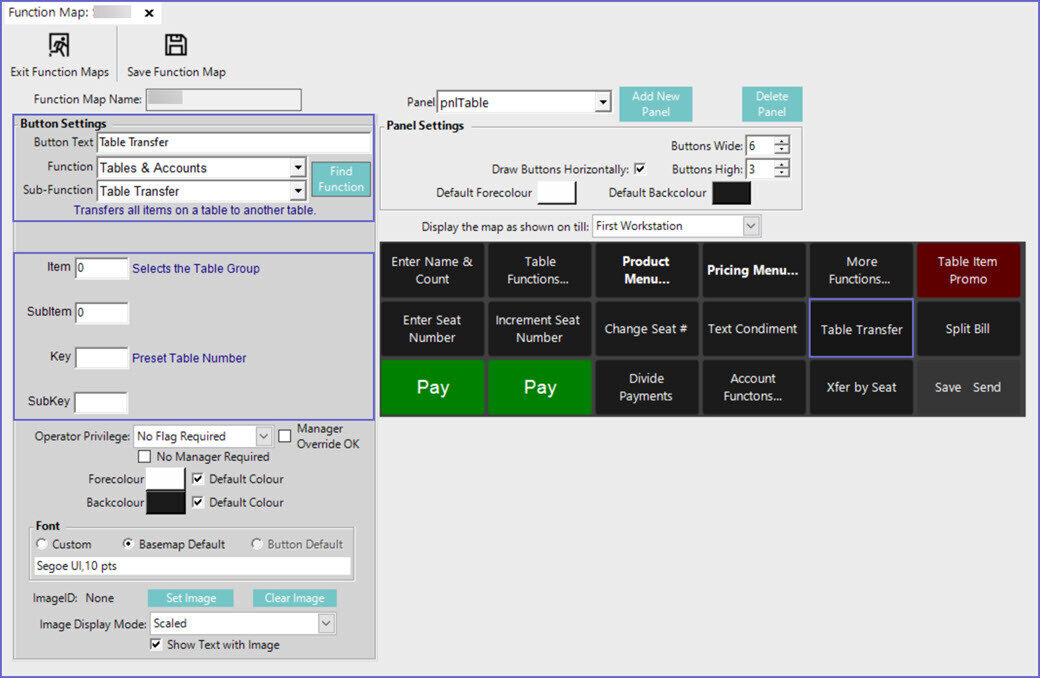
- When Transferring ResDiary Tables in Bepoz, the Table Transfer Function button must be configured with the same Table Group that is being used by ResDiary; i.e., the same Table Group that's configured on the ResDiary Till Extension and ResDiary Transaction Queue

Transfer ResDiary Table SmartPOS Workflows
- When Transferring ResDiary Tables via SmartPOS, there are couple different possible workflows and different outcomes depending on the Table that the Operator Transfers (or attempts to Transfer) to
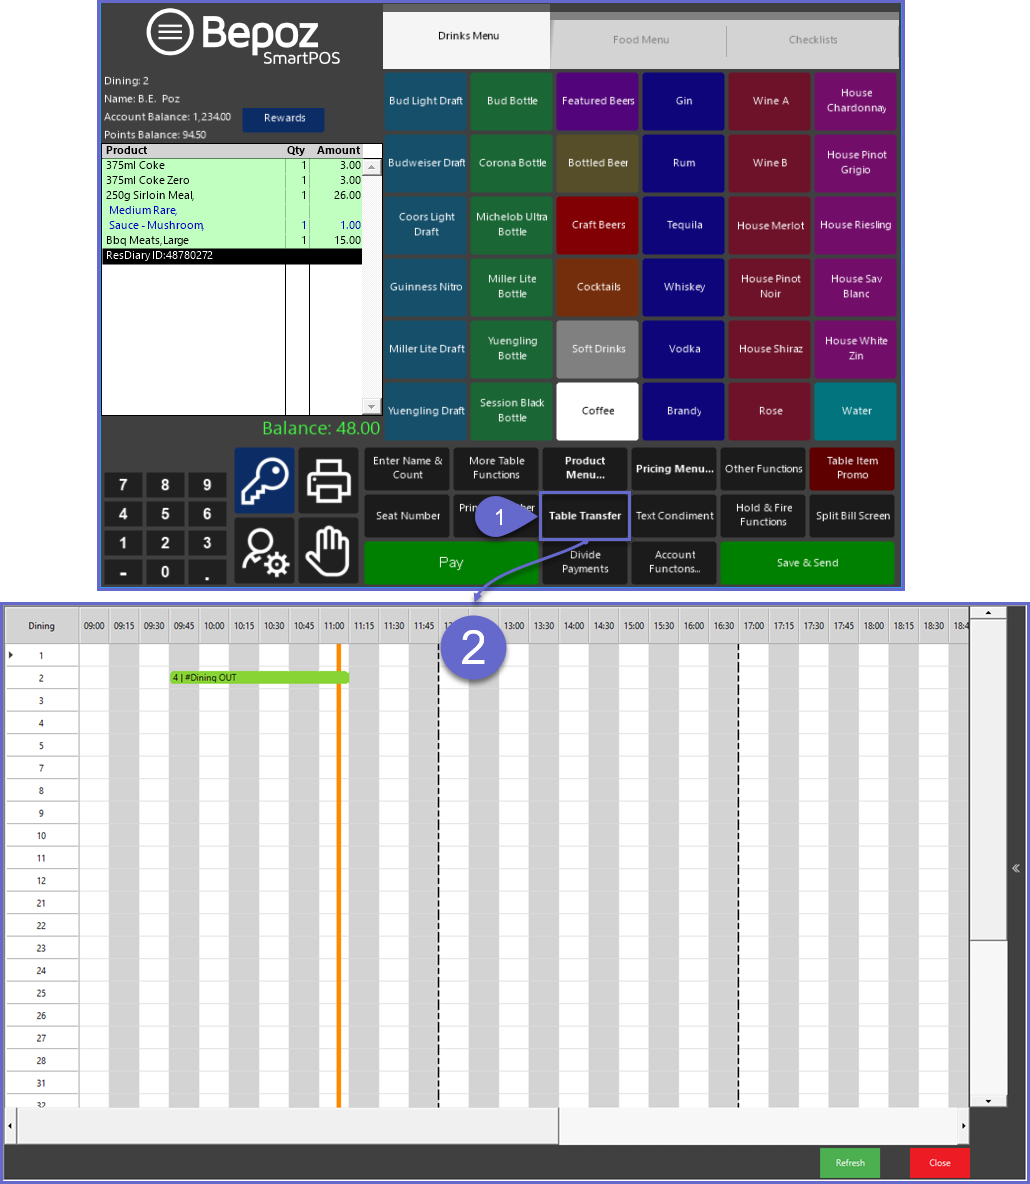
- To begin, with the ResDiary Table open, tap on the Table Transfer function button
- The Table Booking Grid will open with 2 different options for completing the Table Transfer; the Table being Transferred will be labeled "#Dining OUT"
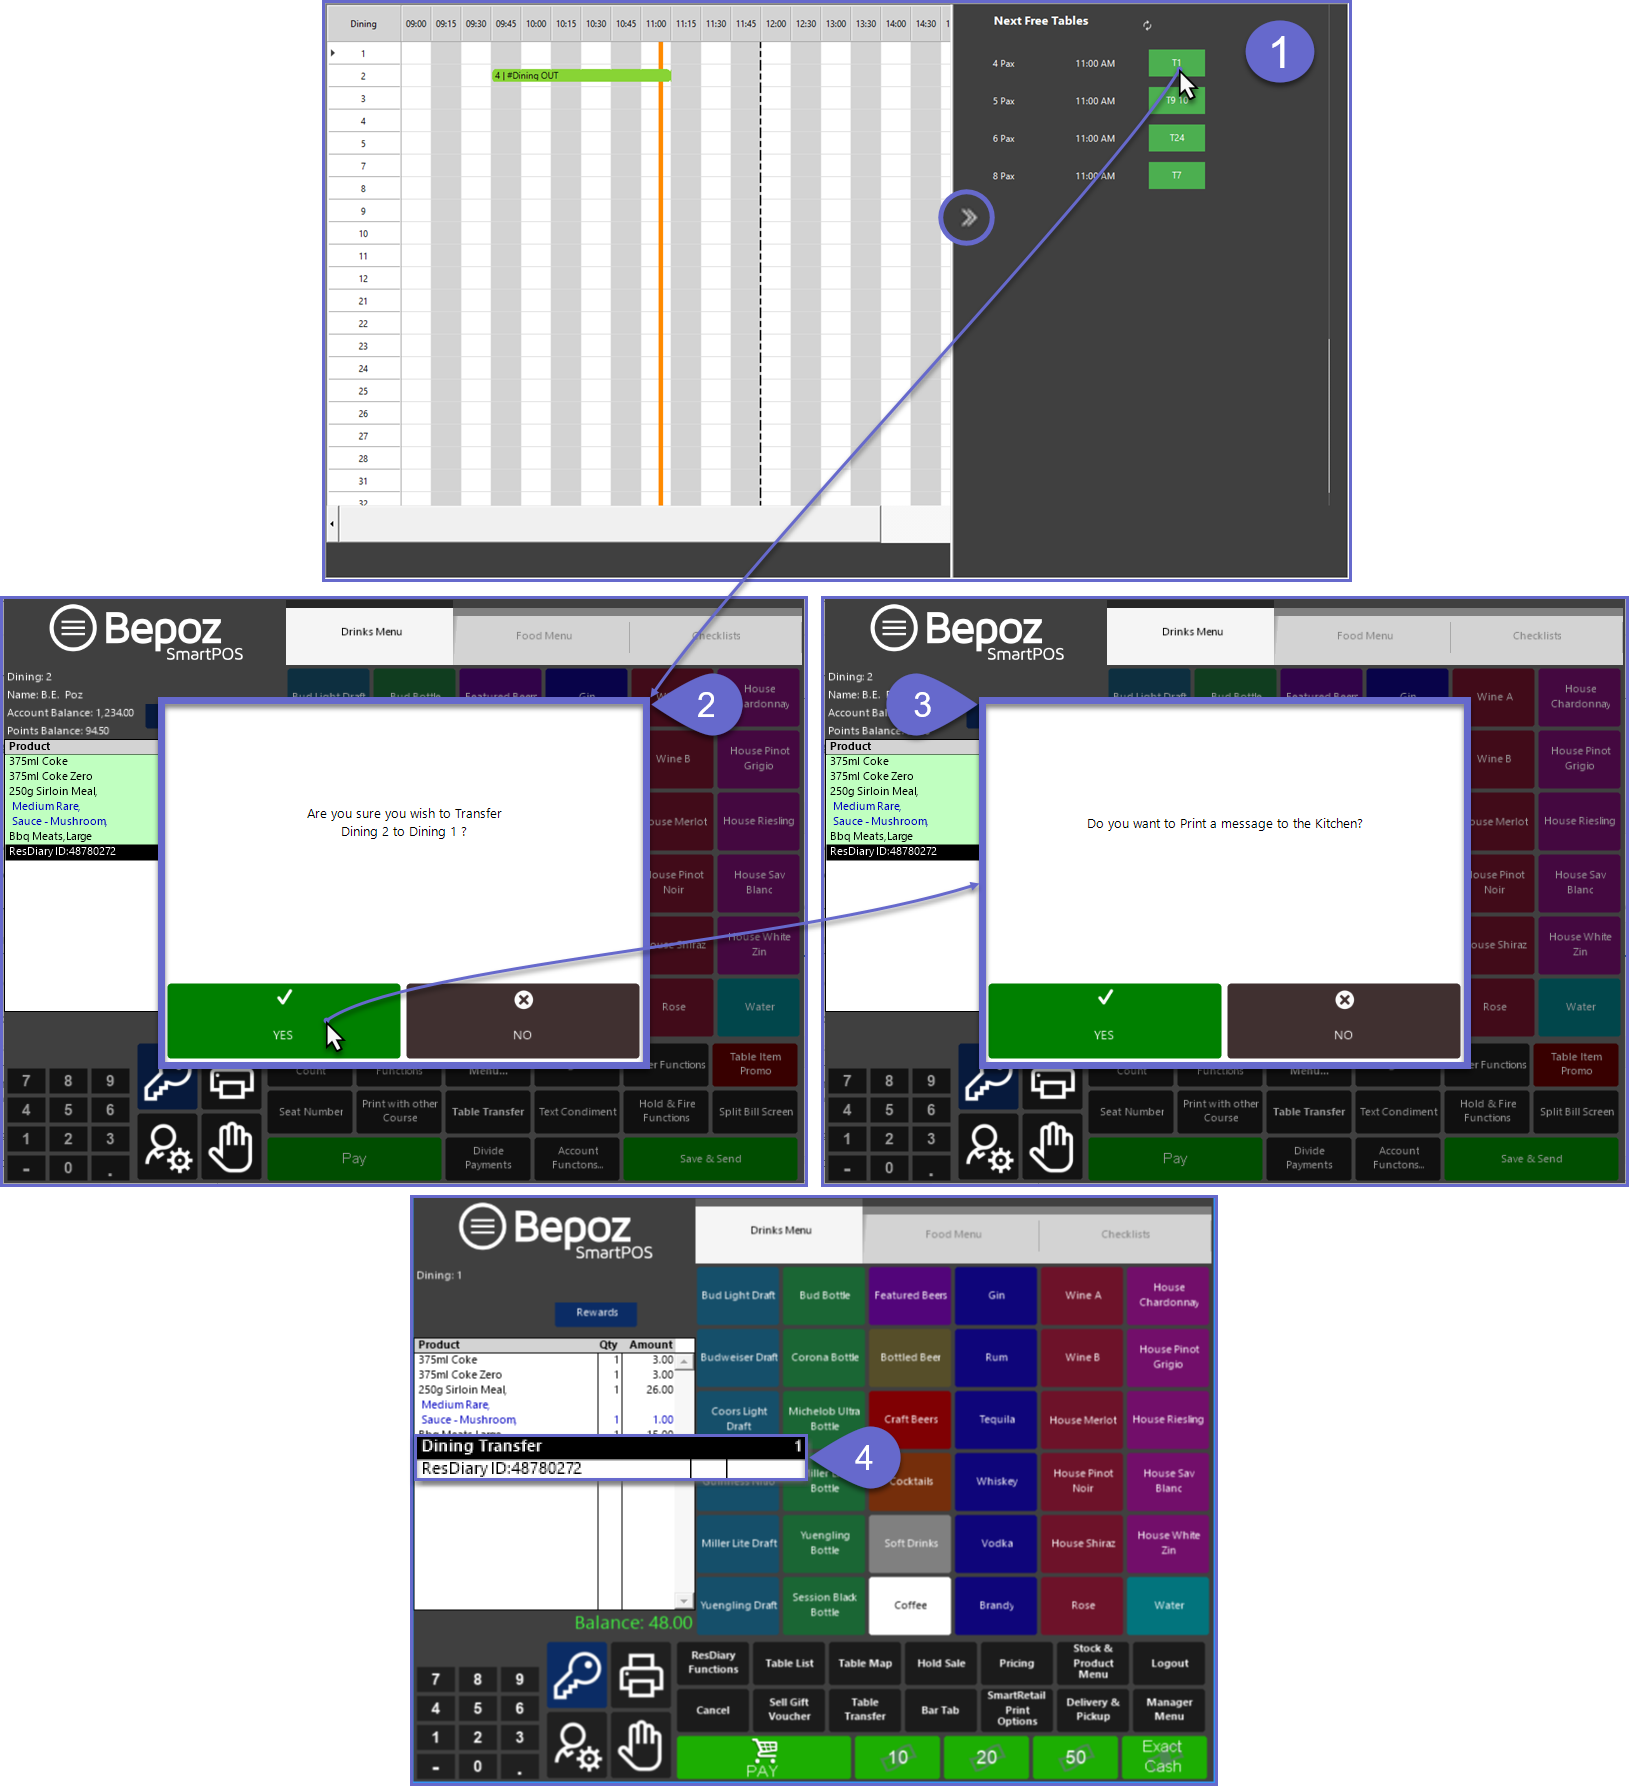
- From the Booking Grid, Operators can tap the chevron icon on the right side of the screen to expand the pop-out panel and then choose a suitable Table from the "Next Free Tables" options which are retrieved from ResDiary
- Optionally, Operators can manually select any available Table from the Grid by tapping on the desired Table's line

Transferring to a Next Free Table
- After expanding out the pop-out panel, select the desired Table from the list of available Next Free Tables
- After selecting one of the Next Free Tables, the Operator will first be asked to confirm the Transfer
- If Yes is selected to confirm the Transfer, a prompt will appear on screen asking if the Operator would like to Print a message to the Kitchen notifying of the Transfer
- Lastly, the Transfer will be completed which can be confirmed by the Transfer line in the Transaction Window

Transferring Manually to any Available Table
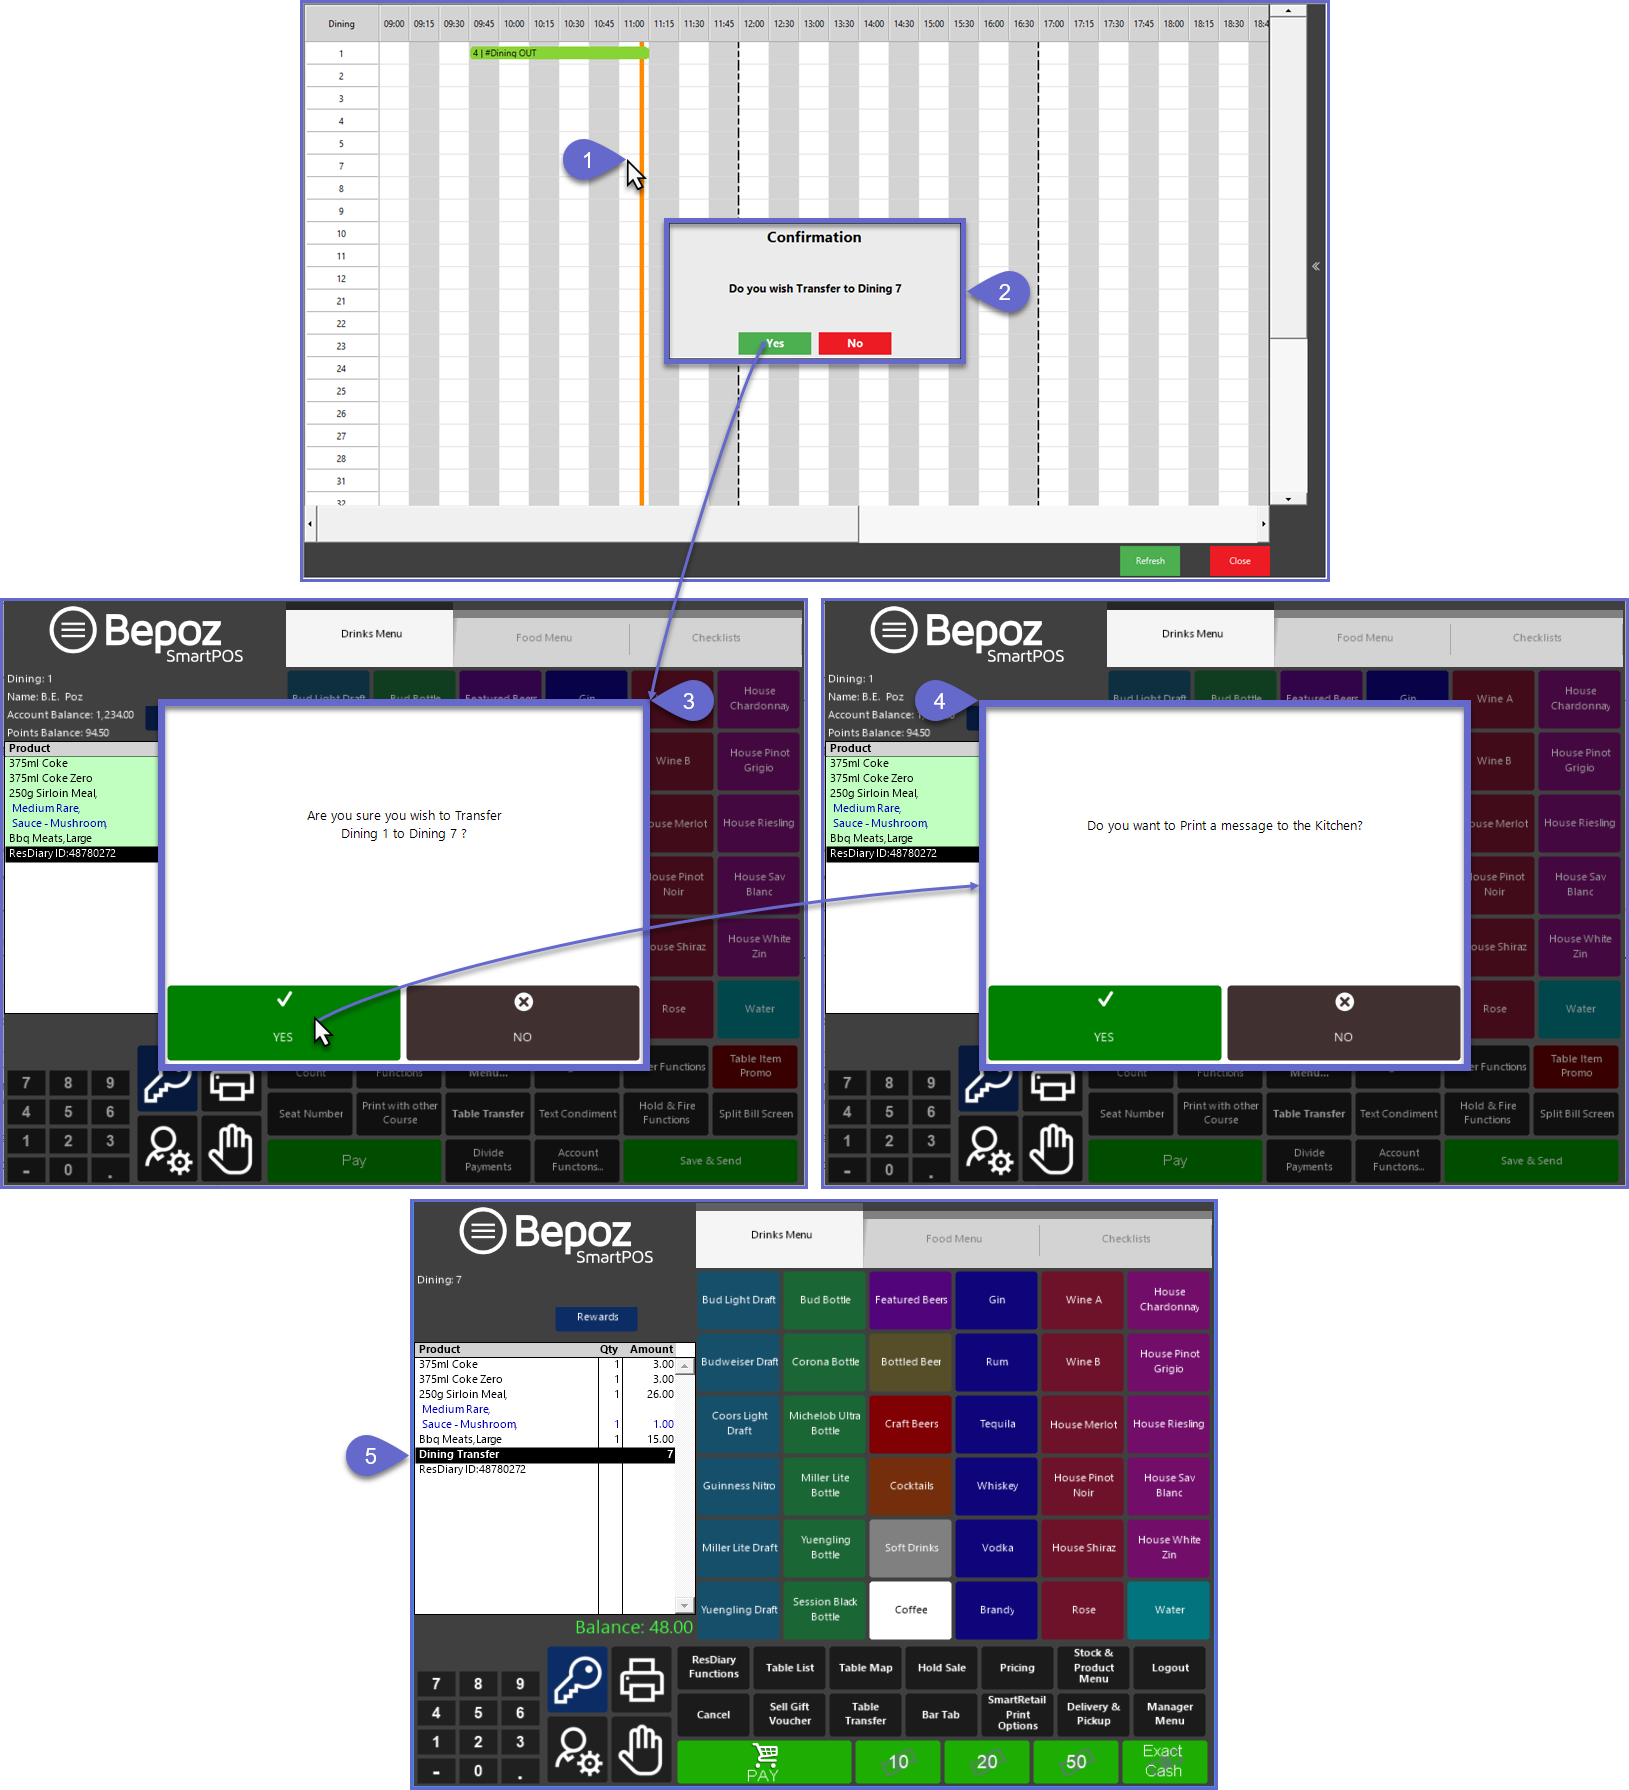
- To Transfer Manually, first select the available Table from the Grid by tapping on the Table's line
- In this example, the Table is being Transferred to another Table with no overlapping Booking in terms of Time Duration; i.e. the Transfer Out table is Booked through 8:00 PM, but the Table being Transferred to has a Booking starting at 7:30 PM
- If the Table is being Transferred to a Table that has an overlapping Booking, the overlapped Booking will automatically be moved to the Next Free Table
- A prompt will appear on the Grid to confirm the Transfer
- The Grid will close and return to SmartPOS where a 2nd prompt will confirm the Transfer
- If Yes is selected to confirm the Transfer, a prompt will appear on screen asking if the Operator would like to Print a message to the Kitchen notifying of the Transfer
- Lastly, the Transfer will be completed which can be confirmed by the Transfer line in the Transaction Window

