
Overview
SmartKDS displays the orders received on the screen. This article covers a step-by-step guide to SmartKDS Printer Setup which includes BackOffice configuration and the KDS Server configuration.
Prerequisites
Minimum of Bepoz v4.7.2.7 + is required
To access Printer Format Settings, the applicable Operator Privileges will need to be enabled
Operator Maintenance 'General' Tab
Operational Setup: "Maintain Printer Formats" Flag
Operational Setup: "Maintain Printer Profiles" Flag
The operator should be able to run KDS Server
KDSLink should be up and running
SmartController should be up and running
Getting Started
Backoffice Configuration
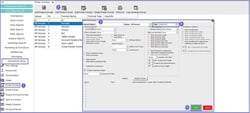
To access Printer Formats, navigate to the Operational Setup component in the side menu of BackOffice and select Printer Formats which will open a Printer Formats Window
Click on ‘Add Printer Format’ button to add a new printer format
Printer Format Setup window opens to create the printer format
Select ‘SmartKDS’ as type from the dropdown
Provide all the required details and click on ‘Save’ button so that all the Printer Format settings are saved
KDS Server Configuration
Follow the below steps to configure Printer Format in KDS Server
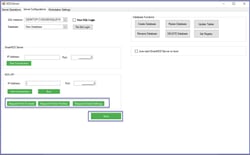
Run KDS Server and select the tab ‘Server Configurations’ tab
Click on ‘Request Print Formats’ to get the print formats from Backoffice which were created in the previous step during Backoffice configuration
Click on ‘Request Printer Profiles’ to get the printer profiles from Backoffice
Click on ‘Request Global Settings’ to get the global settings from Backoffice
Now click on ‘Save’ button to save
Once the above Server configurations are done, follow the below steps under ‘Workstation Settings’
Printer Channel - Overview
Printer Profiles are used to assign a product to a channel(s)
Channels are then used to inform the KDS which products should be displayed on which KDS Client
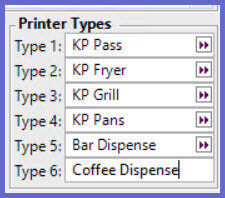
Printer Types that are setup in Venue Settings are mapped to Remote Channels 1-6 in KDS

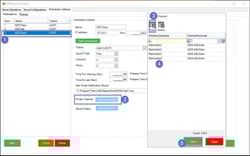
Navigate to the ‘Workstations’ tab and click on the Printer Channel Extended Setup button to add or delete the printer channels for the desired workstation
Select the Printer Channel and Printer Format from the dropdown
Click on save button to save the printer channel settings
Printer Channel - Setup Guide
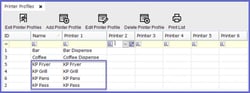
In this example we will setup a KDS Station that will show the Pass, Fryer, Grill & Pans orders - typically known as the EXPO KDS
We will be using the Printer Types that have been assigned below:
EXPO KDS Setup
Select the workstation to be configured
Open the printer channel setup
Add the printer channels necessary for the required configuration
In our example we wish to map Printer Types 1-4 to our EXPO KDS
Remote 1 = Printer Type 1, and so forth
The same printer format will be used for each channel
All products that have a Printer Profile with Printer Types 1-4 designated, will now display on the EXPO KDS
Quicklinks & Additional Resources
SmartKDS Installation
KDSLink Setup
SmartKDS Server Configuration
Updating password in KDS.Server.exe.config file
SmartKDS Workstation Settings
SmartKDS Printer Setup
SmartKDS Usage
SmartKDS Workstation
KDS Metrics Report