- INTERNAL - Bepoz Help Guides
- SmartPDE | SmartPDE Mobile App
- SmartPDE Mobile App Settings
-
End-User | Products & SmartPOS
-
End-User | Stock Control
-
End-User | Table Service and Kitchen Operations
-
End-User | Pricing, Marketing, Promotions & Accounts
- Prize Promotions
- Points, Points Profiles and Loyalty
- Product Promotions
- Repricing & Discounts in SmartPOS
- Vouchers
- Account Till Functions
- Pricing, Price Numbers and Price Modes
- Raffles & Draws
- Marketing Reports
- Accounts and Account Profiles
- Rewards
- SmartPOS Account Functions
- Troubleshooting
- Product Labels
- Packing Slips
-
End-User | System Setup & Admin
-
End-User | Reporting, Data Analysis & Security
-
End-User | Membership & Scheduled Billing
-
End-User | Operators, Operator Permissions & Clocking
-
Interfaces | Data Send Interfaces
-
Interfaces | EFTPOS & Payments
- NZ EFTPOS Interfaces
- Linkly (Formerly PC-EFTPOS)
- Adyen
- Tyro
- ANZ BladePay
- Stripe
- Windcave (Formerly Payment Express)
- Albert EFTPOS
- Westpac Presto (Formerly Assembly Payments)
- Unicard
- Manager Cards External Payment
- Pocket Voucher
- OneTab
- Clipp
- eConnect-eConduit
- Verifone
- AXEPT
- DPS
- Liven
- Singapore eWallet
- Mercury Payments TRANSENTRY
- Ingenico
- Quest
- Oolio - wPay
-
Interfaces | SMS & Messaging
-
Interfaces | Product, Pricing, Marketing & Promotions
- Metcash Loyalty
- Range Servant
- ILG Pricebook & Promotions
- Oolio Order Manager Integration
- Ubiquiti
- Product Level Blocking
- BidFood Integration
- LMG
- Metcash/IBA E-Commerce Marketplace
- McWilliams
- Thirsty Camel Hump Club
- LMG Loyalty (Zen Global)
- Doshii Integration
- Impact Data
- Marsello
- IBA Data Import
- Materials Control
- Last Yard
- Bepoz Standard Transaction Import
-
Interfaces | Printing & KDS
-
Interfaces | Reservation & Bookings
-
Interfaces | Database, Reporting, ERP & BI
-
Interfaces | CALink, Accounts & Gaming
- EBET Interface
- Clubs Online Interface
- Konami Interface
- WIN Gaming Interface
- Aristocrat Interface
- Bally Interface
- WorldSmart's SmartRetail Loyalty
- Flexinet & Flexinet SP Interfaces
- Aura Interface
- MiClub Interface
- Max Gaming Interface
- Utopia Gaming Interface
- Compass Interface
- IGT & IGT Casino Interface
- MGT Gaming Interface
- System Express
- Aristocrat nConnect Interface
- GCS Interface
- Maxetag Interface
- Dacom 5000E Interface
- InnTouch Interface
- Generic & Misc. CALink
-
Interfaces | Miscellaneous Interfaces/Integrations
-
Interfaces | Property & Room Management
-
Interfaces | Online Ordering & Delivery
-
Interfaces | Purchasing, Accounting & Supplier Comms
-
SmartPOS | Mobile App
-
SmartPDE | SmartPDE 32
-
SmartPDE | Denso PDE
-
SmartPDE | SmartPDE Mobile App
-
MyPlace
-
MyPlace | myPLACE Lite
-
MyPlace | Backpanel User Guides
- Bepoz Price Promotions
- What's on, Events and tickets
- Staff
- System Settings | Operational Settings
- Vouchers & Gift Certificates
- Member Onboarding
- Members and memberships
- System Settings | System Setup
- Reports and Reporting
- Actions
- Offers | Promotions
- Messaging & Notifications
- System Settings | App Config
- Surveys
- Games
- User Feedback
- Stamp Cards
-
MyPlace | Integrations
-
MyPlace | FAQ's & How-2's
-
MyPlace | Release Notes
-
YourOrder
-
YourOrders | Backpanel User Guides
-
YourOrders | YourOrder Kiosk User Guide
-
YourOrders | Merchant App User Guide
-
WebAddons
-
Installation / System Setup Guides
- SmartPOS Mobile App | Setup
- SmartPOS Mobile App | SmartAPI Host Setup
- SmartPOS Mobile App | BackOffice Setup
- SmartPOS Mobile App | Pay@Table setup
- SmartKDS Setup 4.7.2.7 +
- SmartKDS Setup 4.6.x
- SQL Installations
- Server / BackOffice Installation
- New Database Creation
- Multivenue Setup & Config.
- SmartPOS
- SmartPDE
- Player Elite Interface | Rest API
- Interface Setups
- Import
- KDSLink
- Snapshots
- Custom Interface Setups
-
HOW-2
- Product Maintenance
- Sales and Transaction Reporting
- SmartPOS General
- Printing and Printing Profiles
- SQL
- Repricing & Discounts
- Stock Control
- Membership
- Accounts and Account Profiles
- Miscellaneous
- Scheduled Jobs Setups
- Backoffice General
- Purchasing and Receiving
- Database.exe
- EFTPOS
- System Setup
- Custom Support Tools
-
Troubleshooting
-
Hardware
2 | SmartPDE Mobile 'Send to Server' Process
This article explains how to send the various stock functions that are completed within the SmartPDE Mobile app to BackOffice so that the database can be updated accordingly. It also explains how to delete stock functions from the app prior to being sent to BackOffice.
This article explains how to send the various stock functions that are completed within the SmartPDE Mobile app to BackOffice so that the database can be updated accordingly. It also explains how to delete stock functions from the app prior to being sent to BackOffice.
Prerequisites
- Minimum Bepoz version of 4.7 and onwards
- Completion of SmartPDE Mobile App Setup in the given order:
-
SmartPDE Mobile Licensing & Installation -
SmartPDE Mobile Workstation Setup -
SmartPDE Mobile Scheduled Job & Configurations -
SmartPDE Mobile Database Settings -
SmartPDE Mobile HomePage
SmartPDE Mobile Send to Server
- Note: The stock functions that are sent to server, i.e. BackOffice are not complete yet, they need to be processed and posted from BackOffice to complete the stock function created by the Operator from SmartPDE Mobile
- To get started, the Operator must open the SmartPDE Mobile App with a valid Operator Login ID
- Navigate to the 'Send to Server' option from the side menu of the SmartPDE Mobile App
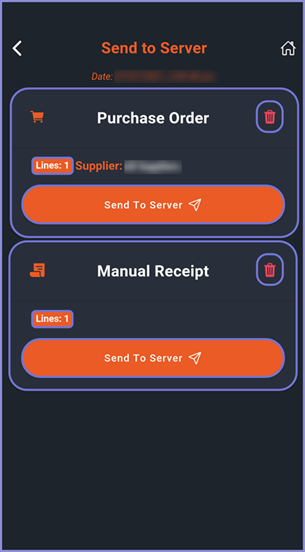
- Once the Send to Server screen is opened, it displays the unsent Stock Transactions & Functions that have been performed in the SmartPDE Mobile App and have not yet been sent to the server
- They are shown as different cards seen as follows:

- E.g., Two Transactions such as a Purchase Order & a Manual Receipt have been created by the Operator on the SmartPDE Mobile App
- The Back button & the Home button situated at the top-left and top-right corners of the screen, respectively, will take the Operator to the Homepage of the SmartPDE Mobile app
Cards
- These cards are described by their Transaction Name on the top of the card
- They also have a Delete button on the top right corner to delete this transaction before sending it to server & BackOffice
- The Lines on the top left side of the card describes how many items are being sent through the transaction
- The 'Send to Server' button sends these Transactions to the Server and respectively to BackOffice
Deleting Stock Transactions
- Note: Once a Stock Transaction is deleted, it cannot be retrieved or recovered
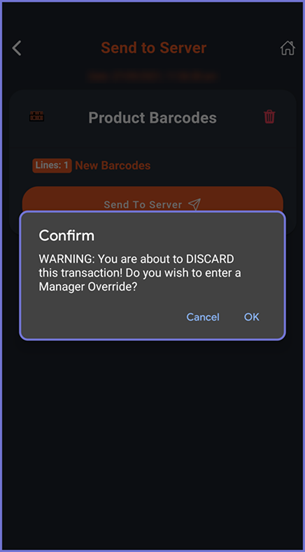
- When a Transaction has been selected for deletion, the app will prompt with a Warning message when performing this act
- Select OK to continue or select Cancel to cancel deleting this transaction
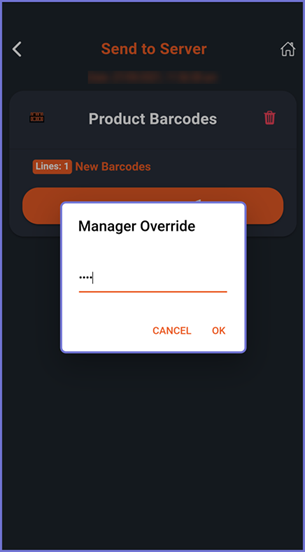
- After an OK selection, a Managers Override Login ID is required to continue with the deletion


- Select Ok to continue or select Cancel to cancel deleting this transaction
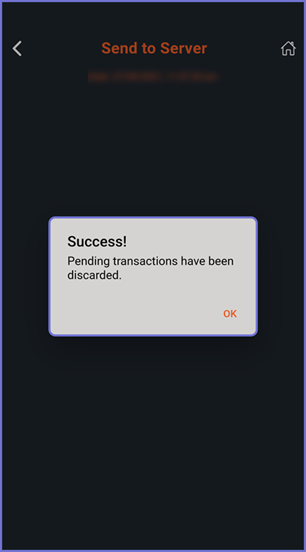
- After an OK selection, a window with a "Success!" Message will show
- Select OK to continue
