
Overview
This article will walk the user through some common workflows for everyday transactions they are likely to utilise in SmartPOS Mobile
Prerequisites
Minimum Bepoz version of 4.7.3.x
Minimum .NET version of 4.8
Completion of SmartPOS Mobile App Setup in the given order:
SmartPOS Mobile Workstation Setup
SmartPOS Mobile Venue Maintenance Setup
SmartPOS Mobile Till Function Map Setup Guide
SmartAPI Host Usage
SmartPOS Mobile App Configuration Screen
Loading SmartPOS Mobile to Oolio Device
To load SmartPOS mobile on the Oolio EFTPOS device, please reach out to your account manager to arrange for the download and installation of SmartPOS Mobile application on desried Oolio Eftpos terminal(s) the necessary steps
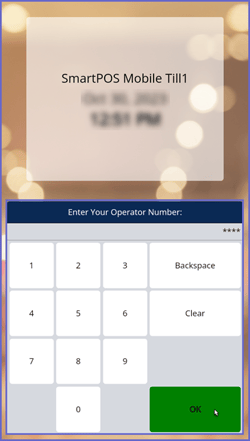
Logging into the App
When the Operator opens the app and the app is connected to the SmartPOS Till created in BackOffice, the app redirects the Operator to the Login page
The Login page has the following details:
Workstation Name
Date
Time
It prompts the Operator to enter the Operator Number to login to the app
If valid, the Operator gets access to the app and is directed to the Products screen of the app, this is the default
If invalid, a valid Operator number must be entered
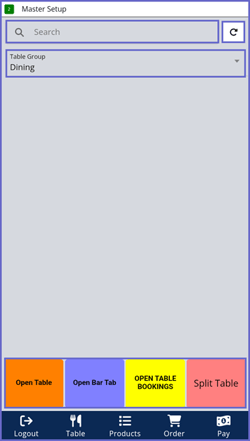
Opening a Table
This requires for the Operator to head to the Table screen located in the Navigation Bar at the bottom of the screen
Here, the Operator can view the Search Bar used to search for the number of a table, bar tab, bistro, etc
The Refresh icon that allows all tablegroups information to be refreshed at once
And the TableGroup dropdown, this allows for the Operator to select a TableGroup as the default option. For more information on how to set the Default TableGroup, please refer to the following article: SmartPOS Mobile Workstation Setup
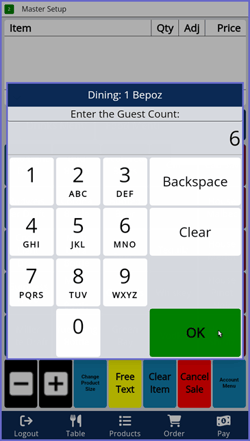
Click the Till Function Button set to open Table, then a Numpad appears to add the Table Number, then a Keypad appears to enter the Guest Name, then a Numpad appears to enter Guest Count
Once this information is entered, the Operator is redirected to the Products screen, with the Guest Name and Table Number on the POS List
Once a Table is opened, the Table icon on the Navigation Bar changes to a Save & Send button
The saved table is seen within the Table screen, the graphical table contains the following information:
Guest Name
Seated Time
Table Balance
Table State
Guest Count
Attaching an Account
To Attach an Account, a Till Function button needs to be set on the Products screen panel i.e. the Stock Panel. For more information on how to setup the Till Function Panels for SmartPOS Mobile, please refer to the following article: SmartPOS Mobile Till Function Map Setup Guide
Once the Account Select till function button is clicked by the Operator, a dialog box appears with the Account Groups listed in the top half of the dialog box and the Accounts within each Account Group displayed in the bottom half of the dialog box
There is also the option to Cancel to cancel the dialog box, Enter Number to enter the Account Number and Search Account by First Name, Last Name, Mobile, Email, etc. as available within SmartPOS
Once the Account is selected, the Operator can view the Account Name and their Points Balance on the bottom of the POS List in the Products screen
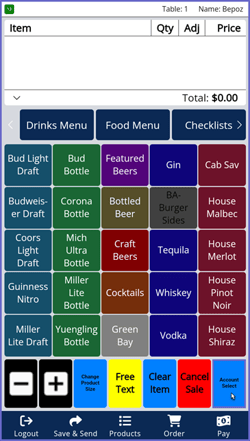
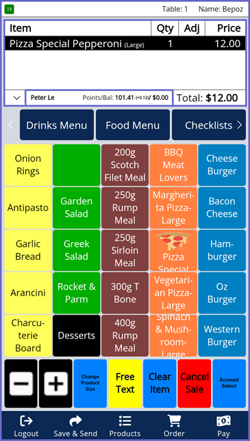
Adding Item(s) to a Sale
The Operator can click on the Product on the Product KeyMap to add the item into the Sale
Adding Products with Condiments takes the Operator to the Condiment selection screen which allows Operators to select condiments. After doing so, the Operator is redirected to the Product screen
Note: The KeyMap set to the SmartPOS Mobile Till is the Product KeyMap or KeySet that will be seen on the app
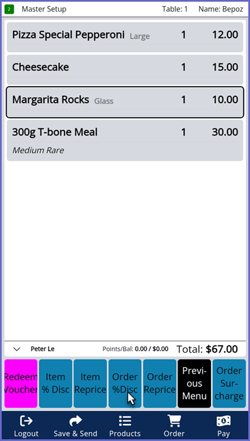
Adding Item Discount(s) and Order Discount(s) to a Sale
The Operator can head to the Order screen, select or highlight the product/item that requires to be discounted and add a Item Discount or an Order Discount as per required
A Numpad appears to the Operator to enter the Amount
The Discount then gets applied to the Item/Order as per required
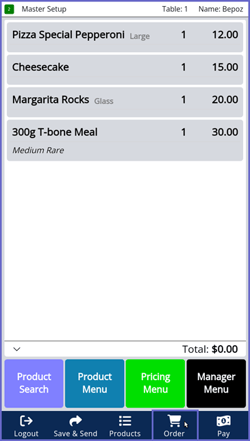
The Discounts can be seen in the Pay screen under the Discounts totalizer
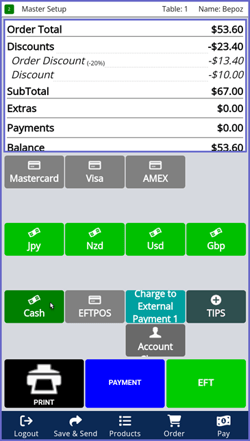
Paying Off the Transaction
From the Pay screen, the Operator can click on Payments to reveal the options that can be used to finalize the transaction
Adding of Tips, an Account Charge or Payment by Cheque, Cash, EFTPOS, etc. All options are available for the Operator as per need
A Numpad would appear with the Balance of the Sale already entered within it to complete the payment of the transaction
SmartPOS Mobile App Setup Articles
To complete the full & correct setup of the SmartPOS Mobile App, the Operator must follow & execute these articles provided in the given chronological order:
SmartPOS Mobile Workstation Setup
SmartPOS Mobile Venue Maintenance Setup
SmartPOS Mobile Till Function Map Setup Guide
SmartAPI Host Usage
SmartPOS Mobile App Configuration Screen